When you click on links to various merchants on this site and make a purchase, this can result in this site earning a commission. Affiliate programs and affiliations include, but are not limited to, the eBay Partner Network.
did you jacked the motor from the oil pan or from somewhere else?
From the oil pan with a small piece of wood did the trick. It wasn't more than a few millimeters. I was freaking out at the time. Some people on this thread and rennlisters got me through it.
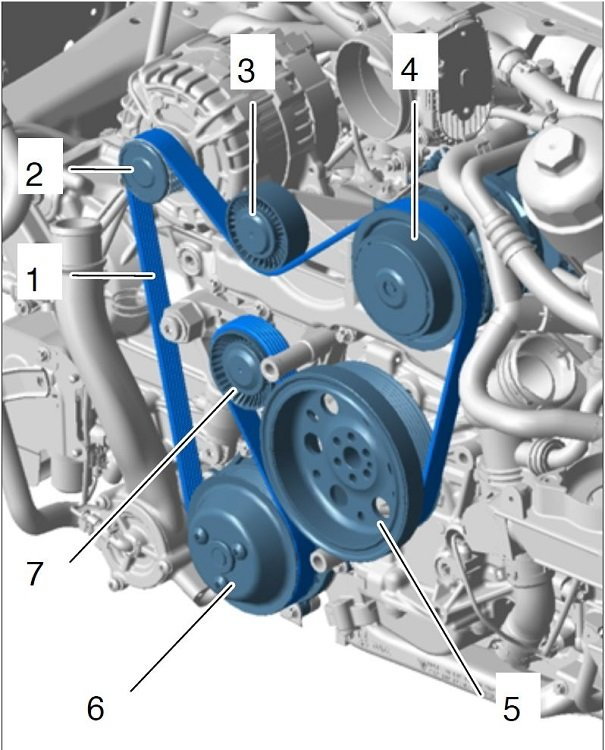
Allow me a stupid question: from the looks of it, the serpentine belt only drives accessories, correct ? Looks like Alternator, possibly water pump (no idea), possibly A/C pump (?), basically all accessories... No risk of anything really bad even if it breaks (like timing issues), just a regular breakdown and tow truck ? it looks like a lot of work and I have a 5y car with only 23K miles, and I'm tempted to take my chances and wait (we had a peek at it when doing a couple COVs a few thou miles ago and it looked brand new then).
It's kinda annoying to have the miles/years decoupled like I do, I need to drive it more to catch up from the PO.
I did plugs just in case (mostly for fear they'd stick to the case), they looked brand new... waste of $ - should have put them back with antiseize ;-) Would you do the serpentine belt at 23K miles just based on age ?
I wouldn't wait more than 6 or 7 years. If it breaks, it can cause damage to any plastic parts near those pulleys, or even damage the pulleys themselves.
From the oil pan with a small piece of wood did the trick. It wasn't more than a few millimeters. I was freaking out at the time. Some people on this thread and rennlisters got me through it.
I was planning to have this done by the dealer before this track season comes to the NE. Now, I will do it myself, along with oil, filter, plugs and coils. Thank you, not sure that the DIY will apply exactly to my car but it must be close enough to figure out the rest.
It's really tricky when you have low mileage for the year, and it requires that much labor at a dealer. I checked mine from under the car, then started it, checked again, then one more time. 3 sample locations at random, the belt looks brand spanking new honestly. No fraying, no cracks, no dryness of the rubber... Unless I see it fraying I will definitely wait for the next time the bumper needs to come off, like a COV or doing air filters. I've been meaning to drop the bumper and see how it's done, but at 23K miles with the belt looking new (and despite a 6 y old car I guess), no, just no... I can't just make myself pay the dealer to do that right now. (I'll be back to eat my words in a future post, or not).
It's really tricky when you have low mileage for the year, and it requires that much labor at a dealer. I checked mine from under the car, then started it, checked again, then one more time. 3 sample locations at random, the belt looks brand spanking new honestly. No fraying, no cracks, no dryness of the rubber... Unless I see it fraying I will definitely wait for the next time the bumper needs to come off, like a COV or doing air filters. I've been meaning to drop the bumper and see how it's done, but at 23K miles with the belt looking new (and despite a 6 y old car I guess), no, just no... I can't just make myself pay the dealer to do that right now. (I'll be back to eat my words in a future post, or not).
My belt has 12k miles on it, along with 3.5years and it looks pristine. After owning aircraft for 25 years, I have become of a proponent of changing parts before they fail for obvious reasons.
So slight Burning rubber smell after replacement. Is that normal? No belt noises. There’s no squealing and I’m positive it was well seated on all pulleys.
So thankful for this write up. Just finished completing the belt replacement and fired up the car to move it from work area.
So slight Burning rubber smell after replacement. Is that normal? No belt noises. There�s no squealing and I�m positive it was well seated on all pulleys.
So thankful for this write up. Just finished completing the belt replacement and fired up the car to move it from work area.
I had no slight burning rubber smell when I did my replacement. Make sure the ribbed part of the belt is facing the right direction and confirm the part number of your belt. I think some cars have different belts depending on options (RAS, etc).
I used your write up and I am *very* grateful.. If I may - a couple of suggestions on things I struggled with (for other guys, or maybe we can collectively take more pics and edit yours as the master guide ;-)
> Remove coolant cap, but leave the oil cap on. Oil filler tube is moveable so you can move the black plastic base piece around with the oil cap still on and this reduces the risk of anything falling down into your engine!
It wasn't obvious to me that this plastic part under the coolant and oil cap lifts UPwards and then you can see the last bolt for the spoiler removal... it's obvious now... but one always fears breaking those clever plastic clips until you know which way to pull ;-)
>Now unclip this one from the airbox (it's towards the center of the airbox when comparing to the first) (clip circled in red), then disconnect the vacuum line (circled in white).
vacuum lines... maybe cars have different setup there based on options / Sports exhaust etc... I only had to disconnect a vacuum line at the airbox intake and one at the T junction. Looked simpler for me...
> Engine carrier and spacer
Same as you reported for some users: I was able to simply tap the sleeve out of the way and right back on with a piece of wood and small hammer, not much effort... saves a lot of work to simply do that. Also in termw of tools it takes specific extensions to remove the bolt and not jam your wrench in the limited space - good to have a set of different length extensions for your socket wrench for flexibility.. It's easy to take out with whatever you got, BUT since you need to use a torque wrench to retighten it to 44lbft, I'd recommend making sure you have the right combo for your torque wrench before taking it off...so you can put it back on correctly. I almost got burned on that one.
> the belt itself
I'm not sure what can be explained here (it's me and my 2x left hands) but I struggled a bit there... The belt is not super flexible and still needs to be teased out and put back in sideways to pass by Pulley #5 which looks blocked in the front by metal brackets but in truth is not!! it's just very limited for access. Every other pulley is easy but #5 is a b!@tch. Elvish fingers required unless I missed some trick. I started with #5, everything from there onwards is easy. Not sure if that's how you guys did it.
Again, *very cool* walkthrough, many thanks to the OP !! Maybe the next guy to do this could take some more pictures - I took plenty of the vaccuum lines but was too involved looking for solutions at the time to take pics of my problem areas -) My bad.

 01-23-2019, 06:12 PM