When you click on links to various merchants on this site and make a purchase, this can result in this site earning a commission. Affiliate programs and affiliations include, but are not limited to, the eBay Partner Network.
Last weekend I did my 4yr/40k mile service (car is 4 years & 2 months old, with 21k miles) since I was due for my annual oil change. When I purchased my parts from Pelican, I went ahead and purchased a serpentine belt since part of the 40k maintenance has you inspect the belt and replace it if necessary (actually due at 6yrs/60k miles). I didn't want to inspect it and not have the belt on hand if it needed replacing. Once I got all my parts I decided that since I was already going to be "in there" that I would go ahead and replace the belt as a preventative measure since it's only a $20 part, even though my original belt was in excellent condition and showed absolutely no signs of wear and tear. I will note that after doing the job, it's more work than I thought it would be and looking back now I think I would have waited until my 6yr mark (it's not necessarily difficult, just pretty involved and there's a learning curve the first time you do it).
There are a couple of great DIYs in the forums that gave me the confidence that the 4yr/40k service was definitely within my skill-level to do. I purchased all the parts from Pelican except for the oil (Walmart). When it made sense, I purchased Porsche supplier parts as opposed to the "Porsche Box" parts (on a couple of the air filters the Porsche box ones were actually a couple bucks cheaper). That saved me a decent amount of money ($60 on spark plugs alone, and they are EXACTLY the same....the original plugs I removed were stamped "Bosch" just like the ones I ordered). Total for everything (including serpentine belt, but not including beer) was $250 and dealers charge anywhere from $1200-$2000 for the service from what I've seen posted here on the forums. I'm not going to go into any detail on the oil change, spark plug change, brake fluid flush/change, air filter changes, etc. since there are already decent DIYsposted, but one thing I didn't find was a DIY for the serpentine belt that had pictures of someone actually doing it on a 991. I did find this thread which had a video of a guy replacing his belt on an older Boxster and while the concept is the same, the procedures for the 991 are pretty different than what the video shows. Jacobello87 posted the factory instructions for the 991 in that thread which were VERY helpful, but I figured I'd share actual pictures and a few helpful hints to make it easier for those of you wanting to do this yourself in the future.
These instructions start after you have removed the tail lights and bumper cover.
Tools Required:
- T30 and T45 Torx bits (for removing the rear spoiler)
- Various metric sockets (didn't note exact sizes while I did it, but no crazy sizes so everyone should have them already)
- 30mm box wrench (for moving/loosening the belt tension pulley)
- Six-pack of your favorite beer
************************************************************************ ****************************** STEP 1: REMOVE REAR SPOILER
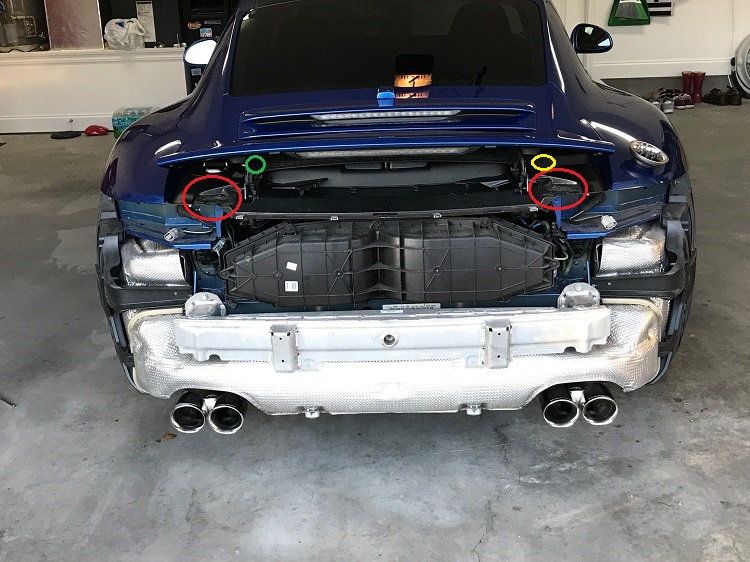
- Open engine lid (it's closed in Pic 1 below....my bad!) - Spoiler should already be raised from removing tail lights and rear bumper cover. Unscrew various fasteners (T45 and T30) that are securing bottom left and right sides of spoiler to the vehicle body (red circled areas).
- Remove 10mm (I think that's the size) bolt holding the black plastic piece that's under the oil and coolant caps to the body of the car (not visible in Pic 1 below, because the engine lid was down but it's in the general area of the green circle. Clearly visible in Pic 2 and circled again in green).
- Remove coolant cap, but leave the oil cap on. Oil filler tube is moveable so you can move the black plastic base piece around with the oil cap still on and this reduces the risk of anything falling down into your engine!
- Disconnect wiring harness for rear spoiler (not visible in Pic 1, because the engine lid was down but it's in the general area of the yellow circle. Clearly visible in Pic 2 and circled again in yellow ).
- Do not try and disconnect the engine lid latch. It all comes out with the spoiler even though that isn't plainly obvious until you remove the spoiler.
- Lift rear spoiler up and away.
- Immediately screw coolant cap back on after removing spoiler (to avoid anything dropping down into coolant reservoir).
************************************************************************ ****************************** STEP 2: REMOVE AIR BOX
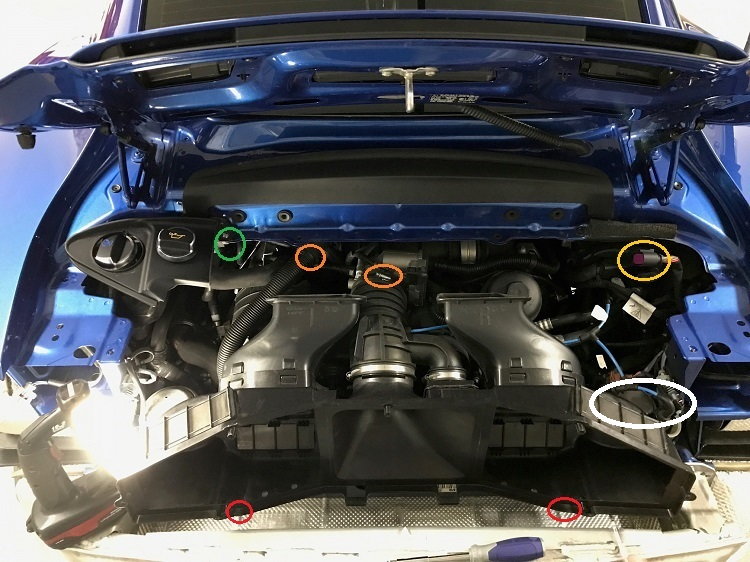
- OK, so in this picture, I've re-circled where the bolt for the plastic piece under the oil and coolant caps is in green as well as the rear spoiler harness in yellow. You can also see my coolant cap is screwed back on and how the oil cap never had to come off and that black plastic base piece is able to be moved around when removing the spoiler.
- Remove two bolts (one on each side) on the bottom left and right sides of the air box (not visible in pic, but in the general area of the red circles). If you're changing air filters like I was, you'll also remove a bunch of T27 (I think) torx screws to get to the filters. If all you're doing is the serpentine belt, this isn't necessary.
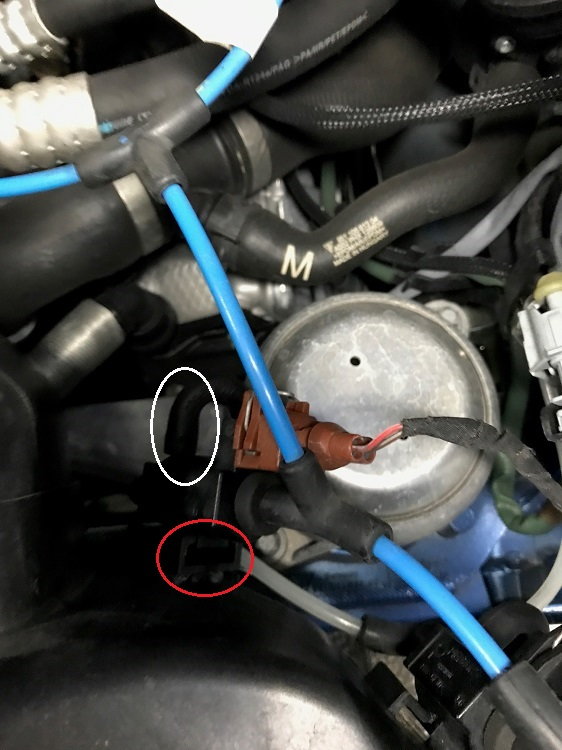
- You're also going to be disconnecting the sound symposer tube and engine intake tube (circled in orange...close-up in Pic 3) as well as unclipping two vacuum connections from the air box (general area circled white....close up pics in Pics 4 & 5).
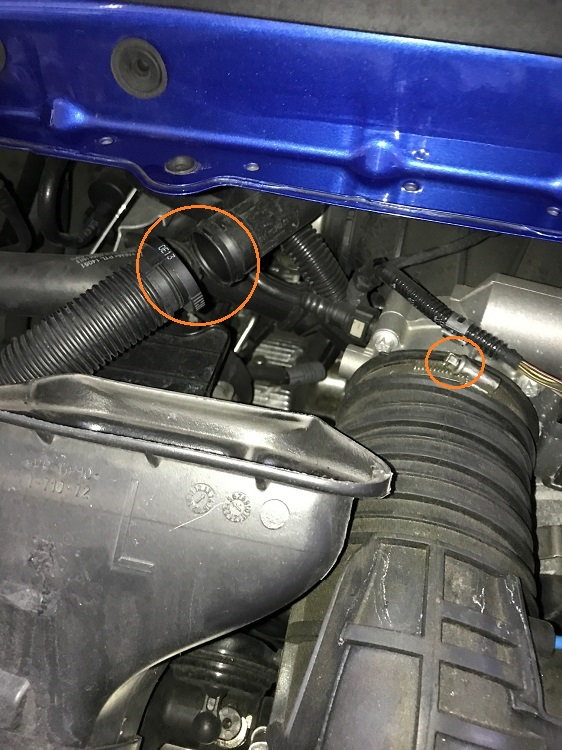
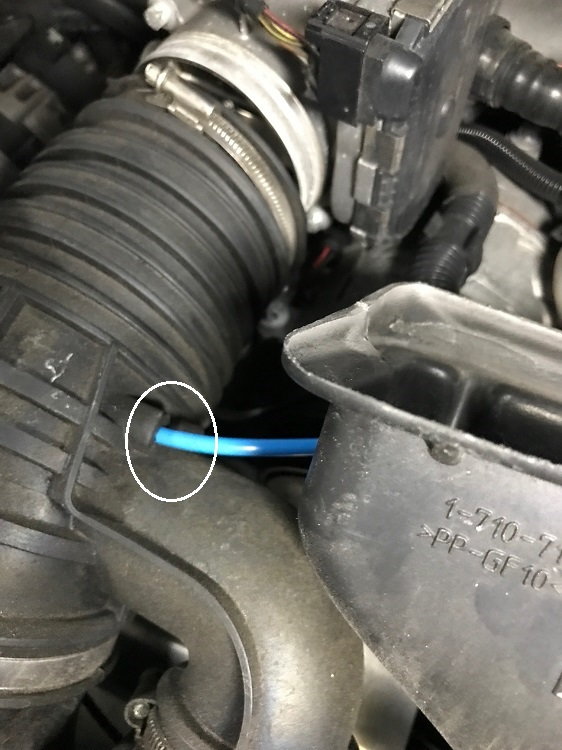
Close-up of disconnecting symposer tube and engine intake tube: - Symposer connection is just a clip/squeeze connection, disconnect it and let it hang loose
- Engine intake tube requires a 7mm I think. loosen it a lot and then use some force to pull the tube free. It will be on there pretty good.
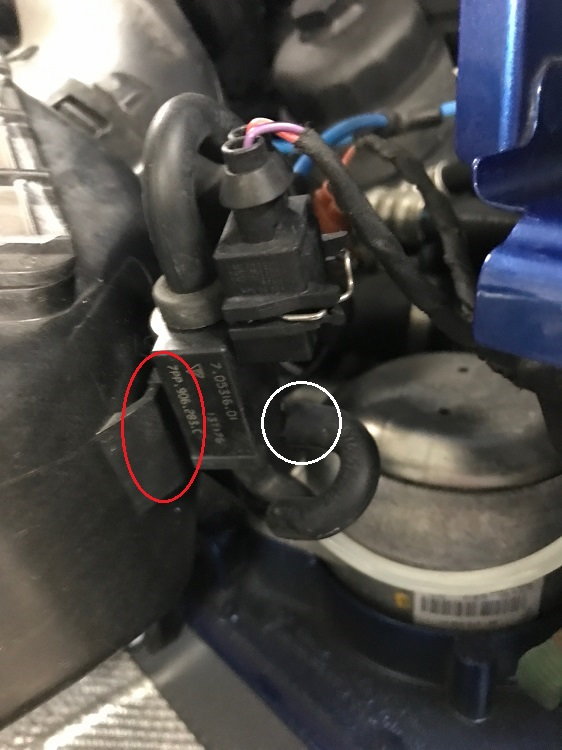
Disconnect 3 vacuum lines (first two below are in the area that was cicled in white in Pic 2 above)
- Unclip this from the airbox first (far right side of airbox) (clip circled in red), then disconnect the vacuum line (circled in white).
- Now unclip this one from the airbox (it's towards the center of the airbox when comparing to the first) (clip circled in red), then disconnect the vacuum line (circled in white).
- Now disconnect the third vacuum line that is connected to the engine intake tube (circled in white)
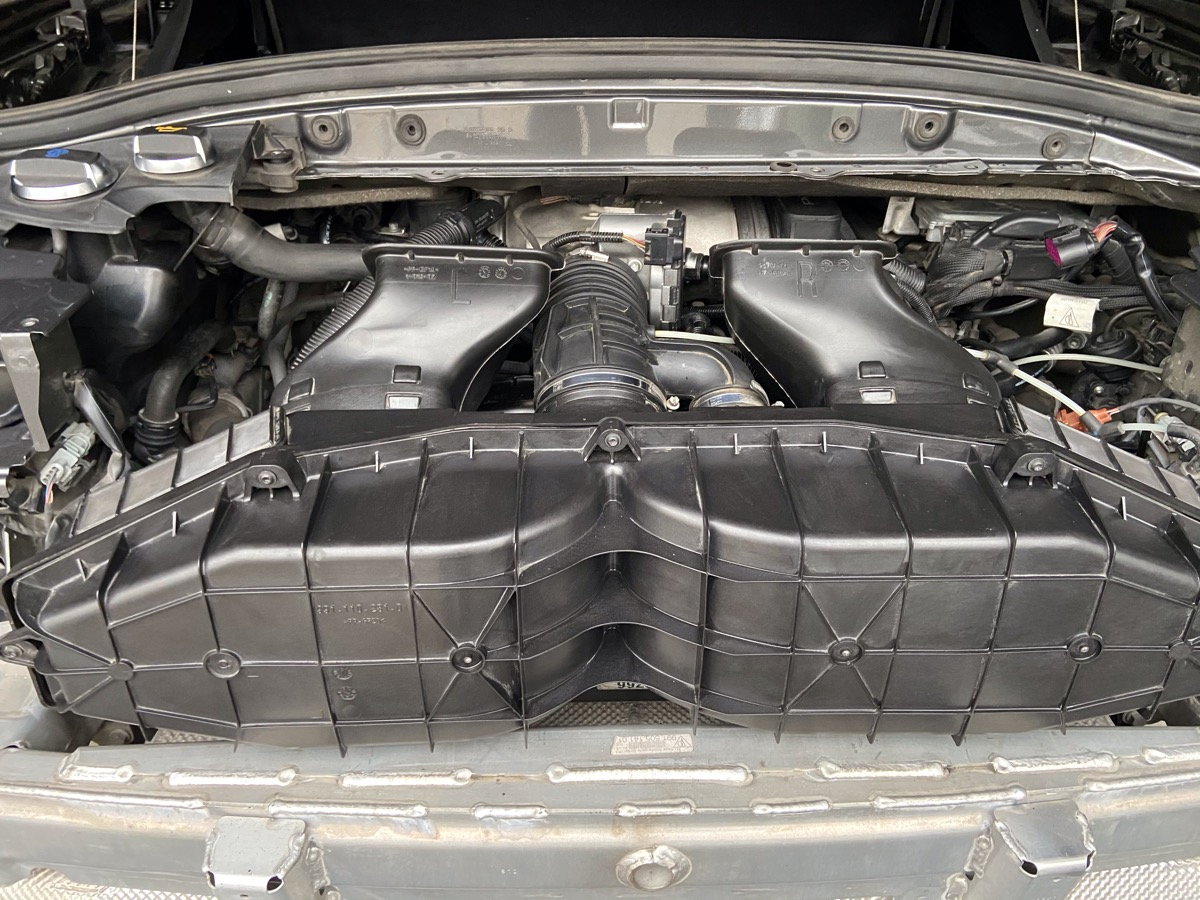
Now you can pull the airbox out from engine bay!
************************************************************************ ****************************** STEP 3: REMOVE AIR BOX RESTING PLATE.
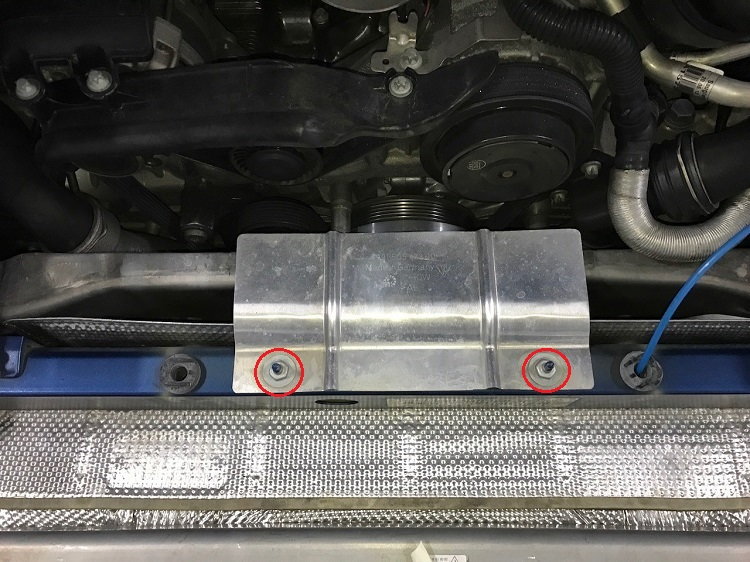
- There is a resting plate for the airbox that you can now see. Remove the two nuts (14mm I think) circled in red in the pic below and remove the plate.
************************************************************************ ****************************** OVERVIEW OF SERPENTINE BELT:
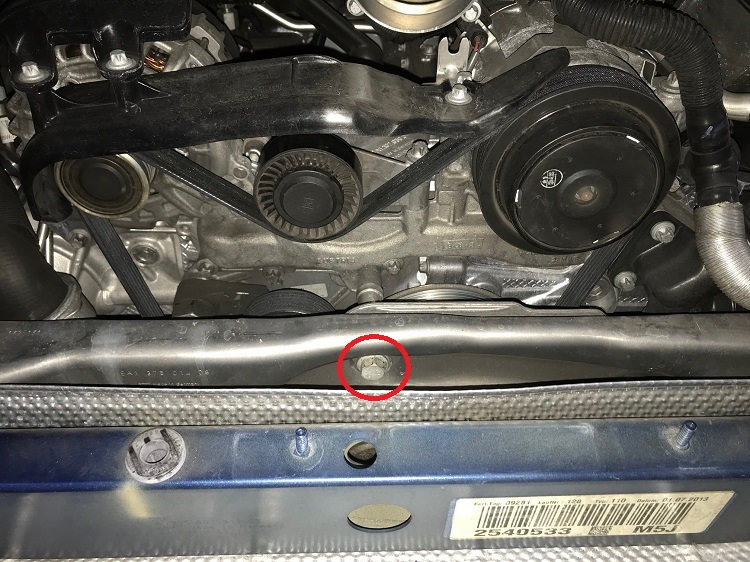
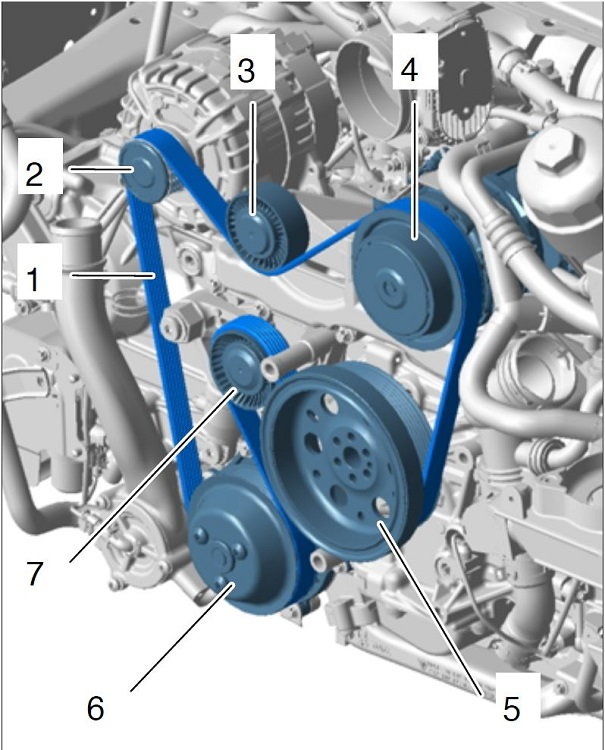
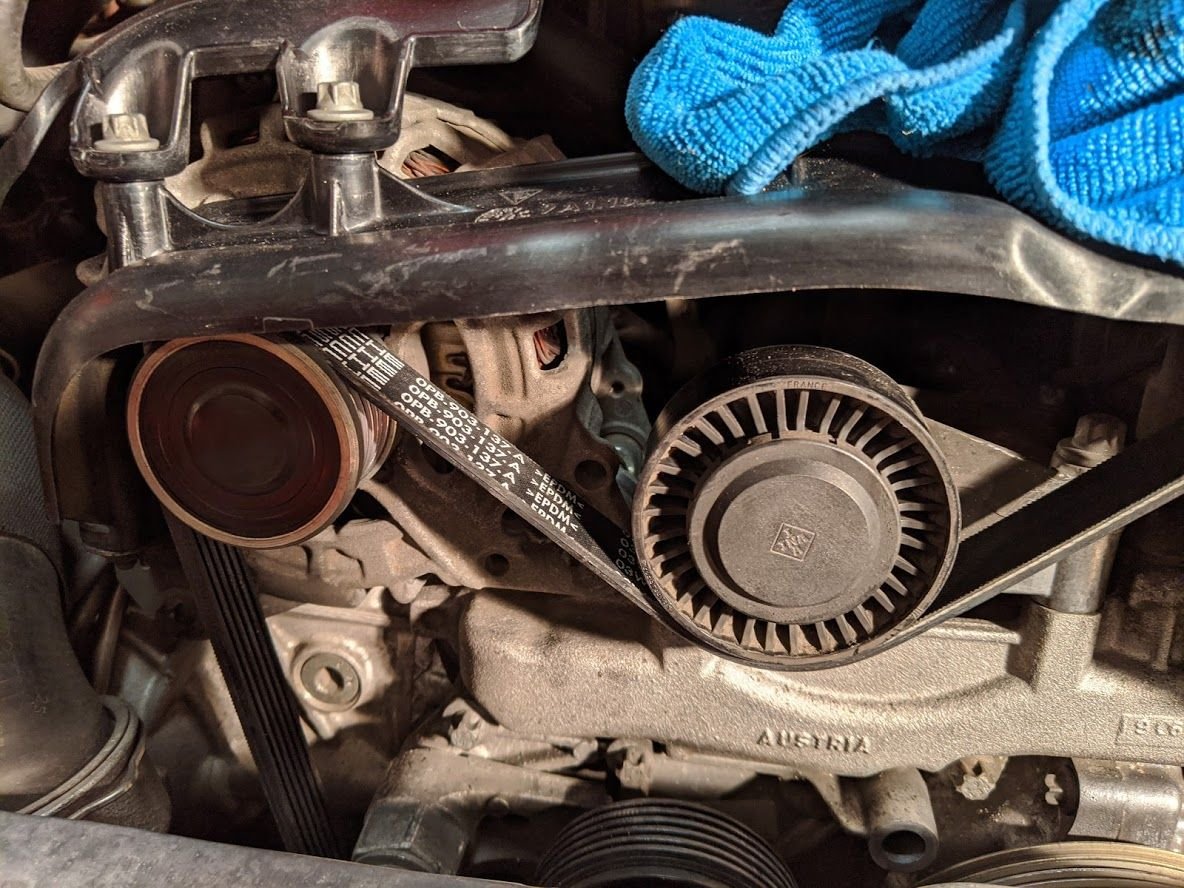
- Now you have access to the serpentine belt.
- Actual picture (engine carrier bolt circled in red and discussed in detail in Step 4):
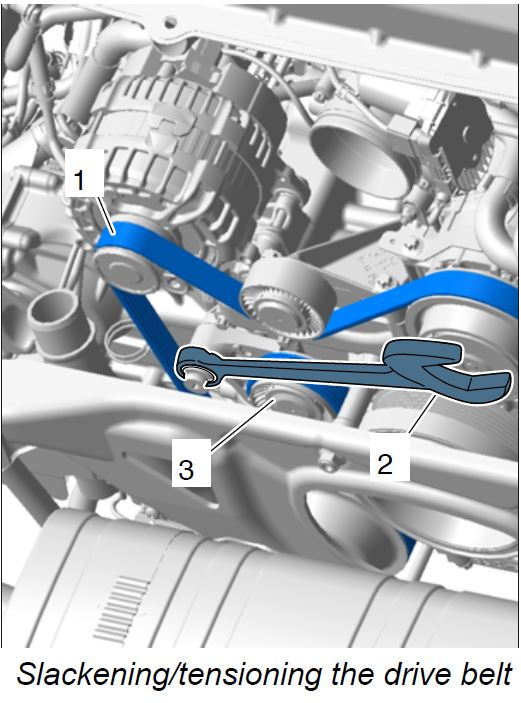
Picture from factory instructions:
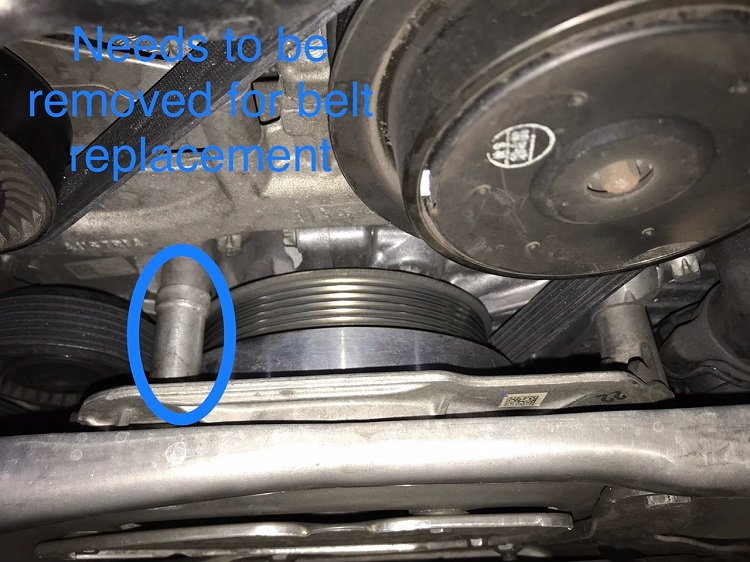
***************************************************************** ************************************* STEP 4: REMOVE ENGINE CARRIER BOLT AND SLEEVE
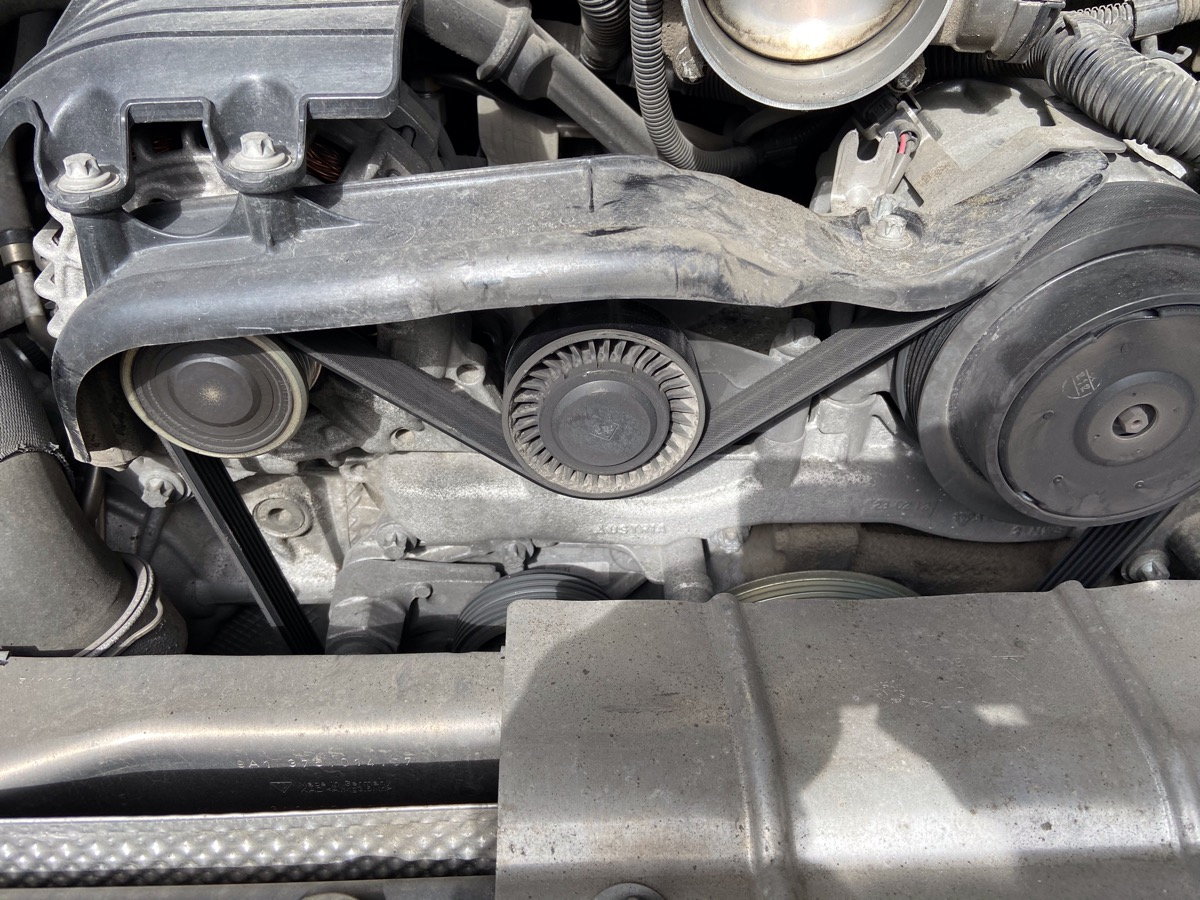
- In order to remove the belt, you have to get the carrier bolt and sleeve out. Here is an actual pic of mine for an overview:
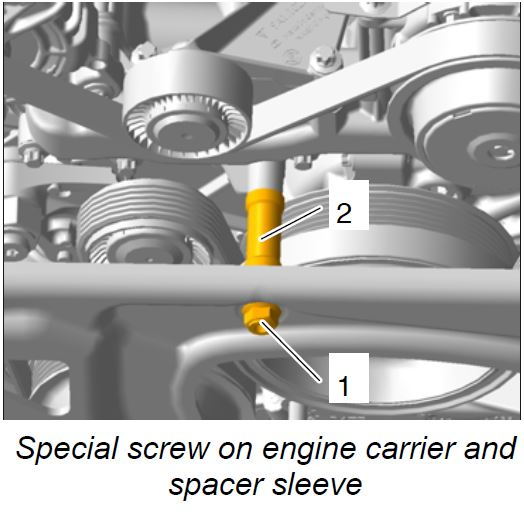
- Here is a pic from the factory instructions:
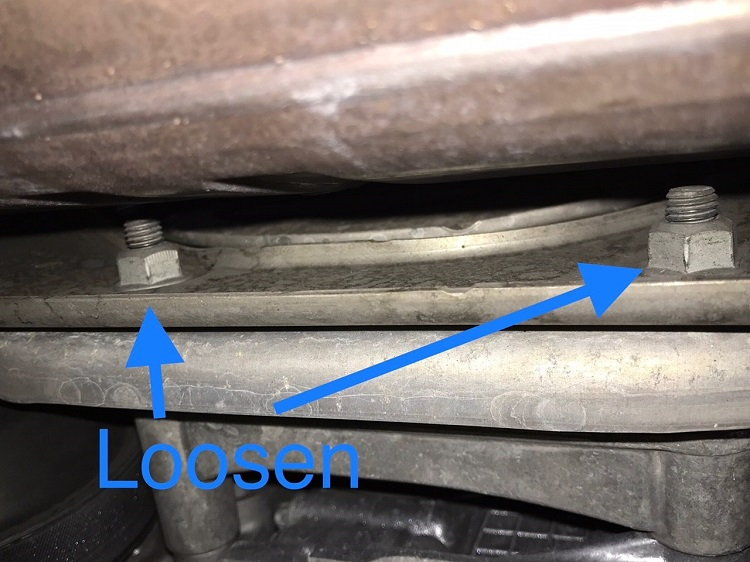
- In order to get them out, I loosened three bolts on the unpainted metal part that the carrier bolt "starts" from so I could wiggle the carrier bolt sleeve free after removing the bolt. Without doing this, it was impossible for me to get it out. **Update: RoWa reports he was able to remove the carrier bolt spacer with a few gentle taps with a rubber mallet without loosening the other three engine carrier nuts and it went back in just the same. So try that first, YMMV.
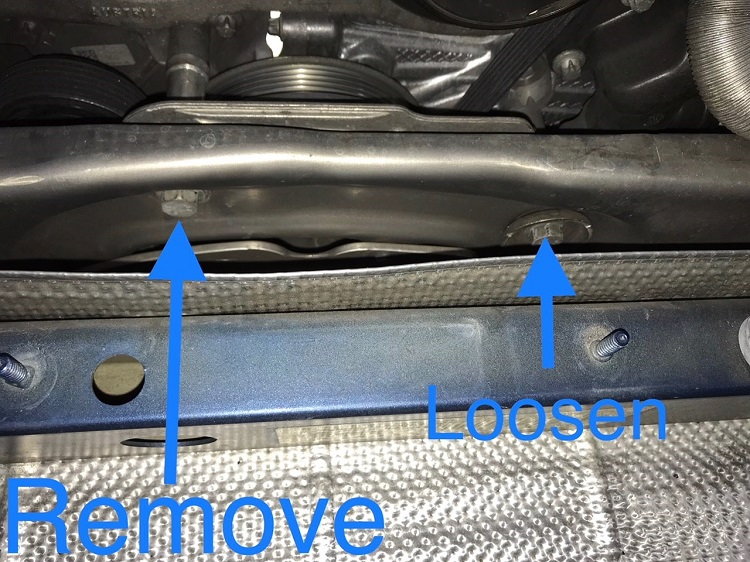
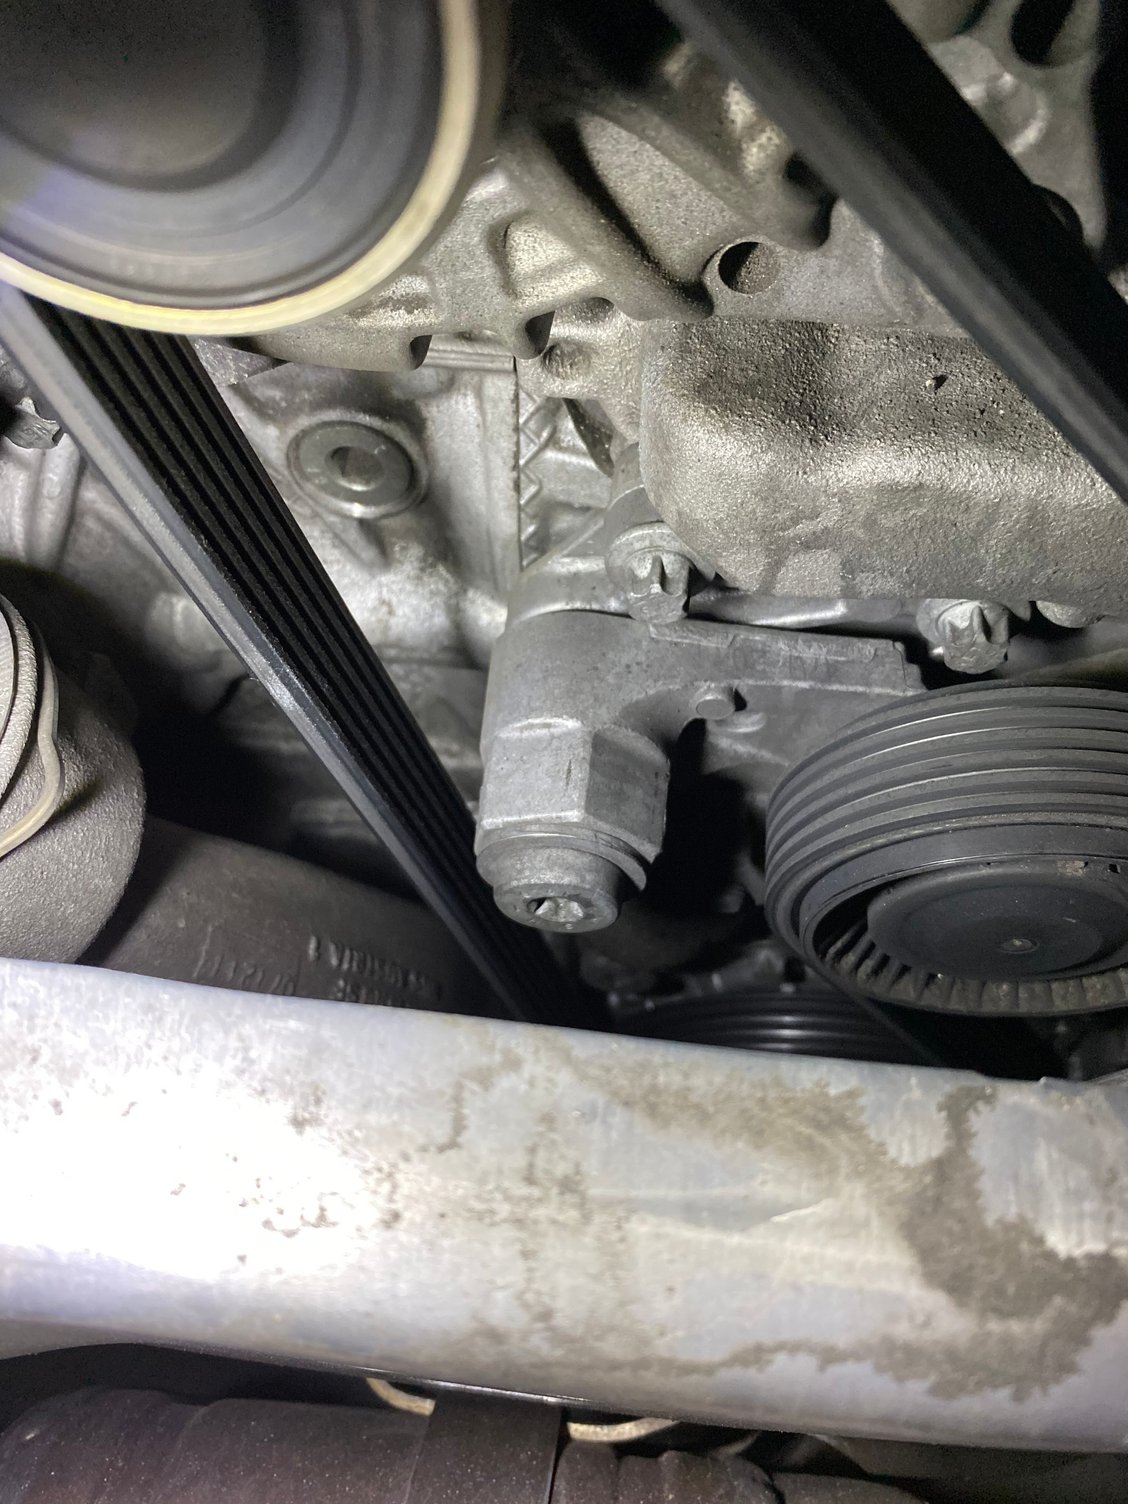
- These two are accessed from under the car and the picture is taken from the ground pointing up:
- This picture is taken from standing up looking down and shows the third bolt to loosen as well as the carrier bolt:
- Once the three bolts are loosened, you can now remove the carrier bolt and then the carrier bolt sleeve.
***************************************************************** ************************************* STEP 5: REMOVE AND REPLACE SERPENTINE BELT:
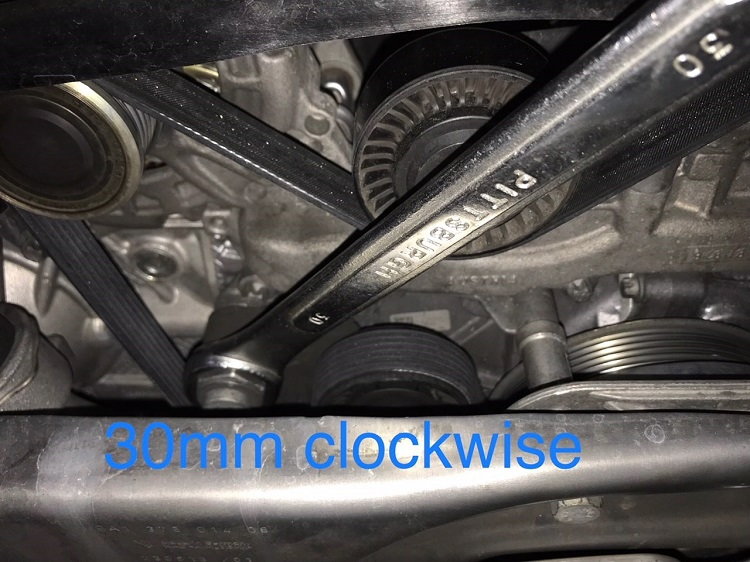
- Finally, you can now replace the serpentine belt!!
- Using a 30mm box wrench, rotate the belt tensioner clockwise all the way until it stops.
- Remove the belt while still holding the tensioner down (helper makes this easier).
***************************************************************** *************************************
That's it! Replace the belt exactly as the old one was on there. Use the factory diagram (Pic 9 above) as a guide to make sure you install the new belt correctly. Last pulley you should be putting it around is the tensioner pulley and having a helper do that while you push down (clockwise) on the wrench makes it easier. Then put your car back together using all the steps above but in reverse (Update #1: Engine carrier bolt torque is 44 ft lbs. Update #2: We had a member replace his belt and his carrier bolt would not thread back in. A simple block of wood under his metal oil pan {991.1} and a slight shift up on the engine with a jack lined it back up in place in order to thread the carrier bolt back in).
Hope you all find this useful. Now that I've typed it out it seems harder than it actually is. Starting from step 1 above and getting it all back together will probably only take me ~45 minutes now that I know what I'm doing.
Thanks, that makes sense to me. All the more reason I think I'll just tackle this myself and a) save a bunch of money, and b) save potentially even more if the tensioner is noise-free. It'll be parked for the winter anyway, will have all the time in the world to screw something up and come back here begging for help
Just finished this today. My neighbour was gracious enough to give me a hand, which was great as he's a lot handier than me.
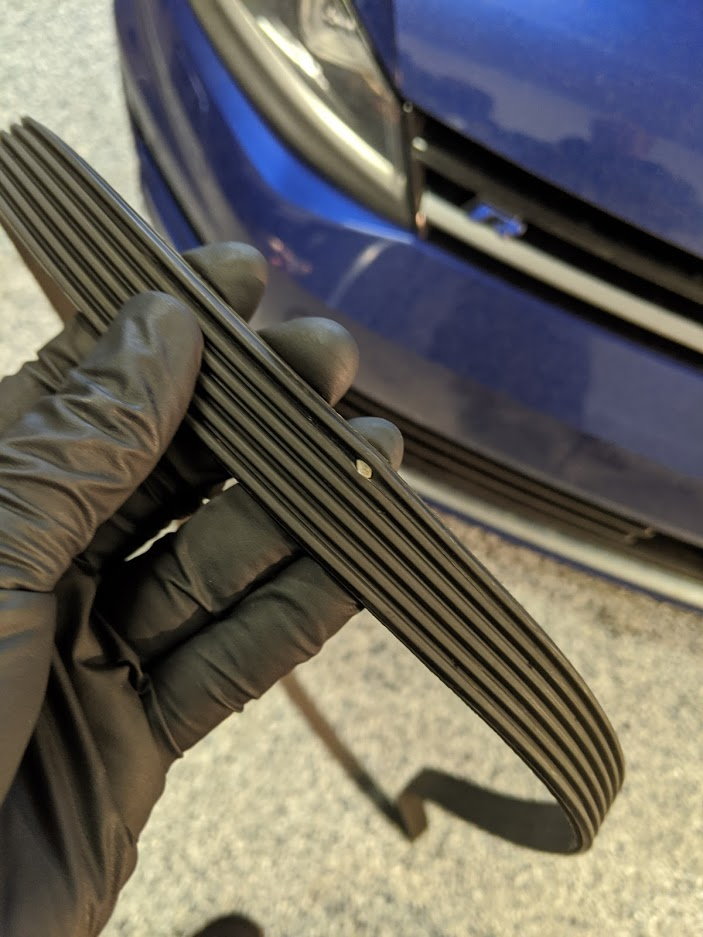
Old belt, to my knowledge, might have been the original from when my car was manufactured in August 2012, so it was absolutely overdue. There was even some foreign debris in the belt:
One more data point - I was able to pop the sleeve out without needing to remove the extra bolts. We just tapped it with a hammer/screwdriver and used a plastic trim removal tool to sort of leverage it up and out.
Thanks to this post, I was able to change my serpentine belt today.
everything went well, except the dust in the engine compartment, incredible.
But the previous owner lives on a gravel road, so�
The longest thing was cleaning everything.
My belt tensioner is leaking fluid so I decided to replace it along with the belt, but I am struggling for room to remove the top tensioner mounting bolt. Anyone has any ideas? From picture it would seem there is lots of room but the wrench plus torx bit make it like 3/4inch too long.
Access from bottom is also tight.
Edit: to be clear, I will obviously remove the belt before I remove tensioner spring per service manual guidance. But I wanted to see how I’d go about removing it with the limited space.
My belt tensioner is leaking fluid so I decided to replace it along with the belt, but I am struggling for room to remove the top tensioner mounting bolt. Anyone has any ideas? From picture it would seem there is lots of room but the wrench plus torx bit make it like 3/4inch too long.
Access from bottom is also tight.
Edit: to be clear, I will obviously remove the belt before I remove tensioner spring per service manual guidance. But I wanted to see how I�d go about removing it with the limited space.
It looks like you could loosen the tension and that would provide the room you need by getting the tension wheel out of the way. Take the belt off first. Alternatively, use a ratcheting wrench. The little teeth will bite into it like a torx.
Edit: I misunderstood which bolt is removed. The bolt is the inset torx in the middle of where the 30mm wrench goes. Later, when I completed this I used an Xtreme Access low profile wrench and socket set from Kobalt (Lowe�s house brand) and a low profile torx drive set from EZRED (found of Amazon).
It looks like you could loosen the tension and that would provide the room you need by getting the tension wheel out of the way. Take the belt off first. Alternatively, use a ratcheting wrench. The little teeth will bite into it like a torx.
The tensioner spring is attached to the tensioner pulley. I managed to take it out by using an angle socket wrench with a shirt as possible torx impact socket.
I changed the belt and belt tensioner. with the air fans and spoiler out, I turned on the car and it ran fine, but I have a high pitch sound/whine, but is not loud. Sounds like a vacuum leak. I double checked everything and all the vacuum lines are on tight.
Any ideas on what it could be? Could it be because of the air fans are not pushing air? Belt breaking in?
Thank you thank you thank you for this posting. Just did my serpentine belt last week for the 6 year replacement interval while replacing the engine air filters and it turned out great. Saved a bundle of money and the belt was only 17 bucks. These forums are life savers and money savers!
Here are the factory instructions that Jacobello87 posted in this thread which helped me out a lot.
Great write up on the serpentine belt replacement. Challenging this project along with o2 sensor replacement and Spark plug and coils. Need to research on this forum the spark plug and coil replacement process. My guess is the Serpentine belt is the most challenging. Arghh!! wish me luck!!! lol
Great write up on the serpentine belt replacement. Challenging this project along with o2 sensor replacement and Spark plug and coils. Need to research on this forum the spark plug and coil replacement process. My guess is the Serpentine belt is the most challenging. Arghh!! wish me luck!!! lol
Click on the "Decent DIYs" hyperlink in my OP for plugs, coils, and filters instructions (it's a 40k mile maintenance DIY).
o2 Sensor replacement is really straight forward (on the 991.1 at least). The "hardest" part is getting to the where the sensor wires plug in. It's snaked back up into the engine bay, so do the o2 sensor the same time you do the serp belt since both involve removing the rear bumper and air box. Here's a good DIY on o2 sensor replacement. Buy one of

 01-25-2020, 10:16 AM