When you click on links to various merchants on this site and make a purchase, this can result in this site earning a commission. Affiliate programs and affiliations include, but are not limited to, the eBay Partner Network.
After my recent purchase of HRE wheels, I suddenly felt my car was riding too high -- the wheel gap was too much for my tastes. My car has SPASM suspension but still, didn't feel low enough. Strangely, I thought the ride height / wheel gap was acceptable with the Carrera Classic wheels that my car was originally sporting. Anyhow, so I went with H&R springs over TechArt since TechArt is just slightly lower than SPASM. I lowered a couple of cars (including a MB E350 sedan) in the past on my own so I figured I'd go ahead and DIY it for my 911 as well.
I didn't really find any step-by-step tutorials on rennlist or 6speedonline so decided to take the time to take pictures along the way so I can write up the steps.
DISCLAIMER: I am not a mechanic -- just a guy with a knack for DIY'ing stuff. These are the steps I performed to lower my 991 C2S with SPASM suspension. If you want to lower your car, I would strongly recommend you have it done by a professional shop. If you plan to do the work yourself, you do so at your own risk. Lowering a vehicle by untrained individuals can potentially lead to damage to your vehicle, other vehicles on the road, and/or other property; injury to yourself and/or others around you during and in result of improper work. It can even potentially lead to death should the car fall on you or anyone else around your vehicle at the time it is raised -- or should you lose control of your vehicle on the road in result of a poor job on your part. Again, I strongly recommend you go through a professional shop to get your car lowered so I really want to iterate that you are assuming 100% of the risks by doing the work yourself! Stop now and contact your Porsche dealer or other qualified shop. Read on only if you understand these risks.
I would suggest you navigate away from this thread now before you get tempted to attempt something I'm advising you to not do yourself.
Are you still reading this? Okay, you have been given ample warning advising you to not attempt this yourself!
These will be the sections I will be adding. Each section will be in a separate comment in this thread to help with better organization.
SECTION 1 - TOOLS
SECTION 2 - FRONT
SECTION 3 - REAR
SECTION 4 - BEFORE & AFTER PHOTOS; OTHER THOUGHTS
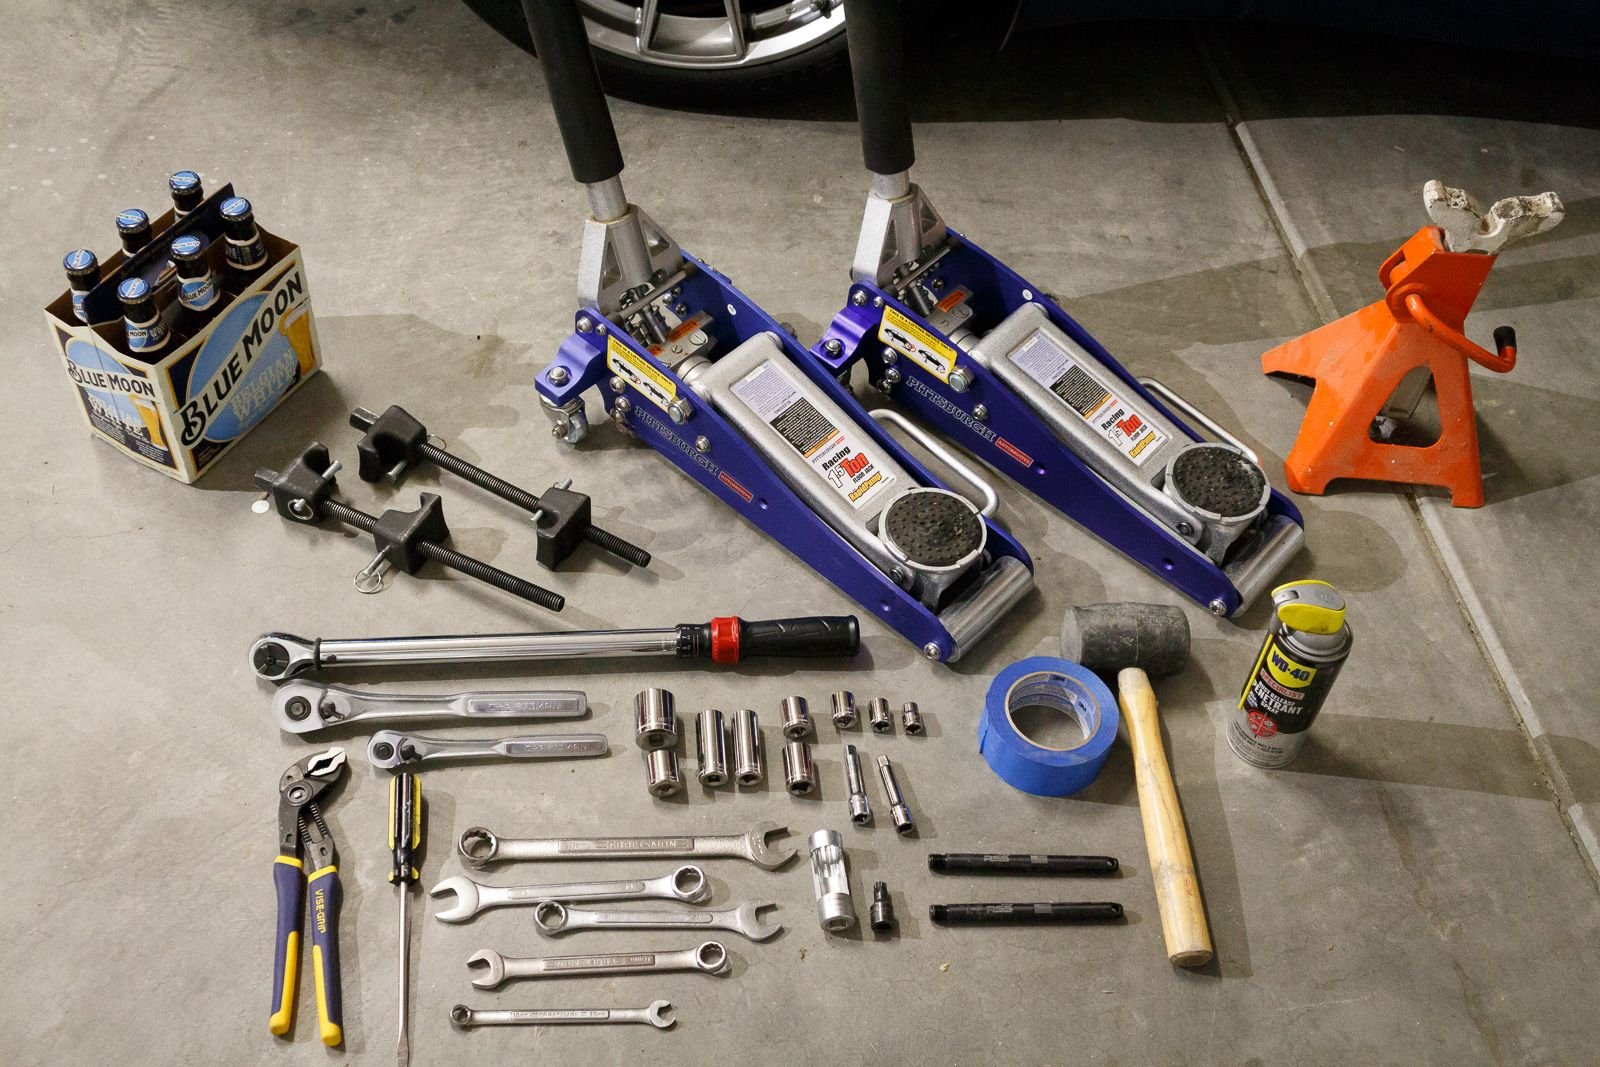
Before diving in to the steps for lowering the vehicle, here is a list of the tools I used. Although I own an air compressor with pneumatic impact wrench and pneumatic driver, I opted to not use it for this job.
Photos speak a thousand words so feel free to stare at the photos to know what I used -- but I'll go ahead and list those thousand words below the photo.
Tools
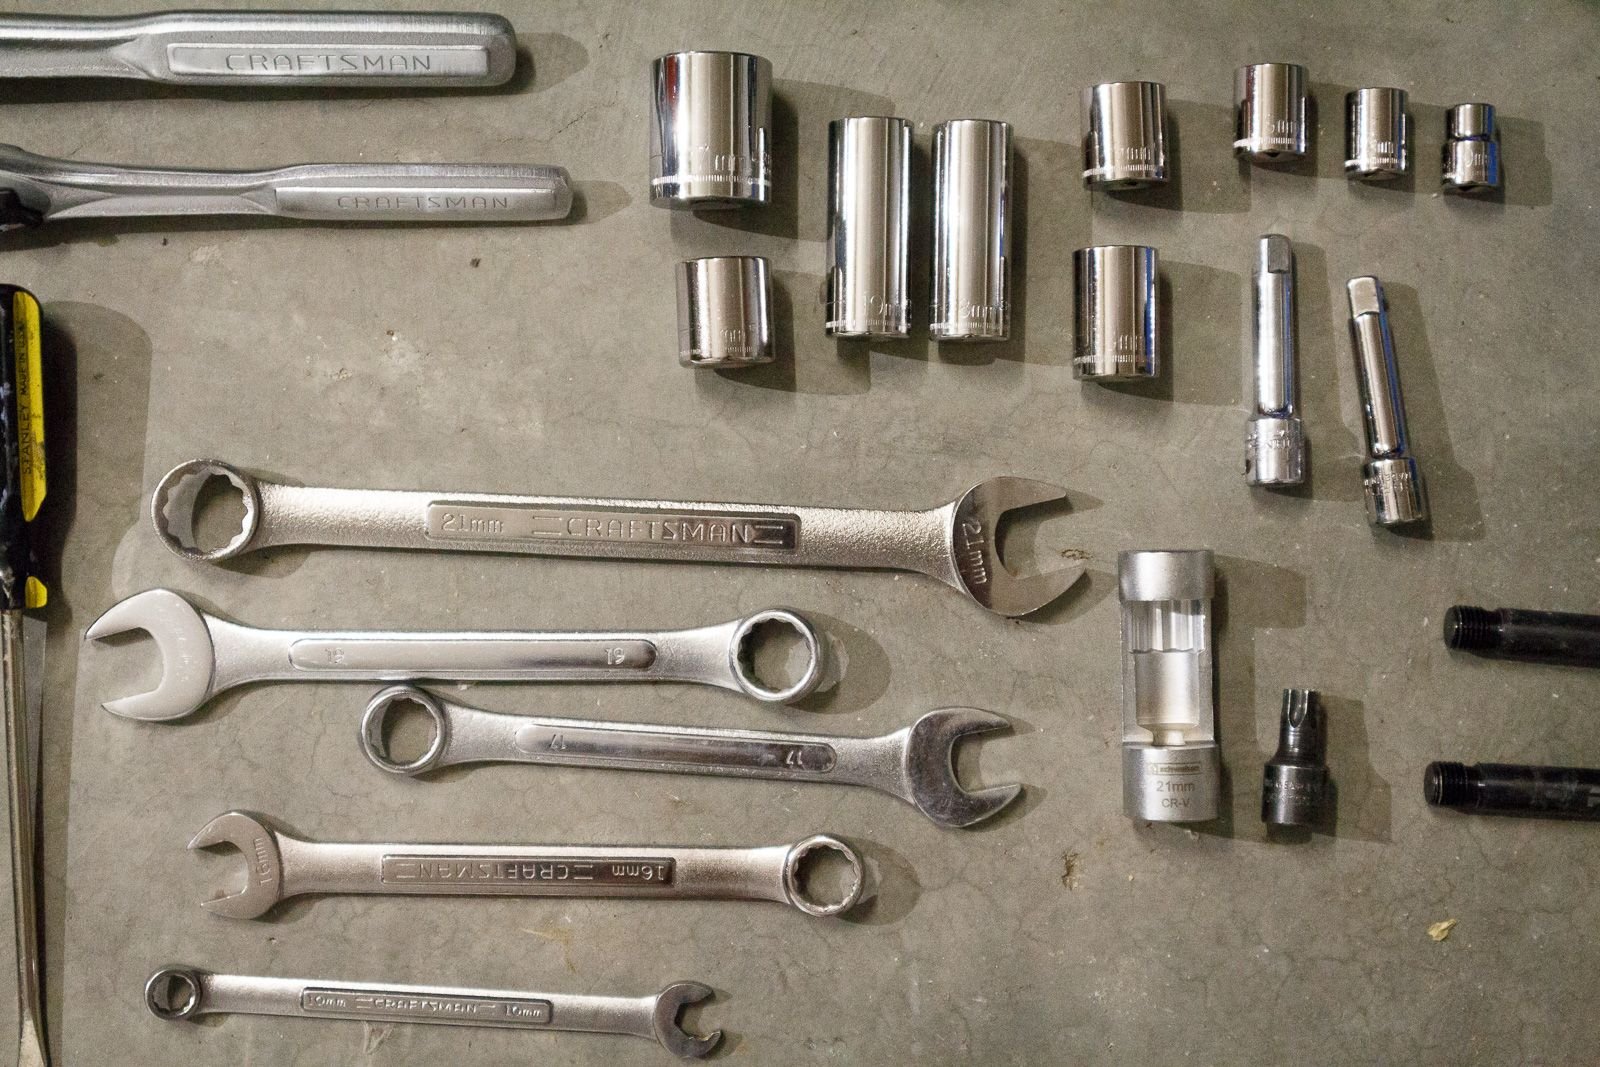
Sockets and Wrenches close-up to view size readings
If you skipped straight down to this step without reading comment #1 above, please go back up and read comment #1 before reading any further about the risks involved in lowering your own car.
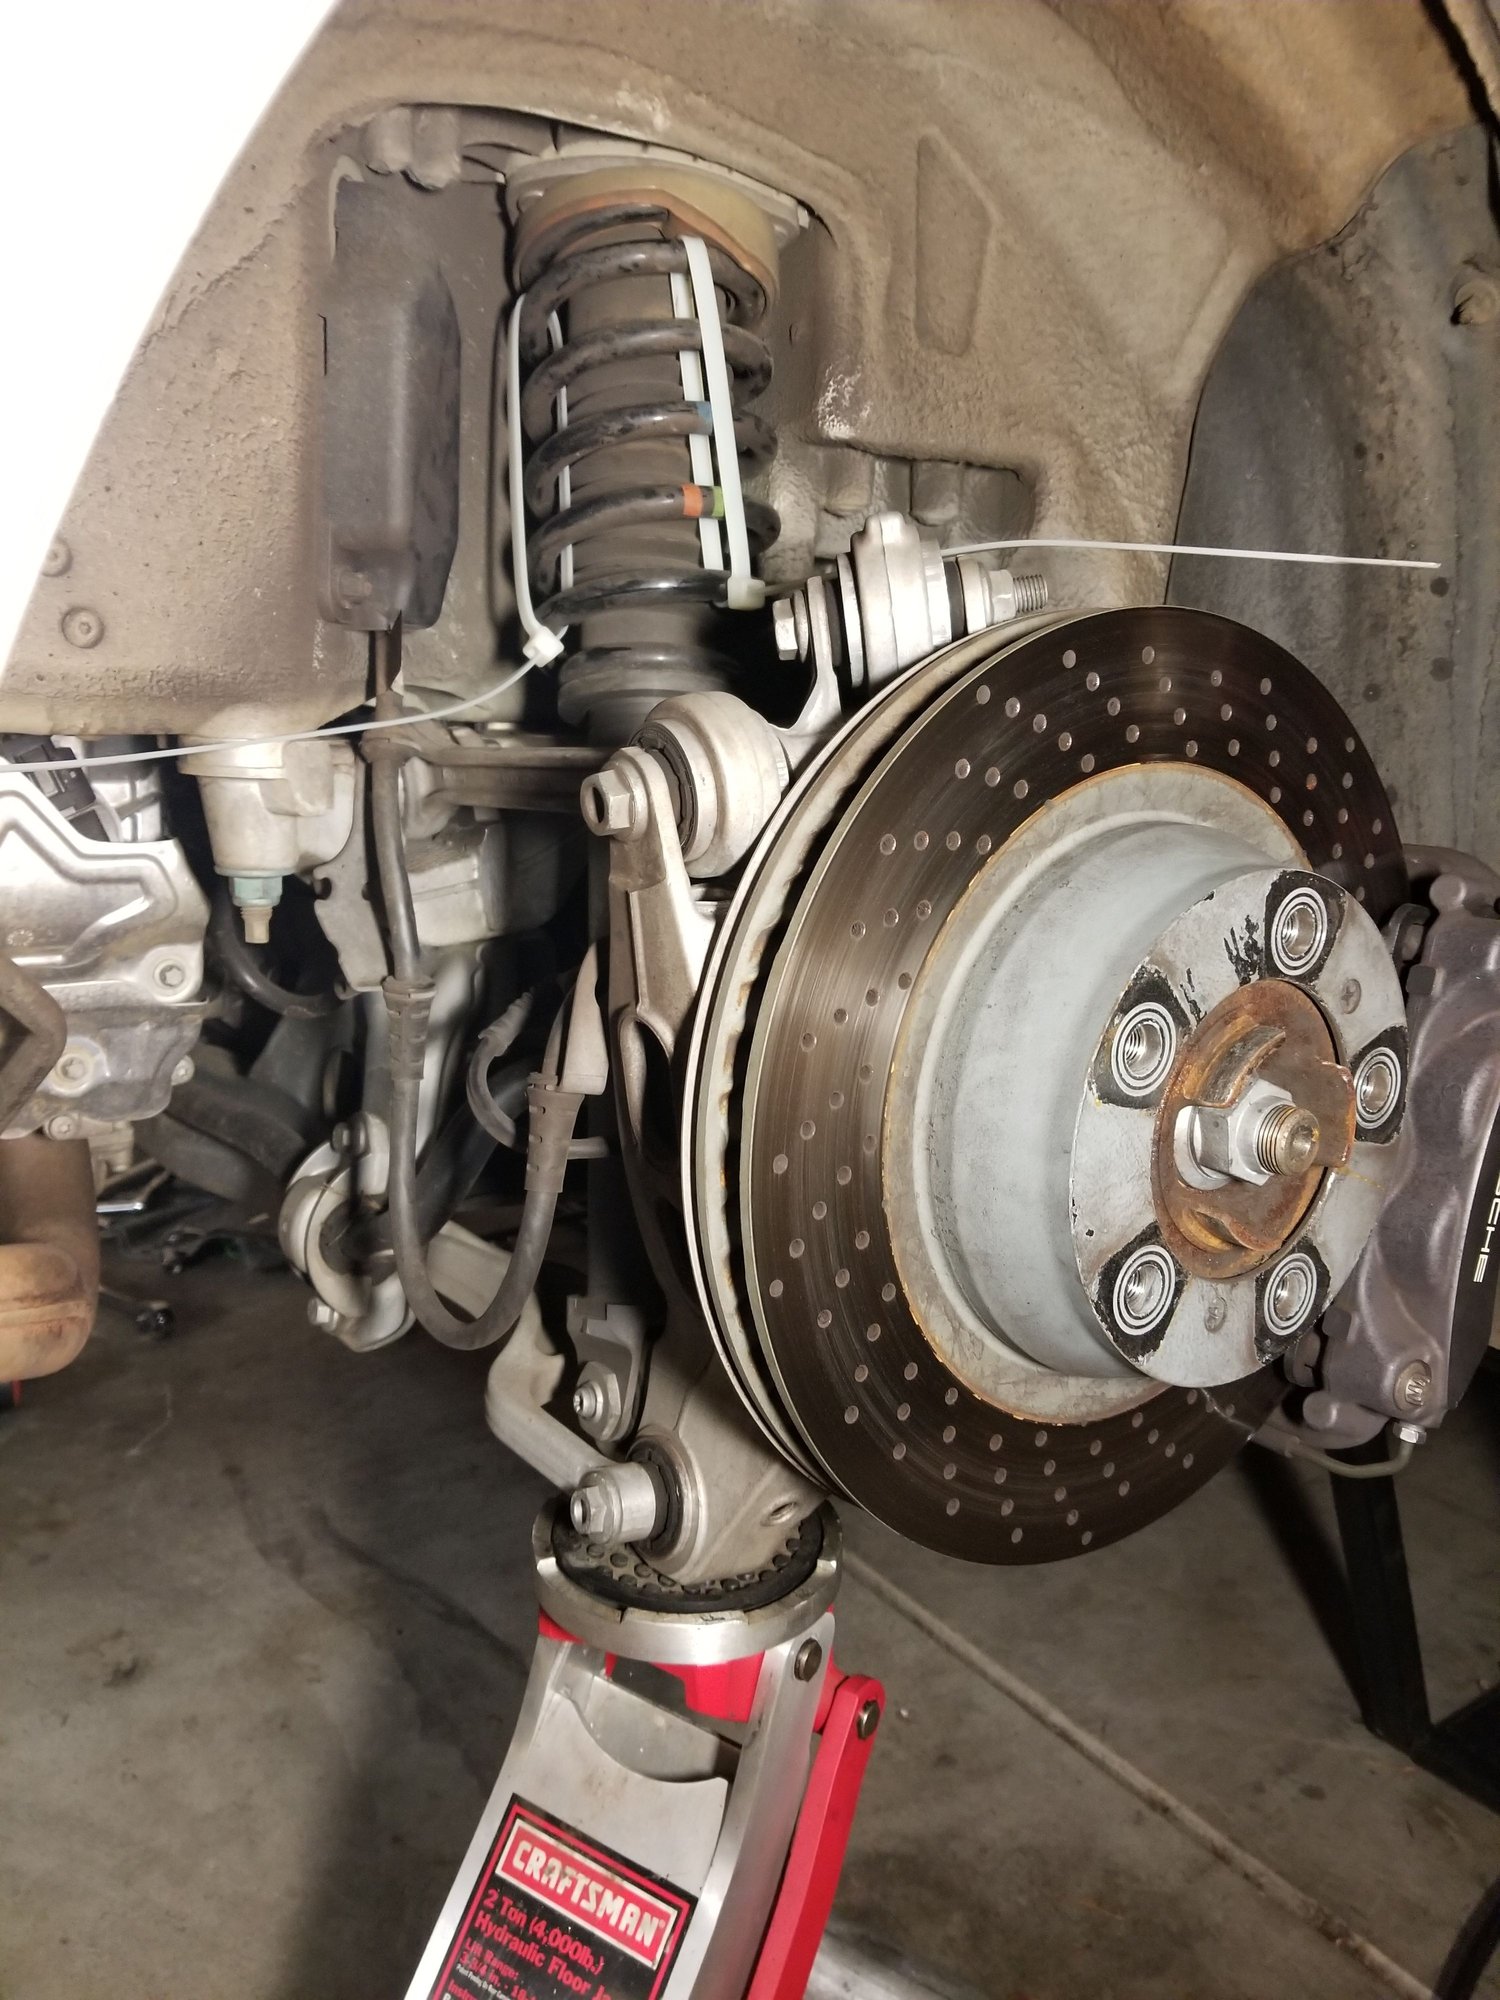
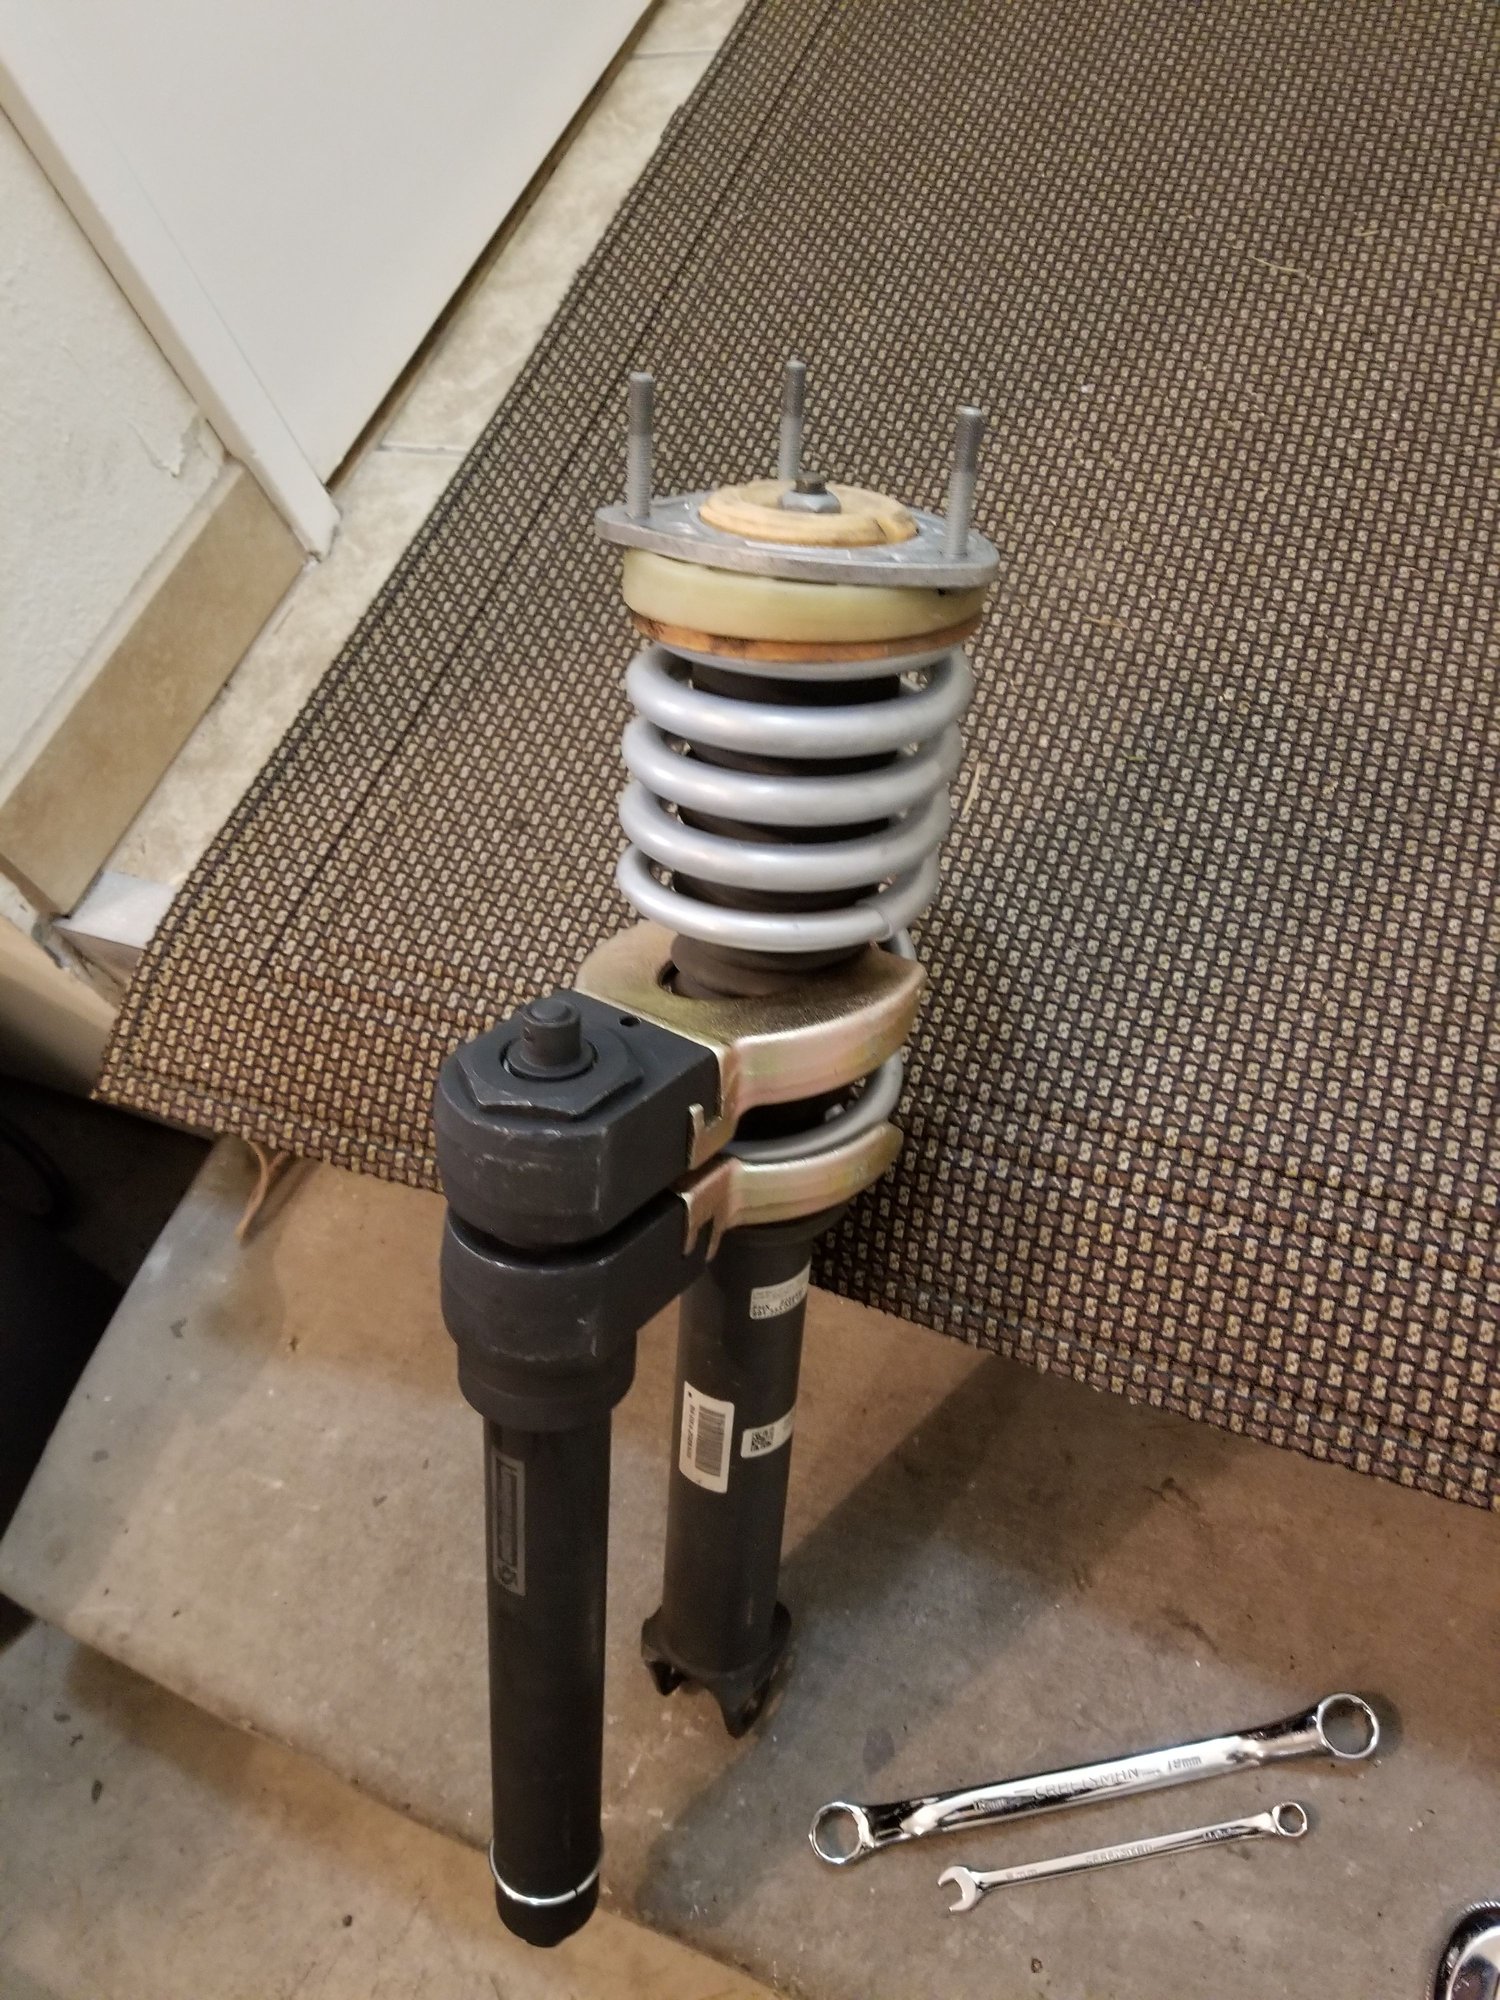
In this section, I describe the steps I performed in replacing the front struts. Interestingly, I didn't actually need to remove the front strut from the car to replace the springs. Unorthodoxed? Probably.
Note: I try my best to use the correct terminology when describing parts but as I stated above in comment #1, I'm not a mechanic so please refer to the photo when i describe a part as a thingamajig.
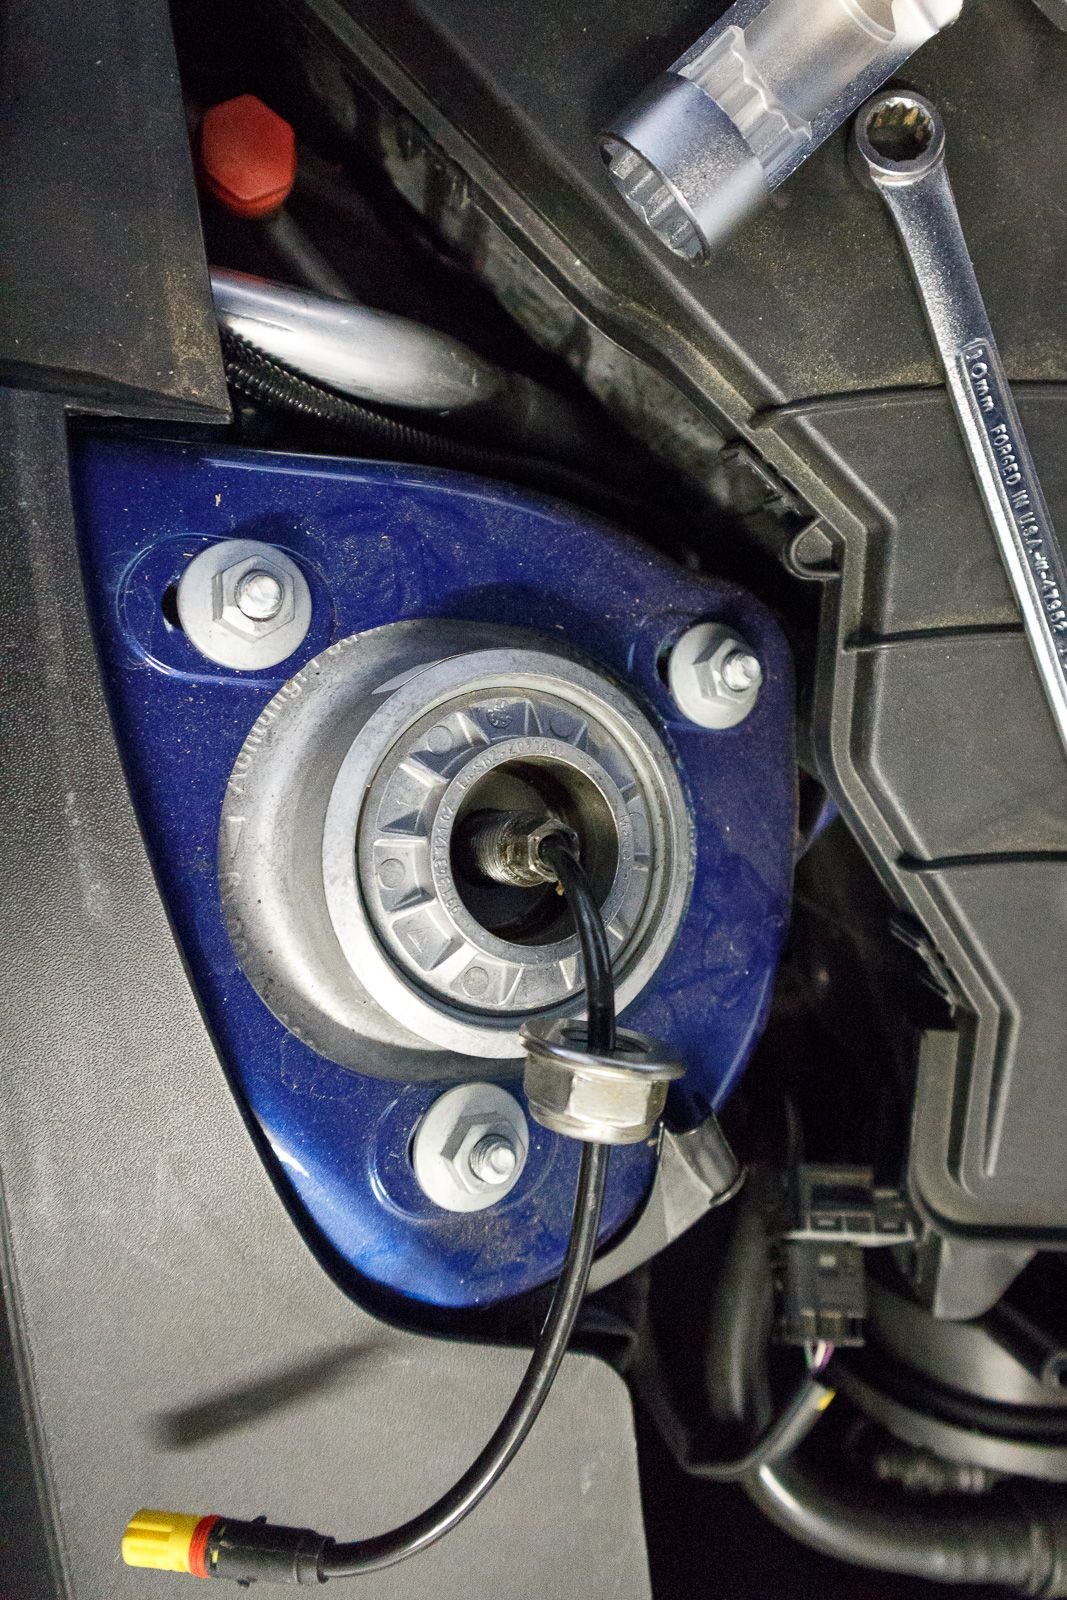
1. Remove the large plastic panel that spans the width of the frunk to gain access to the front strut upper mount. It's held down by built-in clips and can easily be lifted from the handles on either side of it.
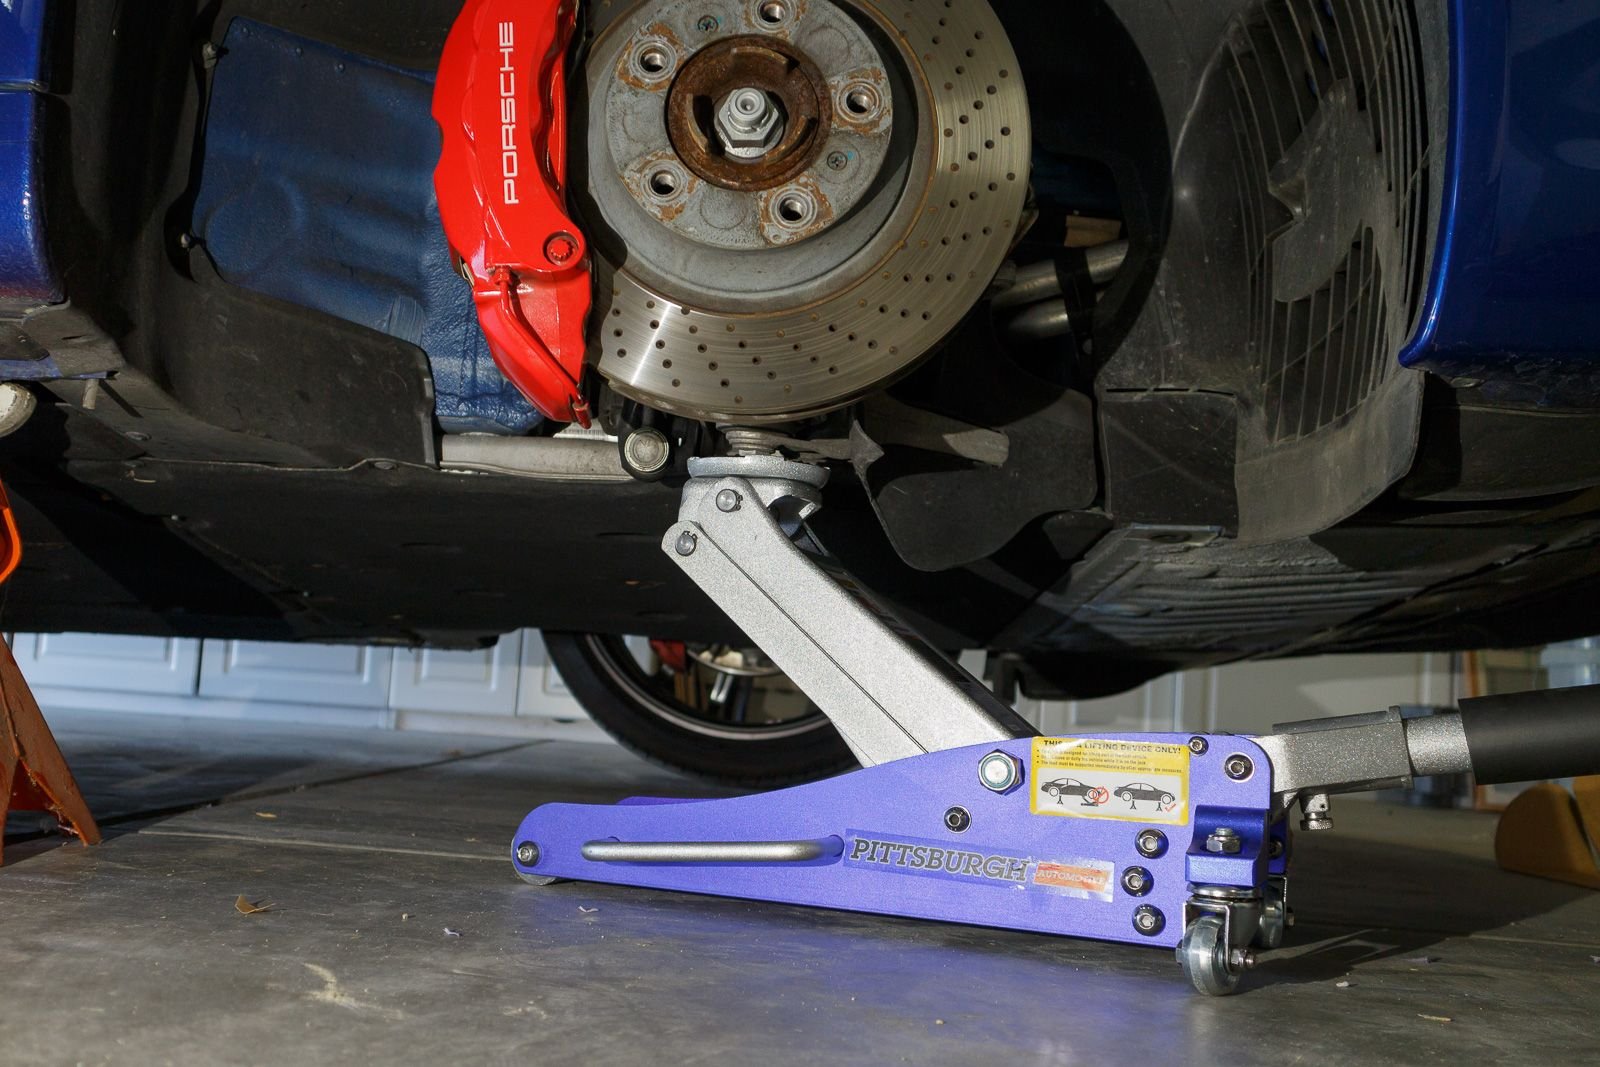
2. Jack up one side the car and keep it secured with a jack-stand. I jacked up from the rear -- which causes the front of the same side to lift up as well. This gives me enough room to put a jack stand on the front. Lower the rear down onto the jack stand. Place some sturdy/heavy object against the opposite rear tire for extra security and peace of mind.
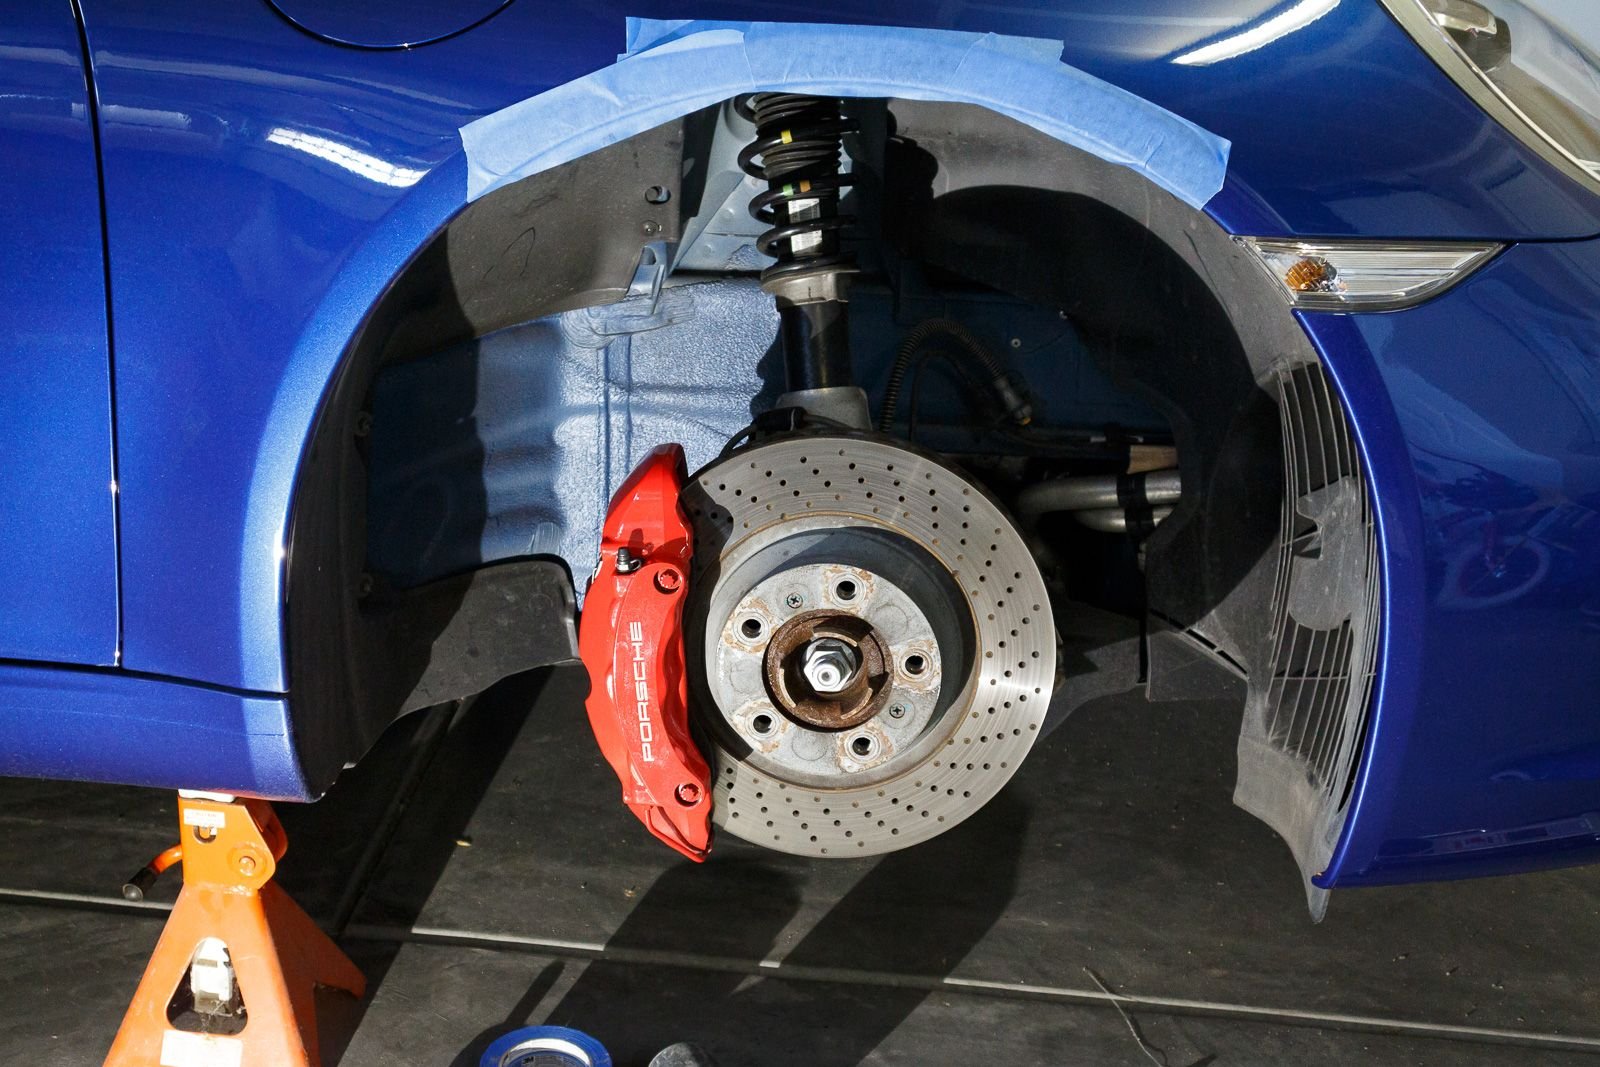
3. Stick masking tape along the curve above the wheel well to protect the paint. In retrospect, I should have applied multiple layers of the tape, just in case. Fortunately, the 1 layer was enough but it's not worth taking that chance.
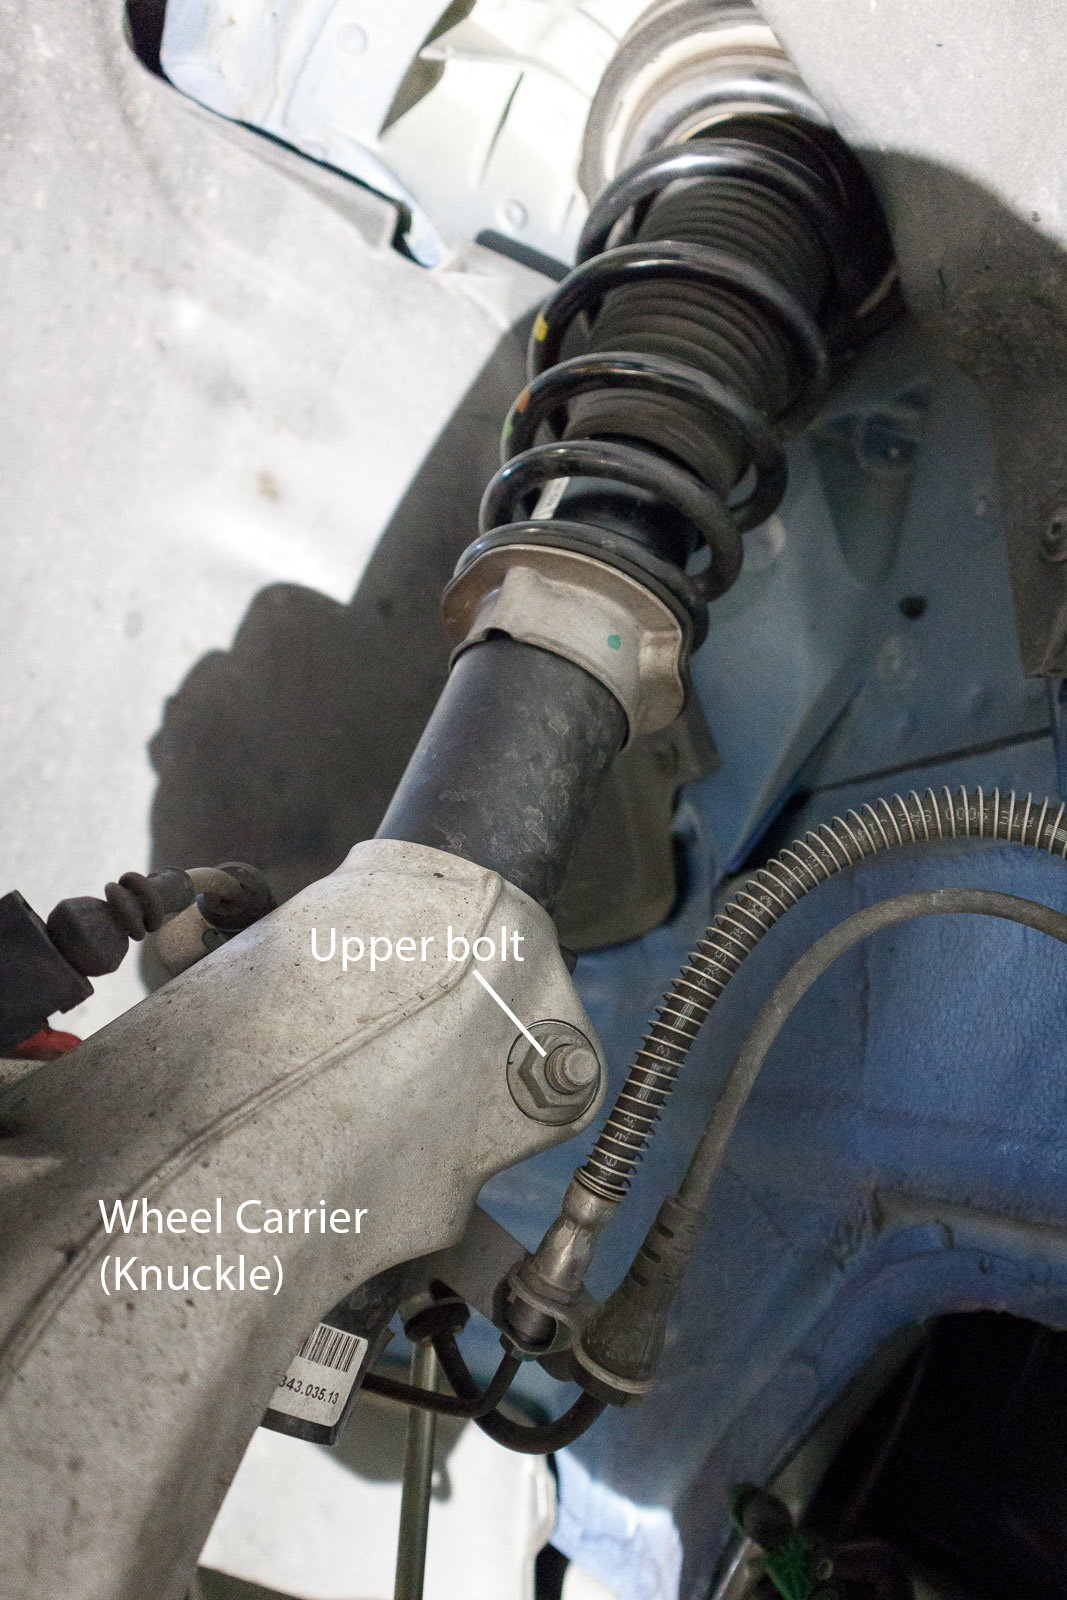
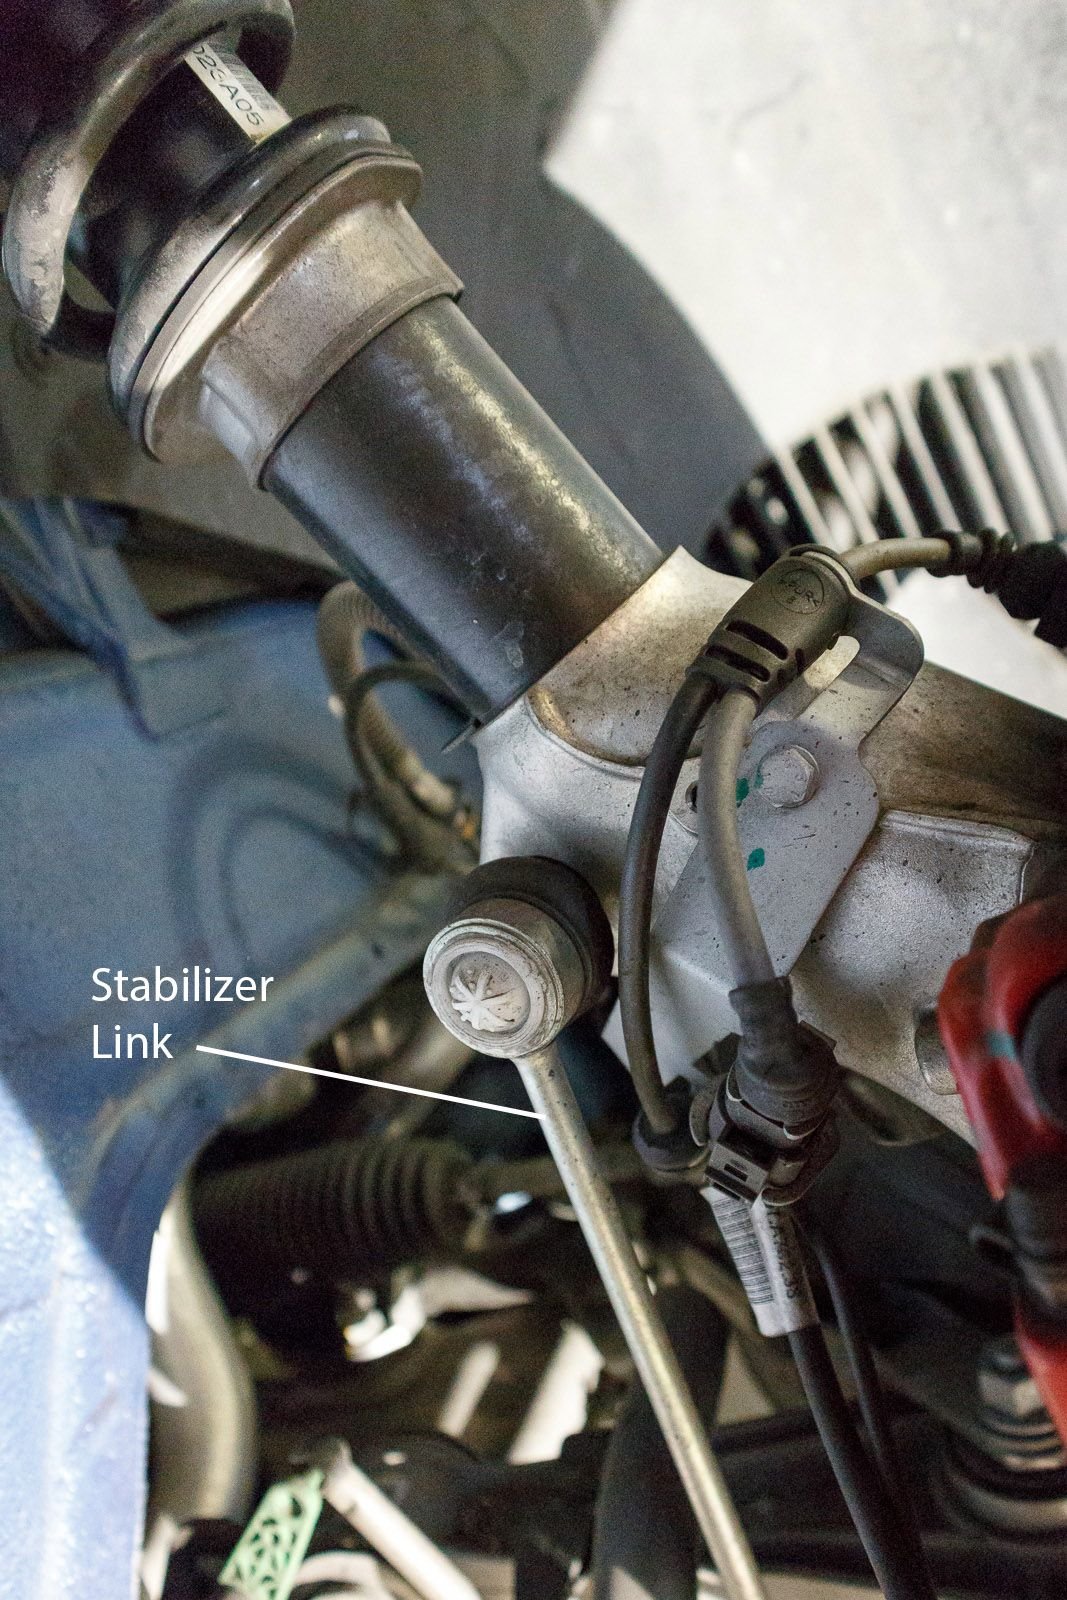
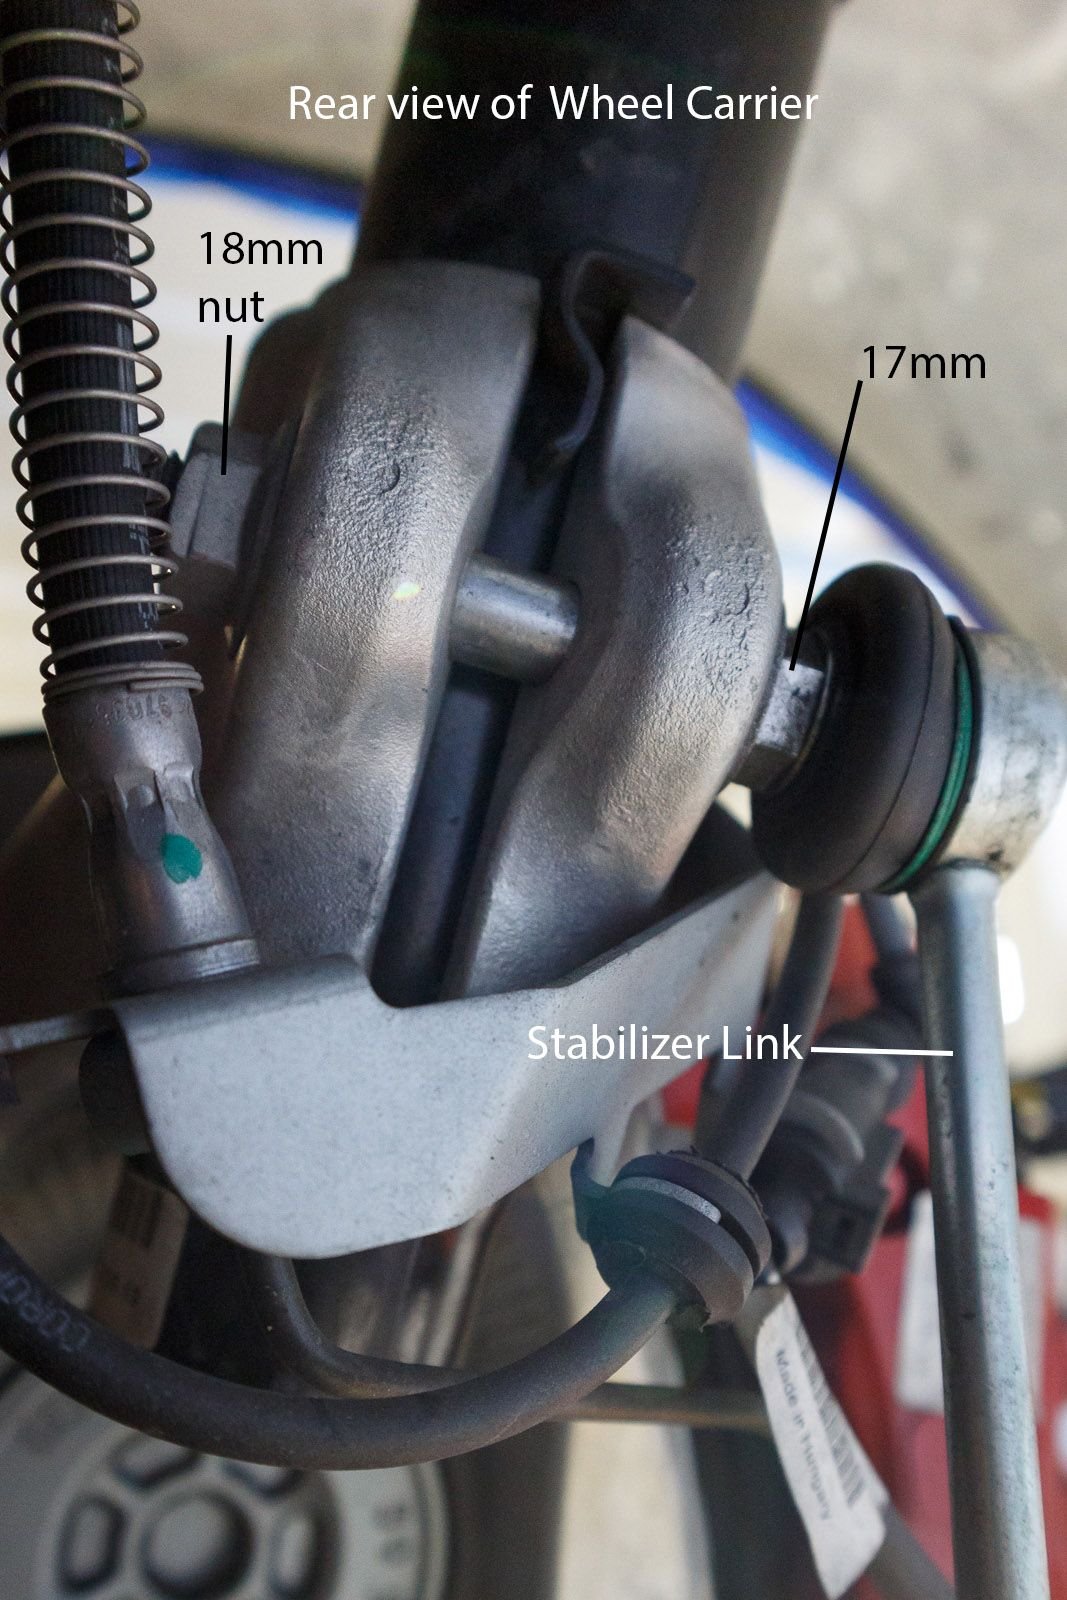
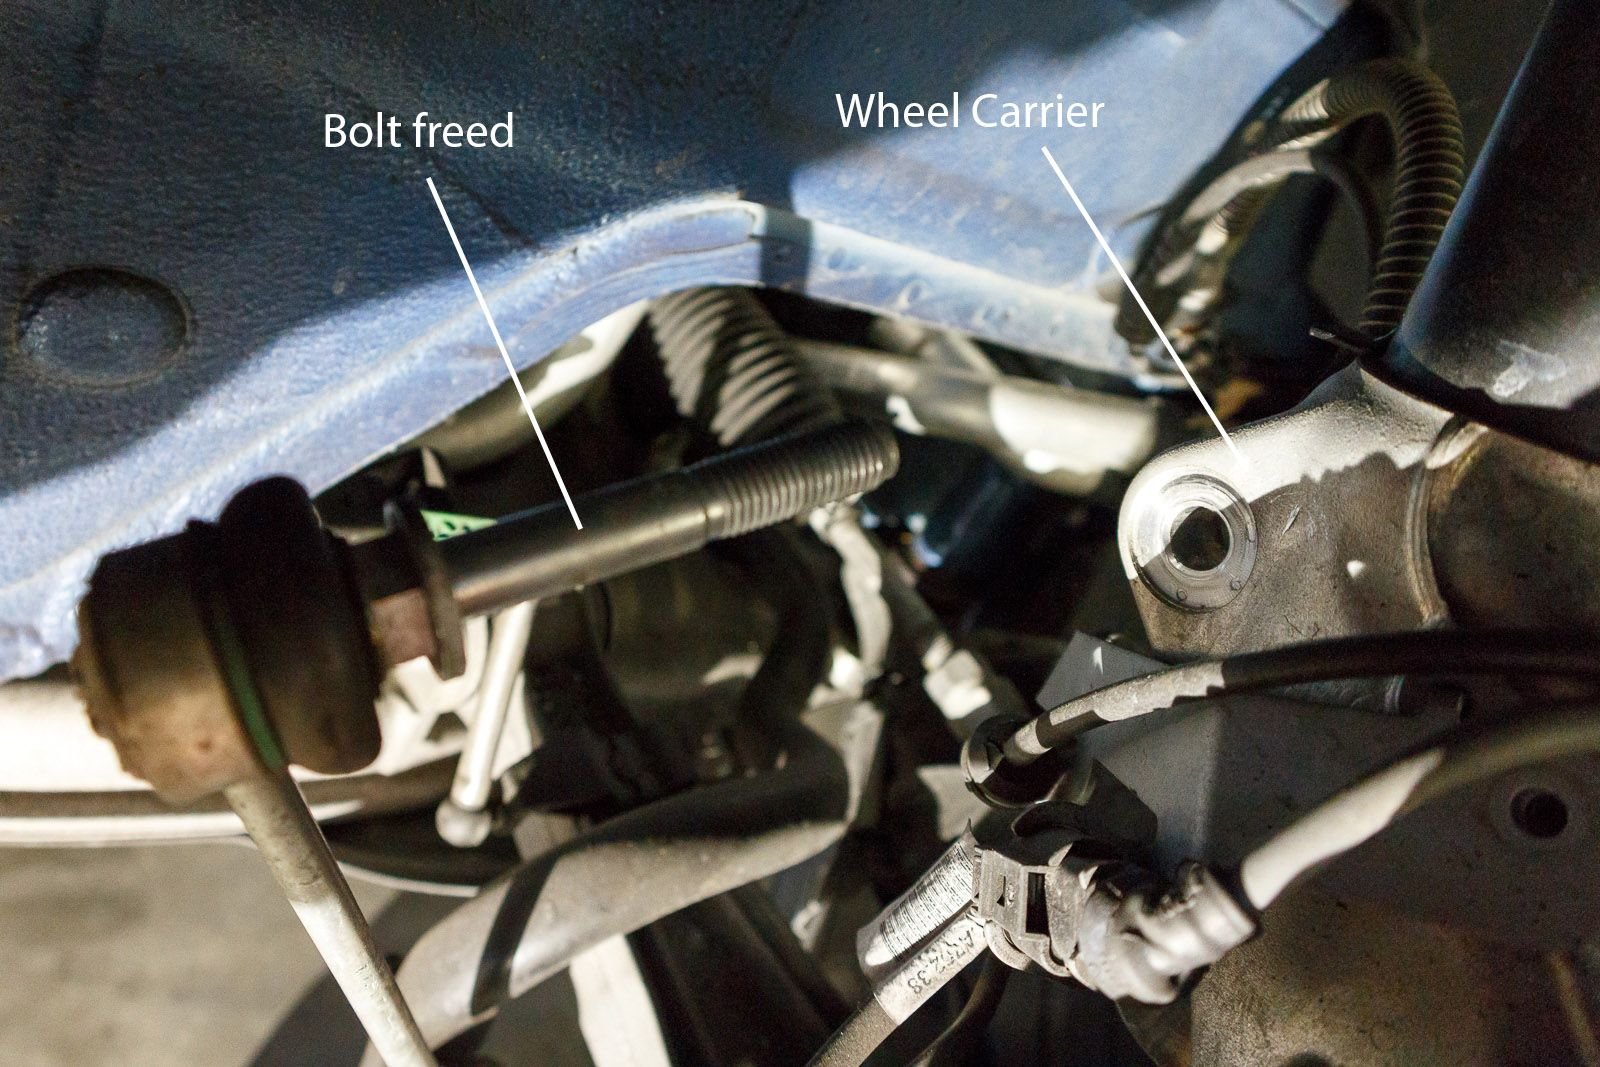
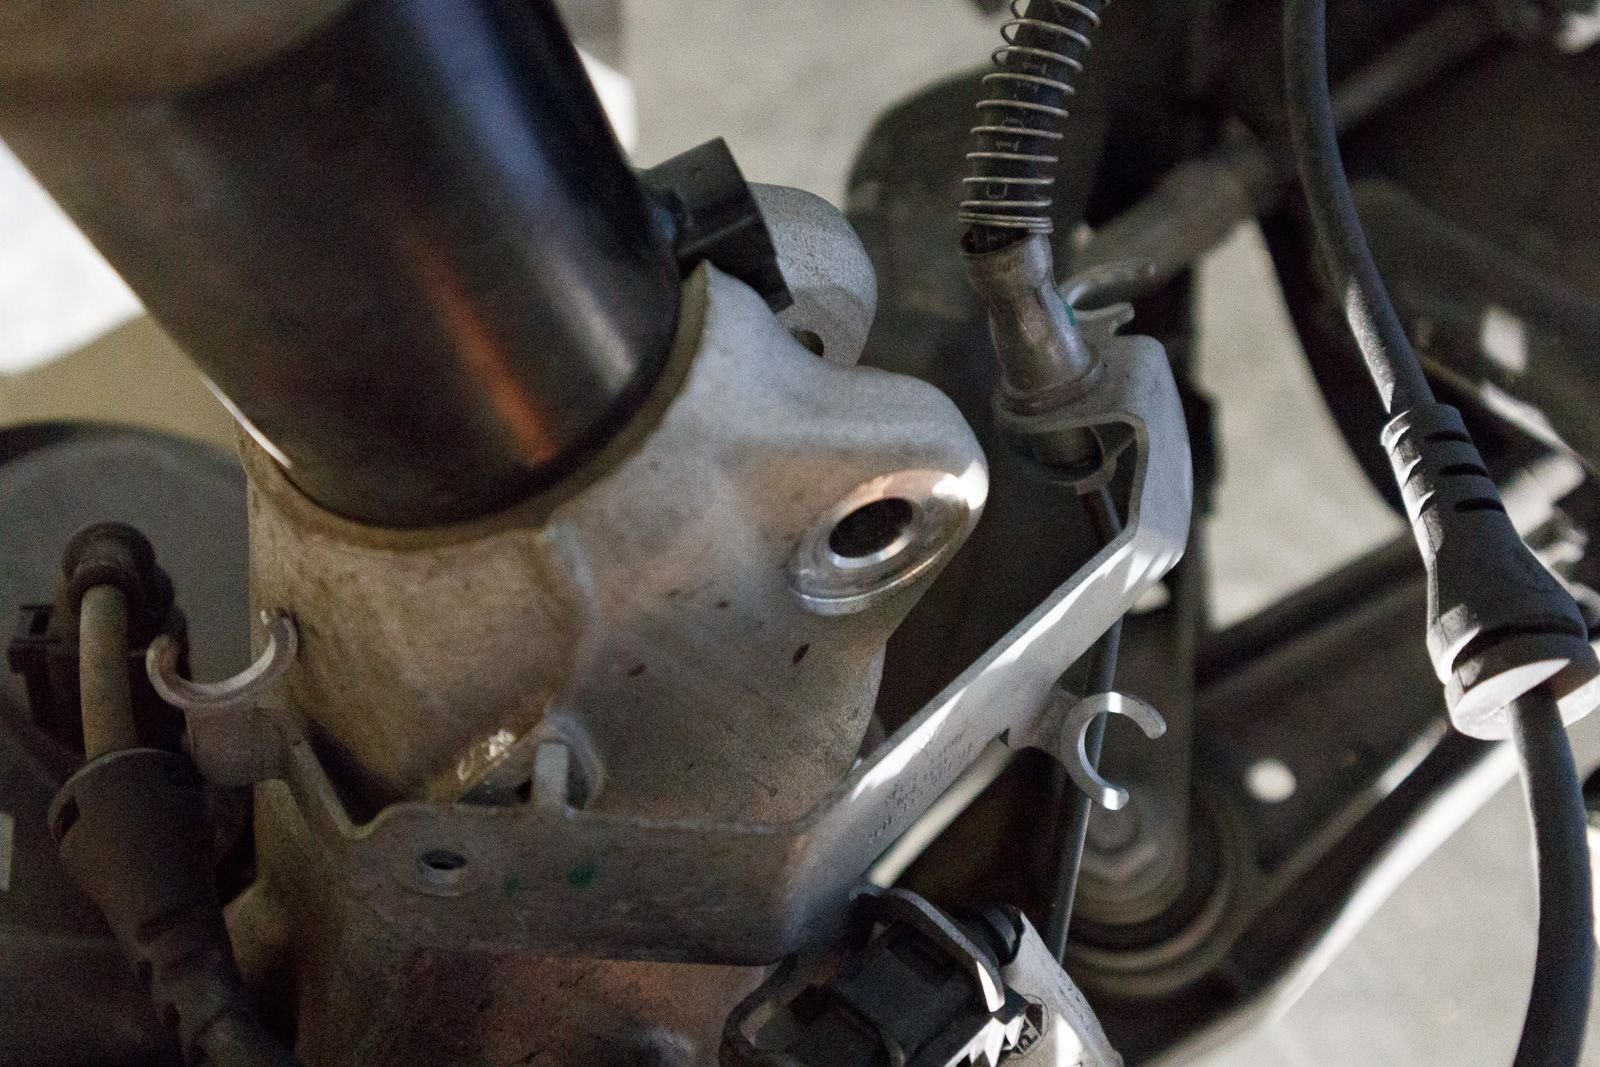
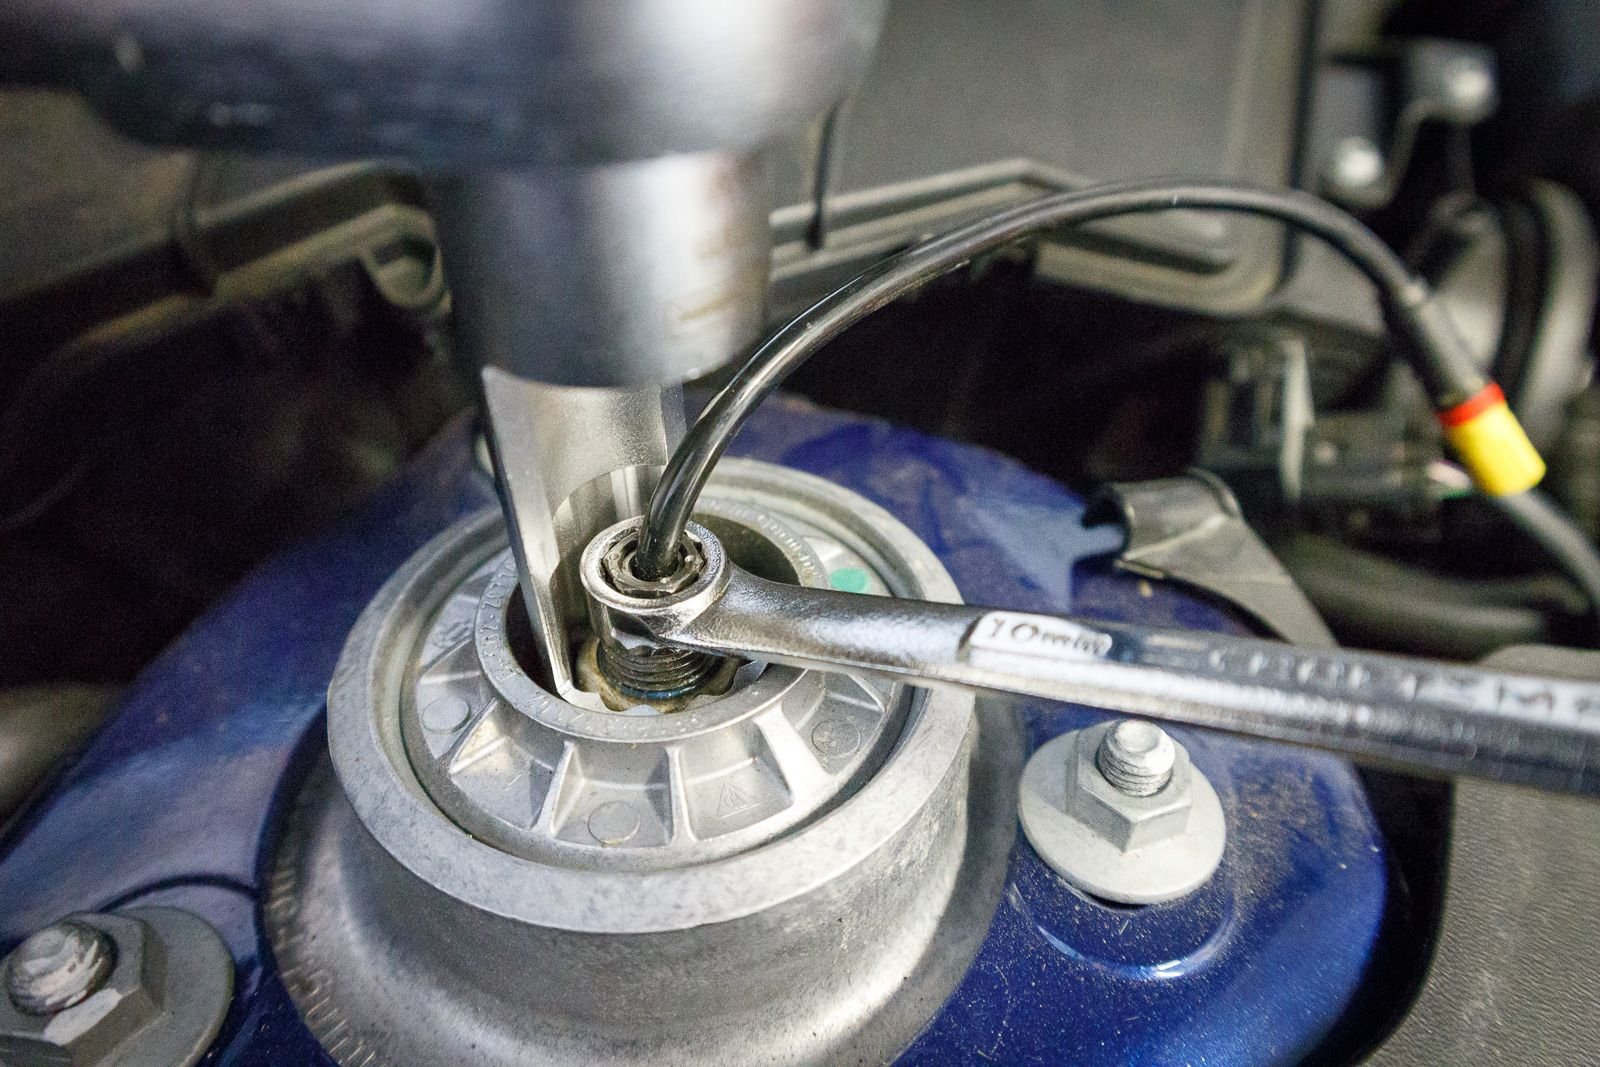
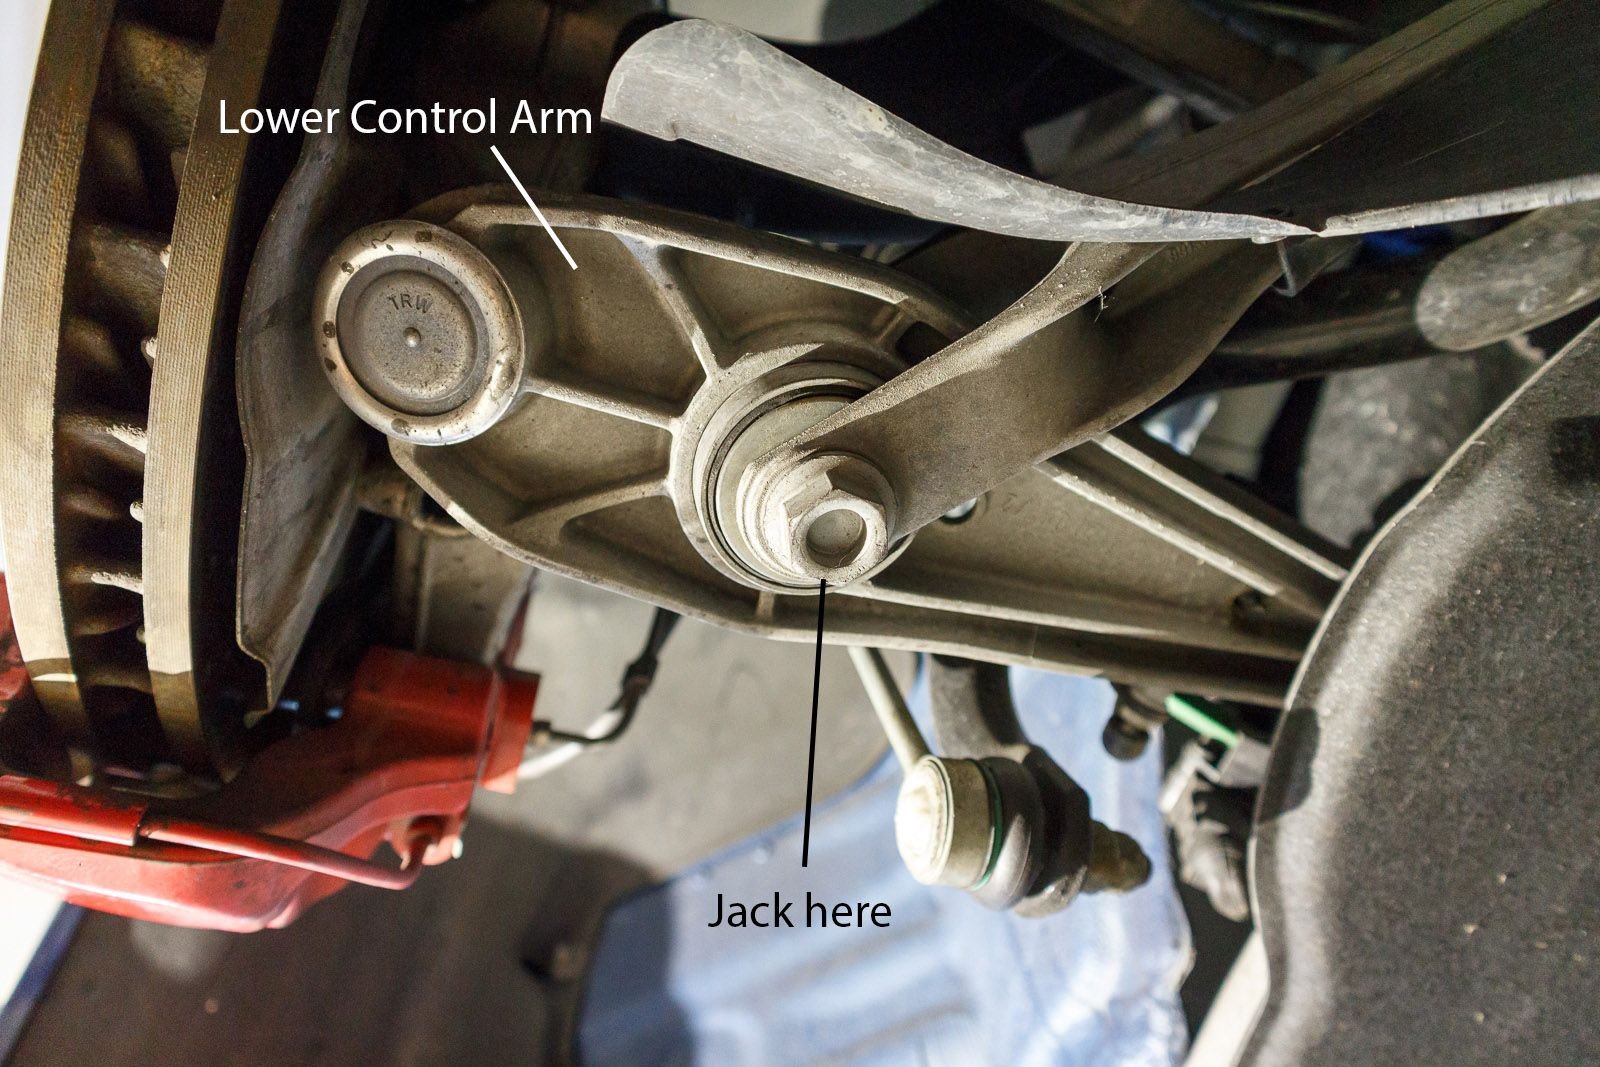
4. Remove the upper bolt of the wheel carrier / knuckle to free the stabilizer link. The wheel carrier / knuckle is that metal object holding the bottom of the strut that also happens to house the wheel bearing. The upper bolt can easily be pulled out after removing the 18mm nut. I also had to insert a 17mm crescent wrench to hold down the opposite side to prevent it from spinning as I loosened the nut.
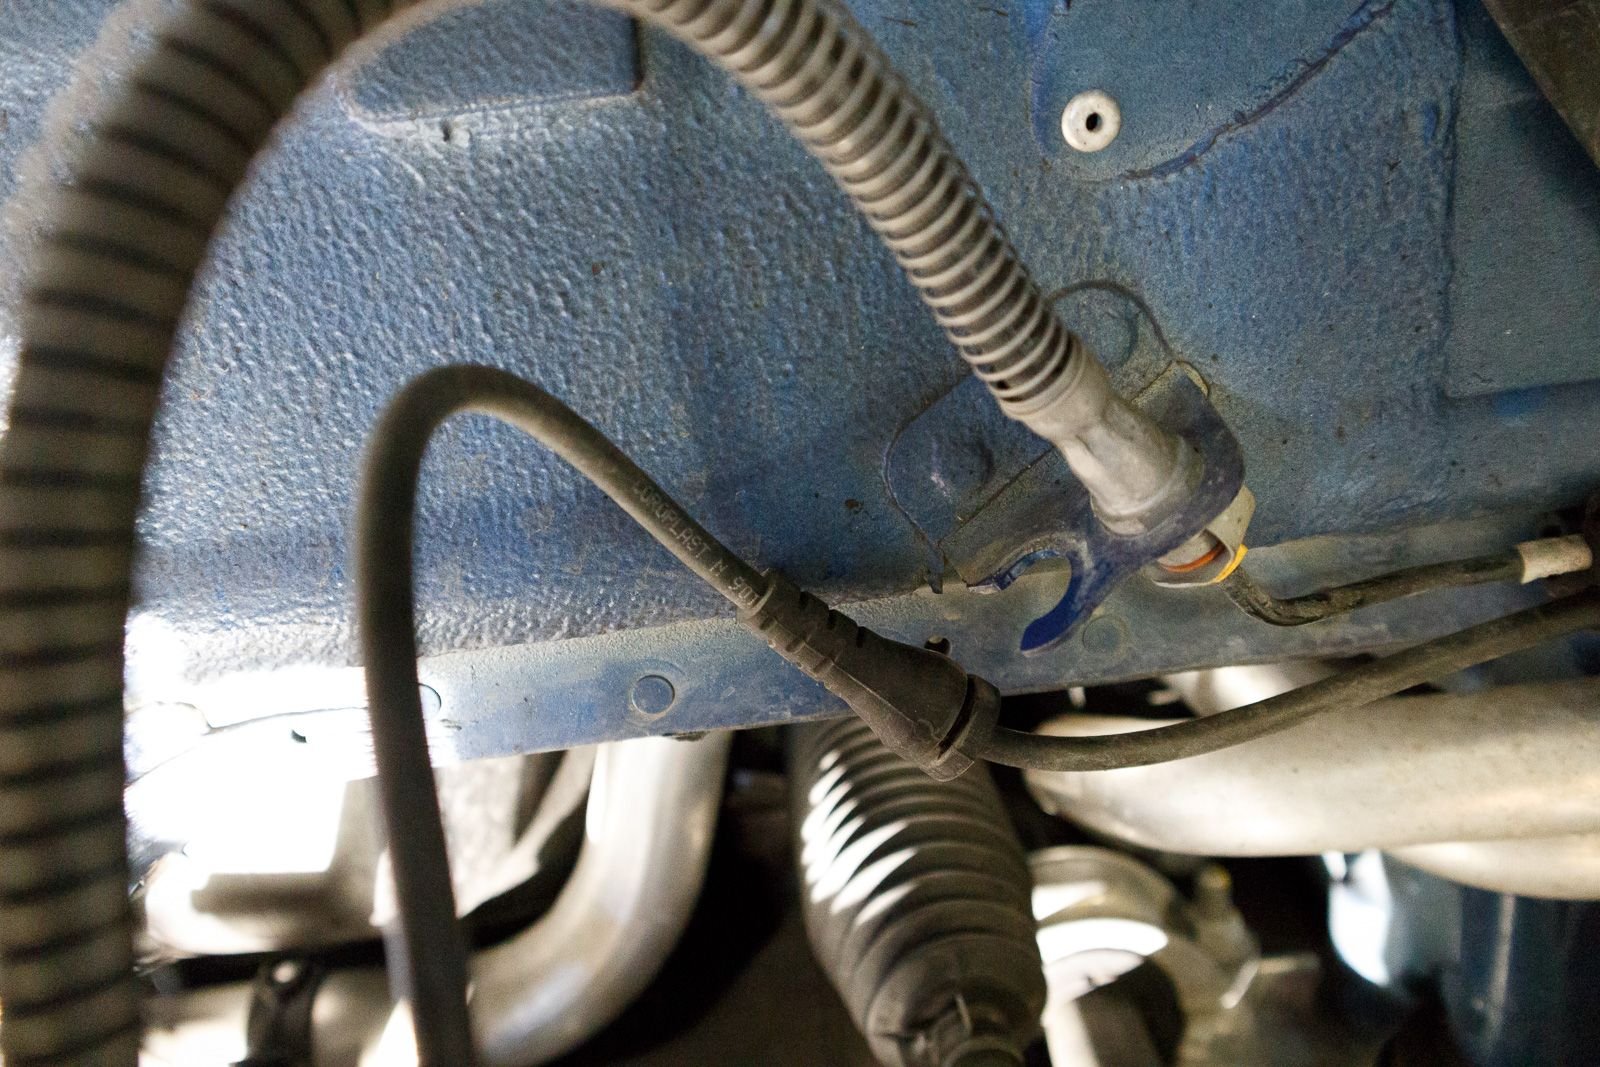
5. Disconnect the bracket thingy holding the brake line. Also disconnect the brake line rubber mounts to free up the brake line. This will prevent it from stretching in a later step.
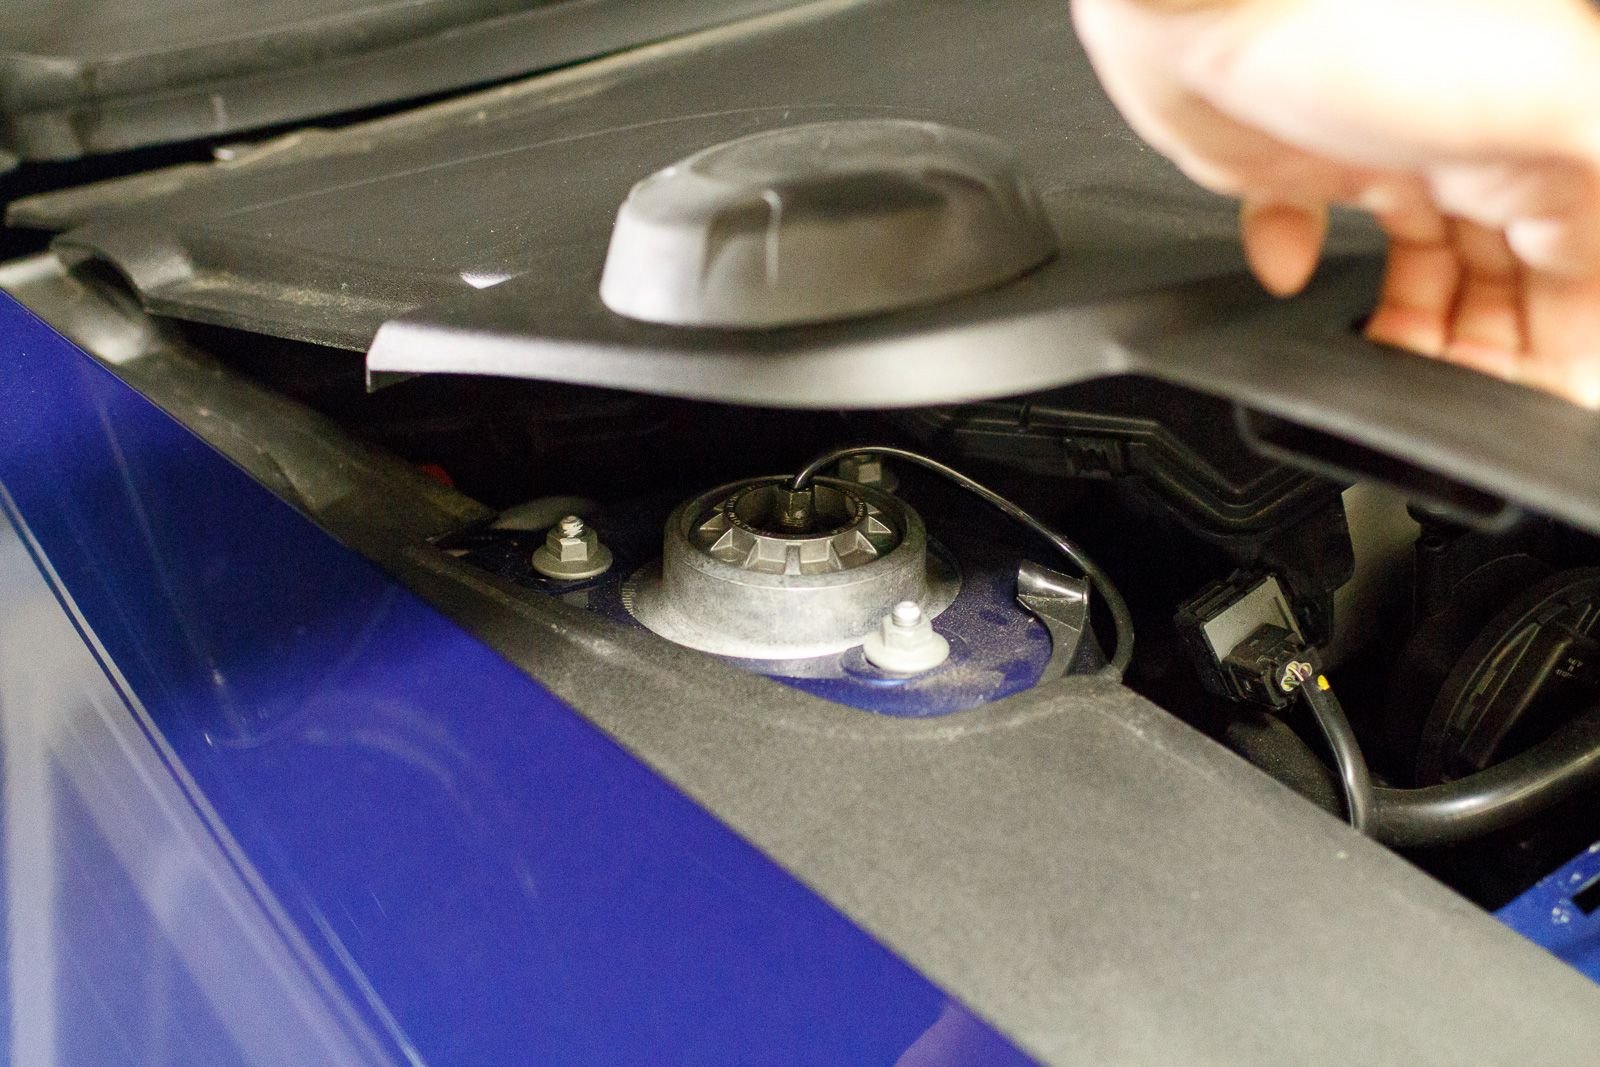
6. Disconnect PASM cable from the top of the strut
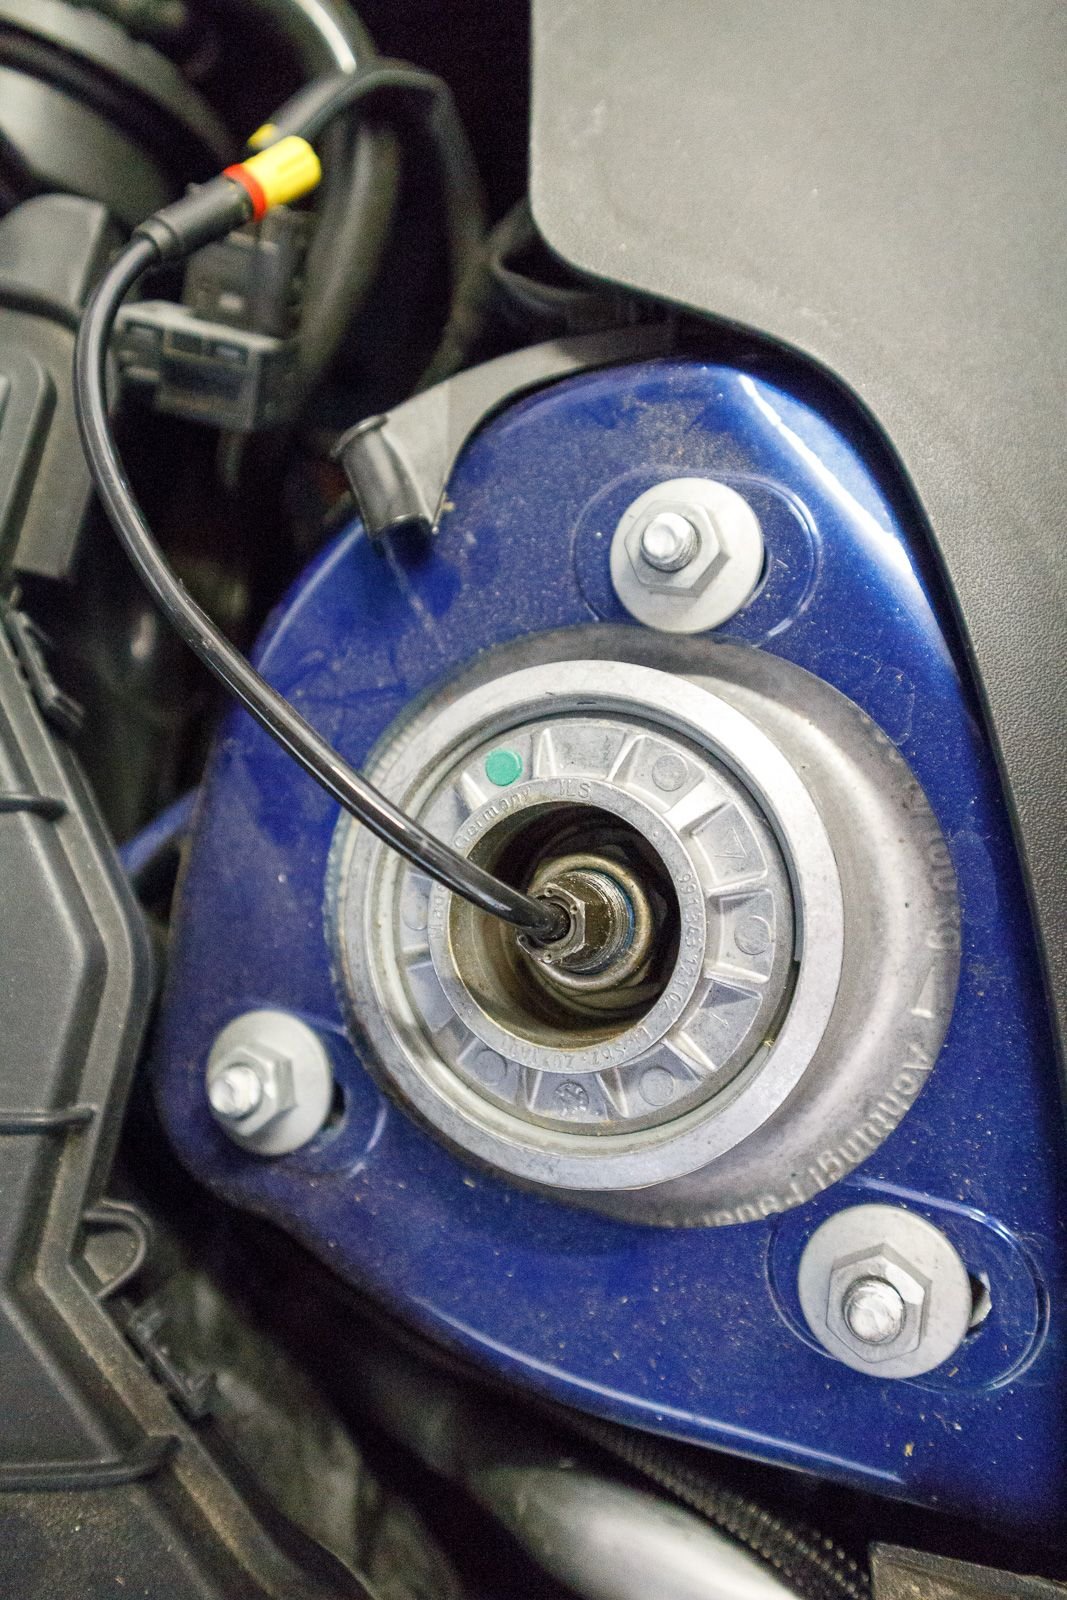
7. Remove the Strut from the upper strut mount. The three bolts that are part of the upper strut mount can be laterally adjusted -- which adjusts the front wheel camber. I left this alone. It is not necessary to dismount the upper strut mount from the car chassis. Simply remove the 21mm bolt holding the strut to the upper strut mount using a 21mm strut nut socket. The socket gives you access to the threading of the strut's shaft. The idea here is to remove the bolt with the special socket while holding the strut's shaft in place with a 10mm crescent wrench to prevent the whole strut shaft from rotating.
Oh boy... it's already 1:30 AM!? I need to go to sleep as I need to wake up early for work. Will continue this write-up tomorrow night....
Nice write-up so far, and thanks for taking the time to do it! I'm sure this will help a lot of us DIY'ers considering tackling a job like this. It is certainly no small task.
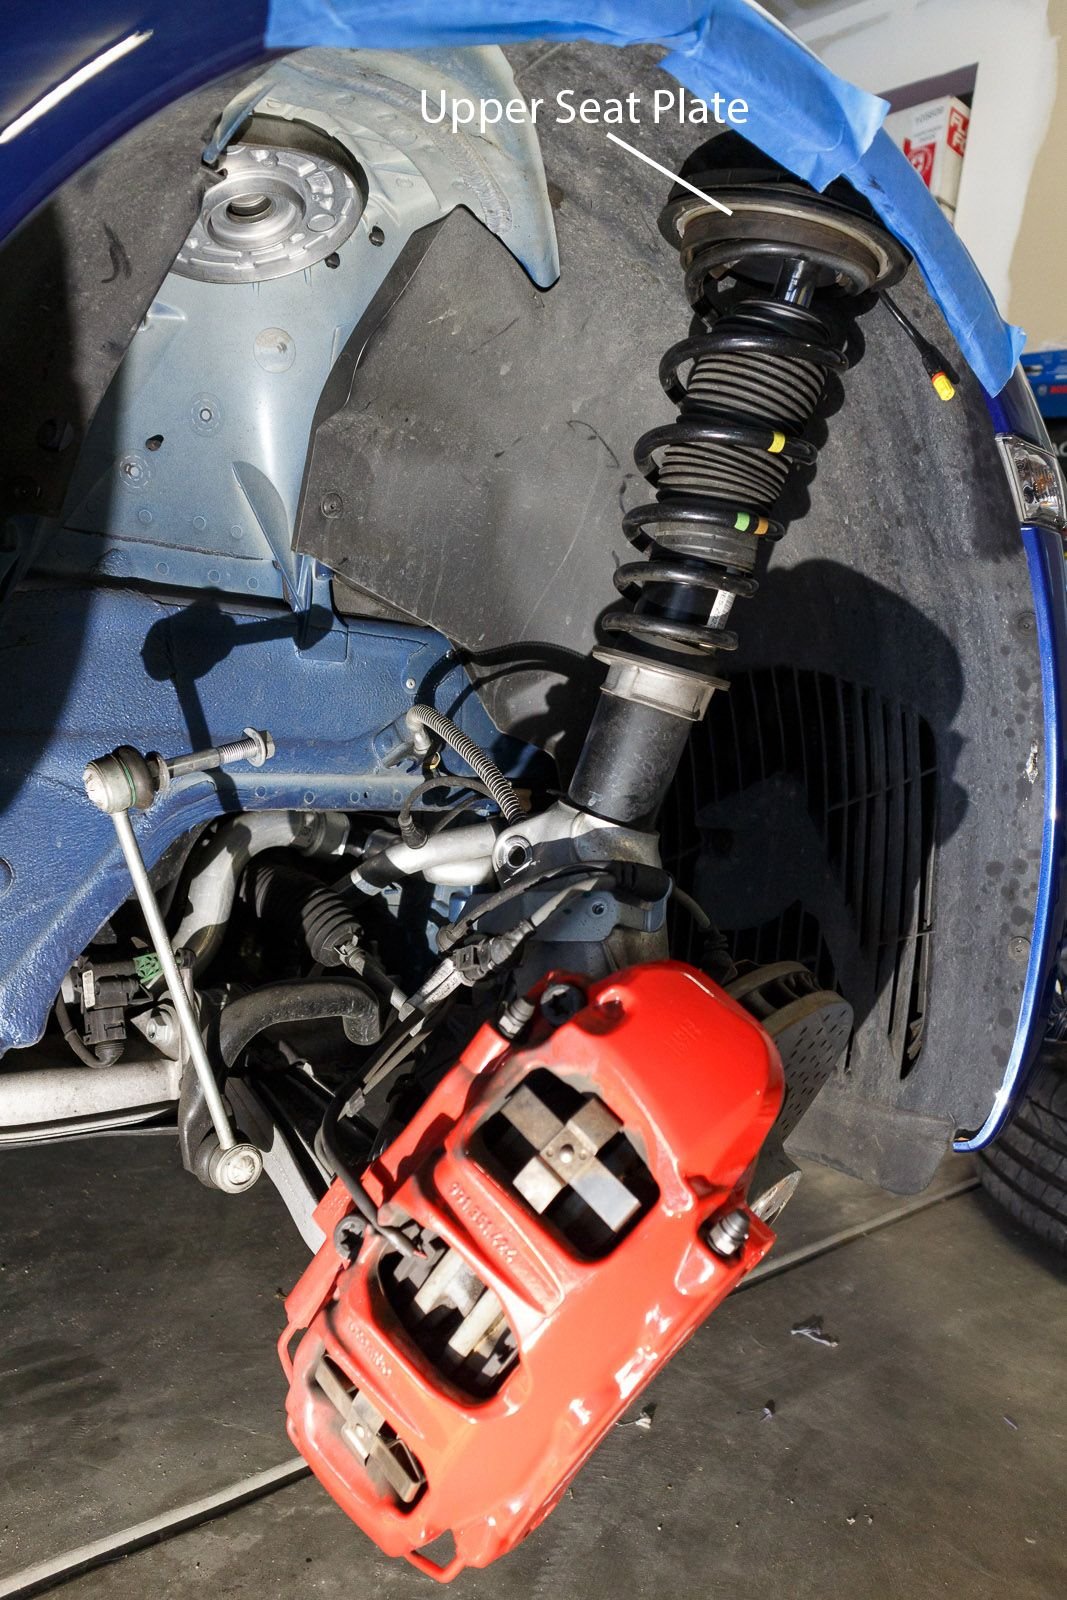
8. With the strut now free from the upper strut mount, bring the strut outwards towards the inner edge of the wheel well. This will move the entire wheel carrier / rotor assembly as well. Now very carefully, with some force, push down on the wheel carrier while also pushing down on the top of the strut assembly's upper seat plate. This step might be easier with an extra set of hands though I was able to do it by leveraging my body to apply pressure to the wheel carrier while my hands pushed down on the strut plate. The idea here is to apply enough pressure such that the top of the strut assembly and PASM cable clears the wheel well. Note again: my car has the SPASM option which may have been why it required relatively little effort to get the assembly from inside the wheel well to outside of it with minimal pressure. I suspect PASM and non-PASM cars might require additional force and possibly require compressing the springs with spring compressors in order to accomplish this.
Slowly and carefully pull the top outwards away from the wheel well so that it's on the outside of the vehicle. Be careful of the brake line because pulling the top of the strut out too much will put pressure on the brake line. The strut should just swing out far enough to allow barely enough space to remove the upper seat plate and pad, boot assembly, and spring. Since I did this by myself, I reapplied pressure on the strut and wheel carrier and pushed it back into the wheel well so that I could prepare the boot assembly.
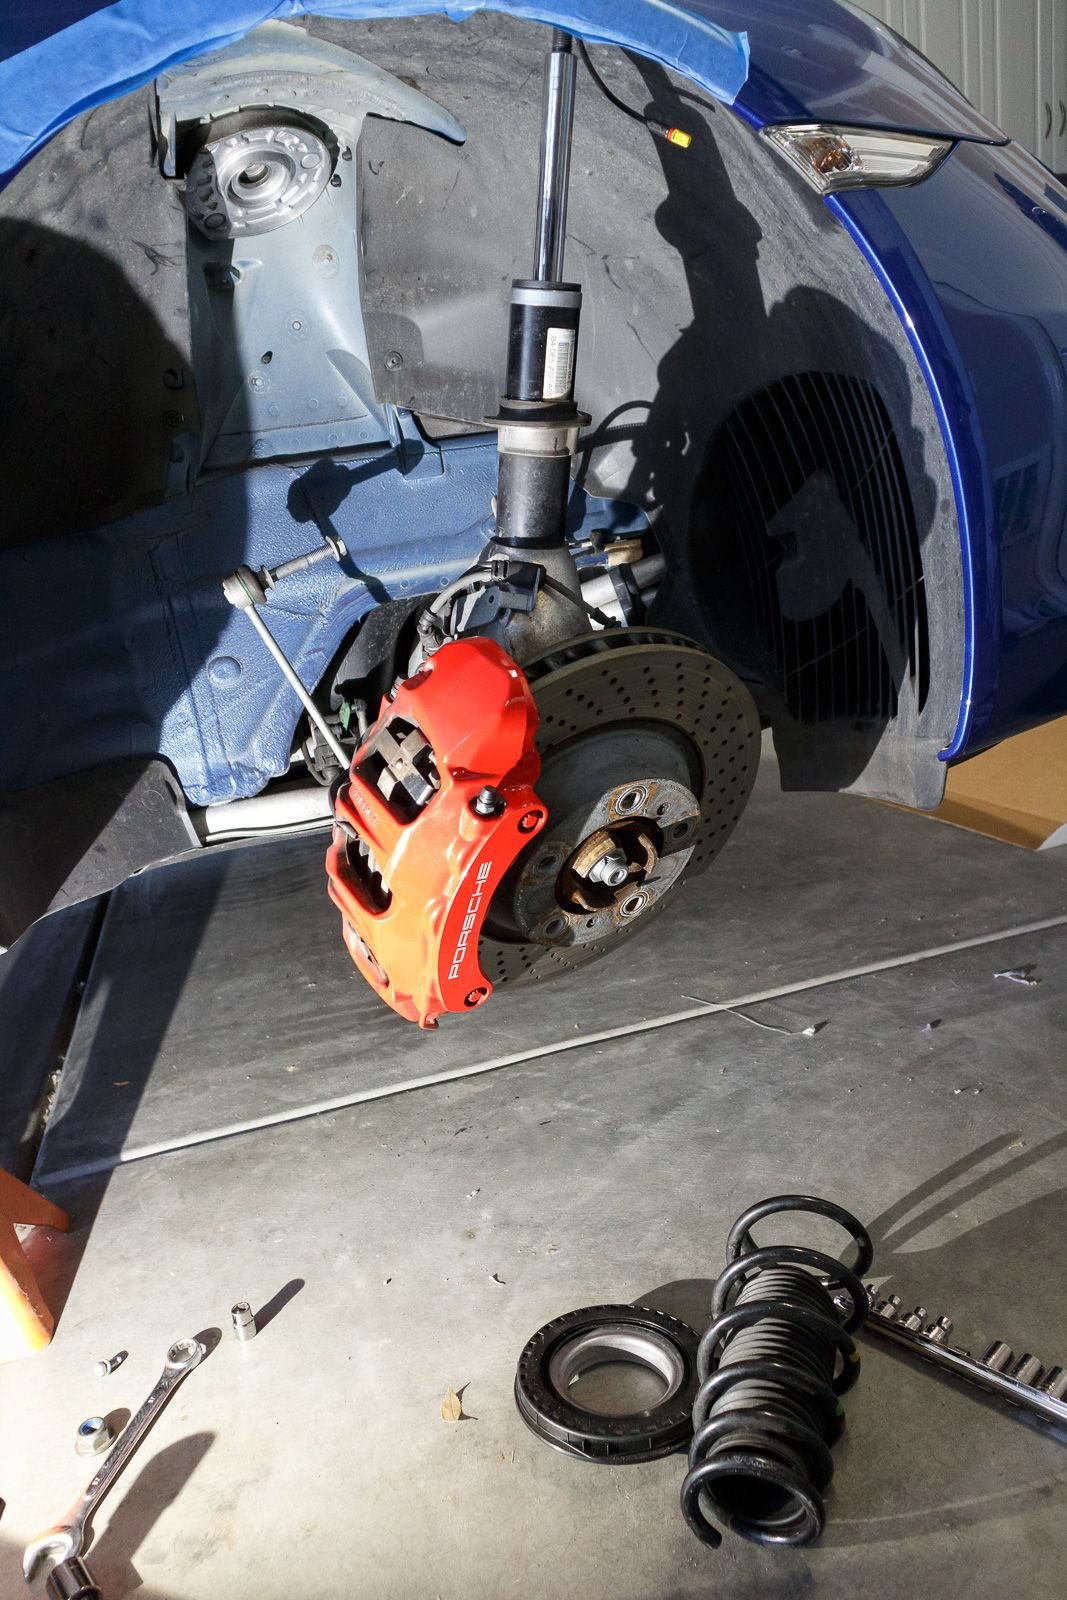
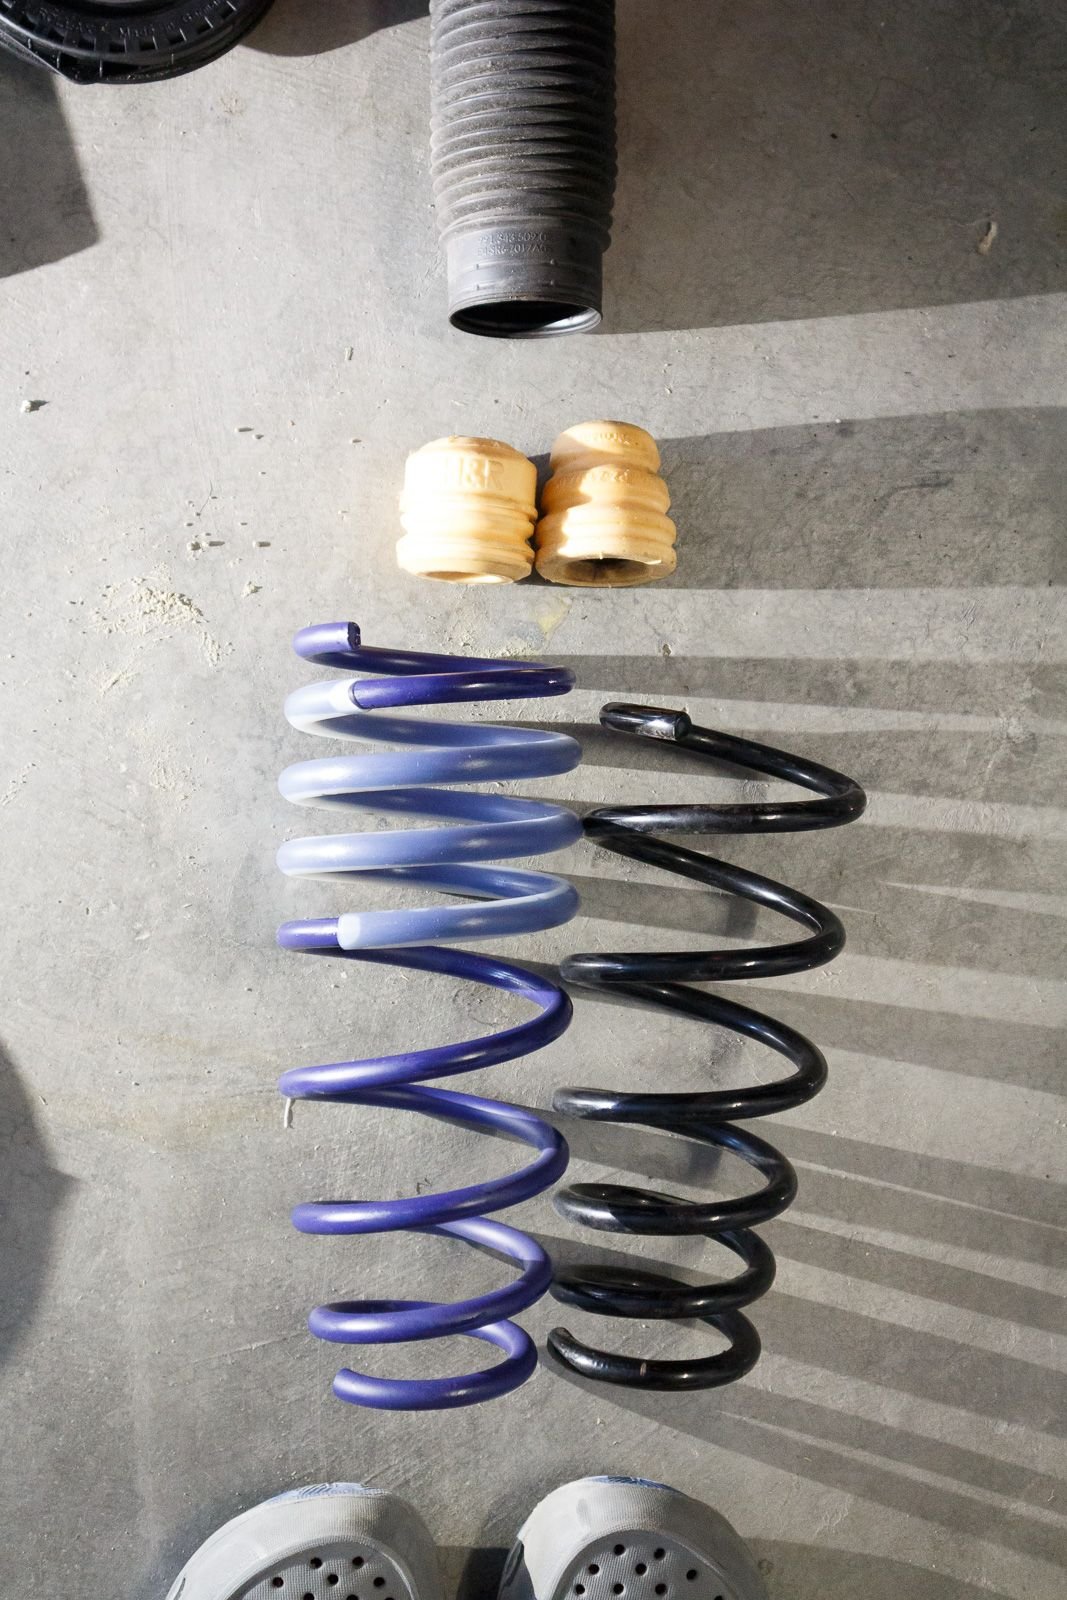
9. H&R includes a new strut bumper (yellow foam/rubber thing) that needs to be used instead of the stock Porsche strut bumper. Carefully pull the strut back out of the wheel well, install the new lowering spring followed by the boot assembly, and then top it off with the upper seat plate and pad. Align the bottom edge of the new spring coil with the indentation on the strut's lower seat / spring rest and then rotate the upper spring plate such that the top edge of the new spring coil aligns with the indentation of the upper spring pad. Perform the pressure applying process described in step 8 to get the strut assembly back inside the wheel well. Reassemble the strut to the upper strut mount, reversing the steps above. To aid in inserting the stabilizer link bolt back through the top of the wheel carrier's bolt hole, I used a jack to slowly raise the lower control arm until the stabilizer bolt aligned with the hole. Complete the reassembly of everything else.
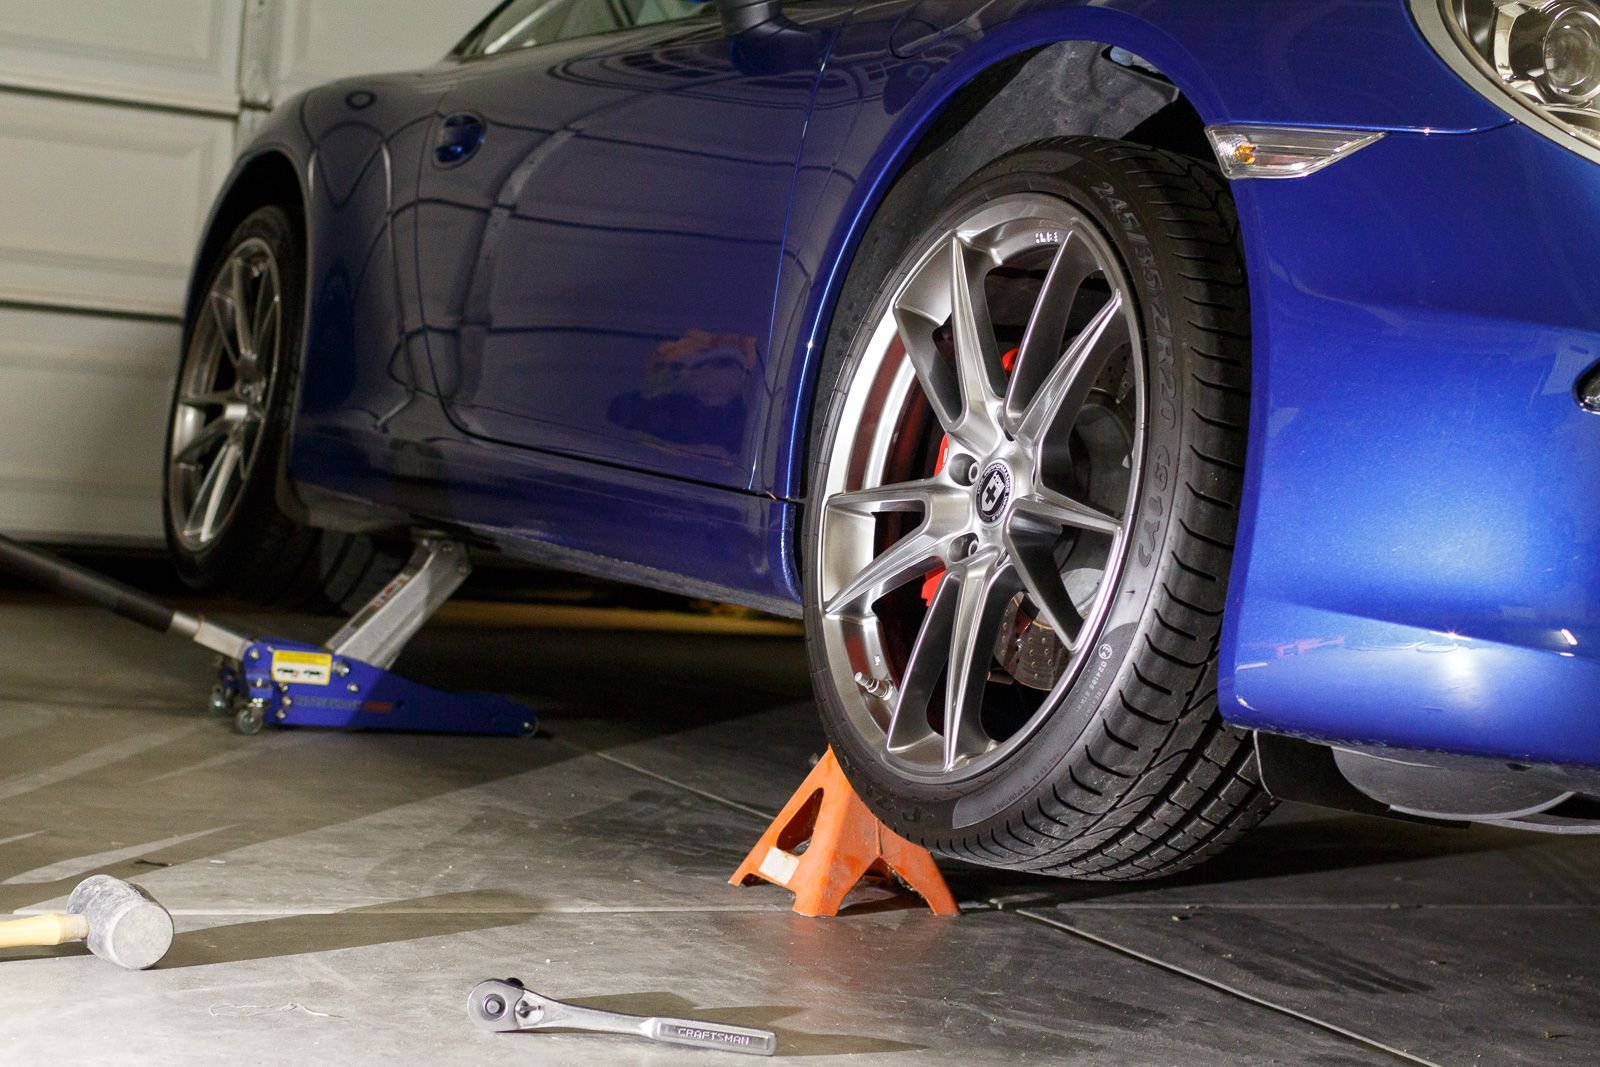
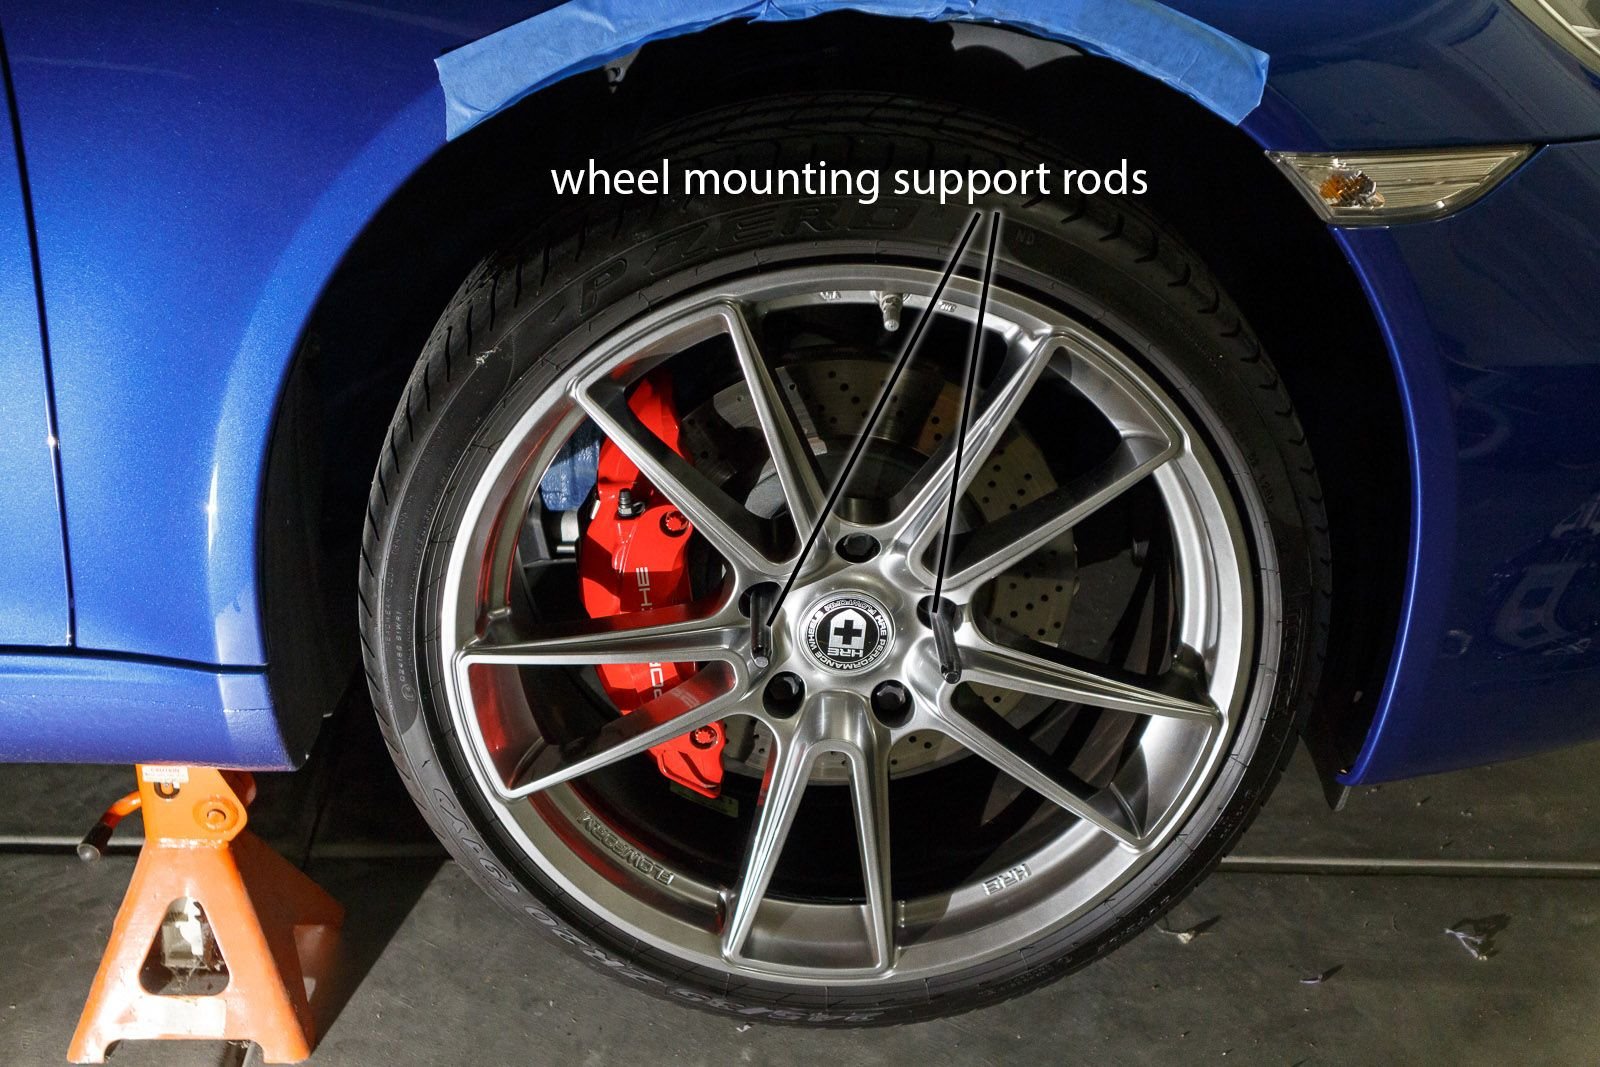
10. Reinstall the wheel! I used two wheel mounting support rods (I think that's what they're called... came with my RSS spacers (not used anymore in my fronts with the HRE offset) but you can also buy these things from Porsche, I believe) to make this process effortless. Hand tighten the bolts, lower the car enough so that the tire against the ground provides just enough resistance, then torque the bolts down to 118/ft-lb. Then lower and remove the jack. Repeat the above steps for the other front side.
The front is now lowered. Take a step back, pop open a beer while staring at the new aggressive stance of the car. Ahhhh. That was easy. Sadly, the rear is a lot more complicated. I'll do the write-up for the rears over the next couple nights.
I've done about 15 suspensions on audi/vw and rx7's and I didn't have the ***** to do this one myself. Kudos to you, subscribing
Thanks. I'm sure you can totally do the 911 yourself if you've lowered Audis!
Originally Posted by Code
Nice write-up so far, and thanks for taking the time to do it! I'm sure this will help a lot of us DIY'ers considering tackling a job like this. It is certainly no small task.
Just trying to give back to the rennlist community!
Originally Posted by 991carreradriver
Can't wait for the rest of the write up.
Hoping to wrap up the write-up with the rears tomorrow. But the rears did take a while and might require some detailed explanation so might have to break it into two parts over the next two nights.
If I am reading this right, you left the strut in place in the wheel carrerier and removed the springs while essentially working inside the wheel well. Why didn't you remove the strut entirely from the car? Wouldn't it have been easier to do the spring assembly on the ground, or was it more complicated to completely remove the strut?
I've done suspension work on many other cars and have managed to get by without the special open sided socket for the strut top bolt. But now that I have PASM with the wire I need to get one. From your pictures it looks like 21mm.(?) What is this socket called and where did you source it?
Again, thanks for the write up. I look forward to seeing your adventures with the rears!
I just did a full TechArt spring swap this weekend on my 2015 C2 w/o PASM, and I wanted to document some of the work involved regarding the rear springs. There seems to be plenty of info out there on front spring swaps, but not much for the rears. This thread seemed to be the best existing reference I could find to add my pictures. I also found this thread handy for torque specs.
Pull up the carpet from the front edge behind the back seats. Carpet is stiff and you need to bend the carpet to get it out from under the side panels. I only brought mine up to where the picture shows. There is a black foam insert to pull out from above the exposed electrical items once the carpet is pulled up.
Access to the top strut bolts is pretty good, although there are many threads and the nuts don't spin easily, so it requires patience. Remove the three strut bolts. I marked my bolt locations for reference during reinstall, but they don't move around so it is not necessary to mark them.
I compressed the spring using a floor jack, then kept it compressed using four big 175 lb zip-ties. I could not fit my spring compressor in there, and the zip-tie method actually worked quite well.
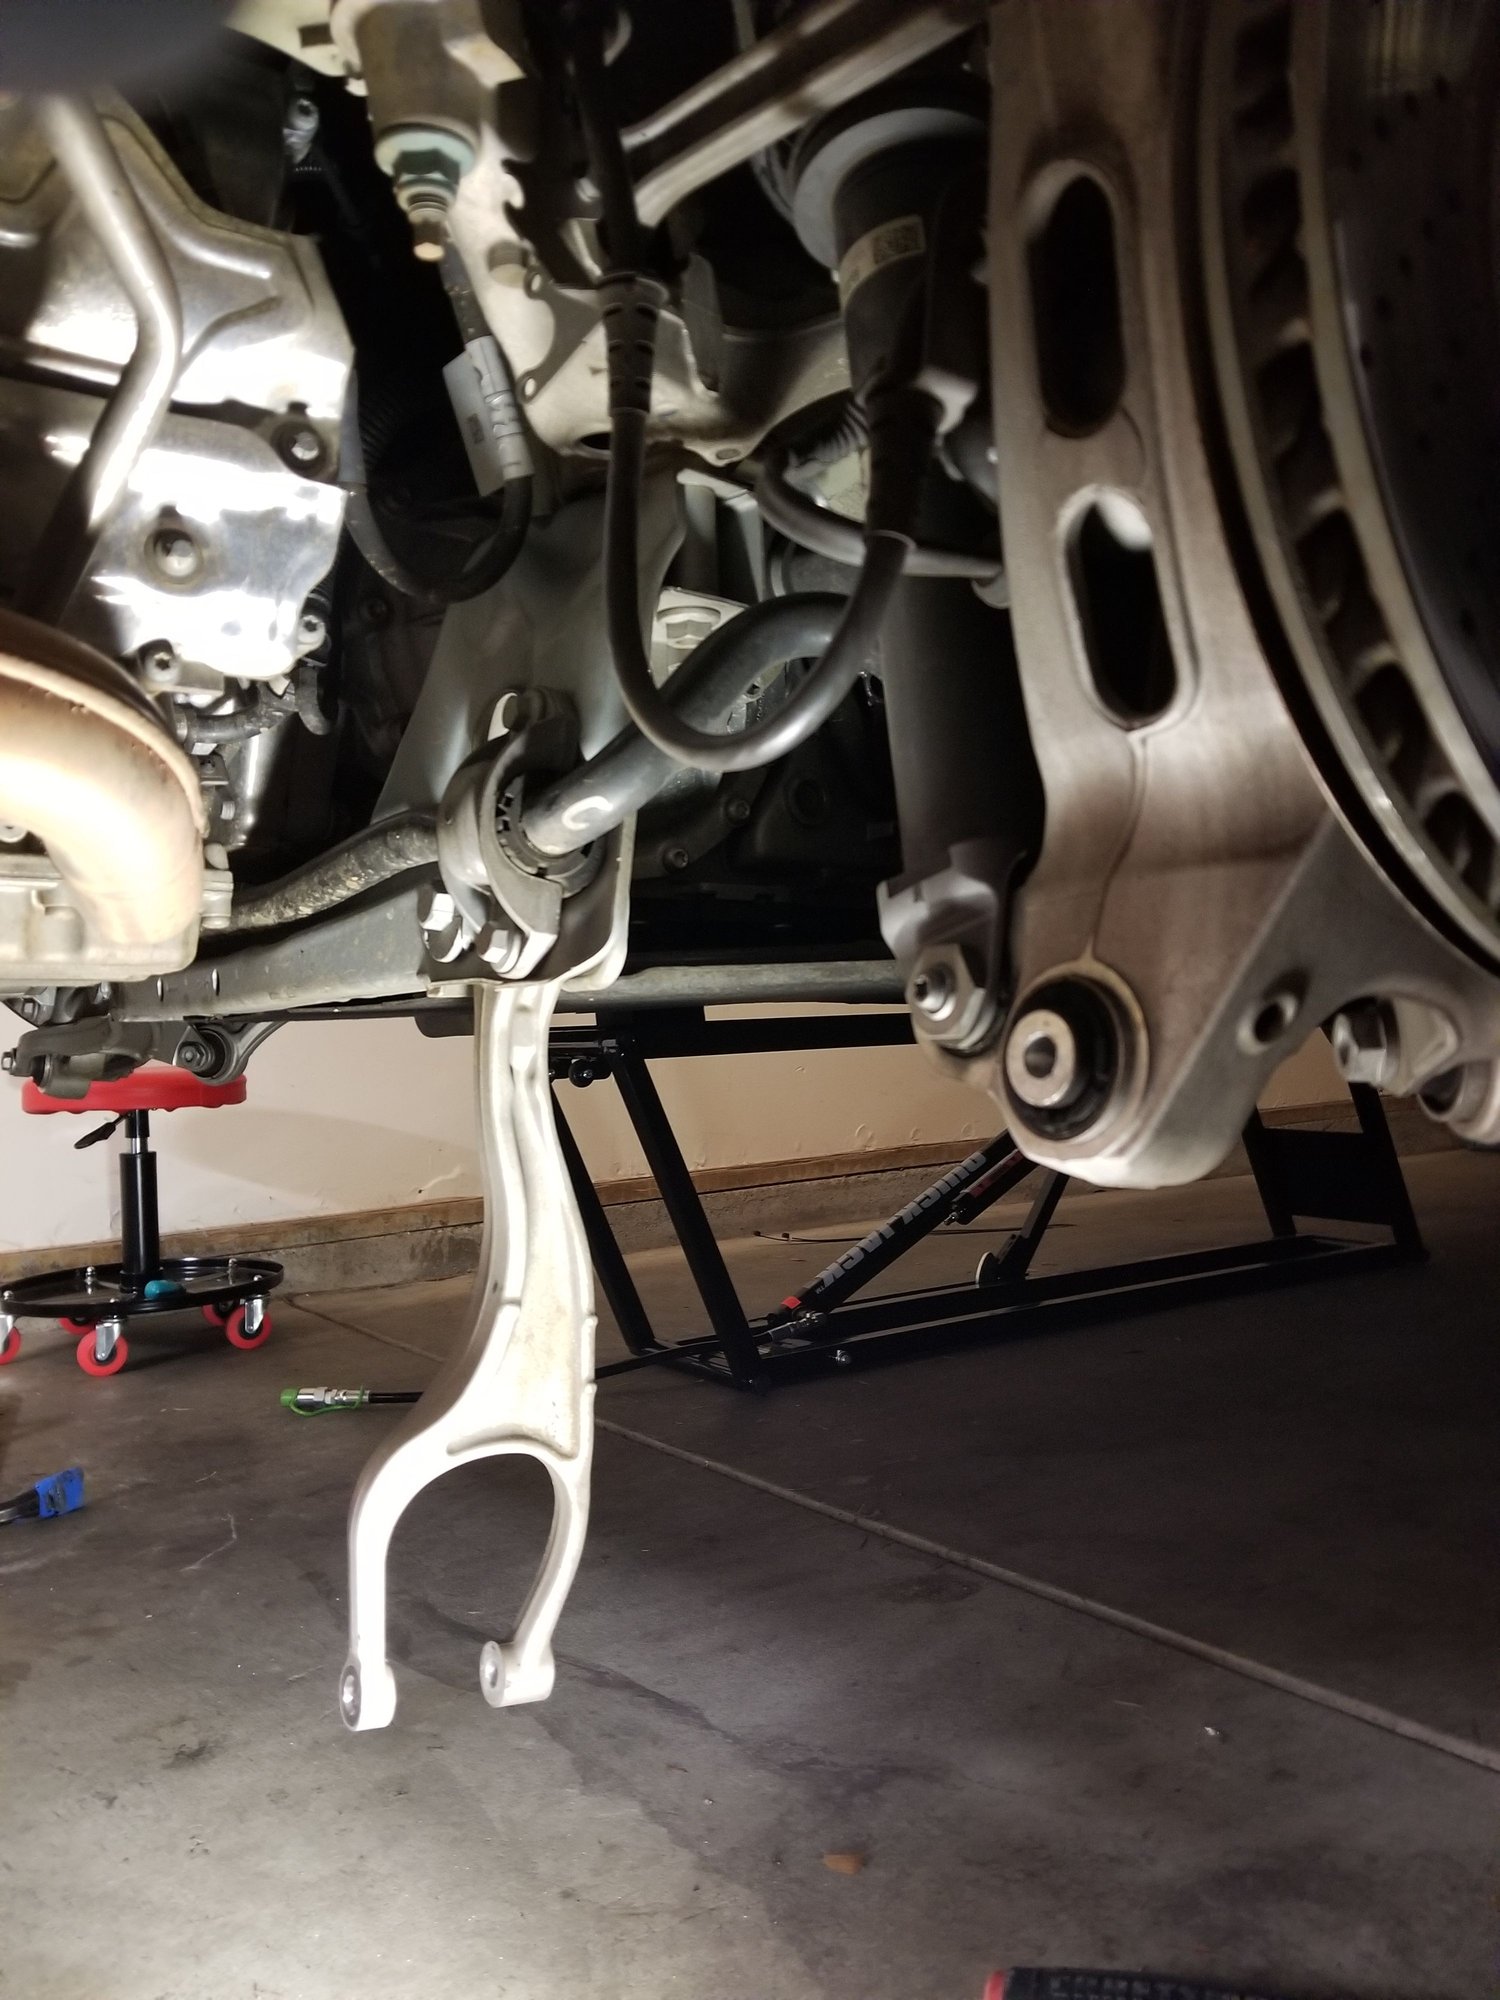
I disconnected the lower control arm from the wheel carrier, slightly loosened the other end of the lower control arm, and swung the control arm away. Remove the lower strut bolt and prepare to pull the strut out.
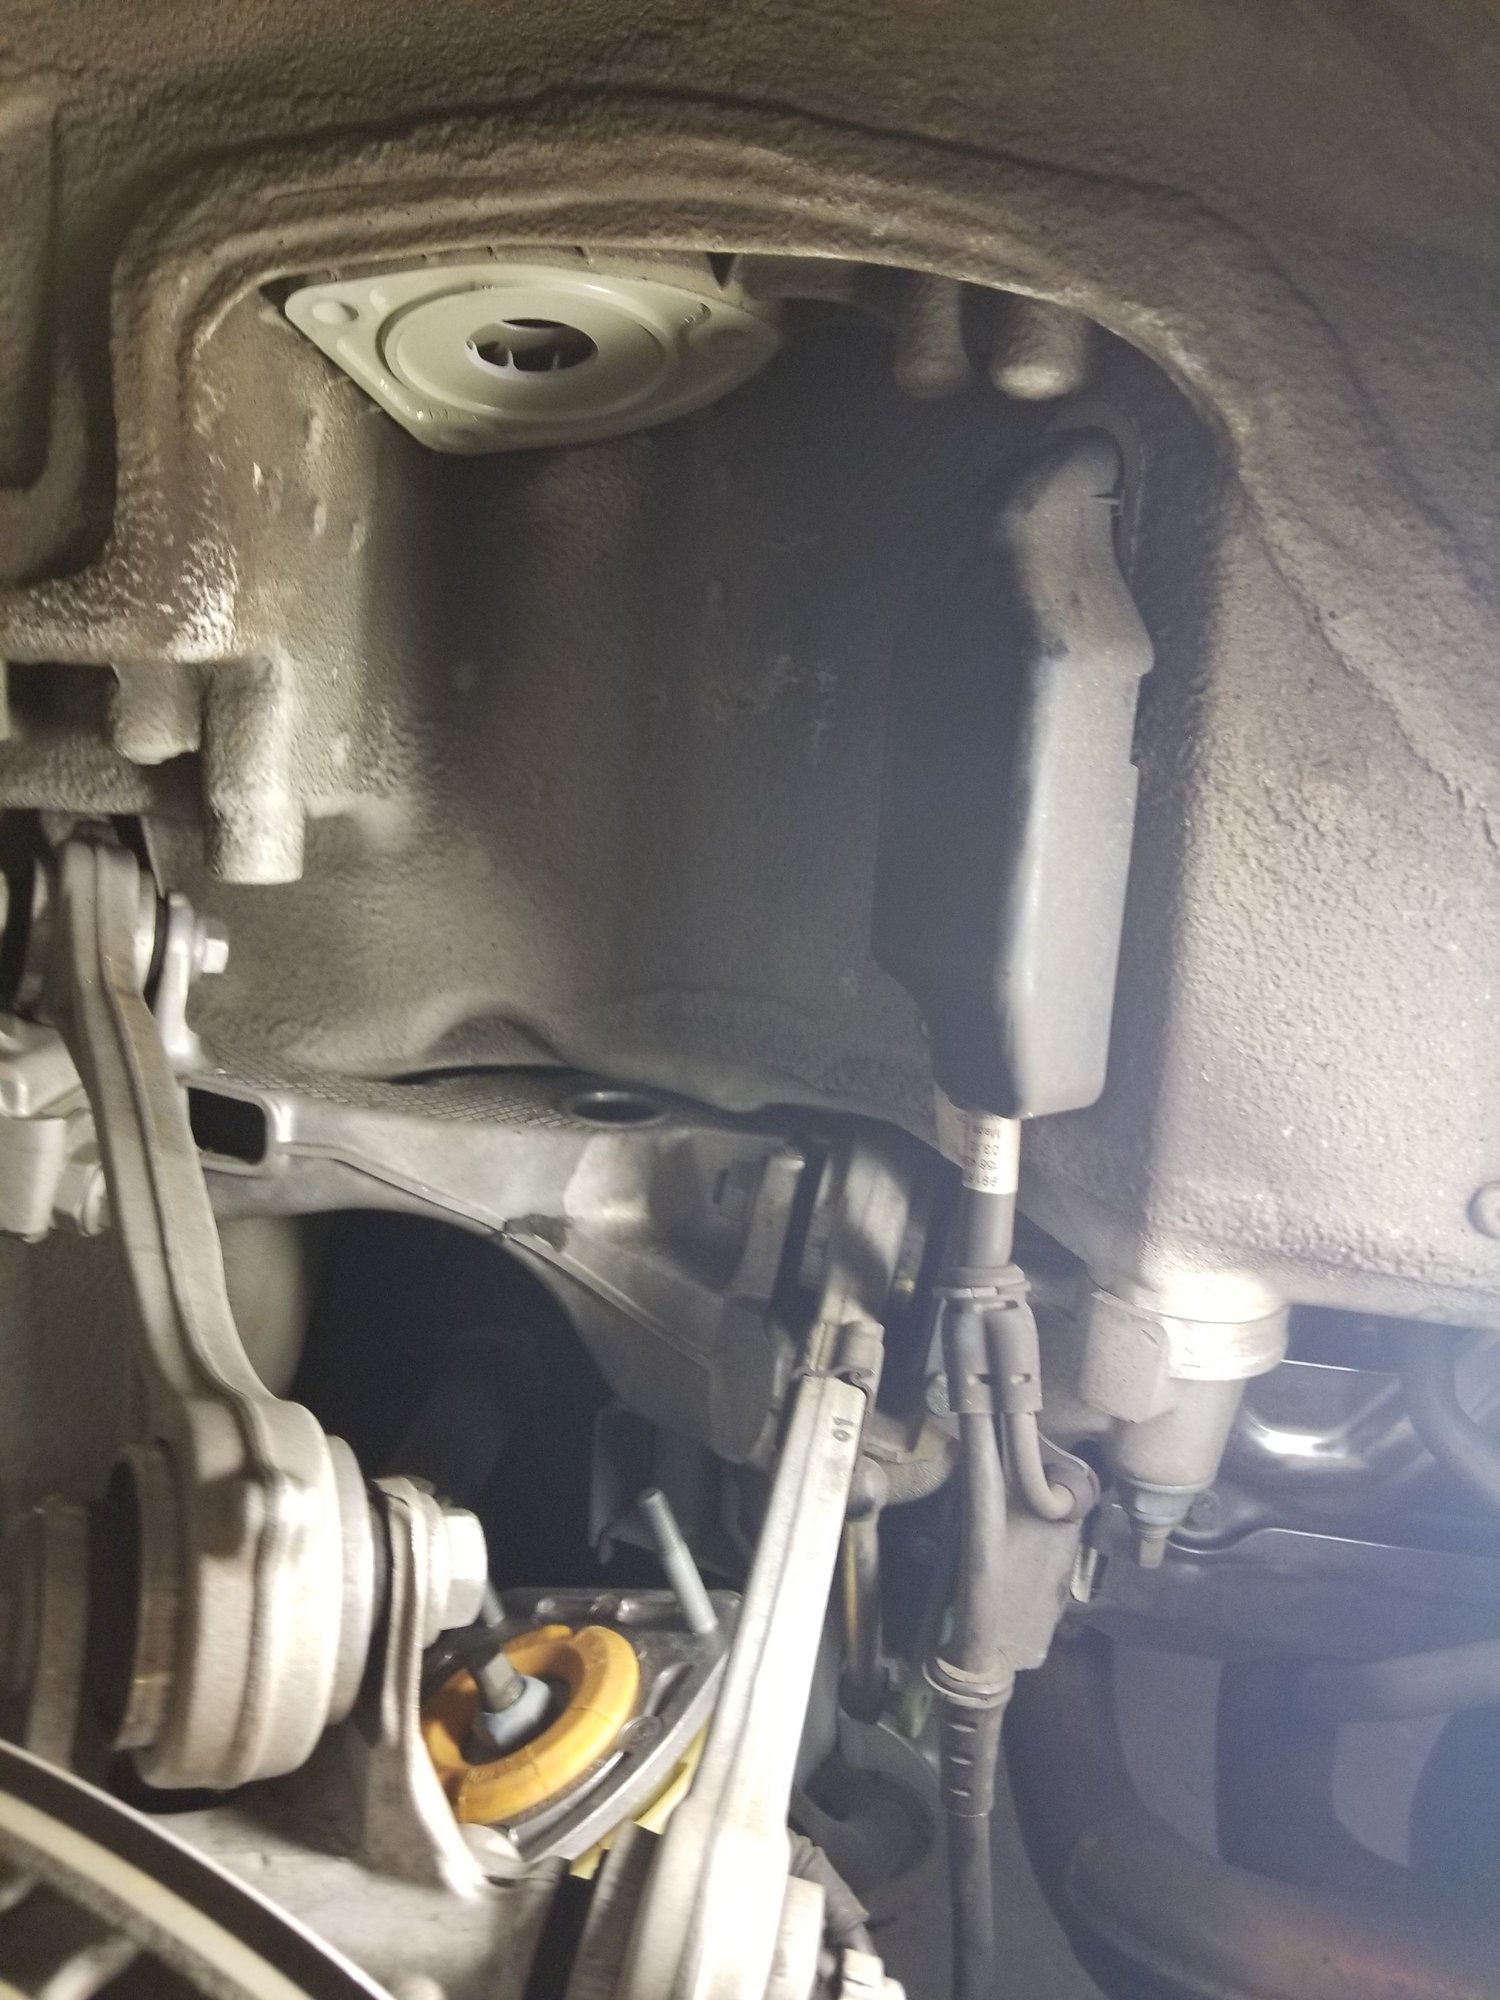
Remove the strut going toward the rear of the car. See next picture for the wiring connection which I had to disconnect due to a clearance issue. Note: This picture and the next are from the drivers side, the others were from the passenger side.
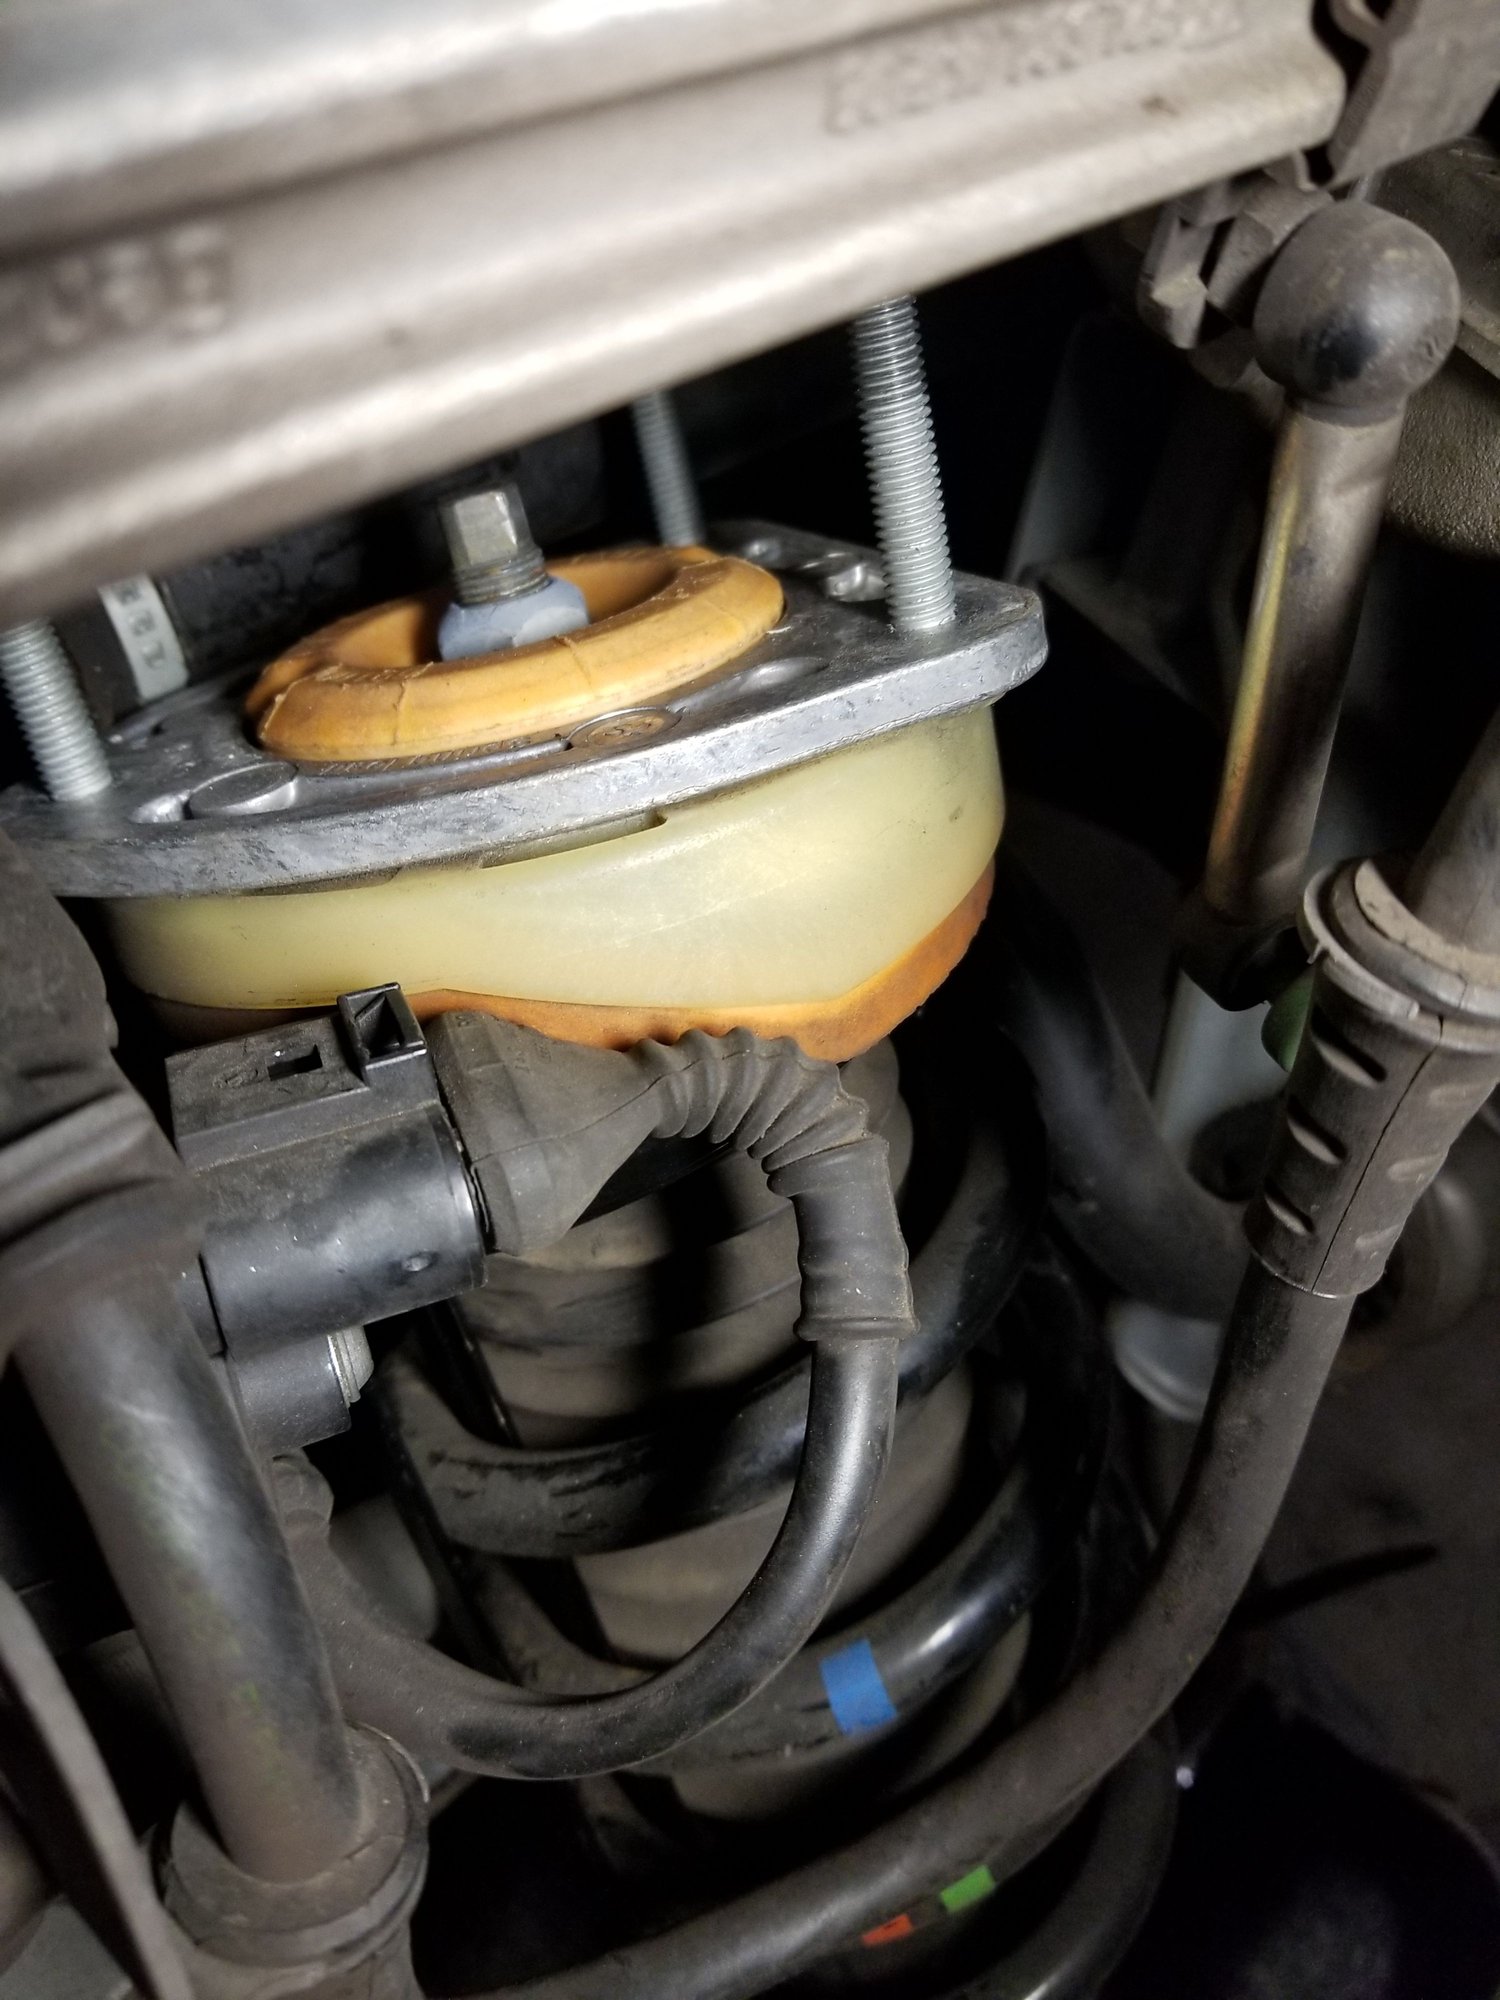
The connector shown next to the yellow upper strut foam got in the way when removing/installing the strut. Disconnect it and pull aside.
Compress the spring using a real compressor once the strut is removed. Note that the strut will need to be compressed to go back in. I found that the struts went back in easily if they were compressed to slightly less than 21.5" measured from the top edge of the strut mount to the center of the lower strut mount hole. I used four more 175 lb zip-ties to keep it compressed at 21.5" during install. Note that the TechArt springs are progressive, which means that I do not have as much room to get my spring compressor in place at the upper side of the spring. Just compressing one lower coil was enough to bring the strut length to 21.5".
The shock can rotate at the bottom, which helps in clearing the wheel carrier during strut removal and install. The top strut bolt requires a 19mm and 9mm wrench combo. Therefore, you need two different Schwaben strut sockets for a front and back spring job, 21mm for the front, 19mm for the rear. ECS Tuning sells the sockets.
The only post-work issue I had was a brief flashing red Parking-Brake light upon first trying to start the car. I held in the parking brake button for a few seconds, then pulled the button for a few seconds, which allowed the parking brake to reset it itself. After 50 miles, it has not reoccurred. I assume the alarm was from the electrical connectors that I removed and reinstalled, noted above. Alignment still feels good, but I will get it done in about a week. The drop looks good, at least 1" all around, I'd say. Ride is nice, as I expected from previous reviews. Pictures will come later.
Last edited by whiteducktail; 12-07-2017 at 02:39 PM.
Reason: Added Schwaben socket links.
I will add on to this thread since it helped me prepare for the installation yesterday.
As mentioned above, my .2 GTS is equipped with PDCC, FAL, and RWS.
The TechArt springs have been installed! At this time, I decided on lowering springs simply due to the fact I wanted to keep the factory front axle lift and PASM. I will post more feedback on ride quality in the coming weeks. I expect it to play nice with the DSC controller. Most feedback on these springs is pretty positive.
The fronts were extremely easy to install. 1 hour max for both sides. The strut stayed on the car and I just swayed the strut assembly outward and replaced the spring on the car. Carefully jacked it back into position. The strut socket tools from ECS Tuning were key. I had to remove a bracket holding on the line for the front axle lift and the PDCC stabilizer link connection to the strut, other than that, it was as easy as it sounded.
Then, there are the rears. The rear carpet lifts up easily. Don't go crazy taking apart your interior, just bend it upward and remove the plastic covers over the rear LATCH points. This will give you plenty of space to get a socket and impact tool on those 13mm nuts holding the top of the struts. I had to disconnect the lower control arm, and two other arms aside from the lower bolt holding on the strut assembly. Perhaps it was due to the fact my car had PASM Sport, I did not have to compress the springs on the car to get the assembly out. It all slid in and out easily. Once the assembly is off the car, I used a spring compressor and the strut socket tool to replace the spring. I also lowered the C-Clip to the lowest position on the strut. The rears took about 3 hours along, although I spent some extra time on it due to trying to figure out the best approach.
Now time to get an alignment, and report back!
Oh and I was psyched the springs came in a silver color!


 08-22-2017 | 04:16 AM


 I'll do the write-up for the rears over the next couple nights.


