When you click on links to various merchants on this site and make a purchase, this can result in this site earning a commission. Affiliate programs and affiliations include, but are not limited to, the eBay Partner Network.
What equipment did you use to make this mount? I'd like to try something like this.
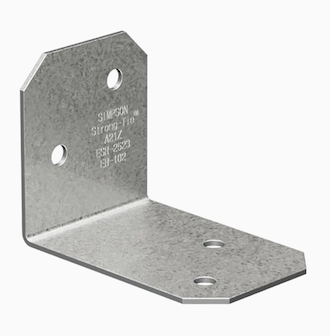
Nothing fancy is required, but you do need to be able to cut the metal piece down to size, I think I used a HF electric cutoff tool and a pair of sheet metal shears (could also use an angle grinder, even a dremel tool, but that would take longer). For the metal piece, I just used this tie plate from HD (because it was cheap, so if I screwed up then it's no huge loss). You'll need to find a way to bend the metal as well.
This is what I did:
1. Remove the side piece that runs along the tunnel & take measurements
2. Use thin cardboard to mock up a template, adjust until you're happy
3. Tape up the metal and trace your template
4. Cut, bend and drill (if you want to screw down your unit), then sand down the edges
5. Test fit and repeat steps 5&6 if needed
6. Once you're happy with the final unit, paint or wrap then install your phone holder of choice (I disassembled a vent magmount and screwed it into my unit).
7. Install & enjoy
A couple of things to consider:
-Depending on the location you mount your unit, it could affect the use of your cupholder; I don't use the left side cup holder myself (I fabbed my own cupholder as well) because I don't like the idea of having liquid above my electronics (I mentioned this to my friend and we go look at his newly purchased car & we found coffee stain on the bottom edge of his side piece ).
-consider the angle you want your phone to be at, if you install the mount before reinstalling the side piece, the mount could be blocking the side piece. This won't be a problem if your mount slides in to the slot after the sidepiece is re-installed.
It was a fun project for me. Just take your time, I think I made 3 different versions before I settled on one that worked for me.
I believe you need an m4 or m6 screw to take the rennline mount to the spiegel head but it�s seriously the best thing I�ve come across. You can slam the brakes and I haven�t had any issue. Plus wireless charging and no backing plate the keeps your phone from wireless charging.
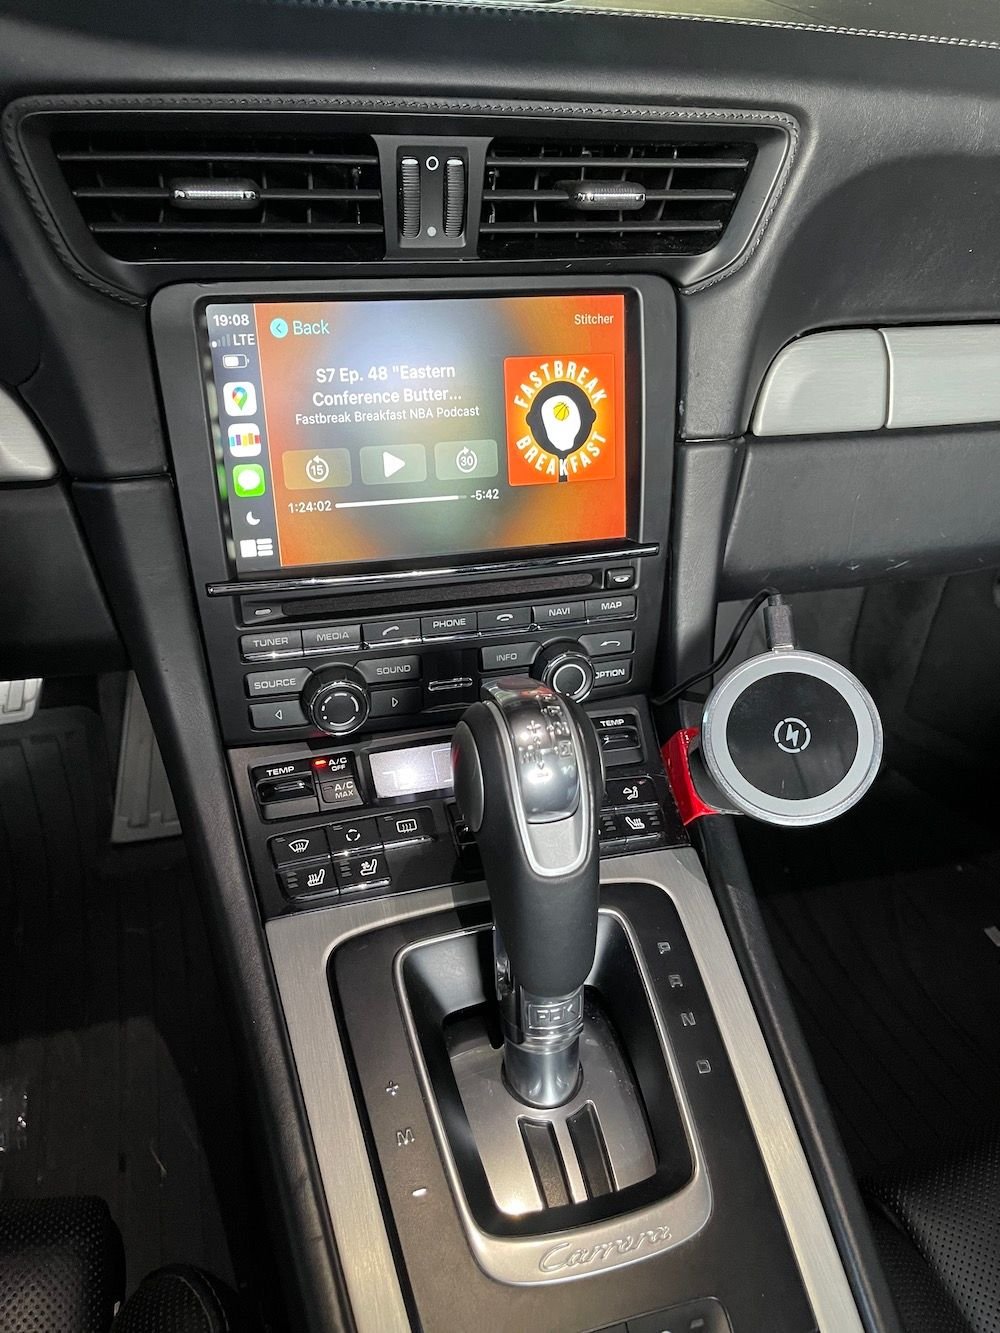
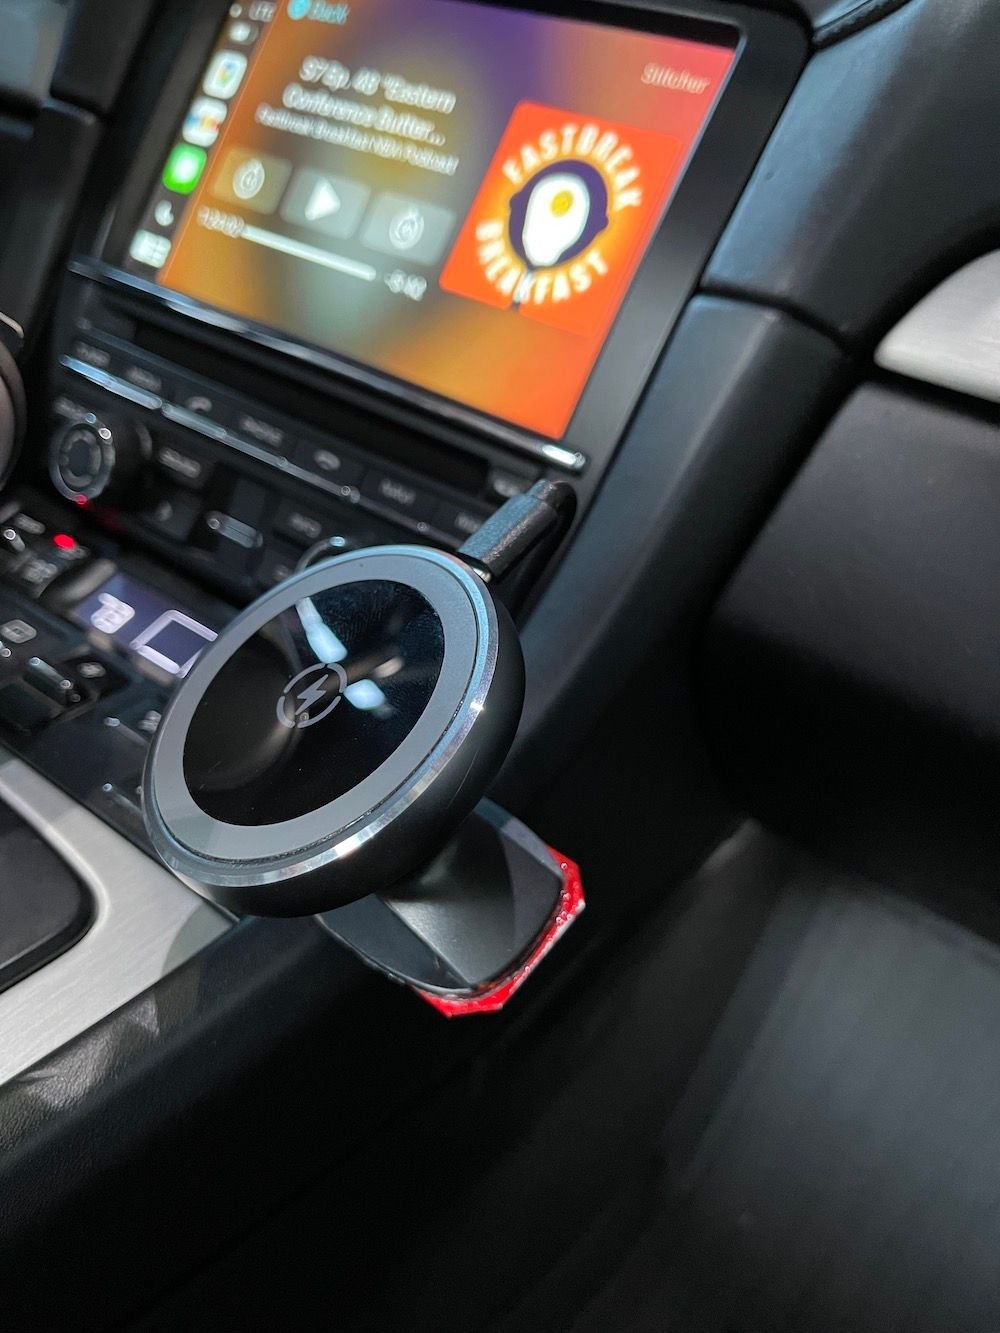
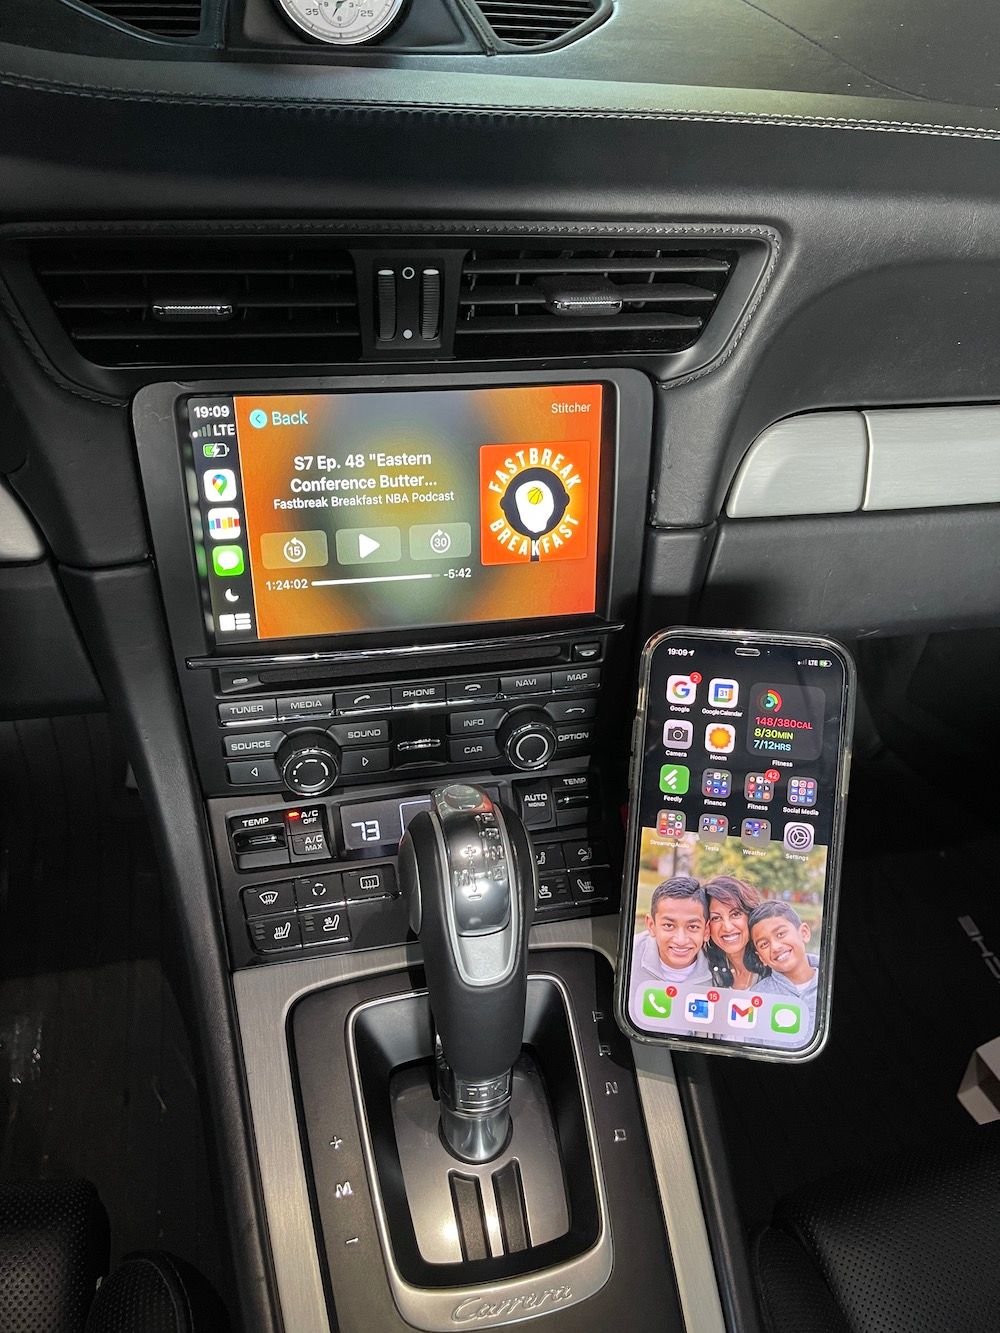
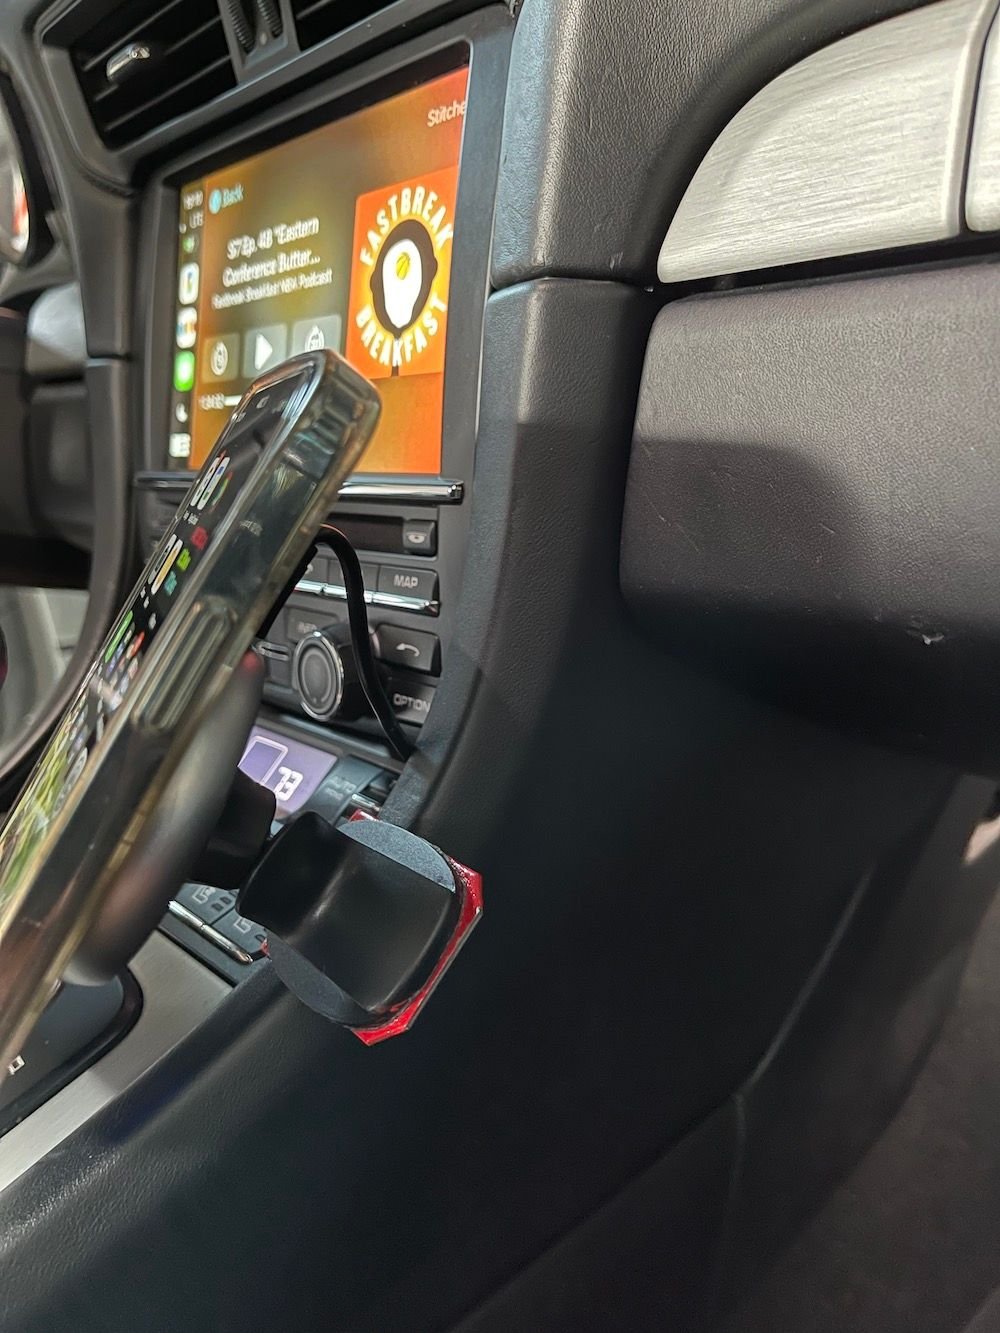
For reasons that only made sense to me at the time, I hit it with some gloss red paint. I then cannibalized a couple of iPhone stands and chargers I had laying around in the garage. This resulted in a tidy little Qi Charger for my phone. It's way better and far less obtrusive than anything I've tried before. The Qi charger magnets do a great job of holding my iPhone in place and the phone is easily accessible with a quick glance down at the dash if I need to use it. I did the Apple CarPlay upgrade last year, so I actually don't need to interact with my phone directly all that much since I can use Siri to control most relevant functions when driving. I used some 3M automotive tape to keep the L Bracket attached to the inner side of the console bolster. The charger is attached to a ball joint so the phone can be turned or rotated to the driver or passenger. This is my iPhone 12 Pro. I also tried it with my wife's Pro Max. Both fit on the charger and clear the dashboard.
Here are some pics:
I've ordered a u-shaped flat USB C to USB A wire to clean up the install a bit.
This is the phone mount and the Qi charger I had in a box in the garage. I had to do a little dremeling and combined parts from the two to get the ball and socket from the Qi charger to work with the smaller phone mount.
For reasons that only made sense to me at the time, I hit it with some gloss red paint. I then cannibalized a couple of iPhone stands and chargers I had laying around in the garage. This resulted in a tidy little Qi Charger for my phone. It's way better and far less obtrusive than anything I've tried before. The Qi charger magnets do a great job of holding my iPhone in place and the phone is easily accessible with a quick glance down at the dash if I need to use it. I did the Apple CarPlay upgrade last year, so I actually don't need to interact with my phone directly all that much since I can use Siri to control most relevant functions when driving. I used some 3M automotive tape to keep the L Bracket attached to the inner side of the console bolster. The charger is attached to a ball joint so the phone can be turned or rotated to the driver or passenger. This is my iPhone 12 Pro. I also tried it with my wife's Pro Max. Both fit on the charger and clear the dashboard.
Here are some pics:
I've ordered a u-shaped flat USB C to USB A wire to clean up the install a bit.
This is the phone mount and the Qi charger I had in a box in the garage. I had to do a little dremeling and combined parts from the two to get the ball and socket from the Qi charger to work with the smaller phone mount. https://www.amazon.com/gp/product/B0...?ie=UTF8&psc=1
I purchased the Rennline upper mount. Love it. Blocks the closest cup holder to the driver, but i never used it anyway. Really close to the glove box power connection.
Rennline upper mount also. You can mount it on either side of the console - I mounted mine on the left side, Cliff mounted his on the right.
I might switch mine across. Mounted high left it annoyingly blocks the touch screen and a few of the buttons. I was concerned about losing the cupholders by mounting it right, but in reality I never use them either.
Functionality-wise it works well.
I also just bought an alternative from Carmount - it's a simiar magnetic mount device with an adhesive backing. It's rather petite and I was considering mounting it on the lower left corner of the rear view mirror and hanging the phone downward from there. We'll see.
I used the Rennline phone mount with a Belkin Magnetic Wireless Car Charger. Standard hard-silicon Apple MagSafe case without using the metal plate that Rennline provides to stick to your phone case. The Rennline mount uses a standard sized-ball that comes on a lot of car mount products. So I pieced the two together (no modifications required).
The purpose of this post is that there's been some debate in several different threads on whether the MagSafe case magnet and mounts were strong enough to hold the phone during spirited driving. A Rennline rep in one of the threads insisted it wasn't. Well, the video below shows you that it definitely is.
I don't have a picture of it mounted in the car yet because I just made the video that demonstrates the holding/grip strength of the solution I went with. Once I get it in the car I'll update this post with a final picture of it in the car.
Here's the parts I used in case anyone wants to go with the same solution:
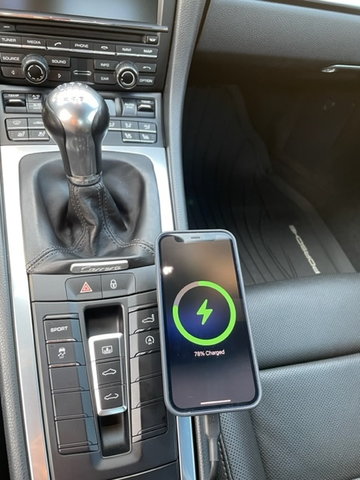
Pics of my install. Turned out SUPER-clean IMO and was easy to do. I initially wanted to mount at the more forward position on the center tunnel, but with the phone on the charger shifting in to 7th gear bumped the phone.
I left the extra wire out for this pic before tucking it in so you could see where I chose to keep the small amount of extra wire.
All buttoned up.
Pic from driver's seat with phone charging.
Console buttons aren't blocked from view and it sits up high enough (but not too high) that you can put your hand between the center tunnel and the charger if you need to.
I don�t want to stick the pad on my dash. Easy to see for navigation. Hard to remove from dash. Has positive hold spring loaded ratchets to secure phone. No vibration no phone fall.
Pics of my install. Turned out SUPER-clean IMO and was easy to do. I initially wanted to mount at the more forward position on the center tunnel, but with the phone on the charger shifting in to 7th gear bumped the phone.
I left the extra wire out for this pic before tucking it in so you could see where I chose to keep the small amount of extra wire.
All buttoned up.
Pic from driver's seat with phone charging.
Console buttons aren't blocked from view and it sits up high enough (but not too high) that you can put your hand between the center tunnel and the charger if you need to.
Class5: DO you have Numeric or other short shifter?
I bought the exact kit as you but waiting on the rennline mount, plan was to install it in upright position next to PCM, wondering if it will interfere with my 7th gear (but I have Numeric shifter)
Class5: DO you have Numeric or other short shifter?
I bought the exact kit as you but waiting on the rennline mount, plan was to install it in upright position next to PCM, wondering if it will interfere with my 7th gear (but I have Numeric shifter)
It does not interfere, assuming a sane angle on the swivel mount, and the size/position of the phone on the mount. (Pixel 6, Renline mount, Numeric Shifter)


 09-10-2021, 03:00 PM
 ).
).