When you click on links to various merchants on this site and make a purchase, this can result in this site earning a commission. Affiliate programs and affiliations include, but are not limited to, the eBay Partner Network.
First off, there's a lot of tunes floating around out there. I came from BMW's where the Procede, Cobb and JB4 were the dominant tunes available. I've tried all 3 of these tunes on my BMW's and stayed with the BMS tune as to me, it gave me very solid gains while maintaining driveability. For my 911TT, I wanted the exact same thing so the JB was an easy choice.
Hat tip to @BMS - Terry and Payam for an awesome product, speedy shipping, swag gear and tune.
Installation:
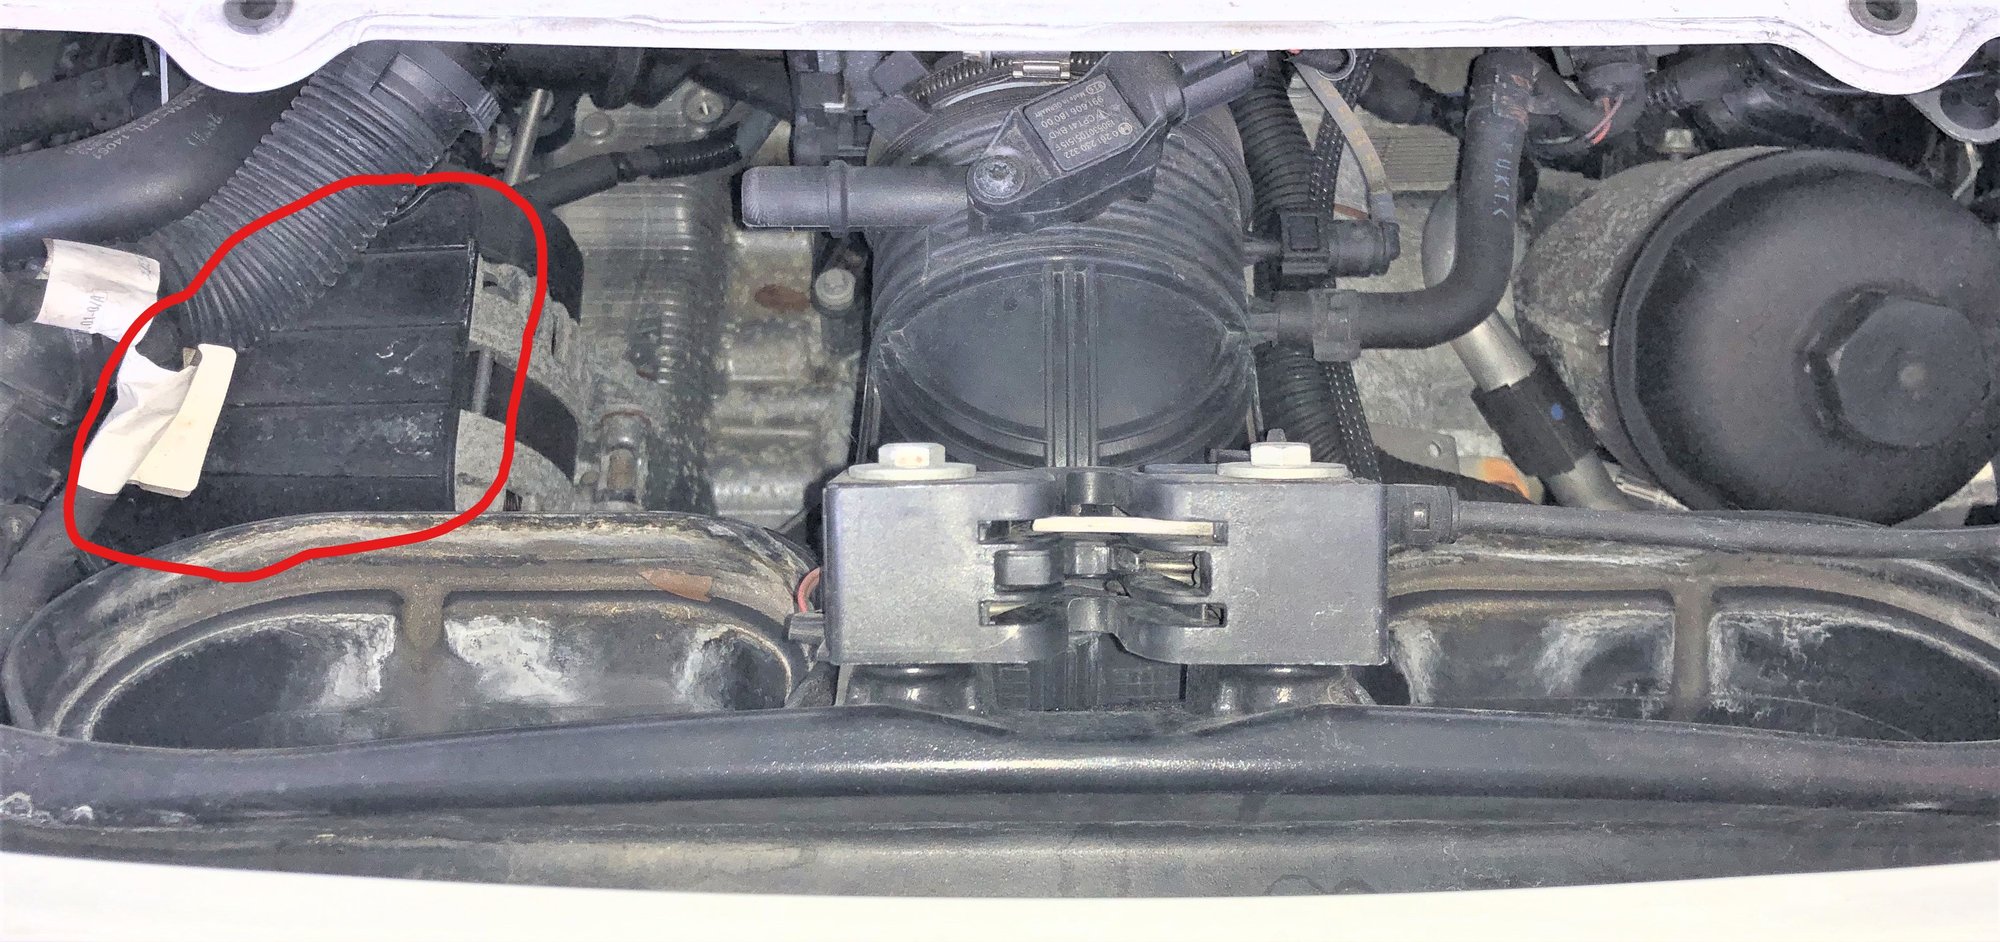
Before we get started, a shoutout to @Todd Leichtfuss on the video he posted on how to remove the engine shroud and fans to expose the engine bay and the sensor locations.
Once Engine is exposed:
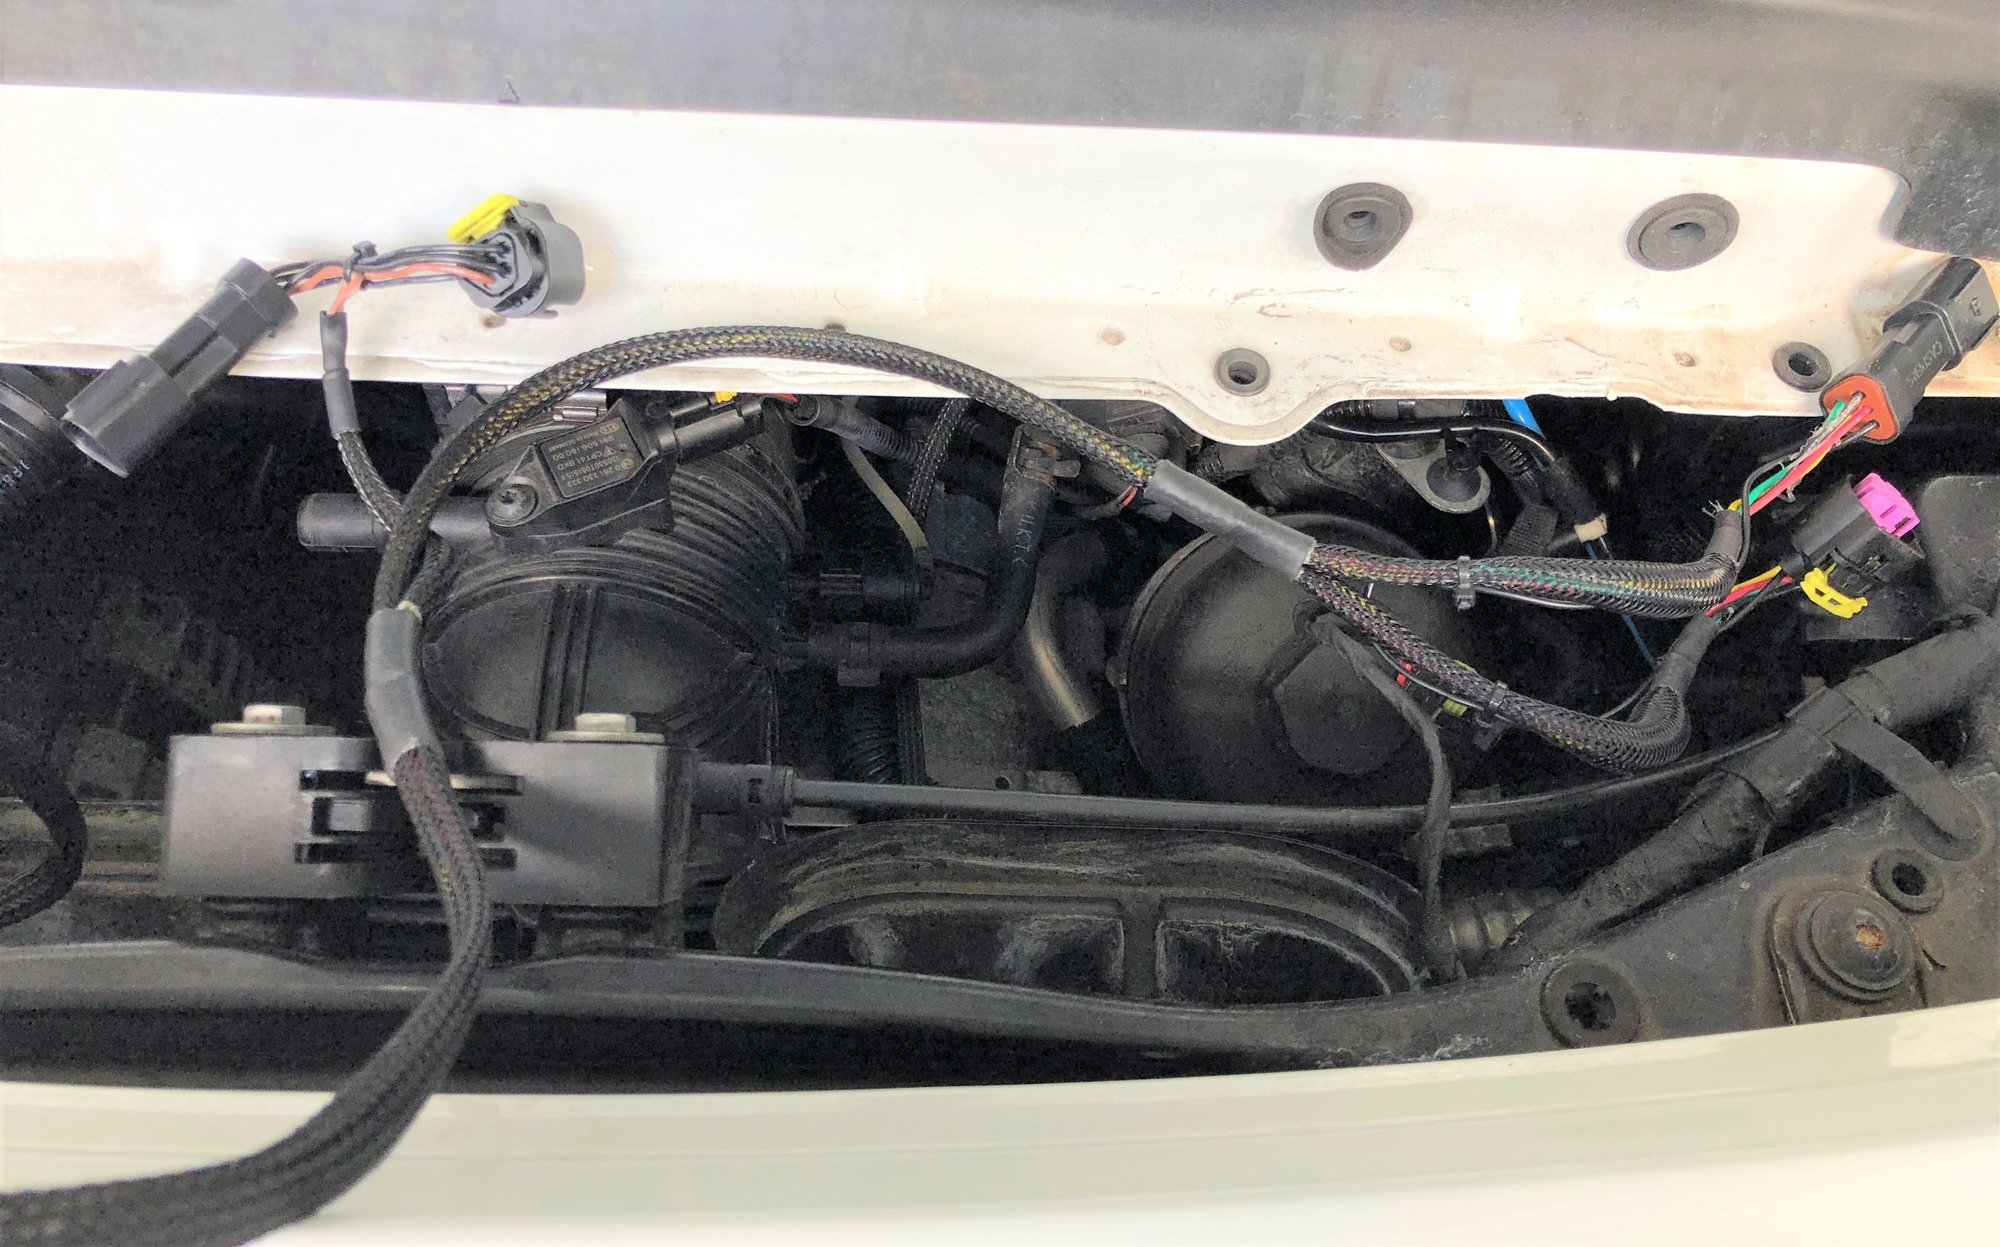
You'll need to unplug the factory MAP& TMAP sensors and plug the JB4's harness into them. There are 2 JB4 plugs for each sensor, one to plug into the actual sensor and another to plug into the unplugged socket from the engine harness to close the loop. Here's a picture of the JB4 harness laid out near the sensors - TMAP plug has a brown wire on the LEFT while the MAP has green and red wires on the RIGHT.
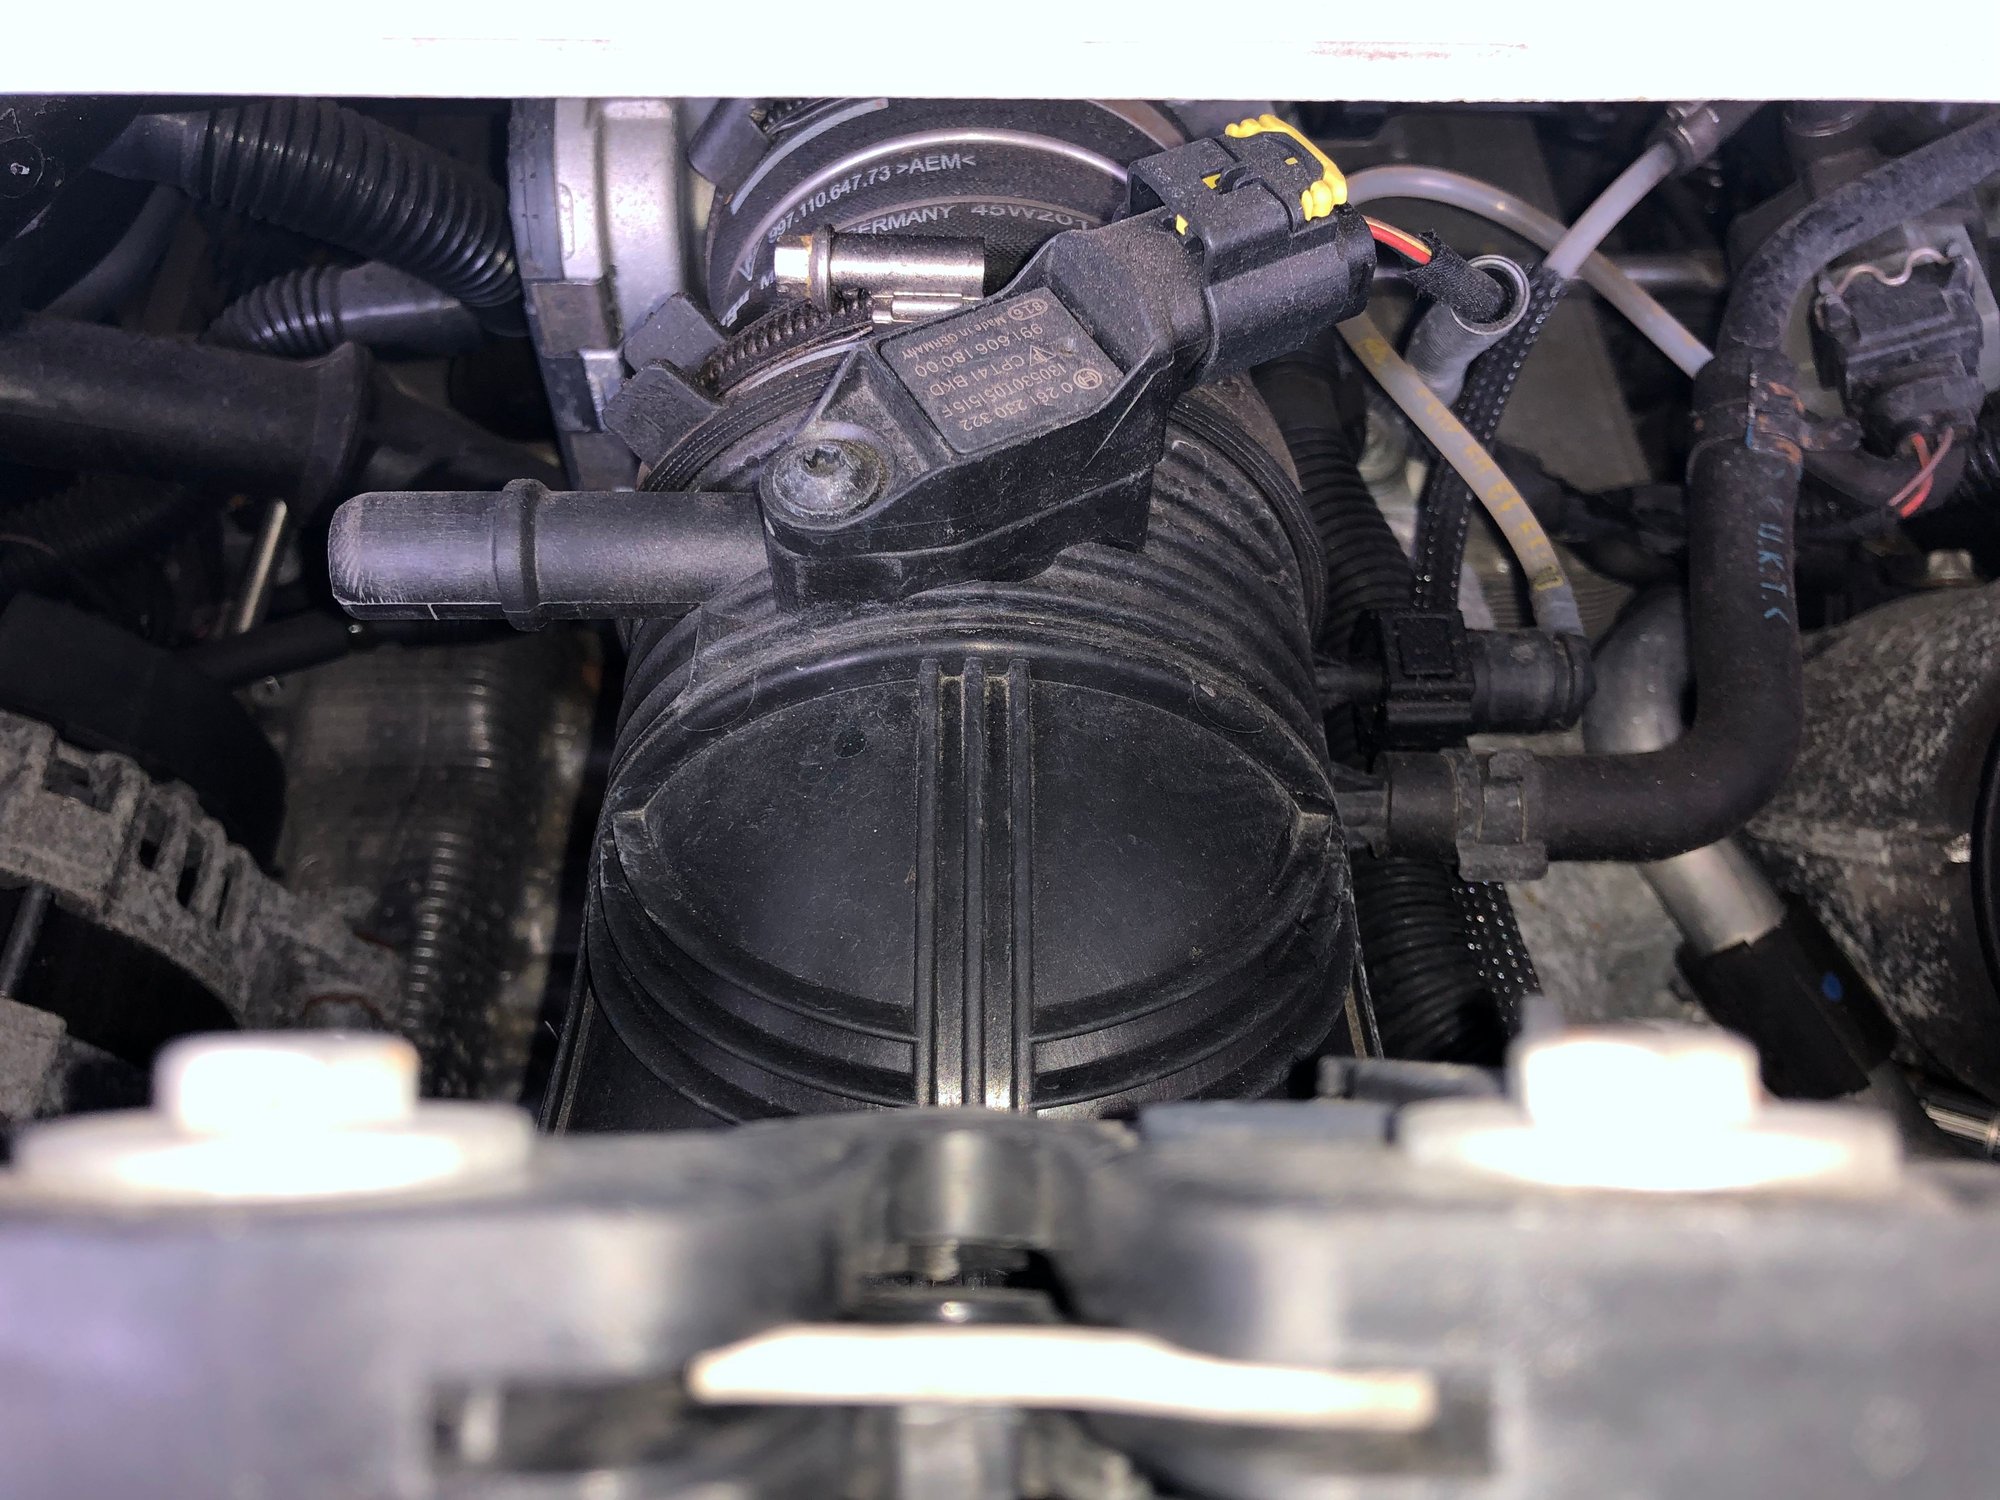
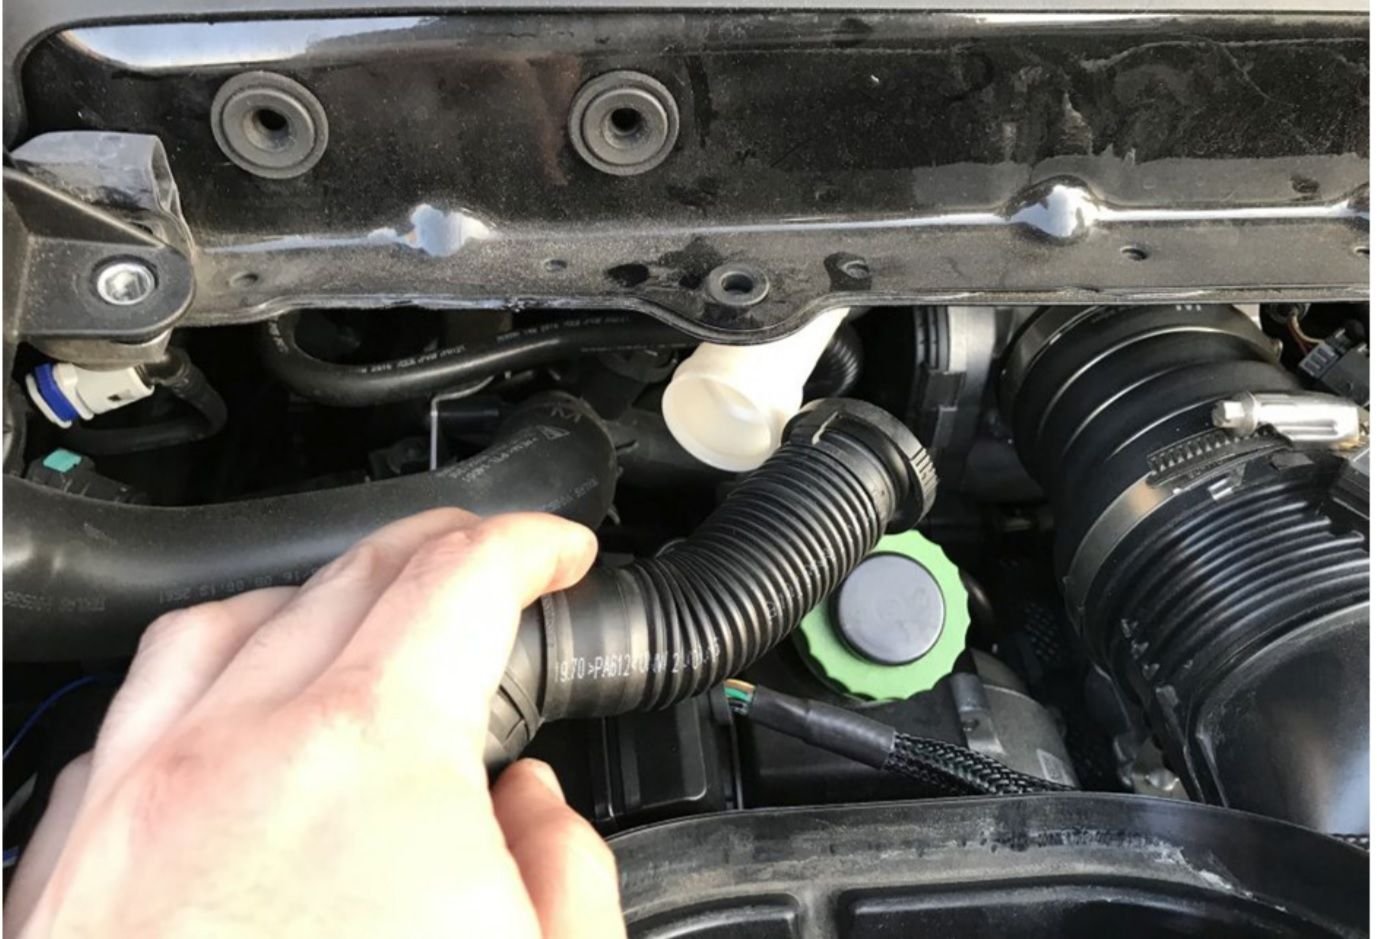
The TMAP is super easy, take a flat head and slide it beneath the front side of the clip to unlock the plug and it should slide right off See picture below:
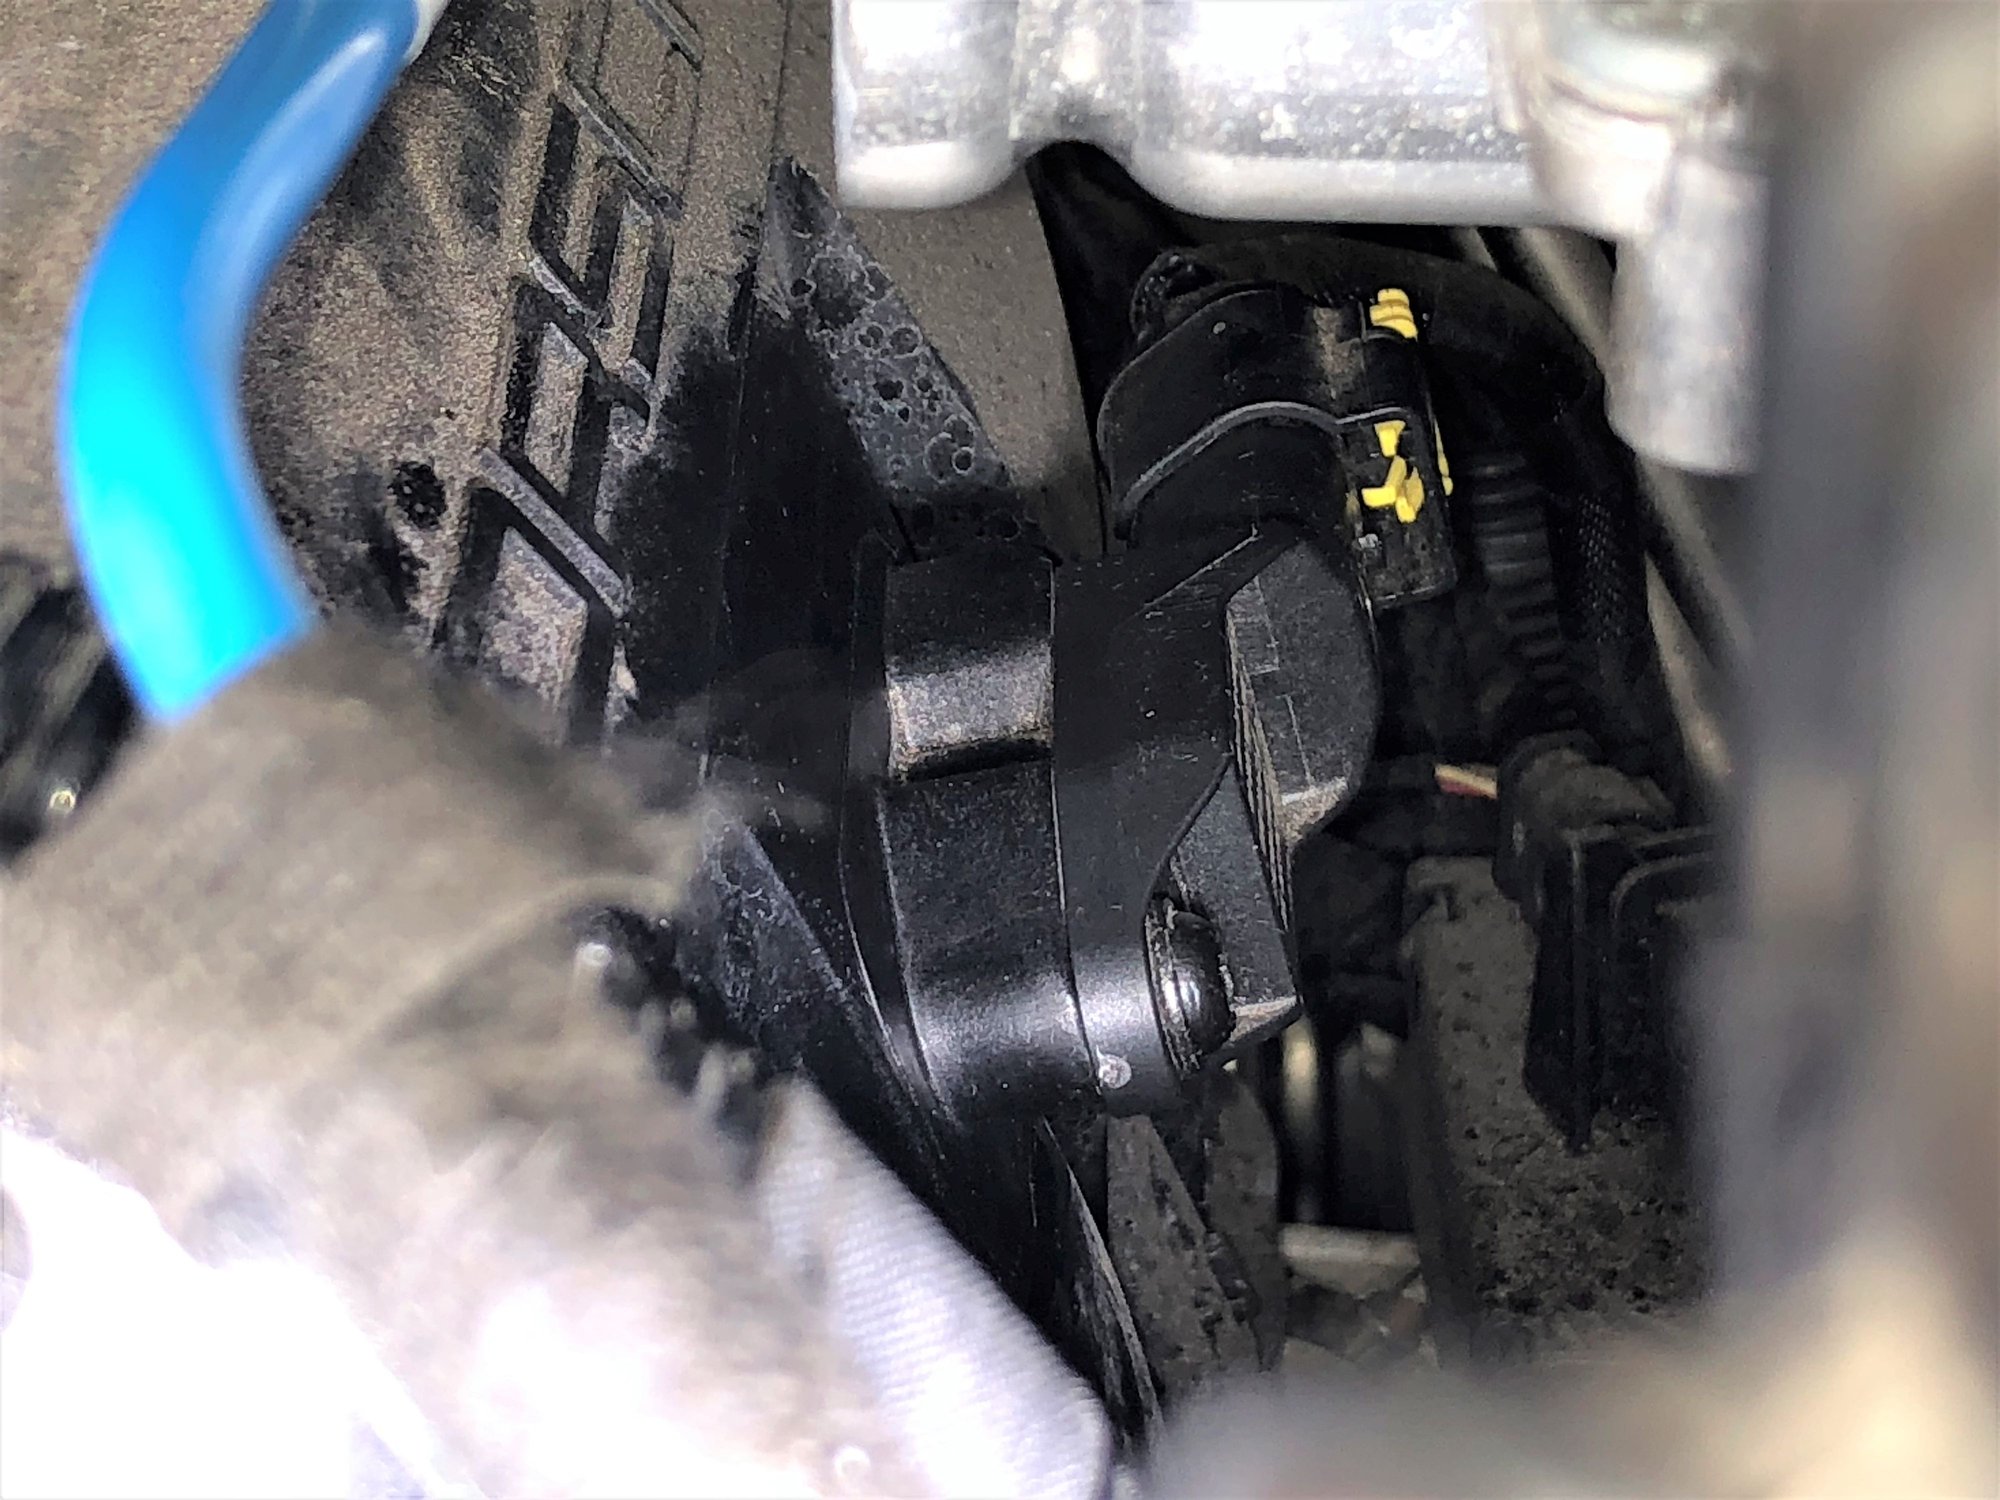
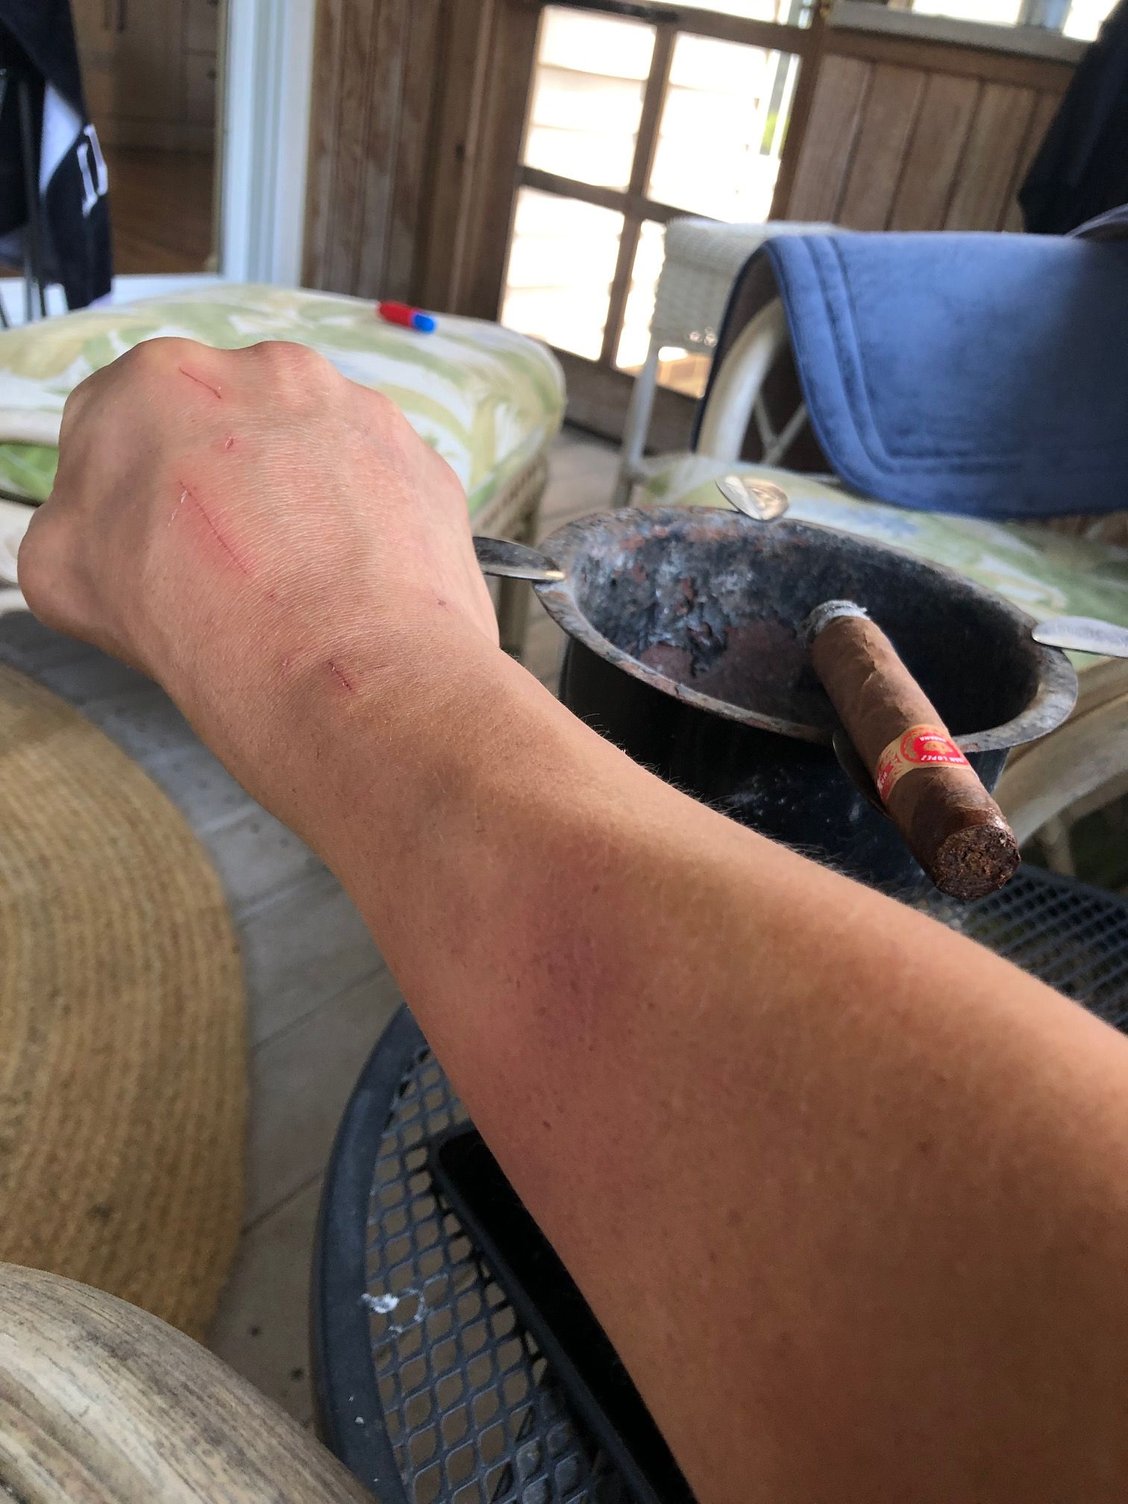
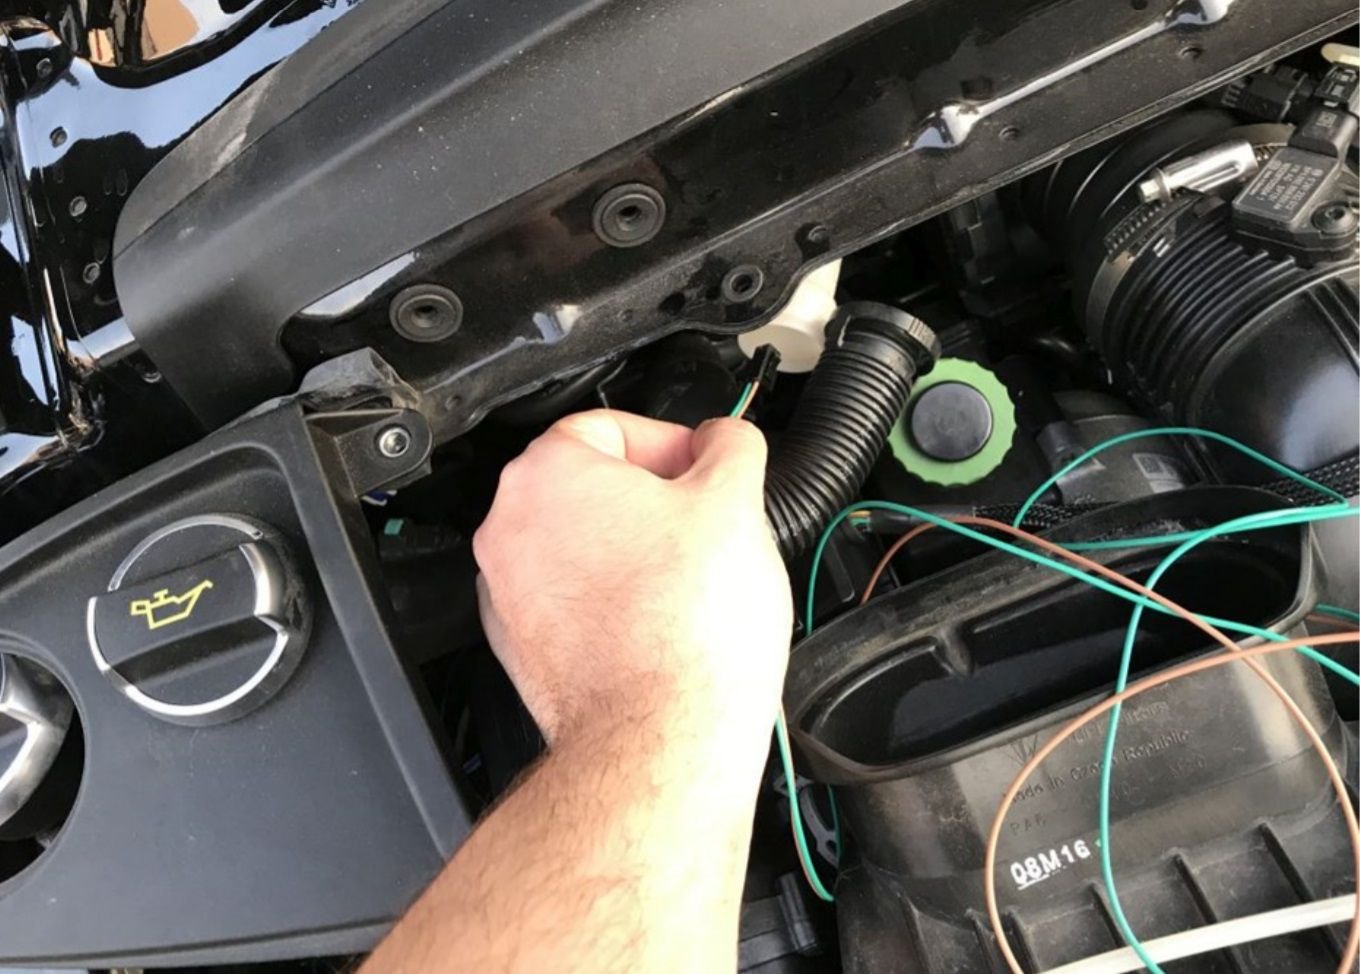
The PITA one is the MAP sensor that's tucked in the back right corner of the engine as you can only get one hand in there. I have small hands/wrists so I was able to reach in there and get to it.
Here's a picture of the sensor. MAP Sensor
Hand/Arm got pretty scraped up in the process
I made a video to help you locate and identify the right plugs and show you with some visual context where the sensors are (50 second mark):
Try and use a flat head to unlock the factory plugs to the MAP & TMAP sensors first - this will help you slide the plug right off (you'll need a long one to get to the MAP sensor)
Pull on the plug and NOT THE WIRE to slide it off from the sensor - the MAP sensor is a tight fit and you'll be looking for torque but will damage the factory harness!
MAP Sensor - once you've unplugged the factory plug from the sensor, plug the JB4 back into the factory harness plug FIRST. You do this by holding the JB4 plug in your palm before maneuvering your entire hand into the engine bay. While holding the JB4 plug in your palm, use your pointer finger and thumb to grab the unplugged harness and rotate it until it lines up with the JB4 plug (it only fits one way). Once this plug is connected, the other JB4 plug is pretty easy to plug into the MAP sensor since the sensor doesn't move.
MAKE SURE THAT THE PLUGS ARE COMPLETELY PLUGGED INTO THE SENSORS/HARNESSES AND ARE TIGHT
Mounting the JB4
I used Zip Ties to mount the JB4 on top of the plastic Alternator cover (see picture):
JB4 FINAL CHECKS
Remove ALL TOOLS near/in the engine bay (you don't want a screwdriver or something being a pinball in the engine bay when it starts up)
Plug in the fans and just mount them for now
Start the engine up and make sure she starts and idles fine - if there's a problem, the car will die immediately (if this happens, you might have a plug that you didn't fully plug in)
If all is good, shut off the engine and remove the fans so you can install OBD cable (I like to make sure there are no problems first before finishing the more ancillary pieces such as the OBD cable just in case something isn’t right).
OBD Cable, Bluetooth Connect and Mounting the JB4 OBDII Canbus Cable: Note, you can't go past MAP 2 or log anything other than Boost if you don't install the OBD Canbus cable.
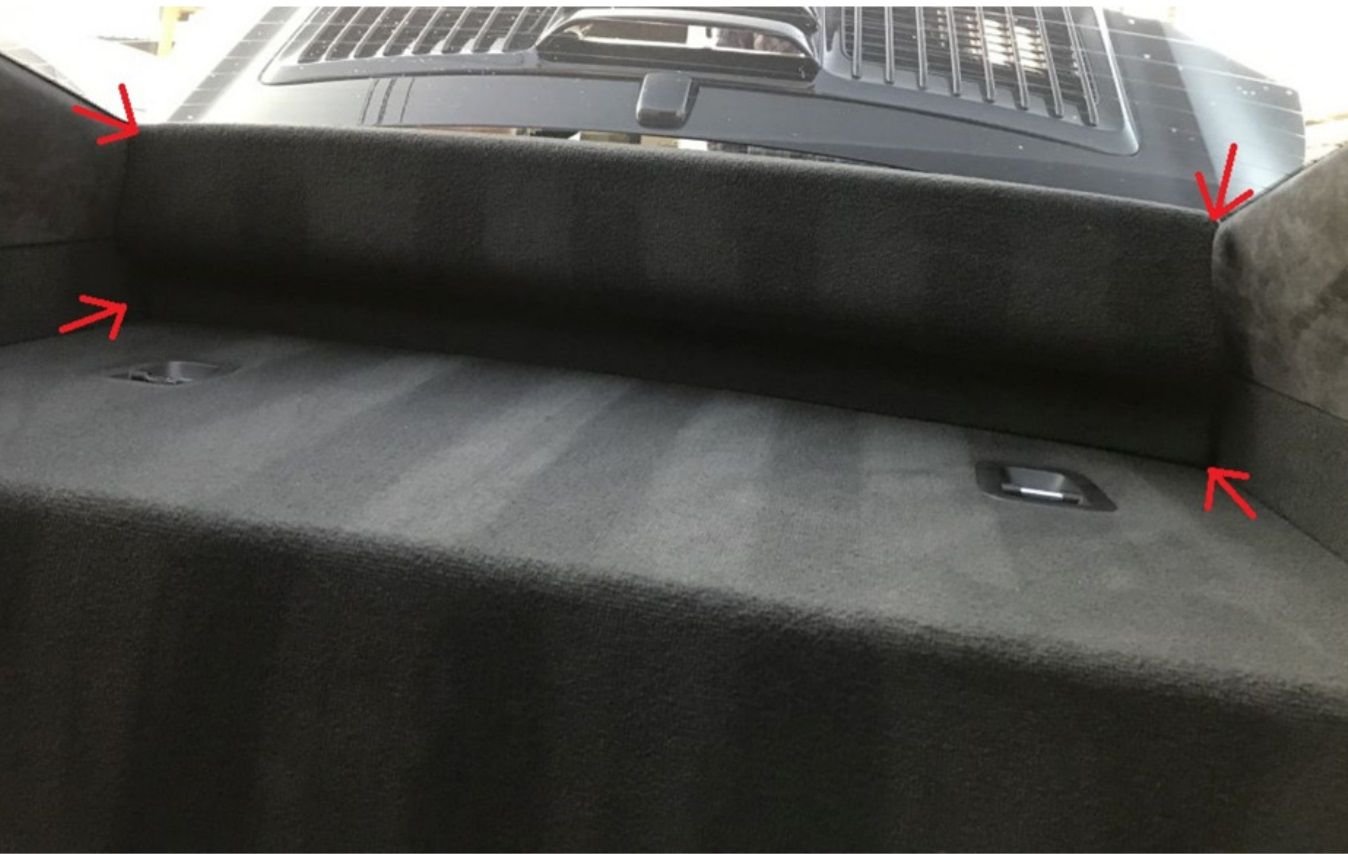
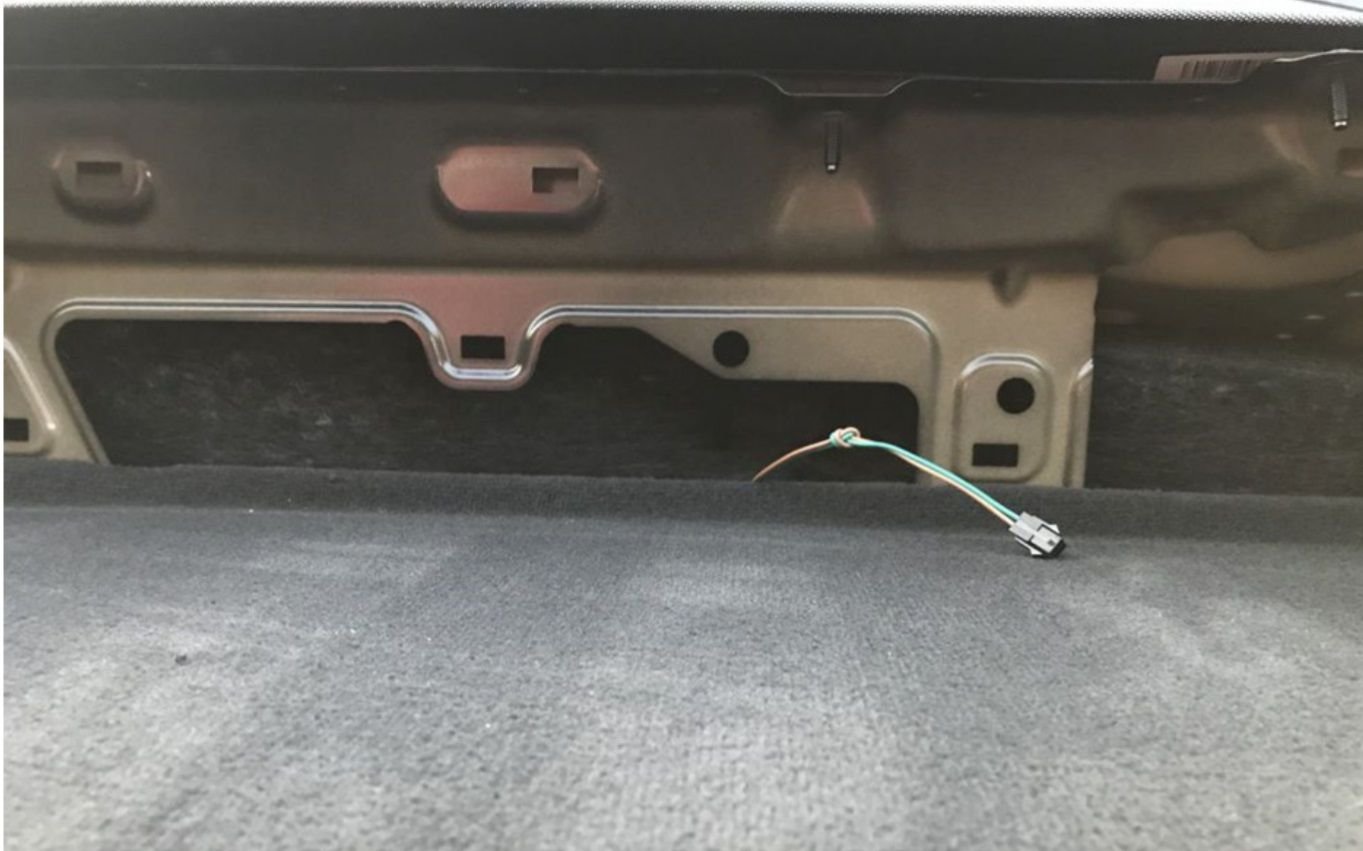
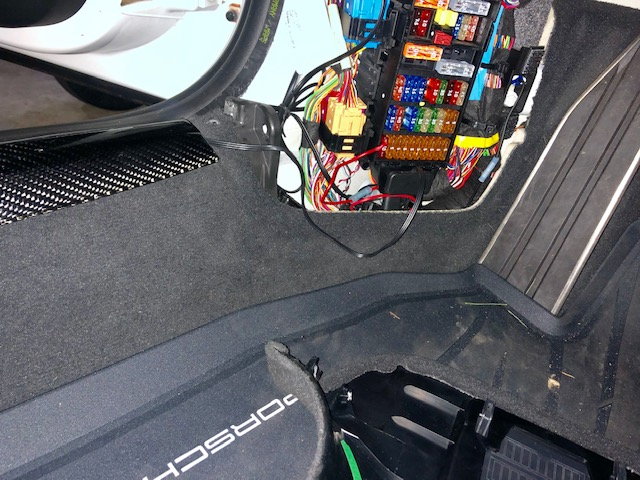
Remove the rear cover by simply pulling the panel towards you
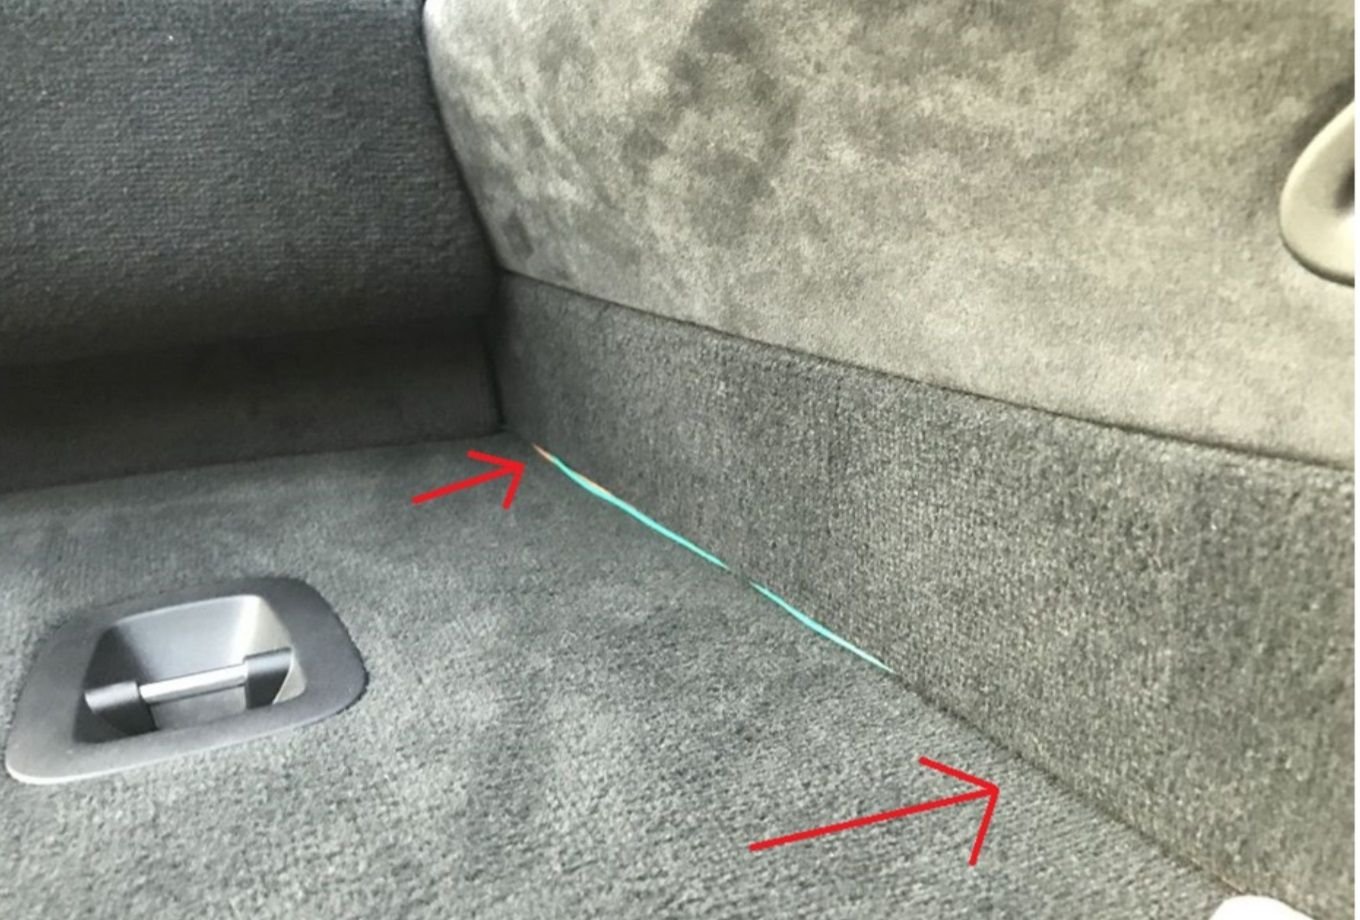
Just tuck the cables in along this edge here.
Here's a picture of my car (I took out my rear seats) - you just tuck the wires just behind the panels
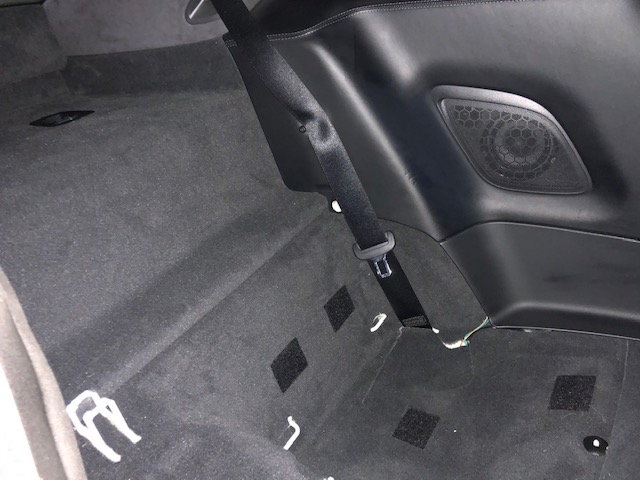
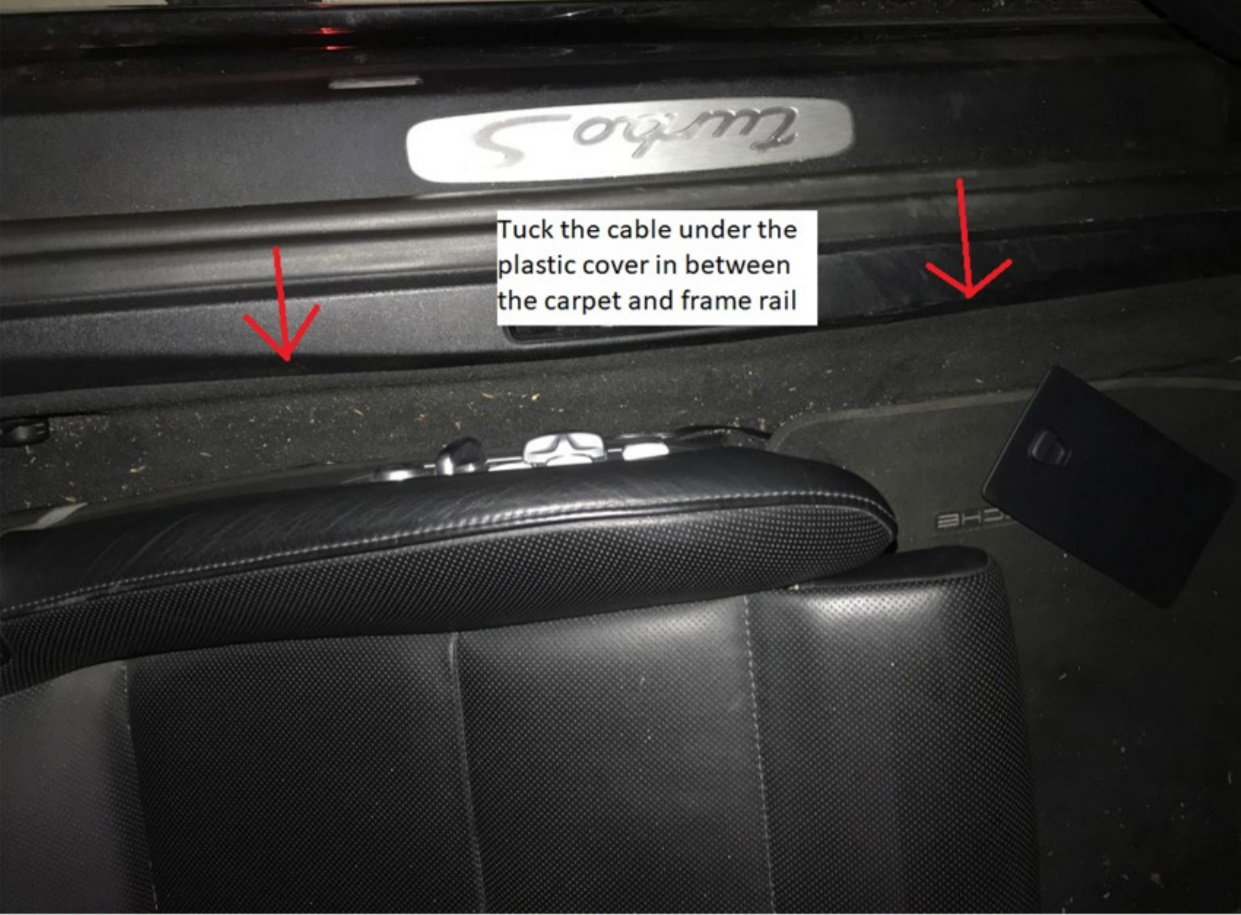
Once you tuck the cables in behind the panels, you can just do the same along the door trim as shown below.
Mine is a 991.1 so the OBD plug is behind the fuse box. For 2nd gen's, the plug is exposed on the bottom side of the dashboard above the dead pedal rest.
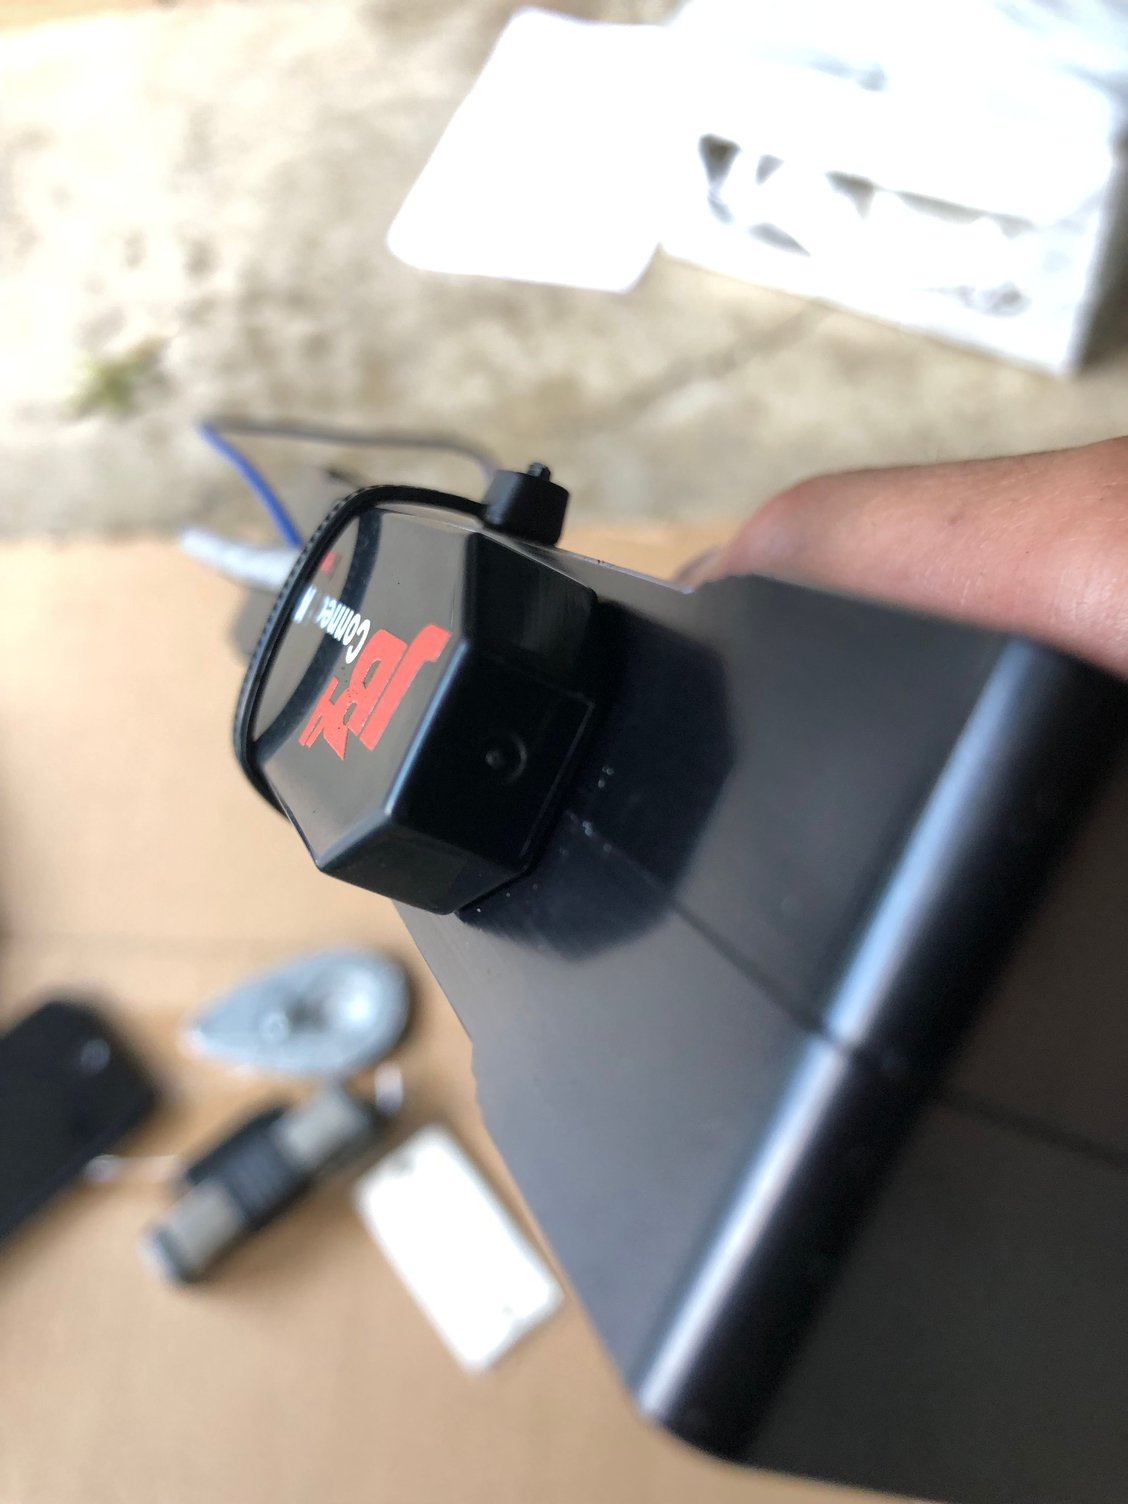
JB4 Bluetooth Connect
If you have the JB4 Connect bluetooth transmitter, slide the transmitter out from the zip tie that holds it against the JB4 case. Find a place to mount it and make sure it's pointed towards the FRONT OF THE CAR (If you mount the JB4 to the top of the Alternator Cover, the cord should have enough slack to run it through the same tube the OBDII cable went into).
Failing to do this might lead to an unstable bluetooth connection which will be problematic while datalogging, switching maps or updating firmware.
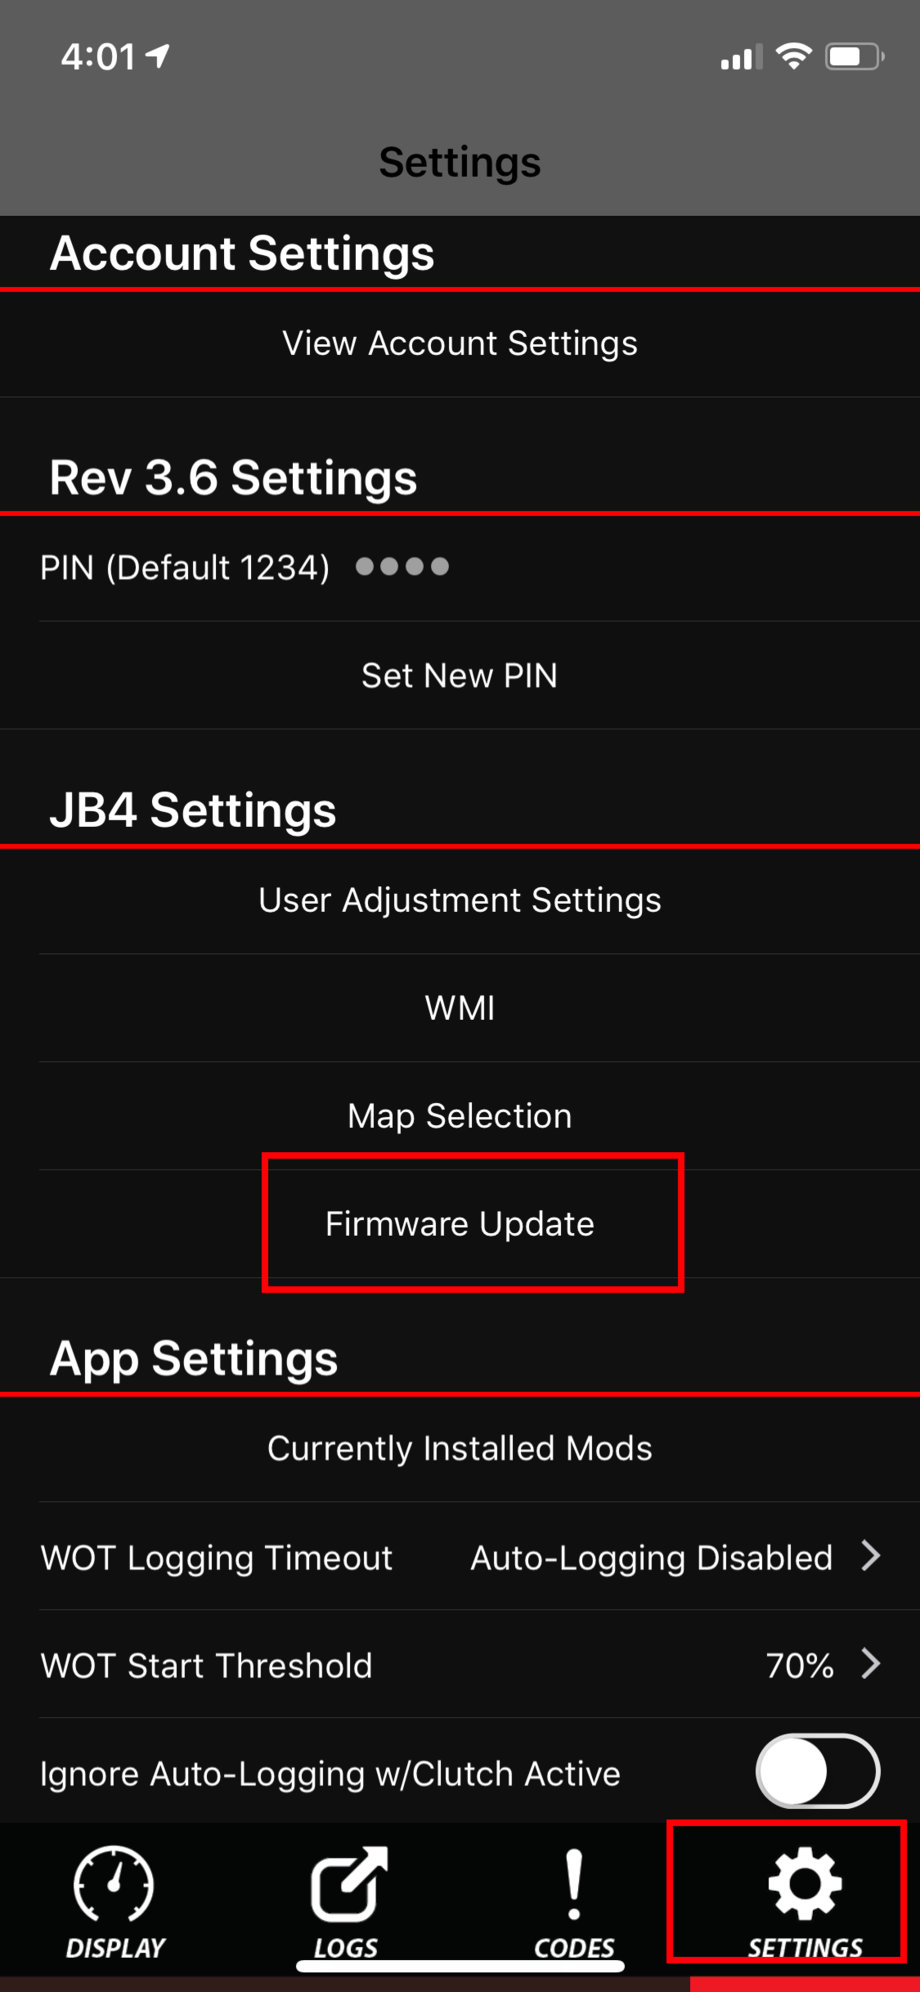
JB4 Mobile App/Firmware update
Download the Mobile App from your applicable App store and register for an account.
Here's a reference video in case you have questions:
Connect the JB4 mobile app to the car **SIT IN THE DRIVERS SEAT, TURN THE KEY TO ACCESSORY MODE SO THE JB4 HAS POWER AND CONNECT TO CAR ON THE APP TO MAKE SURE THE APP HOLDS THE CONNECTION TO THE CAR FOR A FEW MINUTES** This is to ensure that you have a stable bluetooth connection to change maps, log data, or update firmware!
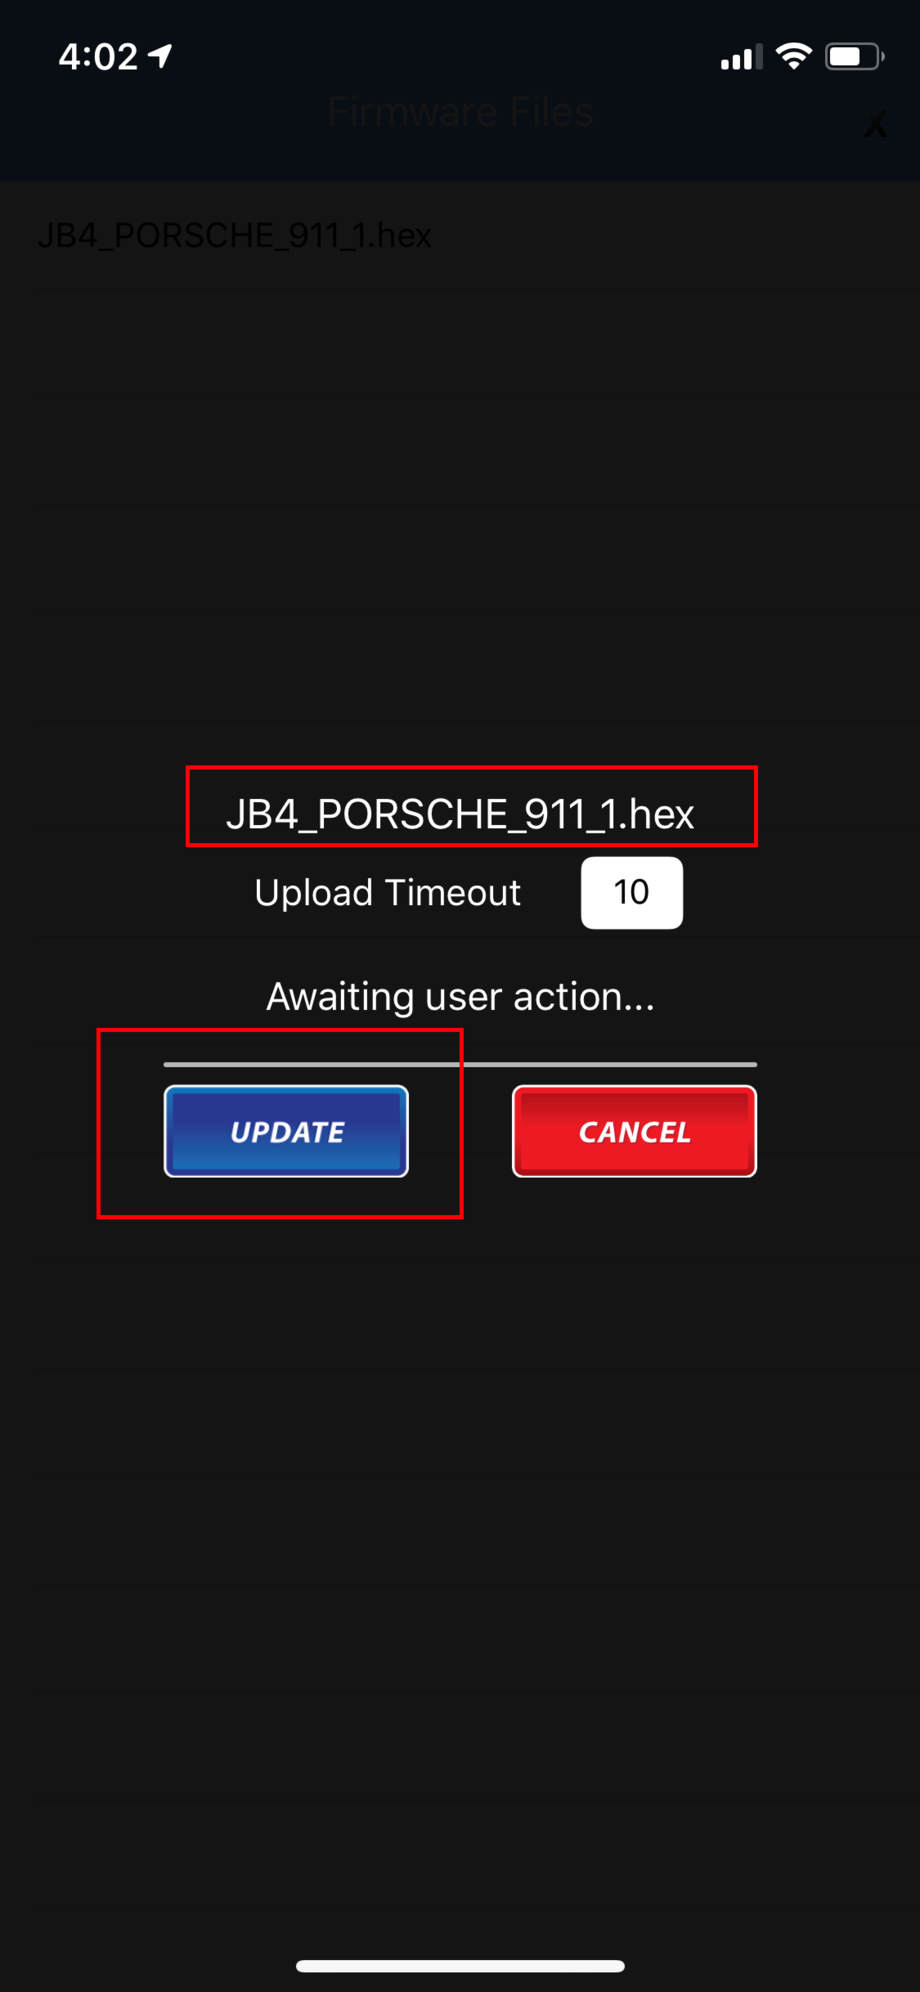
Updating the JB4 Firmware - CLICK "SETTINGS" AND THEN "FIRMWARE UPDATE"
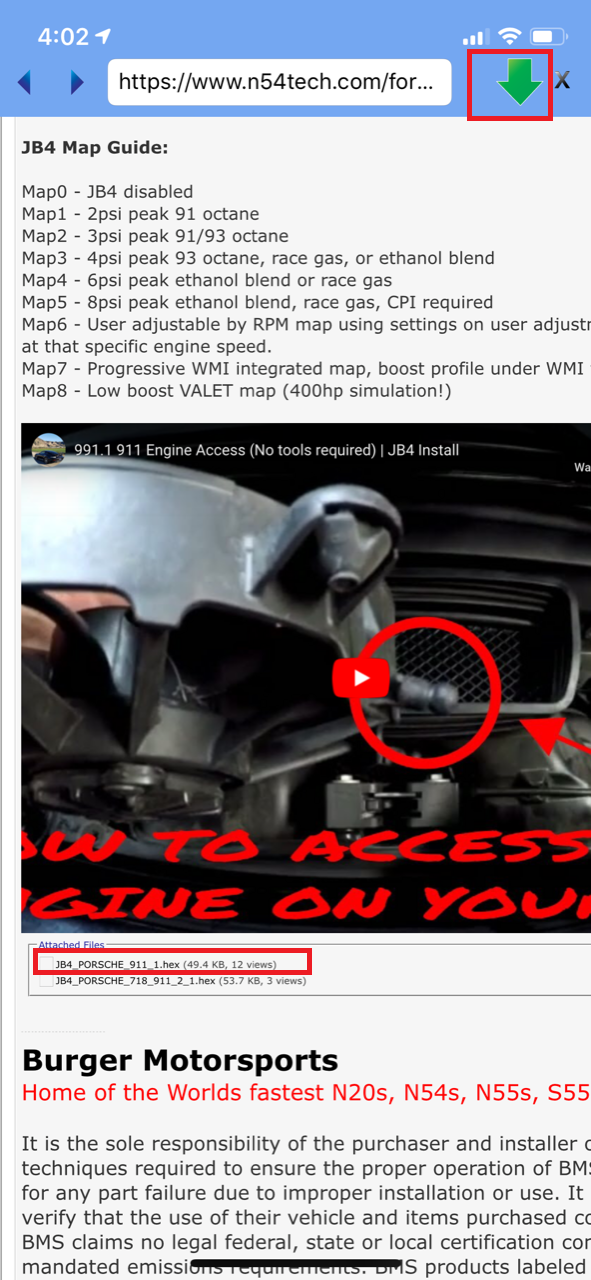
You will now be taken to the N54 homepage within the built in browser. Navigate to the Porsche forum and select the appropriate thread for your car. The appropriate firmware is always sticky and in the first post. Select the correct firmware and hit the green button on the top RIGHT side of the screen to pull up a list of your downloaded firmware.
Select the correct firmware and flash it from here.
Map 1: Sharper response - feels like the turbo spools earlier due to the increased mid range torque that comes on. *** Dyno tells me it feels similar to my friend's 2nd Gen Turbo S with an earlier spool (991TT has a smaller turbo i think).
Map 2: Fatt *** mid range that runs farther up the power band - strong torque swell that comes on early and sticks with you longer. Perfect for daily driving or for laying the smackdown.
Map 3: The Shiznit! The wall of torque comes on early and stays with you farther up the power band. There's so much thrust here that the moment you back off the throttle, the car feels like someone yanked the leash. 2nd gear is nearly useless. I took 4th gear to redline and leaked a little bit.
It's exactly as expected - perfectly docile but can melt tires as the drop of a dime. Completely excessive but that's how America does it right? Well done Terry/Payam~
Great write up and thanks for taking the time to take the pics and do the video. I am sure it will help a lot of people.
Did you have to run the wire to the OBD port?
Thanks Neil, just trying to contribute to the community here and help guide folks.
I did run the wire for the OBD port and actually updated the original post with the instructions on how I did it. It's super easy to run the wire but as I mentioned, the cable is a prerequisite to being able to run anything above Map 2 and log more than just boost.
Wow Kenny, thank you for that write up and review! I'm glad you're enjoying the new found power!
We just need to get more of the users to post their feedback too. Over x20 in circulation right now
Got some logs for us to look over?
No surprises here, rock solid tune - exactly as it was in my BMW's.
We're getting some flooding here in the DC area. I'll get some logs over to you my next time behind the wheel once some of this rain/heat clears out.
Thanks again Payam~
No surprises here, rock solid tune - exactly as it was in my BMW's.
We're getting some flooding here in the DC area. I'll get some logs over to you my next time behind the wheel once some of this rain/heat clears out.
Thanks again Payam~
Really happy to hear! Of course Kenny, anytime man.
I have the Cobb Stage 2 tune in my 2014 TTS. Can you compare the tunes and give me some idea of what I should expect. You can answer me in PM if you would like.
I have the Cobb Stage 2 tune in my 2014 TTS. Can you compare the tunes and give me some idea of what I should expect. You can answer me in PM if you would like.
It's very hard to say cause I don't really have any data from the Cobb to compare to. I've been searching high and low for any logs, or actual data from third party customers.
From what I have gathered we're faster or on par with custom tunes from the people using Cobb. The off the shelf maps are slower than the times we have posted.
10.3@137mph in the 1/4mile and 166mph in the standing 1/2mile. I have yet to see any other tuner come close with stock turbos on a 991.1 TT/S
Don't forget the safety systems that we implement into the JB4 along with map switching, logging, everything in real time right on your phone or tablet.
That's what makes the JB4 superior to the flash tuning systems like Cobb. Do you have methanol in your car?
If you have any more questions, don't hesitate to ask or email me.
Payam - I just sent some logs over. Not sure if they're comprehensive enough. Share your thoughts and let me know if you want to see different pulls.
The sheer force behind the 60 mph-100 mph was incredible. Although I couldn't muster more than a 3.1 second 0-60 mph time (still a little damp out).
Payam - I just sent some logs over. Not sure if they're comprehensive enough. Share your thoughts and let me know if you want to see different pulls.
The sheer force behind the 60 mph-100 mph was incredible. Although I couldn't muster more than a 3.1 second 0-60 mph time (still a little damp out).
Super clean logs man! I just replied to your email. I bet the car hauls!
It's very hard to say cause I don't really have any data from the Cobb to compare to. I've been searching high and low for any logs, or actual data from third party customers.
From what I have gathered we're faster or on par with custom tunes from the people using Cobb. The off the shelf maps are slower than the times we have posted.
10.3@137mph in the 1/4mile and 166mph in the standing 1/2mile. I have yet to see any other tuner come close with stock turbos on a 991.1 TT/S
Don't forget the safety systems that we implement into the JB4 along with map switching, logging, everything in real time right on your phone or tablet.
That's what makes the JB4 superior to the flash tuning systems like Cobb. Do you have methanol in your car?
If you have any more questions, don't hesitate to ask or email me.
Can anyone tell me where the grommet is on a 991.1 turbo coupe? I cannot find a grommet to run the wires inside the car and I�m trying to keep the JB4 inside the car if possible.
You will have to go through the sound tube grommet that is connected to the Y piped on the rear driver side. I believe we should have some instructions posted on our website for that method. https://www.n54tech.com/instructions...tall-Guide.pdf
You will have to go through the sound tube grommet that is connected to the Y piped on the rear driver side. I believe we should have some instructions posted on our website for that method. https://www.n54tech.com/instructions...tall-Guide.pdf
-Payam
thank you Payam. So do I just leave the sound pipe disconnected? @BMS


 07-06-2019 | 05:41 PM