When you click on links to various merchants on this site and make a purchase, this can result in this site earning a commission. Affiliate programs and affiliations include, but are not limited to, the eBay Partner Network.
Hello
Help please
My rubber is also crumbling. Pieces of it fell on the car's carpet.
I noticed there was a little freedom / shift in the steering wheel that I was moving up and down.
what should I do? Feeling frustrated.
(I have a 997 carrera s 2005).
As far as I can tell (and I did study the whole assembly extensively), that rubber is just a soft stop when you move the steering column all the way. It doesn't do anything else.
What kind of "freedom/shift" do you feel? When it's locked in position? Left/right turning the wheel? Or only while adjusting?
Hi
When the steering wheel is locked there is a slight freedom of the millimeter - up and down.
Also, I hear the noise "Pak Pak Pak" when I drive with the car on a rough road or on reflectors on the road..
TNX
Hi PowerFlower, just writing to thank you for starting this thread, i had a similar problem with my 2005 Boxster S steering telescoping freely.
My Porsche tech advised a change of steering column, thanks to your experience, he thanked me for enlightening his day.
I have a 2000 Boxster S that has a freely telescoping steering wheel that will not lock. Specifically tltan123, how did you fix this same issue with your 2005?
Did you lubricate that same funnel part and tap on it with a mallet? I hit my brakes super hard during a driving school braking maneuver this weekend and the wheel unexpectedly bottomed out at the dash. Not very comforting!
I finally crawled up under the steering column with a can of Liquid Wrench penetrating oil. Wear safety glasses if you try this! I moved the column locking lever strait down and noticed where there is movement of the mechanism in the steering column shaft above the brake pedal. I shot the penetrating oil into the cracks and openings there. Stuff sprays everywhere! Moved the locking lever back up and shot it again. Then I got a 6 ounce short hammer and a dull chisel and tapped all along the locking mechanism. Very little room to generate much force laying under there with your head jammed into the pedals. Let it sit soaking for 3 days, unlocked the lever, slid the steering wheel into different positions while moving the locking lever up and down and it dispersed the lubricant and started to function correctly. All that aluminum had a thin white powder on it like salt residue. Must be how corrosion builds up on aluminum in a humid environment like I live in.
I finally crawled up under the steering column with a can of Liquid Wrench penetrating oil. Wear safety glasses if you try this! I moved the column locking lever strait down and noticed where there is movement of the mechanism in the steering column shaft above the brake pedal. I shot the penetrating oil into the cracks and openings there. Stuff sprays everywhere! Moved the locking lever back up and shot it again. Then I got a 6 ounce short hammer and a dull chisel and tapped all along the locking mechanism. Very little room to generate much force laying under there with your head jammed into the pedals. Let it sit soaking for 3 days, unlocked the lever, slid the steering wheel into different positions while moving the locking lever up and down and it dispersed the lubricant and started to function correctly. All that aluminum had a thin white powder on it like salt residue. Must be how corrosion builds up on aluminum in a humid environment like I live in.
Thanks Synchcord, i squeezed under the wheel, squirted WD40 into any part or space I could see. then I tapped gently with a hammer but not gently enough and the screw at the end broke off. now the locking lever is completely slack and non functional.
the steering wheel still telescopes in and out but doesnt move up and down.
probably going to have to replace the whole column.
Well, some more WD on that part, and a tap with a mallet, and letting the adjustment lock jump back a few times (instead of carefully guiding it), and it suddenly snapped into place again
May need to get some thicker oil than WD to avoid future issues, but for now at least my steering wheel is fixed again and it doesn't move up/down or back/forth anymore when you least want it to
You are awesome. Thank you so much for writing this up because I just bought my Cayman yesterday and went to go in reverse, holding the steering wheel for supports, only to have it pull right into me. Seeing as the car seeing as the car is 12 years old and sold as is I was about to be pretty irritated, would rather use another word but would probably get flagged for it. I tapped the little cone underneath without having to remove anything after spraying it with some good lube and it freed right up!
I was fortunate I guess that the length of hand le on my hammer and trying to hold a chisel and still hit it with the other hand prevented me from generating much force. I hate you broke your screw. My 2000 boxster steering only telescopes, no tilt in my unit. It is still functioning/locking. I only move it to keep it �greased�. Bear in mind that I used Liquid Wrench NOT WD-40. WD gets sticky and holds on to dust and dirt over time. Eventually the entire mechanism will fail on this 20 year-old car no matter.
I'll just make a comment on lubricating this part.
Is there any sign that the factory used lubricant on the parts? The reason I ask is the cone shaped piece looks like a "collet" type device, where the cone end is actually split by a thin saw cut down the center - and it's meant to lock the in-out movement of the column when it's wedged into a matching female shaped cone that compresses it (due to the slit in it) and it locks the shaft from moving in or out. A lubricant might allow it to move in/out even when it's wedged into the matching cone. A bit of lubricant on the outside diameter where it isn't tapered probably would be fine, but I'd avoid getting lube on the shaft that it slides on. I haven't seen the part that allows the tilt yet - so can't comment on that engineering.
I was fortunate I guess that the length of hand le on my hammer and trying to hold a chisel and still hit it with the other hand prevented me from generating much force. I hate you broke your screw. My 2000 boxster steering only telescopes, no tilt in my unit. It is still functioning/locking. I only move it to keep it �greased�. Bear in mind that I used Liquid Wrench NOT WD-40. WD gets sticky and holds on to dust and dirt over time. Eventually the entire mechanism will fail on this 20 year-old car no matter.
I should have been more careful. Thanks for great advice all the same. I took it to an Indy who has locked it one position- not sure how. But it�s fine for me until I have money to replace the column.
@PowerFlower lower, I've just had the same problem and am Also in Dubai. Maybe something to do with the heat and the dust. Could you give any more information on which bits you freed up and how?
Last edited by MRWDXB; 06-21-2020 at 07:58 AM.
Reason: Tagging user
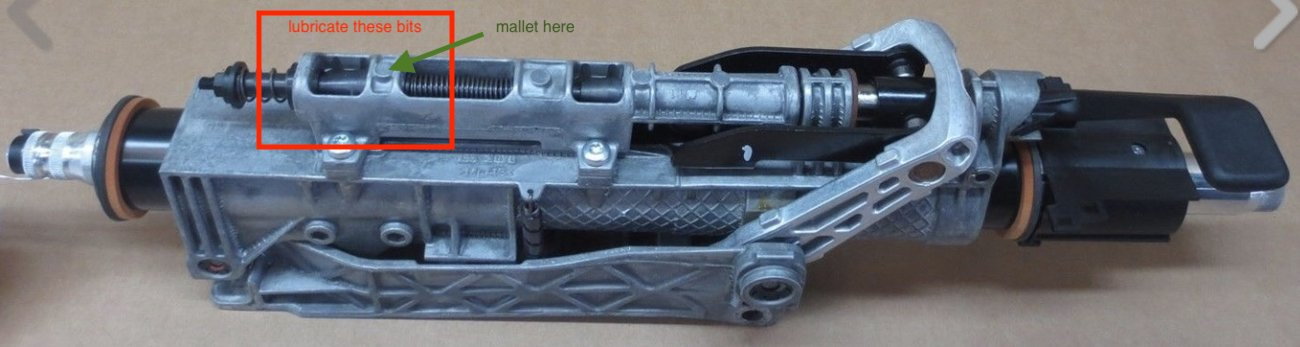
Maybe this clarifies. In this picture, the steering column is upside down (this is what you would see from underneath) and the steering wheel is on the right:
Key is to make sure those black plastic bits can slide within the aluminum. That's why I hit the aluminum with a mallet (and not the screw on the end!), much safer, and combined with wiggling the locking lever, that's how I got it to go loose... and then click in place again
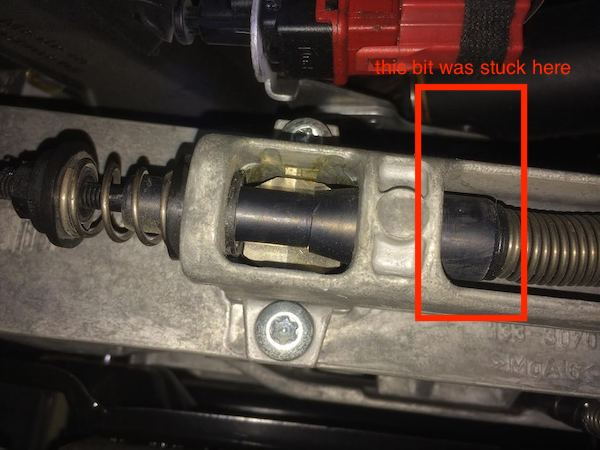
If you compare it to the photo I took of my own column in the car when it wouldn't lock anymore:
...you can see the black plastic part that was stuck in the wrong place (see the red square above).
Happy to have a look with you on the weekend if you need help by the way!
Last edited by PowerFlower; 06-21-2020 at 10:23 AM.
@PowerFlower, Thanks for your swift reply, I'm heading down to the parking with a mallet and a can of WD right now. Ref the offer of help, that's very kind of you, I'll keep you posted. If I'm not sorted by the weekend I'll let you know. Also I'll be sure to update this thread on progress.
Problem solved. For some reason I'm not allowed to post pictures but I will put videos on my insta (@project997.14s). My connection was completely seized. I had to take it all apart and use a socket screw driver and a hammer to force the top tapered block back and forth. It took lots of WD40 and lots of pushing back and forth until it loosened off.
Having gone through this now I'd recommend starting with taking the unit apart. To do so you need to remove the bottom dash, the four torque bolts holding the unit on then remove the black plastic bolt at the far end of the unit. The whole thing should drop down from the steering column and then slide off the rod that runs from the release handle to the plastic screw. Once off, make sure you photogarph the unit and take photos or videos as you go along so you can refer to them when reassembling.
Once off, its much easier to start tapping parts with a mallet. BE CAREFUL: Some components are plastic. Also, the unit is spring loaded. When you remove the plastic grommet at the far end (furthest from the steering wheel). the spring in the centre will pop out. It's best to remove all plastic components before you start tapping.
When reassembling, ensure that all the parts go back in the right place. First the long spring (inserted from the end and not from the side. Then the plastic tube that fits down the end of the spring and creates a seal between the spring and the tapered metal spacer. Then the tappered metal spacer followed by the plastic stopper that holds it all together. Insert the long, thin tube into the centre hole. This long, thin tube has holes drilled down its length therefore, it's easy to identify. This tube activates the second tapered spacer and is essential for this unit to work properly. Finally add the two metal blocks (square metal, tapered on one end, serrated teeth on the other) in the the square holds on top of the unit. Slide the whole thing back onto the rod that runs from the release handle to the plastic screw. Be careful to hold the far end of the unit whilst doing this to stop the unit springing apart. Screw the plastic washer and bolt back on, replace the torque bolts and check to see if it all works. Without the torque bolts done up, the teeth cant engage so you must tighten them before testing.
Really important are the two blocks that sit above the unit. These sit in square holes and fall out when you remove the unit. They are different sizes so you will find it hard to get them mixed up. Also, the bases are tapered to match the tapered parts that I mentioned earlier.
Hope this helps for anyone who has a really bad case of this. Thanks @PowerFlower for all the advice!
Last edited by MRWDXB; 06-25-2020 at 02:08 AM.
Reason: Typo

 09-22-2018, 09:18 AM