When you click on links to various merchants on this site and make a purchase, this can result in this site earning a commission. Affiliate programs and affiliations include, but are not limited to, the eBay Partner Network.
Would you mind to share some more info on the location of the earth points?
Thanks for the great write up!
They're throughout the car in the frunk and engine bay, I've even found some under the seats.
Just go along the inside perimeter, you can't miss them. They're a bunch.
Unbolt the nut, remove the connector, clean it with a little wire brush. Your goal is to remove any corrosion you find. I found some electrical parts cleaner helps, then put on a little dielectric grease, and put nut back on.
Code:
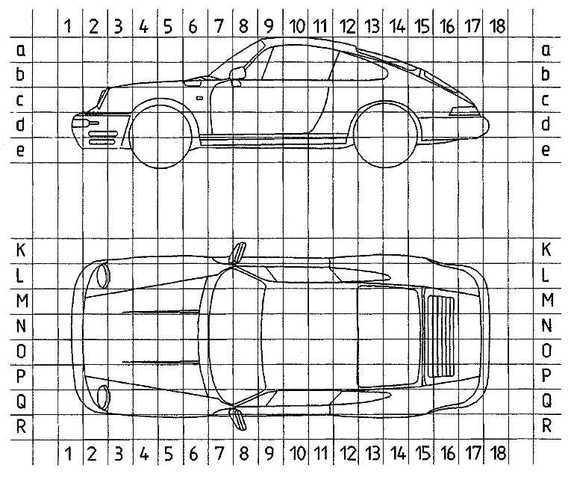
*** Ground Points
GP I Luggage Compartment, wheel housing left 2cP
GP II Luggage Compartment, wheel housing right 2cM
GP III On firewall -
GP IV Ground for power consumers, under seat left 11eP
GP V Electroncis, under seat left 10eP
GP VI Central electrics, on side member right 6bL
GP VII Antenna amplifier on side member left 7bL
GP VIII Inside light convertible, roof centre front 9aN
GP IX Inside light, roof right 11aL
GP IX(sic) Inside light, roof left 11aP
GP X Battery, luggage compartment left 3eP
GP XI Ground strap (starter, transmission, engine, body) 14cM
GP XII Engine compartment rear left 15cQ
GP XIII Motor left 15cO
GP XIV Engine compartment rear right 15cL
GP XV Instruments, isde member left 7bQ
GP XVI Combined lead rear left 13dP
GP XVII Combind lead rear right 12dM
GP XVIII Combined lead front right 4cM
GP XIX Combined lead front left 4cP
GP XX Seat cross member, under seat right 8eL
GP XXI Ground for poser consumers, connection crank case 16cNO
GP XXII Electronics, connection crank case 16cNO
cool - any chance of more info on 3, 13, 14, 17 and 18 ?? please
Of course.., been away with work so not had a chance to reply so here goes...
3. The screen washer jets have built in heaters for ice, and a pair of wires that are moulded into the jet and plug in just where the frunk lid hinges are either side. The issue for me is they seem to be powered all the time the ign is on, whatever the weather, so pointless, doesnt stop the frunk pipework feeding them freezing solid anyway as unlike a front engine car there is no heat there. So just unplug, or if you are mad on weight like me unplug and chop the wires off!
13. Basically delete all the headlight washer stuff, tank, jets, hoses, relay, wiring, and blank off the holes. The washer bottle is under the wing (fender?) and is very big with 2x pumps and hoses etc. If you delete this you can run an RS small washer bottle/tank inside the frunk - euro cars already have this called the high intensity washer (supposed to be filled with special washer fluid) and is fitted in addition to the big tank in the wing. But you can buy it. Then just move the washer hoses that go to the screen jets over to the small tank and move the wires (blu/blk and brn?) over to the new pump. This saves a bit of weight. Although the tank is smaller I don't have an issue with it running out. It gets rid of the under wing wiring and pumps and a couple of relays.
14. I removed all 3 stock horns and brackets, 2x trumpet and one normal, and replaced them with a pair of Bosch mini dual tone horns, just bolt them up to the headlight bowl (there is an unused thread there) and use the exisiting wires from the trumpet horns to feed them. Saves quite a bit of weight and the sound is much better for me..
17, 18. At first I tried to re-wire inside the car but after a check of the wiring diagrams the changes can be made on the underside of the fuse/relay block in the frunk. The cables on the underside are into connector blocks labelled with letters, the connector blocks can be unplugged by pulling on the release lever on the underside of the fuse/relay unit. Some useful info on here (not 964 but same idea) .
Once you know how to identify the correct wires you can splice/change anything. btw those connectors can be the cause of odd faults as the spade plugs can be corroded or opened up so loose, eg DME issues.
I will try to find my notes about which wires to move/join for the mods I have done.
excellent - thanks (again)... I seem to be following around after you with your mods Much appreciated !
cool ! I was going to do this do - but then... the only thing I thought about this later is... do you think that the car is easier to potentially steal if the windows are 'live' all the time? Essentially, one just has to slide something between the seals, push the window button and down they go? Maybe I am just being paranoid.. but I am guess that is why the windows aren't live when the ignition is turned off?
I don't think it is. What's the chance they would know you have modded your car to do that? Plus, if they are set on stealing your car, they're probably gonna.
I don't think it is. What's the chance they would know you have modded your car to do that? Plus, if they are set on stealing your car, they're probably gonna.
yeah - good point ! Where did you get your relay from (if you don't mind me asking) ?
17, 18. At first I tried to re-wire inside the car but after a check of the wiring diagrams the changes can be made on the underside of the fuse/relay block in the frunk. The cables on the underside are into connector blocks labelled with letters, the connector blocks can be unplugged by pulling on the release lever on the underside of the fuse/relay unit. Some useful info on here (not 964 but same idea) .
Once you know how to identify the correct wires you can splice/change anything. btw those connectors can be the cause of odd faults as the spade plugs can be corroded or opened up so loose, eg DME issues.
I will try to find my notes about which wires to move/join for the mods I have done.
Resurrecting this excellent thread
Did you find which wires/connectors you need to move/change for these 2 mods? The fog light one in particular is useful


 12-09-2015 | 10:38 AM


 Much appreciated !


