When you click on links to various merchants on this site and make a purchase, this can result in this site earning a commission. Affiliate programs and affiliations include, but are not limited to, the eBay Partner Network.
The recent road trip highlighted how modern device power needs aren�t met by a USB adaptor in the cigarette lighter receptacle.
I had a couple of USB plugs in my parts stash so decided to hard wire those in.
I looked at running a wire from the battery but before I found a suitable grommet hole in the frunk firewall, a fellow Rennlister, Spokes, suggested using the cigarette lighter power feed.
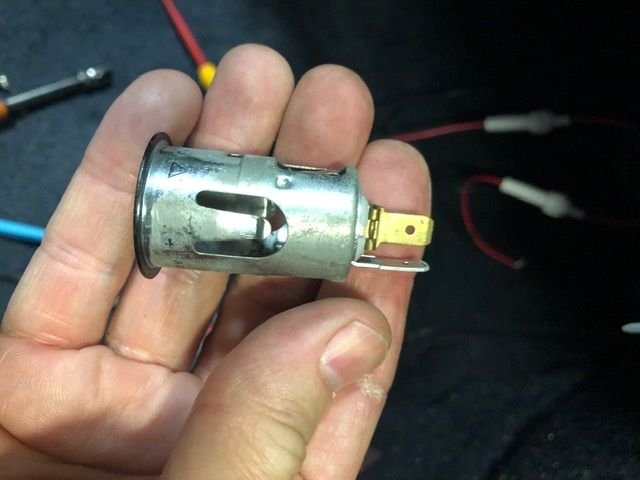
First up is removing the cigarette lighter insert. This YouTube video gives a good instruction.
1. Fuse 7 is for left hand drive cars. It�s fuse 25 for right hand drive cars.
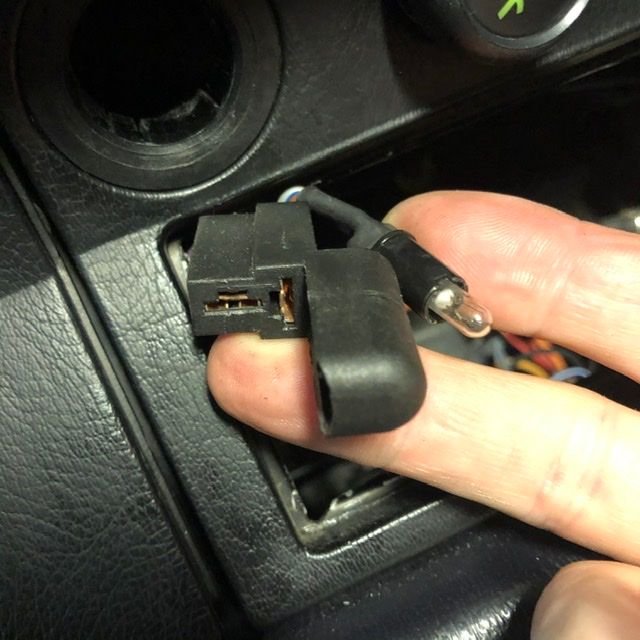
2. My insert required more force to rotate. There are two small tabs you need move the insert over. I needed to assist the rotation with a small screwdriver.
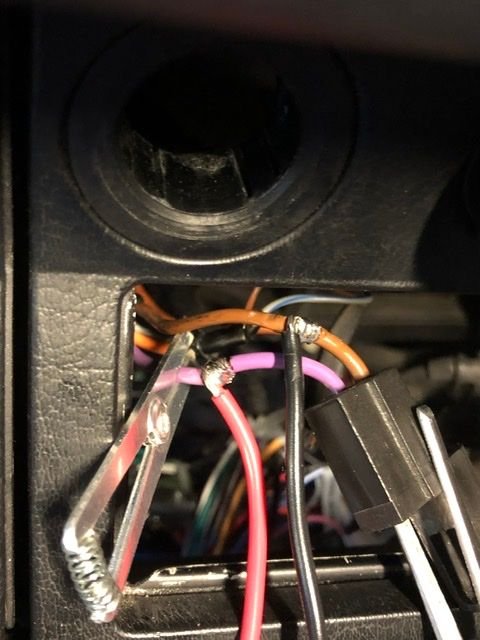
The power wires are clear. Purple is positive and Brown is Ground. I have learned in the past that soldered joints are the most reliable so I tapped in some 10amp wire to each one.
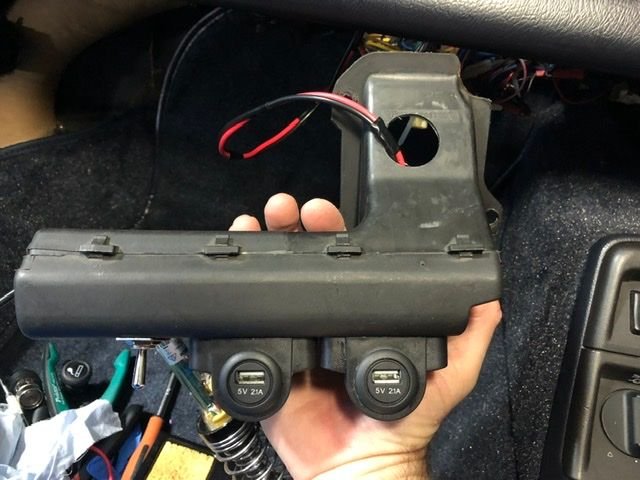
I thought about places to mount the plugs and decided to use the plastic air diffuser under the dash. These plugs have inline fuses and I added a switch. The reason for that is that the cigarette lighter power is powered even with the ignition off and the plugs could have some drain for their Internal circuits so I didn�t want to introduce a source of battery drain.
I just re installed my spoiler motor and found the rubber isolaters missing / crumbling. Yours look to be also? Did you come up with a fix?
To be honest I didn�t know any were missing. My car didn�t come with a working spoiler mechanism so I bought one off a local owner and it came as a box of parts. I�ll check the catalogue.
The issue I ran into is the cap head screws bottom out without fastening the gearbox tight. The rubber bits come with the motor, are not available as parts to my knowledge. Let's share ideas for a fix... see pic on my thread - https://rennlist.com/forums/964-foru...failure-2.html
The issue I ran into is the cap head screws bottom out without fastening the gearbox tight. The rubber bits come with the motor, are not available as parts to my knowledge. Let's share ideas for a fix... see pic on my thread - https://rennlist.com/forums/964-foru...failure-2.html
Are we talking about the motor or the gearbox? My motor has those mounts.
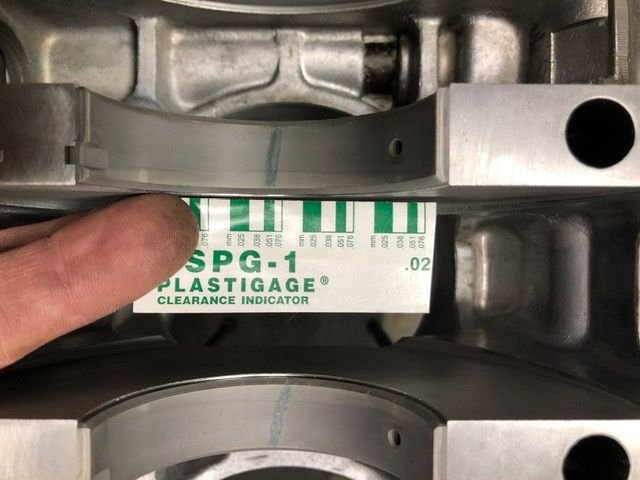
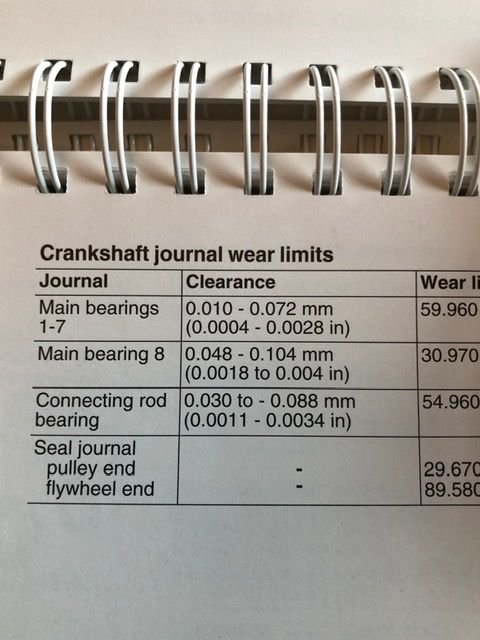
More work on my rebuild for a friend. Given the Glyco stories we had to check clearances. The crankshaft had already been checked. Plastigage confirmed all seven bearings are good. Very consistent readings.
From what I gather it's the rod bearings that have had issues. I'm currently on the fence as to how to proceed myself. Considering the Clevite 77 units as an alternative but it does seem from posts on Pelican that the rod bearings from Porsche are quality checked with witness marks remaining in 3 spots after being measured. Looking forward to seeing how you get on with the rod bearings. I had a very difficult time getting a good measure with out the rod moving at all on the crank during the measure. I'm going to put on the right bank of pistons and cylinders and measure the rods with the crank laid in the case to unsure a solid measure.
From what I gather it's the rod bearings that have had issues. I'm currently on the fence as to how to proceed myself. Considering the Clevite 77 units as an alternative but it does seem from posts on Pelican that the rod bearings from Porsche are quality checked with witness marks remaining in 3 spots after being measured. Looking forward to seeing how you get on with the rod bearings. I had a very difficult time getting a good measure with out the rod moving at all on the crank during the measure. I'm going to put on the right bank of pistons and cylinders and measure the rods with the crank laid in the case to unsure a solid measure.
Pete
The engine owner did the rod bearings himself with Glyco. A few wouldn’t allow the rods to rotate on the crankshaft under their own weight so he started again on those with Porsche branded bearings, which were all good. That was the reason I had to check the crankshaft bearings as well. He just didn’t trust them. Another New Zealander mentioned ACL, but I have no experience with them http://www.acl.co.nz/wp-content/uplo...alianMar17.pdf
I'm getting ready to seal my case and have been reviewing this thread whilst making my plan of attack. I'm wondering if you have any thoughts as to how your sealing strategy has worked out for you. Any problem areas in the last 2.5 years since she fired up? For that matter in terms of the overall rebuild (sealing aside) are there any points that you would sharpen so to speak?
Also- again- thanks for the fantastic documentation. Its really invaluable to another DIY'er

 04-24-2020, 03:43 AM