

Winter Maintenance

Thread Starter
Burning Brakes
Joined: Feb 2002
Posts: 873
Likes: 0
From: London, England
Belated Merry Christmas and Happy New Year to all Rennlisters.
Thought I'd start a very small post on my winter project of doing some light bodywork maintenance and improvements to my 964, partly in preparation for Spa next year and partly just good practice for a 20+ year old car.
My list is quite small:
1. Install Rennline engine carrier strengthener bar (Wevo mounts installed a few months ago).
2. Replace straight through de-cat pipe with a Turbo Thomas straight through silencer (in an effort to reduce the dB level of the exhaust for neighbourly and track reasons).
3. Replace the G pipe with a Cup pipe and re-install secondary silencer.
4. Check and treat any rust I find while everything is removed, paint and protect any crevices that look vulnerable to rust.
That's it! Sounds simple but I'm several hours into this project now and have more respect than I already did for the efforts of robt964!! I am not intending (or able) to do anything as comprehensive as robt964. My efforts will just be a functional and effective means of increasing the lifespan of my car.
So far, I have removed the rear bumper, all the brackets, exhaust system and heat shields and cleaned everything down from the rear wheel arches back. We all like pics so here we are:

The trolley jack is not holding the car, the back is sat on axle stands, but I will probably need to use the jack to hold the engine while I have the engine carrier out unless anyone has any better ideas on how to support the engine - worried about the jack losing pressure over time and the engine dropping before I get the carrier back!
Tonight I got everything cleaned down and degreased as a starting point to see what I am dealing with. Not easy to do in a garage as I had to take everything out, sweep all the floors down, degrease everything and then jetwash it all with a Karcher pressure washer inside the garage! The amount of 'overspray' actually wasn't too bad, I was able to easily brush out any water on the floor with a stiff broom!:


Basically, everything looks pretty sound, but there are a couple of areas that I have definitely caught in good time:

The right hand bumper support looks pretty good but there is some flaking paint.

The left hand side is still sound but looks a little more rusty.

There is a really tight little crevice above the bumper support which I have not seen mentioned on any other threads, but looks like a great place for rust to form. Mine is starting to flake and would only be a year or so before it looks much worse I think. There are metal trays under the lights which prevent most mud getting into this area. The right hand side was covered in quite a lot of oily gunk, so was well protected. The left hand side wasn't and looks the worse for it.


Getting into this space with anything more than a finger is impossible. I have managed to get a small wire brush in there to remove the worst of the flaking paint. The other areas I will wire brush with a rotary attachment on my cordless drill.
These are the products I will use to treat the bodywork:

The Dinitrol RC900 is a product to 'convert' the rust. As it is all surface corrosion I have found and because the main areas I want to treat are very inaccessible I hope this product will stop any rust spreading. The ML is a type of cavity wax and will be applied liberally, after the RC900 has gone off, into any area I think mud and crud could collect and rust can form. The chassis black is for treating the support bars and any other components that need it!
Thought I'd start a very small post on my winter project of doing some light bodywork maintenance and improvements to my 964, partly in preparation for Spa next year and partly just good practice for a 20+ year old car.
My list is quite small:
1. Install Rennline engine carrier strengthener bar (Wevo mounts installed a few months ago).
2. Replace straight through de-cat pipe with a Turbo Thomas straight through silencer (in an effort to reduce the dB level of the exhaust for neighbourly and track reasons).
3. Replace the G pipe with a Cup pipe and re-install secondary silencer.
4. Check and treat any rust I find while everything is removed, paint and protect any crevices that look vulnerable to rust.
That's it! Sounds simple but I'm several hours into this project now and have more respect than I already did for the efforts of robt964!! I am not intending (or able) to do anything as comprehensive as robt964. My efforts will just be a functional and effective means of increasing the lifespan of my car.
So far, I have removed the rear bumper, all the brackets, exhaust system and heat shields and cleaned everything down from the rear wheel arches back. We all like pics so here we are:
The trolley jack is not holding the car, the back is sat on axle stands, but I will probably need to use the jack to hold the engine while I have the engine carrier out unless anyone has any better ideas on how to support the engine - worried about the jack losing pressure over time and the engine dropping before I get the carrier back!
Tonight I got everything cleaned down and degreased as a starting point to see what I am dealing with. Not easy to do in a garage as I had to take everything out, sweep all the floors down, degrease everything and then jetwash it all with a Karcher pressure washer inside the garage! The amount of 'overspray' actually wasn't too bad, I was able to easily brush out any water on the floor with a stiff broom!:
Basically, everything looks pretty sound, but there are a couple of areas that I have definitely caught in good time:
The right hand bumper support looks pretty good but there is some flaking paint.
The left hand side is still sound but looks a little more rusty.
There is a really tight little crevice above the bumper support which I have not seen mentioned on any other threads, but looks like a great place for rust to form. Mine is starting to flake and would only be a year or so before it looks much worse I think. There are metal trays under the lights which prevent most mud getting into this area. The right hand side was covered in quite a lot of oily gunk, so was well protected. The left hand side wasn't and looks the worse for it.
Getting into this space with anything more than a finger is impossible. I have managed to get a small wire brush in there to remove the worst of the flaking paint. The other areas I will wire brush with a rotary attachment on my cordless drill.
These are the products I will use to treat the bodywork:
The Dinitrol RC900 is a product to 'convert' the rust. As it is all surface corrosion I have found and because the main areas I want to treat are very inaccessible I hope this product will stop any rust spreading. The ML is a type of cavity wax and will be applied liberally, after the RC900 has gone off, into any area I think mud and crud could collect and rust can form. The chassis black is for treating the support bars and any other components that need it!
Thread Starter
Burning Brakes
Joined: Feb 2002
Posts: 873
Likes: 0
From: London, England
Jack: Yes, I agree, my experience years ago with such rust converters is they don't really work... Dinitrol has a good reputation and it really is barely accessible and only just visible squinting into the gap with a torch! I'll take a better photo. I would have to take the rear wings off to access it, which seems a shame!
Alex: I was intending to go over the RC900 with the ML cavity wax/sealer. The ML leaves an oily residue so I reckon this would do a pretty good job of slowing down any rust on it's own as I don't see how any rust, even once it's started, could continue to form once coated with oil...?
Alex: I was intending to go over the RC900 with the ML cavity wax/sealer. The ML leaves an oily residue so I reckon this would do a pretty good job of slowing down any rust on it's own as I don't see how any rust, even once it's started, could continue to form once coated with oil...?
Three Wheelin'
Joined: Jan 2013
Posts: 1,609
Likes: 9
From: Bucks
Nice work  - it's tough going but well worth the work. It's scary how many nooks, crannies and shelves are back there. I did as much as I could up behind the rear light boxes but have had to leave the hard to reach places to the bodyshop. I used a bore scope to have a good look around. Tom (Lemass) said he'd get the nozel of the sand blaster up behind there to clean it all out before etch primer and a good few coats of some sealer.
Once painted I'd like to coat these grot traps of the rear arches with something. I've done a bit of reasearch and think I'll give Dinitrol HP a go. It's a waxy coat but non sticky and good for temps upto 180c which is important as you don't want it dribbling off once HOT like most others would. The Dinitrol Metalic specs also look good for the higher wear arch traps.
Data sheets
- it's tough going but well worth the work. It's scary how many nooks, crannies and shelves are back there. I did as much as I could up behind the rear light boxes but have had to leave the hard to reach places to the bodyshop. I used a bore scope to have a good look around. Tom (Lemass) said he'd get the nozel of the sand blaster up behind there to clean it all out before etch primer and a good few coats of some sealer.Once painted I'd like to coat these grot traps of the rear arches with something. I've done a bit of reasearch and think I'll give Dinitrol HP a go. It's a waxy coat but non sticky and good for temps upto 180c which is important as you don't want it dribbling off once HOT like most others would. The Dinitrol Metalic specs also look good for the higher wear arch traps.
Data sheets
Last edited by robt964; Jan 1, 2014 at 08:50 AM.
Thread Starter
Burning Brakes
Joined: Feb 2002
Posts: 873
Likes: 0
From: London, England
Hi Rob, good point you make about temps. I just looked at the data sheets for my proposed Dinitrol products but they don't mention temperature ranges, only for engine underseals. Do you think those cavities (main ones I'm thinking of are behind the light boxes and above the wheel arches), will reach very high temps anyway?
Good tip on the jack by the way! Thanks for that.
Good tip on the jack by the way! Thanks for that.
Trending Topics
Three Wheelin'
Joined: Jan 2013
Posts: 1,609
Likes: 9
From: Bucks
Hi, I think for the closed in cavities that you're referring too it'll be fine, since it can't flow out. If being used to coat the exposed rear portion of the rear arches and up behind the light boxes etc then the lifespan of protection it offers maybe much reduced. In the right conditions, those parts of bodywork do get very hot. I've seen stuff like waxoyl used in the wrong places on some cars so that even the sun on a hot day is sufficient to get the panels hot enough that it dribbles out of the panel seams or collects with crud and blocks drain holes.
Thread Starter
Burning Brakes
Joined: Feb 2002
Posts: 873
Likes: 0
From: London, England
Progress update:
RC900 rust treatment has been applied extensively. I managed to do a pretty good job I think with some long wire brushes reaching the areas I could only just see. Ideally a borescope type device as suggested by Rob with sand blasting would be the ultimate solution but I'm happy that I've reached the deepest nether regions I need to. The car has lasted 22 years with seemingly little paint in these areas so the measures I'm taking should on balance give me many many years of trouble free motoring - which is my goal for this project. By the time these areas fail - I'll be in full strip down resto territory anyway as I see it...!

The RC900 is a cellulose based type product, which was surprising. It leaves a slightly glossy finish on the metal and all the previously rusty areas go black after a couple of applications. I applied 3 coats leaving 6 hours between each. The Dinitrol ML spray can came with a spare nozzle with a small pipe attached (like the one you get with a can of WD40), which was the same shape as the nozzle on the on the RC900 spray can, so I used this attachment to get the RC900 into those hard to reach areas.
My intention initially was just to coat these areas with Dinitrol once protected with the RC900, but I found a can of 'anti-rust' primer in the garage so thought a coat of paint would not hurt, seeing as the paint applied from the factory seemed so sparse.


These were taken after the first coat of primer. I gave the areas two light coats of primer. This was worth doing because the primer seemed to do a good job of getting right into the various apertures.
I ordered a spray can top coat of 80K Guards Red from www.refinishsystems.com. The top coat and lacquer cost �23.40 delivered and arrived next day - great service I think.

This is how it looked after the first coat:


Next I need to give it a couple of extra coats and the lacquer before the final thorough going over with the Dinitrol. Hopefully going to get engine carrier of this weekend so I can take it into work for my welder to work his magic.
RC900 rust treatment has been applied extensively. I managed to do a pretty good job I think with some long wire brushes reaching the areas I could only just see. Ideally a borescope type device as suggested by Rob with sand blasting would be the ultimate solution but I'm happy that I've reached the deepest nether regions I need to. The car has lasted 22 years with seemingly little paint in these areas so the measures I'm taking should on balance give me many many years of trouble free motoring - which is my goal for this project. By the time these areas fail - I'll be in full strip down resto territory anyway as I see it...!
The RC900 is a cellulose based type product, which was surprising. It leaves a slightly glossy finish on the metal and all the previously rusty areas go black after a couple of applications. I applied 3 coats leaving 6 hours between each. The Dinitrol ML spray can came with a spare nozzle with a small pipe attached (like the one you get with a can of WD40), which was the same shape as the nozzle on the on the RC900 spray can, so I used this attachment to get the RC900 into those hard to reach areas.
My intention initially was just to coat these areas with Dinitrol once protected with the RC900, but I found a can of 'anti-rust' primer in the garage so thought a coat of paint would not hurt, seeing as the paint applied from the factory seemed so sparse.
These were taken after the first coat of primer. I gave the areas two light coats of primer. This was worth doing because the primer seemed to do a good job of getting right into the various apertures.
I ordered a spray can top coat of 80K Guards Red from www.refinishsystems.com. The top coat and lacquer cost �23.40 delivered and arrived next day - great service I think.
This is how it looked after the first coat:
Next I need to give it a couple of extra coats and the lacquer before the final thorough going over with the Dinitrol. Hopefully going to get engine carrier of this weekend so I can take it into work for my welder to work his magic.

Thread Starter
Burning Brakes
Joined: Feb 2002
Posts: 873
Likes: 0
From: London, England
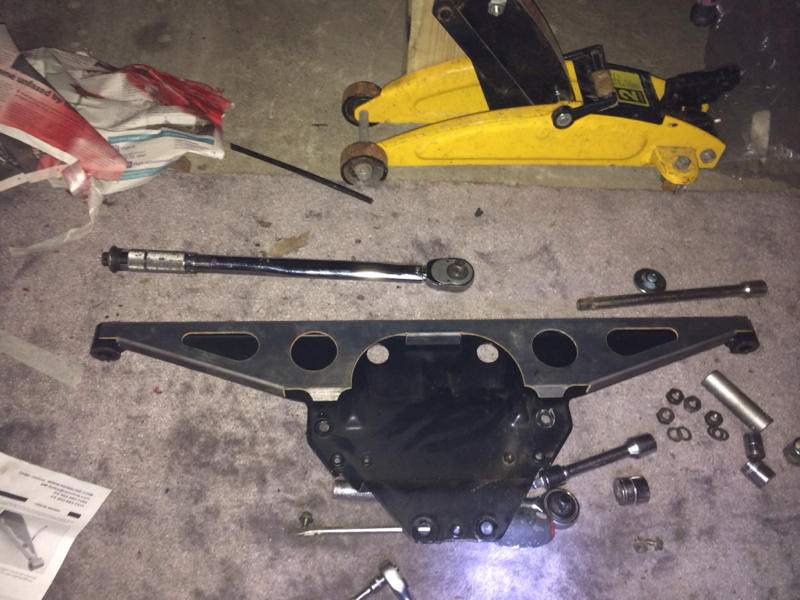
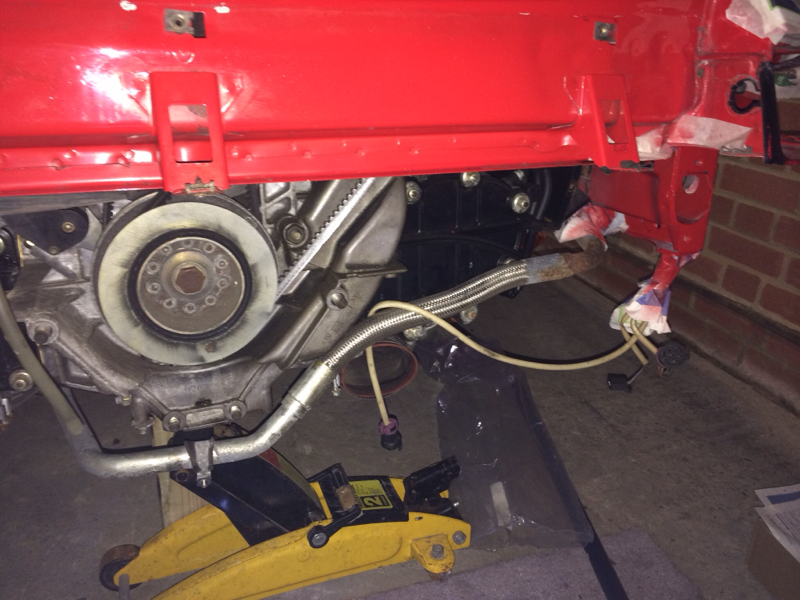
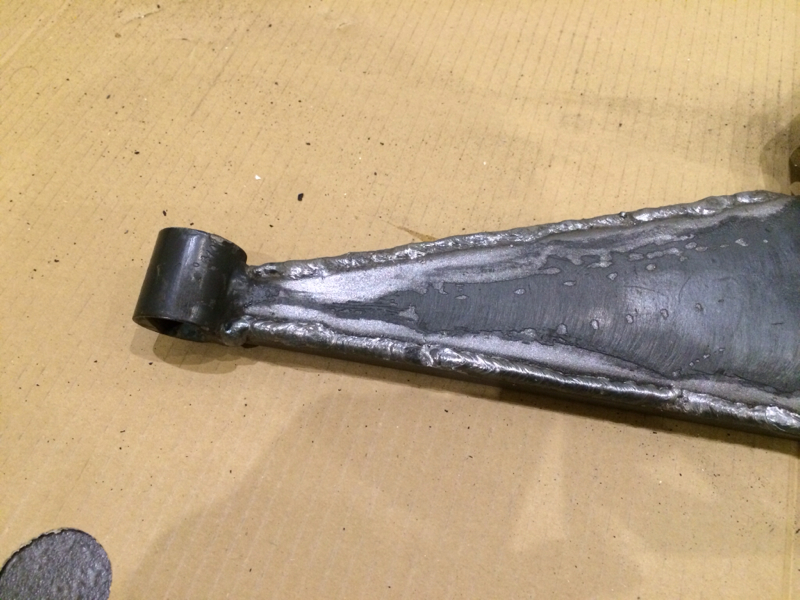
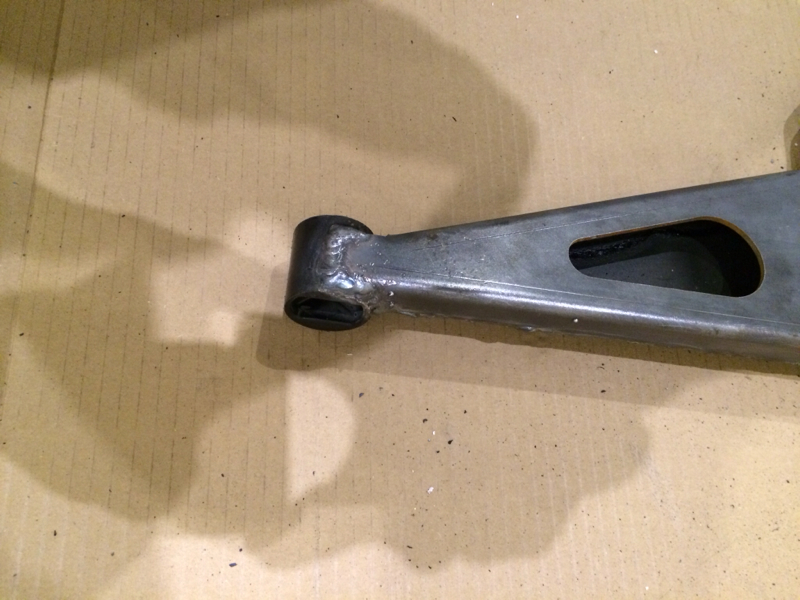
Engine carrier has been removed and strengthened.
Luckily the carrier looked in good condition with no cracks.
Engine carrier removed with Rennline gusset plate laid over the carrier:
image-1890176440.jpg
Engine supported on trolley jack:
image-2476348785.jpg
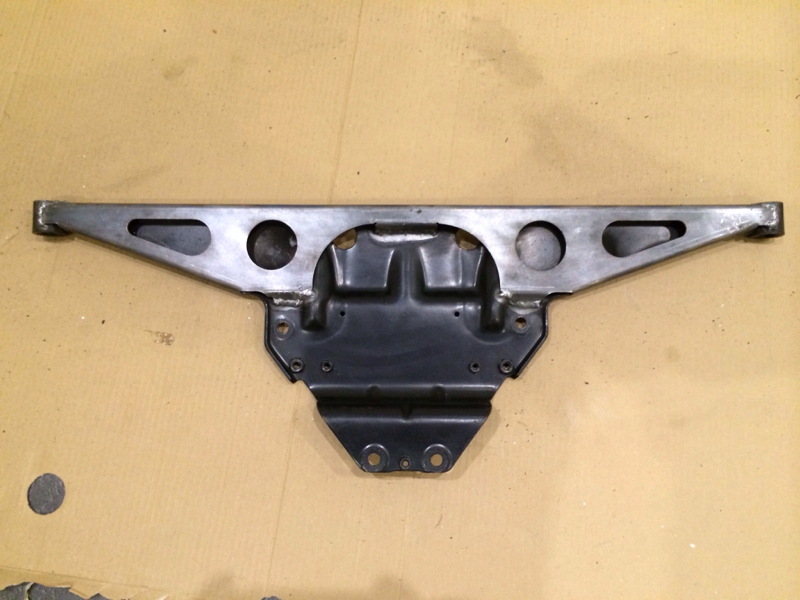
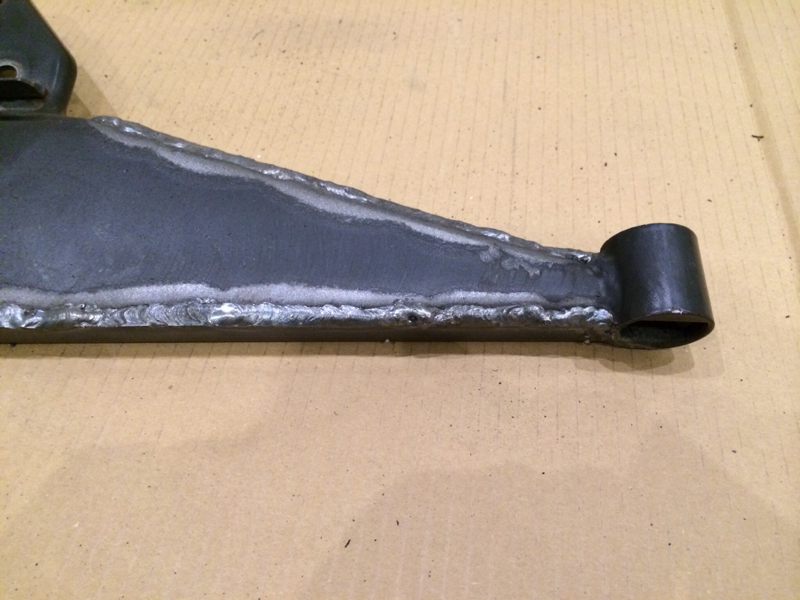
Engine carrier welded up and cleaned ready for primer and paint:
image-1318377129.jpg
image-4157849526.jpg
image-3241850747.jpg
image-2333072302.jpg
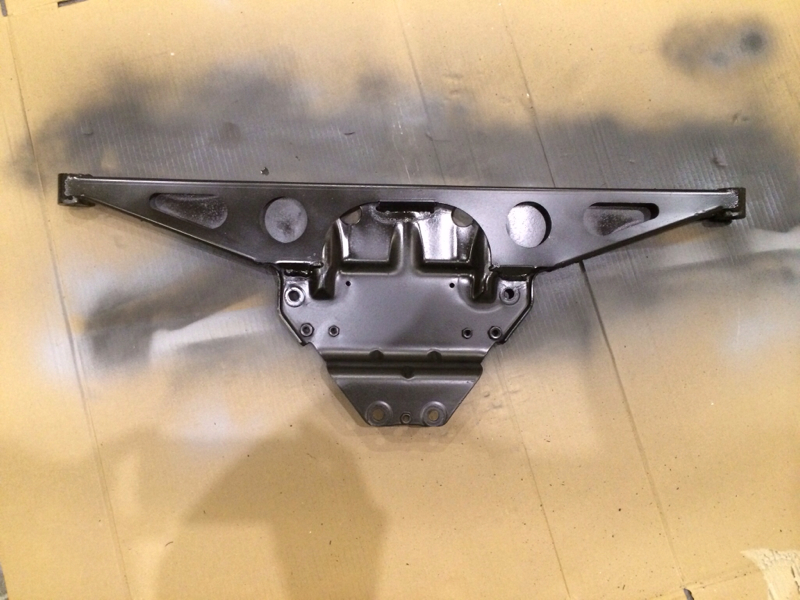
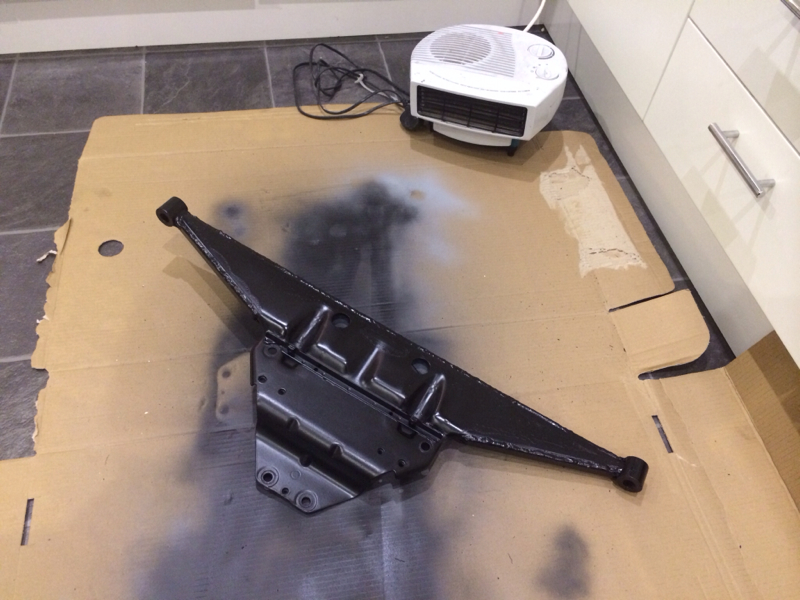
Primered and painted with Eastwood Extreme Chassis Black satin finish:
image-56448164.jpg
Had to get a floor heater from the garage to bake the paint a bit before the missus comes home and wonders what I am doing in her kitchen with engine bits!
image-1933457627.jpg
Luckily the carrier looked in good condition with no cracks.
Engine carrier removed with Rennline gusset plate laid over the carrier:
image-1890176440.jpg
Engine supported on trolley jack:
image-2476348785.jpg
Engine carrier welded up and cleaned ready for primer and paint:
image-1318377129.jpg
image-4157849526.jpg
image-3241850747.jpg
image-2333072302.jpg
Primered and painted with Eastwood Extreme Chassis Black satin finish:
image-56448164.jpg
Had to get a floor heater from the garage to bake the paint a bit before the missus comes home and wonders what I am doing in her kitchen with engine bits!
image-1933457627.jpg
Thread Starter
Burning Brakes
Joined: Feb 2002
Posts: 873
Likes: 0
From: London, England
Managed to find a couple of hours to get the engine carrier back in today. Fiddly job because the rear engine tin needs to go in at the same time and with the engine in its normal position in the car, it takes a bit of maneuvering. There are two bolts opposite the rear engine fan that don't seem to be accessible if you try to refit the engine carrier by itself and offer up the rear tin afterwards.
I managed to get the rubber gasket between the body to dress properly around the rear tin and feel better now I'm not relying on the trolley jack to hold my engine in place!
I decided not to go with fibreglass tinware in the end, as per my other post. I've got other things I want to spend that money on this year for the car, not to mention Spa, 2 Le Mans trips, skiing next month and the Spa 6 hour in September, and that's before a family holiday! So I figured the tin as it is will last me easily another few years yet, by which time I may be thinking of doing this process again anyway. I did take the rear tin to a welding / fabrication workshop near my work but it would have required quite a bit of work to fashion a repair, and I decided this wasn't really economic either and the guy wasn't overly keen to get involved anyway!
Next job is to remove the AC compressor to try and fix a leak, and have a play with my new zinc plating kit with a load of brackets and bolts.....
Thread Starter
Burning Brakes
Joined: Feb 2002
Posts: 873
Likes: 0
From: London, England
Engine carrier back in and tinware all bolted up
image-2337821871.jpg
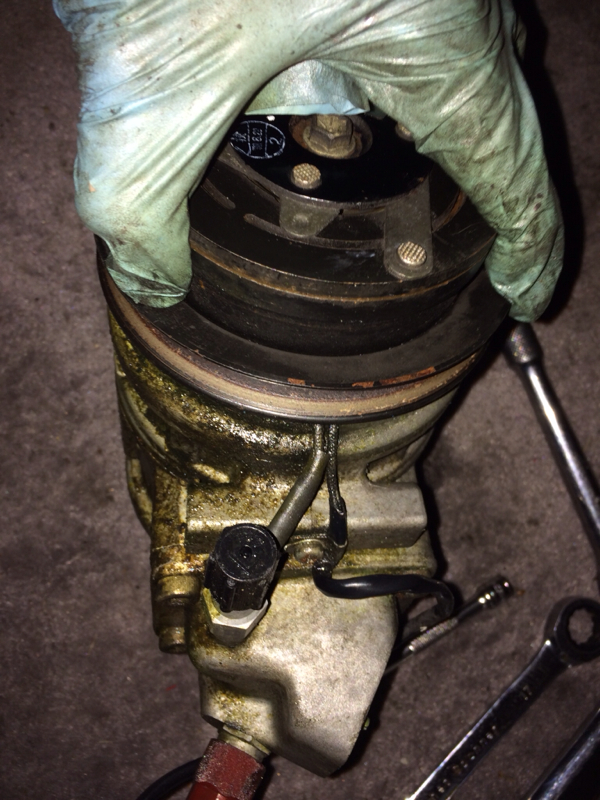
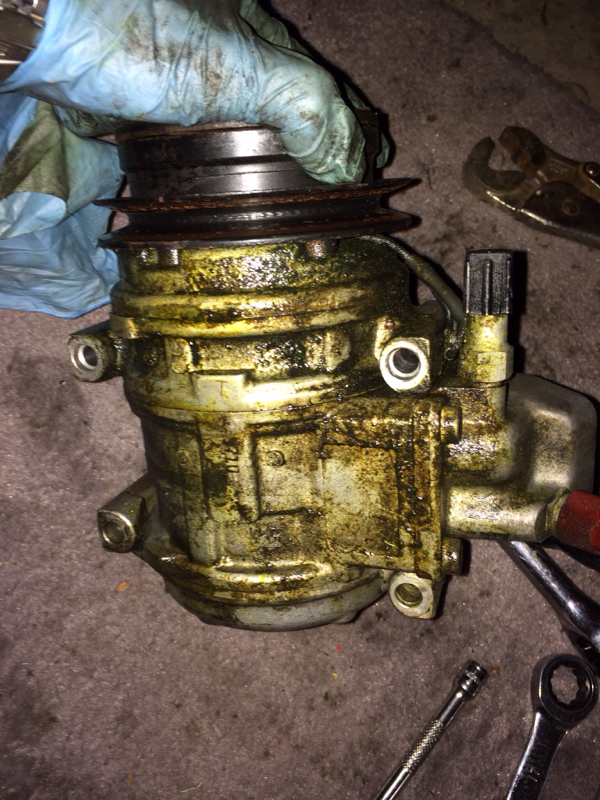
And AC compressor removed to inspect for a leak...
image-109663497.jpg
image-3028521600.jpg
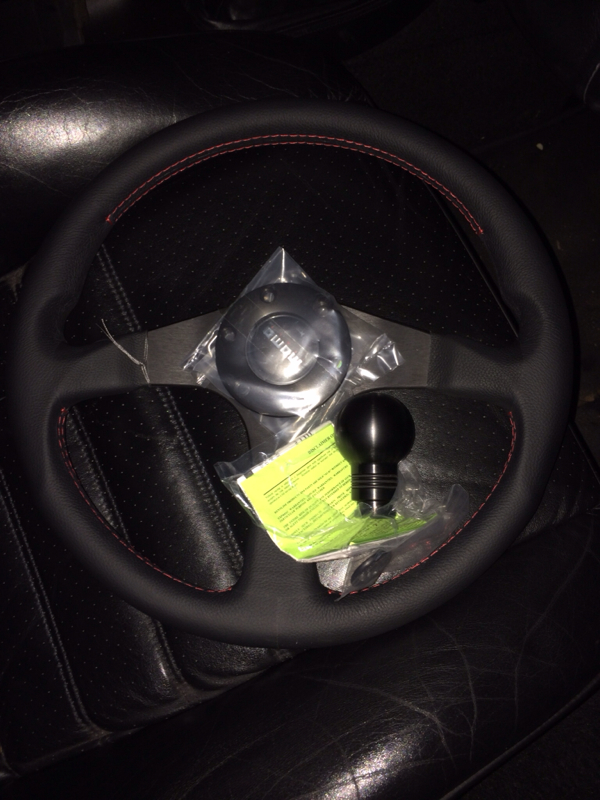
New steering wheel arrived today as well
image-3220950049.jpg
Which will be fitted along with the Rennline aluminium gear **** I bought with the engine carrier. The black anodizing is, despite the pictures, actually a really good match between the steering wheel and the gear ****.
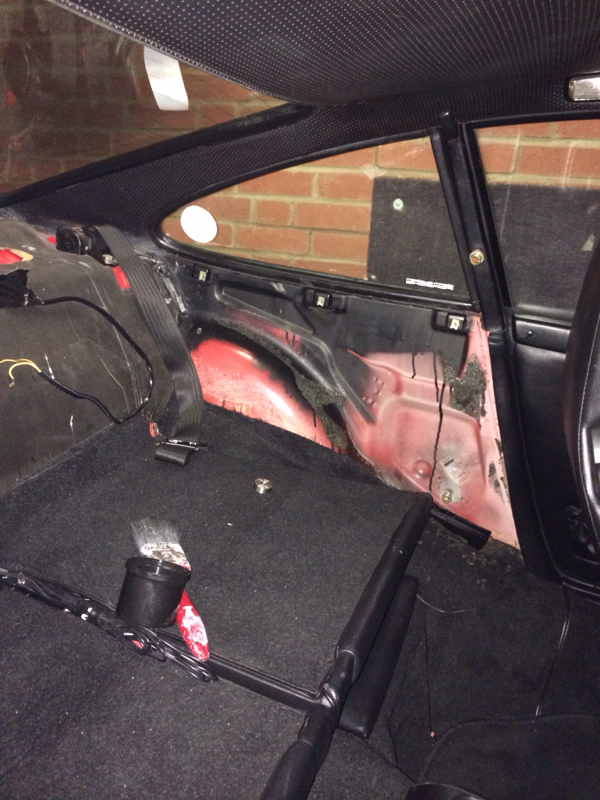
I've also removed the seat belts and dropped them off at Quickfit Safety Belt Services (thanks StuartQ) to get the belts re-webbed in red!
image-3190284498.jpg
image-2337821871.jpg
And AC compressor removed to inspect for a leak...
image-109663497.jpg
image-3028521600.jpg
New steering wheel arrived today as well
image-3220950049.jpg
Which will be fitted along with the Rennline aluminium gear **** I bought with the engine carrier. The black anodizing is, despite the pictures, actually a really good match between the steering wheel and the gear ****.
I've also removed the seat belts and dropped them off at Quickfit Safety Belt Services (thanks StuartQ) to get the belts re-webbed in red!
image-3190284498.jpg
Burning Brakes
Joined: Jul 2005
Posts: 788
Likes: 1
From: SoCal