When you click on links to various merchants on this site and make a purchase, this can result in this site earning a commission. Affiliate programs and affiliations include, but are not limited to, the eBay Partner Network.
I had my 1990 C4's steering rack rebuilt a year and a half ago and I took the engine out twice this past winter (once to replace the flywheel and clutch and once because I didn't read enough Rennlist posts about which way the ring gear goes on before I put it back together the first time). In all of those tasks, you get power steering fluid on yourself. To anyone doing this job now, there is a TSB saying to use Pentosin CHF 11S instead of ATF but not to mix them. Here is some more about the TSB: https://rennlist.com/forums/964-foru...sin-202-a.html
If you have ATF, you're fine to keep it, of course. It's already worked fine for 20-25 years in your car. For me, I switched when I did the steering rack. No problems since then.
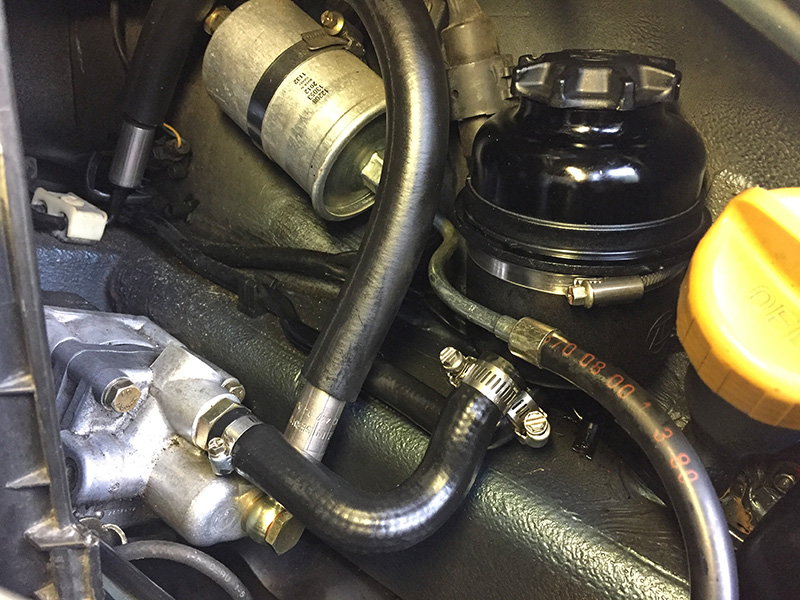
Also, as long as you are draining the reservoir, you should consider replacing it. The fluid's only filter is integrated into the reservoir and if you're going to put new fluid in, you may as well take advantage of the empty reservoir to swap it out. Once the two fluid lines are disconnected (I replaced those as well for good measure), it's easy to get the reservoir out and the new one in. As a bonus, my 1990 car's original reservoir was translucent with a plain cap so you had to read through the dirty plastic for the fluid level. The replacement I got was opaque plastic with a dipstick integrated into the cap. It's not the cleanest way to read the fluid level but it's much easier than the nearly-opaque sight glass method ever was.
Good idea to give that number. Looking at PET again today, I note that I only replaced one of the fluid lines, item 16 in the same drawing, part 964.347.445.03.
Wanting to do a full flush myself. Question is, I don't want to pull the return line off the bottom of the reservoir if I don't have to as that rubber connection is old and difficult to remove from a space standpoint too.
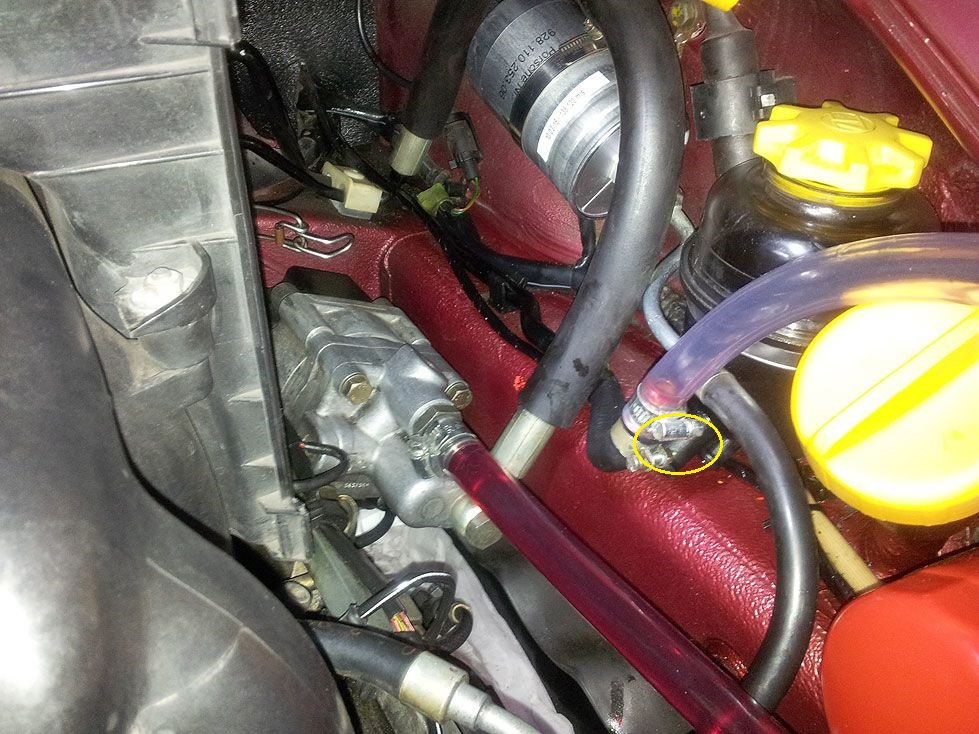
What if I just remove the line that goes from the bottom of the reservoir to the pump, remove the pump end and plumb it to a clear hose to a discharge tank? So the discharge would essentially come from the fitting circled in yellow. Then I would plumb the clear intake hose as pictured below. Why would that not work, and be a more simple process?
Not too sure I understand the question correctly. The two reserviour pipes are the fluid feed (to the pump - clean new fluid) and the return (the empty clear hose) and all that was done here was to bypass the reserviour - large new fluid quantities and conaitiners required. I am not aware there is any other way to capture the return (your yellow circle) apart from the steering rack up front. The yellow circle are the two pipes joined together using some copper plumbing pipe I had - extending the return to an empty container out of view.
Not too sure I understand the question correctly. The two reserviour pipes are the fluid feed (to the pump - clean new fluid) and the return (the empty clear hose) and all that was done here was to bypass the reserviour - large new fluid quantities and conaitiners required. I am not aware there is any other way to capture the return (your yellow circle) apart from the steering rack up front. The yellow circle are the two pipes joined together using some copper plumbing pipe I had - extending the return to an empty container out of view.
I am not wanting to bypass the reservoir. I don't want to remove the return line if possible. Could I not just connect downstream of the reservoir (the connection that flows to the pump) for the outflow to my disposal canister?
Difficult to describe, but hope I got my point across.
Ah, think I get you... Not sure how messy that could end up, as essentially the the system is unpressurised when flushing through - so I think anyway. Happy to be corrected and maybe give it a go - for our own learning (or amusement ).
That's my concern. The question is, does the pump essentially pull the fluid out of the bottom of the reservoir, or does it gravity feed? If it pulling it out, then this method I'm thinking about could be messy.
I figure try it first just by turning the engine with the starter (disconnecting the DME relay), so things go slower and we can shut it down quickly if it all goes pear shaped.
Had look through the different manuals I have and no specific pressure values given. However, in the workshop manual there is an extract "Even small leaks can lead to loss of fluid owing to the high oil pressure in the hydraulic circuit..."
I understand your methodology. One less connection to disturb. That should work as well.
Originally Posted by Super90
Wanting to do a full flush myself. Question is, I don't want to pull the return line off the bottom of the reservoir if I don't have to as that rubber connection is old and difficult to remove from a space standpoint too.
What if I just remove the line that goes from the bottom of the reservoir to the pump, remove the pump end and plumb it to a clear hose to a discharge tank? So the discharge would essentially come from the fitting circled in yellow. Then I would plumb the clear intake hose as pictured below. Why would that not work, and be a more simple process?
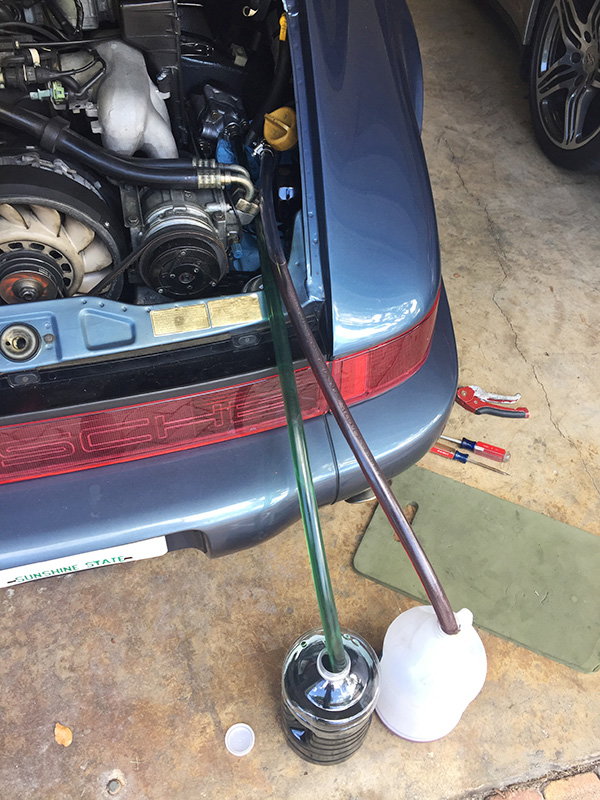
I had my leaky steering rack rebuilt so it was a good opportunity to flush the fluid and upgrade to the Porsche recommended Pentosin CHF202. I followed this DIY and it worked very well. Clear hoses and a second person made it very easy. Using a zip lock bag to catch fluid when disconnecting the hoses also helps minimize the mess.
Picture shows the green Pentosin going in and red ATF coming out.
I replaced the original clear reservoir with the new all black version so the filter gets changed. Also installed a new L shaped hose and clamps to finish the job.
Gonna file this thread for when I do a future flush, thanks OP...
To all who posted here, do all of you have the two washers on the the big banjo pressure line going to PS pump? Some of the pics look like there is no washers? Mine currently is without and not leaking. Have got new 120 washer kit off eBay (thanks for tip Rob) and will add sometime in future...


 05-05-2015, 11:58 AM


 ).
).