When you click on links to various merchants on this site and make a purchase, this can result in this site earning a commission. Affiliate programs and affiliations include, but are not limited to, the eBay Partner Network.
I was doing some work recently and put Power Steering fluid into the PS system. Needless to say, I figured out quickly that this may not have been the best move. Thanks to this forum and instructions from Indycam, here is a DIY with some awful Blackberry pics on how to flush your Power Steering system.
Parts Needed:
1 Gallon Dextron III/Merc Automatic Transmission Fluid - to flush the system
1 Quart Dextron III/Merc Automatic Transmission Fluid - to top off the system after the flush
1 bucket, empty gallon jug, etc. - to catch the old ATF
2 5/8" rubber heater hoses 6' each
2 hose clamps 1/2" to 1 1/4"
1 heater hose connector 1/2" to 5/8"
1 siphon or turkey baster
Lots of shop rags and towels
I bought all of the above parts at my local Advance Auto store (no affiliation), so they should all be locally available. Total cost for this project was about $35.
Procedure:
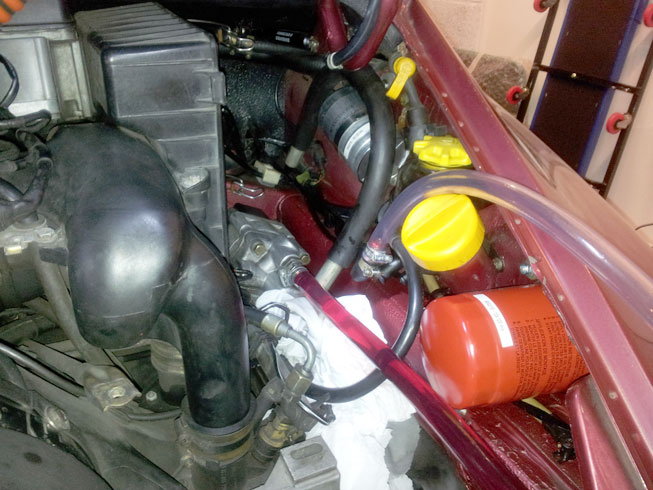
Remove the airbox cover and filter.
Line the area below the power steering pump with shop rags or towels.
Siphon out as much fluid from the reservoir as possible.
Loosen the hose clamp on the pump input line from the PS reservoir.
Pull off the input line from the PS pump, be wary of any remaining fluid in the reservoir or pump.
Connect one end of the 5/8" hose to the pump and secure with a hose clamp.
Connect the 5/8" end of the heater hose connector to the end of the other hose, secure with another hose clamp.
Loosen the hose clamp on return line to the PS reservoir.
Pull the steering return hose off of the bottom of the PS reservoir.
Connect the 1/2" end of the heater hose connector to the return line you just disconnected, secure it with the existing hose clamp.
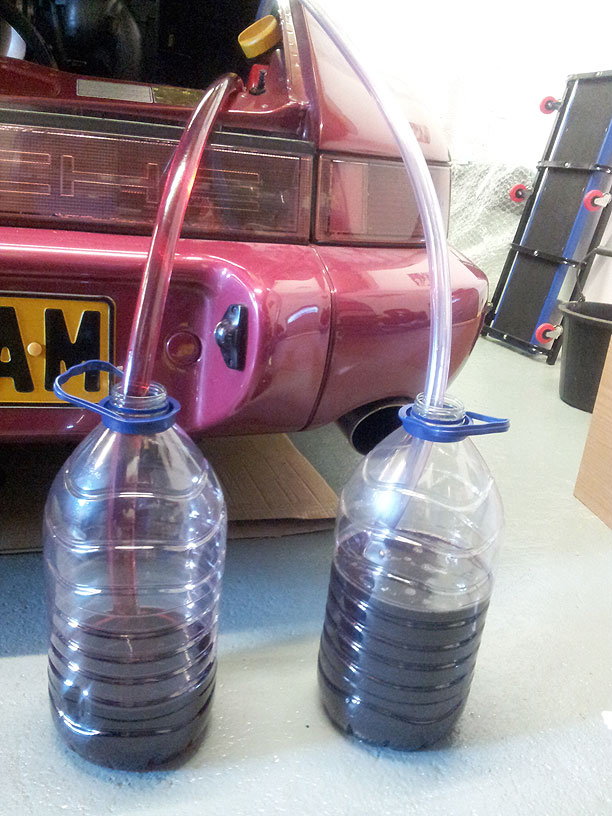
Run the hose from the pump into the gallon of ATF, make sure it's stable.
Run the hose from the return line to the empty bucket, gallon jug, etc.
You'll need to decide if you want to leave you air filter off during the process or not. I decided to leave it off so I could watch the pump for leaks (or worse) during the process. If you're leaving your air filter and cover off, ensure nothing is loose that it could get sucked up into the intake.
Have a partner turn the car on and turn the steering wheel from side to side, ready to turn the car off at a yell.
My gallon of ATF was sucked into the system in about 30 seconds, so you need to be paying close attention.
Have your partner shut the car off when the new ATF gallon is almost empty.
Replace all hoses and hose clamps as they were before you started, keeping in mind that there will be ATF in the long hoses still when you disconnect them.
Once all of the hoses are back on and clamps are tightened, top off the PS reservoir with ATF.
Replace your air filter and cover.
Start the car and turn the wheel back and forth to lock a few times.
Top off the PS reservoir as needed.
Tips:
If I do this again, I will either use clear gallon containers for both the new ATF and old ATF or I will use clear hoses or all of the above. This way, I can be sure of the levels and flow.
Make sure you have a stable place to put the two ATF containers. I held them steady on the rear bumper while my wife ran the car and steering wheel. She then went back inside and I had to figure out how to get the gallon jugs on the ground w/o spilling all of the ATF still in the hoses.
Do NOT use power steering fluid. That's why I had to do this in the first place.
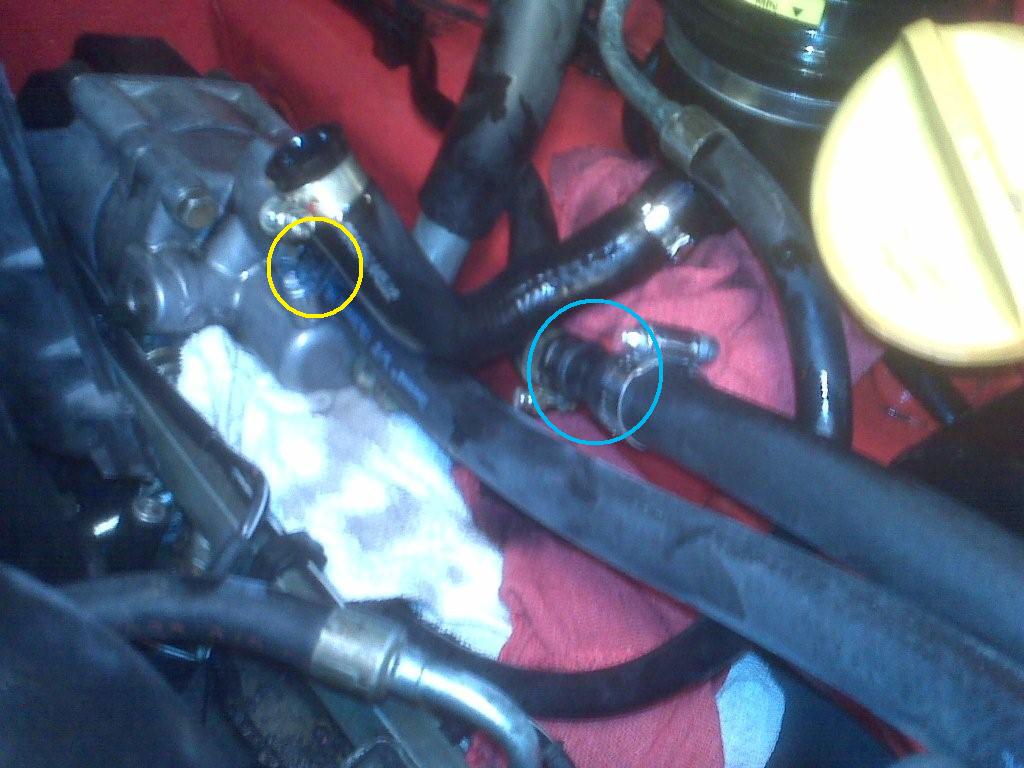
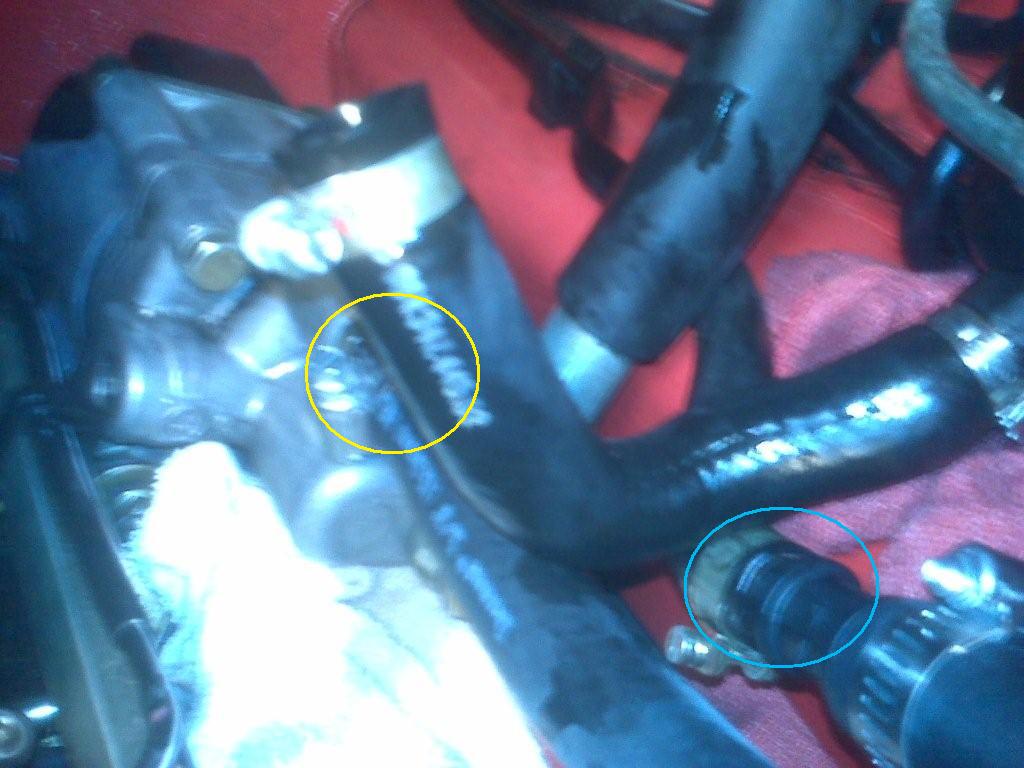
Yellow circle denotes the pump input line that comes from the reservoir, this now connects to the new heater hose and goes into the new ATF gallon. Blue circle is the return from the steering rack to the lower PS reservoir connection. This hose will go into your refuse collector. IMG00102.jpg
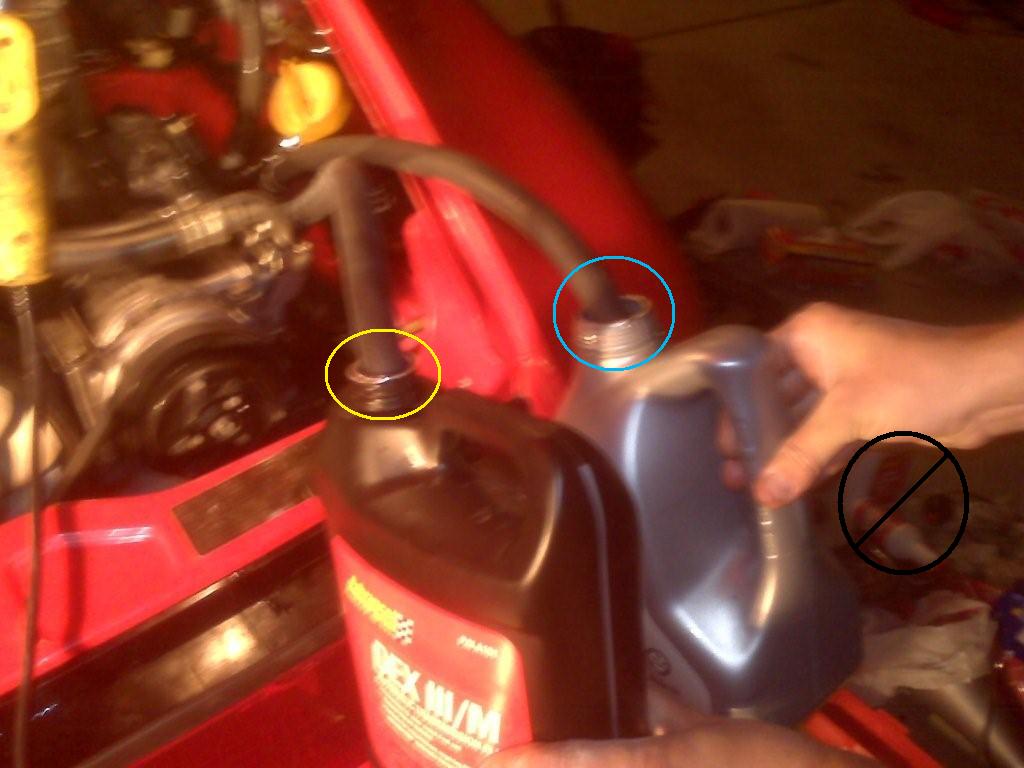
Note in the blue circle the heater hose connector. The smaller end goes into the existing hose coming from the steering rack. The bigger end goes into the heater hose leading to the refuse connector. IMG00104.jpg
This pic shows me holding the whole setup on the rear bumper. Note the black circle with the "Power Steering Fluid." Don't do that!!! IMG00105.jpg
Something I'm not clear on:
The reservoir (supply) line to the pump is, at first, an empty (air-filled) hose simply dipped into a bottle-source of ATF juice?
So, at first the pump has to suck through that hose's 'slug' of air before it gets a solid siphon of fluid?
Now, didn't that entrained/bubblified air have to also be flushed out, as well? (till clear ATF rams it all out.)
Or, did you pre-fill the supply line hose with ATF (to prime the siphon)?
Some pumps pump air very well .
The air would have been followed by a gallon of atf .
The air would be moved forward and then out the drain .
When the car is first put together the system is full of air until its filled up with fluid .
The air will work its way out to the reservoir as the fluid is pumped around at that 2 gallons per minute rate .
Lonnie, I was worried about that as well and almost decided to pre-fill the hose to the input line. It was not an issue though. The negative pressure created by the pump sucked the air and then the fluid right through. Just make sure the end of the hose is in the ATF.
Turning the wheel back and forth once it's all buttoned up seemed to drop the level some, but I just topped it off after.
btw, I don't know How someone could've possibly made the mistake of putting power steering fluid... into a power steering system.
That's CrAzY-talk!
Nope -- that'd never happen to Me...
But if I did -- hypothetically, of course! -- do that, I might now be looking very carefully at your DIY...
Yup.
That's what I might be doing in such a case...
http://en.wikipedia.org/wiki/Porsche_911_classic
"To facilitate filling of the oil tank, Porsche installed an oil filler door (much like the fuel filler door on the left front fender) on the right rear quarter panel. Unfortunately, this unique design was scrapped after only one year, some say because inattentive gas station attendants were putting gas in the oil tank. The oil tank was subsequently moved back to its original position for model year 1973, and remained there until it was moved back within the wheelbase for the 964 models."
1 Gallon Dextron III/Merc Automatic Transmission Fluid - to flush the system
1 Quart Dextron III/Merc Automatic Transmission Fluid - to top off the system after the flush
......
Was, or is, a quart or 5 litres sufficient to completely refill/replace the existing fluid? I've had a look around and I can't actually see anything that indicates the actual fluid capacity of the whole system...
Strangely enough it wasn't until reading a similar thread that I'd thought I'd double check where a very small amount of oil was leaking from and eventually ending up on top of the secondary muffler.
I already knew a leaking filter to engine oil pipe was a culprit but while performing all the filter changes (oil, air and fuel) I noticed that my P/S reservoir wasn't at max level. A paper towel overnight under the pump and reservoir test confirmed a slow leak from the 22mm pipe. But what's this... the leaking fluid was a solid black colour and not the dark Dexron red. A sample taken from the reservoir confirmed this. Bollox...
Don't know why it's a black colour - could it be that it's expected or normal after 20+ years and 140k miles of use with only the occasional top up? - I'm hoping so. Whatever, it's got to go.
Apart from Master alfred_hybrid needing to replace incorrect fluid (not uncommon!), other reasons would/should be repairs or replacement of the steering rack too.
Was, or is, a quart or 5 litres sufficient to completely refill/replace the existing fluid? I've had a look around and I can't actually see anything that indicates the actual fluid capacity of the whole system...
It has been a while since I did this, but IIRC, it was plenty to flush the entire system. I'm pretty sure I saw the new fluid come out into the recycle container before we shut her down.
Another couple of weeks and I'll be ready to get her out of the winter barn. R134 conversion, brake squeal, and continued leak sleuthing are my 2015 resolutions.
I think I used 3-4 liters to flush it, it did not look good the oil that came out.
I had a slight squeal sound from the PS pump, went away with new oil
Thanks alfred_hybrid for the thorough walk through. It gave me the impetus to go and do the same myself (never had to mess around with power steering before).
As you say, plenty messy... I siphoned out the reservoir then removed the 22mm pipe feeding the pump. Had a replacement better condition pipe all cleaned up and ready to swap.
Took notice of your tips. Bought from ebay 1.5m of both 22mm and 18mm clear pipe. Cheap and the same plastic piping as used for home brewing, fish ponds etc. Two 5 litre clear poly bottles of mineral water from the local supermarket (couldn't drink it all so it watered the house plants!)
The 22mm pipe went straight on the pump easy enough. Joining the two 18mm return pipes required a bit more thought. Managed to find a short piece of home heating 12mm copper pipe (same inside diameter of the 18mm return pipe) to join the fixed and clear pipes.
A buddy to fire up the engine while the front wheels were jacked up. Four start ups and switch offs to spot for any leaks. All good and dry. Fired up engine for a longer run. Yup, pretty swiftly the red fluid is sucked up into the system forcing out the grim black stuff in to the other bottle. Didn't take long (maybe 3 litres and 15 seconds) before the black started to turn red. Kept the returning red fluid coming for another litre or so to be sure.
Engine off. Return pipe drained itself without any help. Disconnected this and the joiner and pushed the fixed pipe onto the reservoir inlet and made good with a new hose clamp. Next, 22mm input pipe still with some fluid. Removed it from the pump and lifted swiftly out the way with little spillage. My replacement elbow pipe fitted and also made good with new hose clamps.
Reservoir topped up and engine fired up again. But this time turning the steering wheel full side-to-side lock about 4 times fairly rapidly in forcing out any trapped air. Fluid level dropped and retopped. All good and done.
Sounds easy, but it was fiddly in prepping up for the job but gave myself plenty of time. Steering does feel a tad lighter which is good. Some pics below too.
Also changed the fuel filter while having the space (and that's another fiddly pain in the rear!).
Stunning Porsche 356A Super GT Speedster Auction Fails to Meet Reserve
Slideshow: One of the rarest Porsche 356 Speedsters ever built has resurfaced, offering a glimpse into a little-known chapter of the model's competition history.
Theon Goes Full Carbon Fiber With Stunning New Build
Slideshow: Built around a carbon-bodied 964 and a naturally aspirated 4.0-liter flat-six, this bespoke commission highlights how far the restomod formula has evolved.
Tuner Is Converting Porsche 911s Into Shooting Brakes
Slideshow: A Polish Porsche specialist is moving ahead with one of the most unusual 911 conversions in recent memory: a shooting brake version of the 991-generation sports car.
This Coachbuilt Creation Is A Modern Take on the Legendary Porsche 917
Slideshow: A Porsche Carrera GT has been transformed into a one-off coachbuilt machine that blends analog supercar engineering with styling inspired by the legendary 917 race cars.


")


