
Oil leak (and need PET help) UPDATE: Leak found added pictures
 03-10-2009, 09:38 PM
#31
Addict
Rennlist Member
Rennlist Member
Thread Starter
My line is wet around the end where it terminates which makes Jaime's suggestion to check the connection and the washers before replacing the line a good one.
If it is in fact the hose then it looks fairly straightforward to replace (although $300 is a tad steep imo!)
If it is in fact the hose then it looks fairly straightforward to replace (although $300 is a tad steep imo!)
 03-10-2009, 10:47 PM
#32
Professor of Pending Projects
Rennlist Member
Rennlist Member
The one that Pelican had for less than Sunset was: 964-207-252-14 (oil filter to engine) which is mostly a hard line with a section of rubber hose. This one was US$199.75
To replace you need to loosen the oil tank from the rubber mounts to make it easier to get the hose in there...
Also, life will be easier if you remove the smaller hoses in the tank... if you never done them (or the PO), best to do so now while you are at it...
It goes without saying that an oil change would be needed (unless you remove it before doing all this and reuse it..)
03-10-2009, 11:25 PM
#33
Addict
Rennlist Member
Rennlist Member
Thread Starter
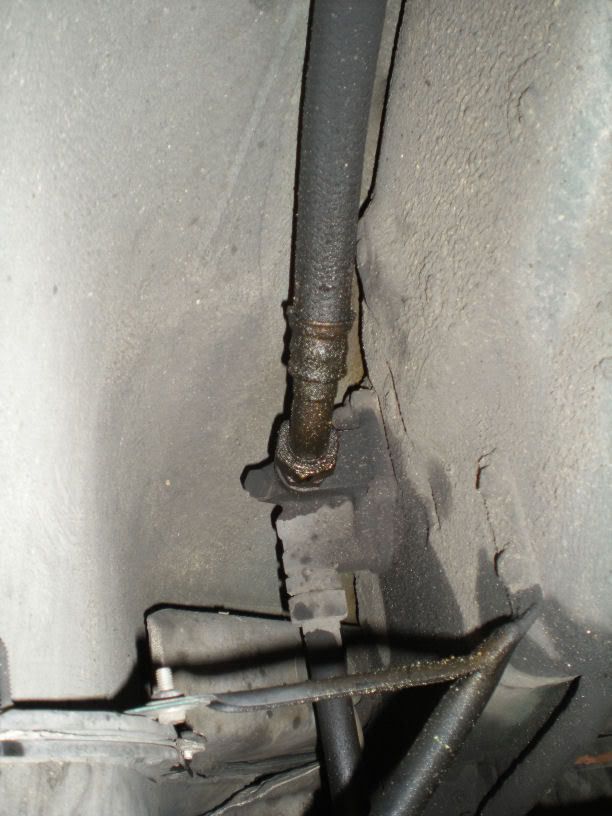
Well I just spent an hour cleaning (although god only knows how Jaime got his so clean) running the engine, re-cleaning and have now identified exactly where the leak is.
It is at this same spot as above but is at the top of the metallic sheath (clamped portion) where the rubber begins/ends.
This picture shows the area prior to cleaning:
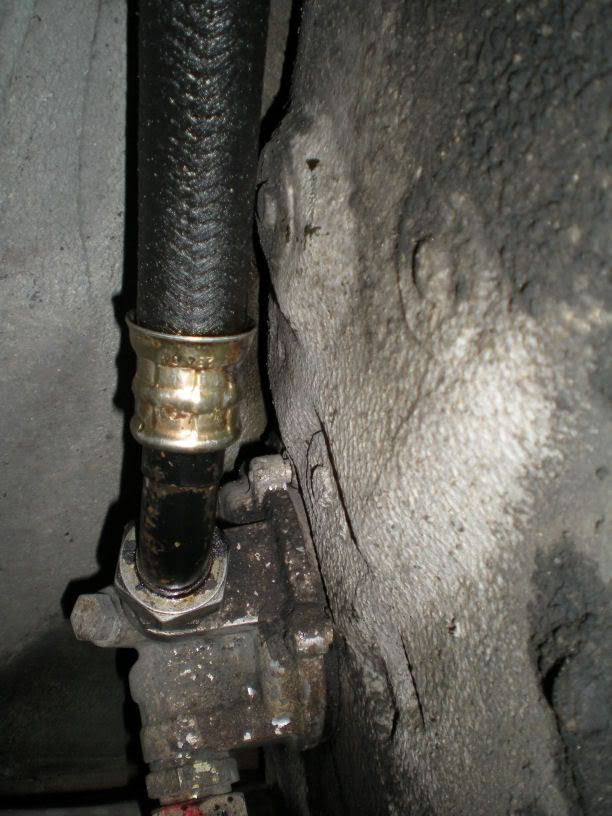
This picture shows the area after cleaning:
And this (little piggy) picture shows the oil building-up and running along the hose:
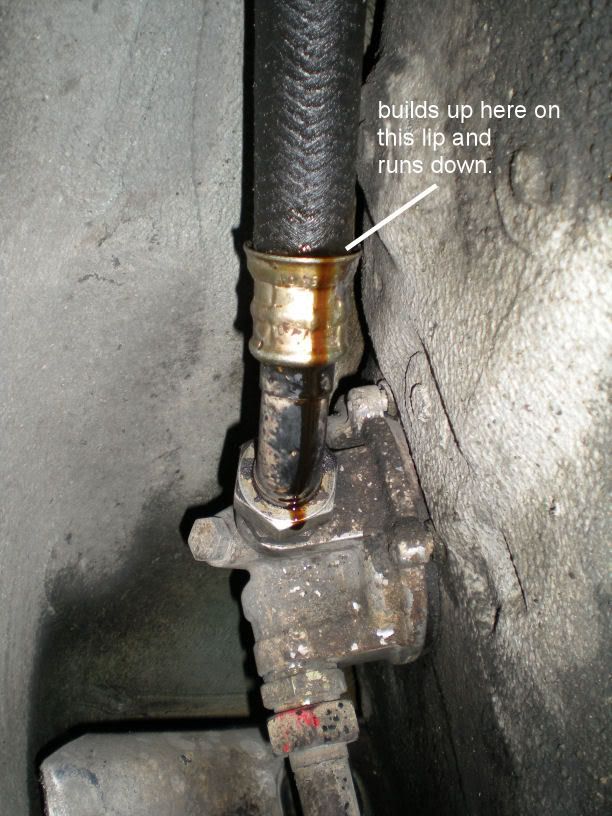
Is it the opinion of the board that this will require an entire replacement hose? It looks in good condition aside from this.
It is at this same spot as above but is at the top of the metallic sheath (clamped portion) where the rubber begins/ends.
This picture shows the area prior to cleaning:
This picture shows the area after cleaning:
And this (little piggy) picture shows the oil building-up and running along the hose:
Is it the opinion of the board that this will require an entire replacement hose? It looks in good condition aside from this.
03-11-2009, 12:08 AM
#34
Nordschleife Master
03-11-2009, 10:38 AM
#35
Professor of Pending Projects
Rennlist Member
Rennlist Member

#46 in the diagram... part no. 964-207-254-07
change the washer as well... good to have some shellac (spelling??) available when you put the adapter back.
To replace you need to loosen the oil tank from the rubber mounts to make it easier to get the hose in there... you will find out when you try...
Also, life will be easier if you remove the smaller hoses in the oil tank... if you never replace them (or the PO), best to do so now while you are at it...
It goes without saying that an oil change would be needed (unless you remove it before doing all this and reuse it..)

Last edited by Wachuko; 03-11-2009 at 01:44 PM.
03-11-2009, 12:55 PM
#36
Addict
Rennlist Member
Rennlist Member
Thread Starter
ok, and sorry for not having let this thread die just yet, but where does this line terminate? Under the passenger side skirting? Is it the same washer at the other end?
03-11-2009, 01:08 PM
#37
Rennlist Member

IMO do not consider anything but a hose from a Porsche dealer, Sunset or reputable parts place like Pelican.
Some have had this pipe/hose rebuilt by a local shop, however there has not been 100% success rate at that. When I did mine it turned out that the rubber flex connection point would rotate at the clamping position. Thus there was no way an independent shop could properly orientate the rubber to the pipe correctly. Even when the pipe does not rotate, the local shops may not get it done correctly.
BTW, once I started doing this I replaced all the oil lines, incluidng to the oil cooler and replacing the oil cooler.
http://www.trademotion.com/partlocat...&siteid=214626
for another source and pricing
03-11-2009, 01:12 PM
#38
Nordschleife Master
 03-11-2009, 01:16 PM
#40
Rennlist Member
 03-11-2009, 01:20 PM
#41
Addict
Rennlist Member
Rennlist Member
Thread Starter
Steve, all super helpful, thank you.
At least its not that long. Looks like it ends just behind the shark fin. Is it the same washer that end?
Seems a fairly easy DIY: drain oil, pop off the wheel and the sharkfin, undo two bolts and replace line and washers, add a zip-tie up top and replace everything...am I missing something?
Cheers,
--H
03-11-2009, 01:58 PM
#42
Rennlist Member
about 2, make that 3, hours of skinned knuckles, cursing ( How the hell does that end fit down to the thermostat?) and drinking a few beers.
Be very careful getting those fittings off. You must use two wrenches and fully support the oil thermostat and filter housing as you try to undo those connections.
Buy the rubber buffer 999 703 246 00 as you will likely break it. Also 2 of 999 703 324 00 rubber buffers for oil tank
While you are there do the short lines to the body and the lines from the oil tank to the thermostat. See Jamie's pics.
Last edited by stevepaa; 03-11-2009 at 02:16 PM.
03-11-2009, 02:09 PM
#43
Professor of Pending Projects
Rennlist Member
Rennlist Member
Steve, all super helpful, thank you.
At least its not that long. Looks like it ends just behind the shark fin. Is it the same washer that end?
Seems a fairly easy DIY: drain oil, pop off the wheel and the sharkfin, undo two bolts and replace line and washers, add a zip-tie up top and replace everything...am I missing something?
Cheers,
--H
At least its not that long. Looks like it ends just behind the shark fin. Is it the same washer that end?
Seems a fairly easy DIY: drain oil, pop off the wheel and the sharkfin, undo two bolts and replace line and washers, add a zip-tie up top and replace everything...am I missing something?
Cheers,
--H
 It is not longer than the one that goes from the thermostat to the oil cooler, correct...

The washer is for the connector/adapter, not for the hose. My recommendation is to replace the washer as the one in my car were corroded and leaking. This will require removing the adapter from the oil filter base and from the thermostat. Or not... your call. If you do remove it, replace the washer, use some shellac in the threads, and screw back in well and let it dry before you connect the hose.
The hose attaches to the connector/adapter with a flair/compression setup, no seals/washers needed in there...
Not sure if you can see the adapter and hose well in these photos...


You need the wrenches I mentioned... no space in there to use normal wrenches. You will use the 32mm and 36mm from the set.
BEFORE YOU START - CLEAN THE AREA - degrease it, pressure wash it, whatever method you like... you want to avoid dirt getting in the lines, thermostat, etc...
Remove the tail/sill-fin.
Remove the small hoses at the side and bottom of the oil tank. It is a great time to replace them.
Loosen the oil tank rubber mounts (If I remember correctly I think you have 3 in there). This will allow you to move the oil tank a little to get the hose in. It is going to be a bit of a pita to get it in there, align it, etc. - Does not hurt to order a couple of the rubber mounts (don't ask me why...) just in case...
Have fun!
 03-11-2009, 02:33 PM
#44
Addict
Rennlist Member
Rennlist Member
Thread Starter
Wow, that's a super thorough DIY!
Thanks Jaime and Steve for the write-up, detailed explanation and part #'s. I hope this thread will help anyone else doing this as well as me, after all the effort you have put-in to assist!
Ok, so shopping list:
1x 964-207-254-07 (replacement oil hose)
1x 999 703 246 00 (rubber buffer)
2x 999 703 324 00 (rubber buffer)
Wrench set (PEL-TOL-P242)
Jaime the wrench set has a 32mm and 35mm, there are two 36mm on the page you referenced which one of those should I add?
03-11-2009, 02:41 PM
#45
Professor of Pending Projects
Rennlist Member
Rennlist Member
Wow, that's a super thorough DIY!
Thanks Jaime and Steve for the write-up, detailed explanation and part #'s. I hope this thread will help anyone else doing this as well as me, after all the effort you have put-in to assist!
Ok, so shopping list:
1x 964-207-254-07 (replacement oil hose)
1x 999 703 246 00 (rubber buffer)
2x 999 703 324 00 (rubber buffer)
Wrench set (PEL-TOL-P242)
Jaime the wrench set has a 32mm and 35mm, there are two 36mm on the page you referenced which one of those should I add?
Thanks Jaime and Steve for the write-up, detailed explanation and part #'s. I hope this thread will help anyone else doing this as well as me, after all the effort you have put-in to assist!
Ok, so shopping list:
1x 964-207-254-07 (replacement oil hose)
1x 999 703 246 00 (rubber buffer)
2x 999 703 324 00 (rubber buffer)
Wrench set (PEL-TOL-P242)
Jaime the wrench set has a 32mm and 35mm, there are two 36mm on the page you referenced which one of those should I add?
http://www.etoolcart.com/porscheoill...chsetp242.aspx
It is the same set... Pelican description must be incorrect. I suggest you give them a call to confirm... Look at the description on top
"This four piece spanner wrench set includes the sizes 27mm, 30mm, 32mm, 36mm, and is most useful for removing and reinstalling the various oil lines that are located on the 911. Using the wrong wrench can result in slippage of the tool which can damage the nuts on the line."
Edit - Looking at the 36mm selection Pelican has. Wow! I have not try any of those... but anything that will improve access in that confined space is a plus! Not sure what to tell you... if the set brings the 36mm there is really no need for another one... unless someone else here has experience with both and can chime in as to which one is better.