
Shift linkage bushing??


 10-15-2011, 09:49 AM
#18
Well the shifter was makeing a banging noise downshifting into 2nd took it all apart found seals # 26 were bad changed them out not a bid deal real easy. Found parts 15 and 16 the rubber to be bad on both parts so got part 16 and have on order part number 928 116 145 03.
I will find out if this fits into the ends of 15 and 16.. Then should be back on the road. I did not take off the shift **** just lifting and setting all on the side is room to work from the top ...
Funny I was at the P car dealer getting parts and was talking to a mech named Hauns. He talked with a strong German accent. Had a smile talking to him about German cars ..
06-02-2014, 11:14 PM
#19
Pro
Join Date: Oct 2012
Location: Brockville, On, Canada
Posts: 536
Likes: 0
Received 2 Likes
on
2 Posts
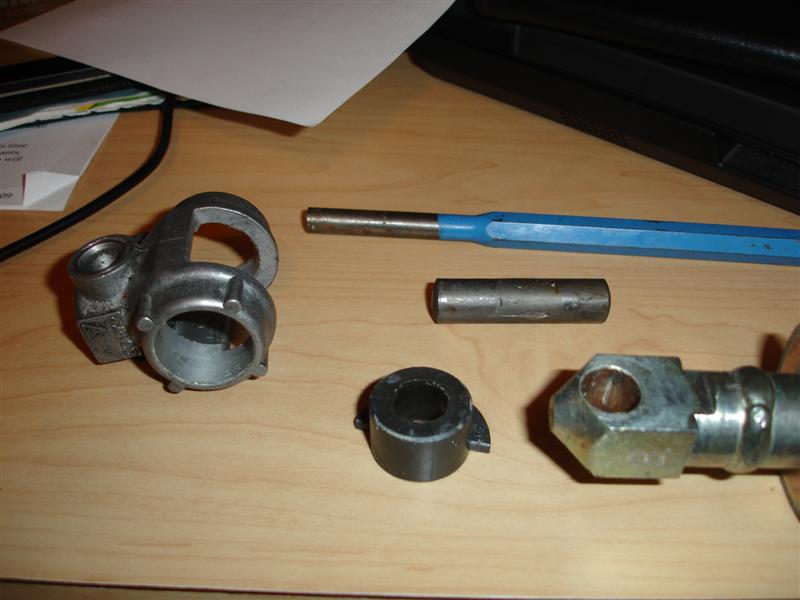
From the picture, it appears that you were successful at removing the pin with a punch and a hammer. I have heard of others destroying the aluminum coupler in the process of this without the use of a press. Can you suggest your method that worked? I'm ready to tackle this DIY for improved shifting.
06-03-2014, 09:51 AM
#20
Professor of Pending Projects
Rennlist Member
Rennlist Member
Thread Starter
From the picture, it appears that you were successful at removing the pin with a punch and a hammer. I have heard of others destroying the aluminum coupler in the process of this without the use of a press. Can you suggest your method that worked? I'm ready to tackle this DIY for improved shifting.
06-03-2014, 10:14 AM
#21
Pro
Join Date: Oct 2012
Location: Brockville, On, Canada
Posts: 536
Likes: 0
Received 2 Likes
on
2 Posts
I went back and looked through your other posts and found the reference to PParts thread where someone help you to answer your question.
PParts supply the bushings via a PP member - cool! He makes the bushings himself. I found a link on his PP signature that directed me to a good ewe-toob video of how to replace on a pre 964 vehicle. In order to not damage the aluminum, you need to hold the steel pin, not the aluminum coupler. That way, as you pound out the pin, you are not stressing the aluminum "knuckle".
Tackling tonight.
06-03-2014, 05:38 PM
#22
Professor of Pending Projects
Rennlist Member
Rennlist Member
Thread Starter
I went back and looked through your other posts and found the reference to PParts thread where someone help you to answer your question.
PParts supply the bushings via a PP member - cool! He makes the bushings himself. I found a link on his PP signature that directed me to a good ewe-toob video of how to replace on a pre 964 vehicle. In order to not damage the aluminum, you need to hold the steel pin, not the aluminum coupler. That way, as you pound out the pin, you are not stressing the aluminum "knuckle".
Tackling tonight.
PParts supply the bushings via a PP member - cool! He makes the bushings himself. I found a link on his PP signature that directed me to a good ewe-toob video of how to replace on a pre 964 vehicle. In order to not damage the aluminum, you need to hold the steel pin, not the aluminum coupler. That way, as you pound out the pin, you are not stressing the aluminum "knuckle".
Tackling tonight.
Here is the link to one of the videos on this:
06-05-2014, 12:22 AM
#23
Pro
Join Date: Oct 2012
Location: Brockville, On, Canada
Posts: 536
Likes: 0
Received 2 Likes
on
2 Posts
Well I finally got around to this DIY.
Removed the under tray front, tunnel, tranny
Removed the central boot
Replaced the shifter tube bushings. Mine were the oval type, not the round rubber type. Don't think this was the issue.
Removed the shifter boot at the tranny, removed the shifter bolt.
Removed the cir clip on the gear shifter and the washer spring washer. Took the whole assembly to the vise.
With the appropriately sized sockets, I pressed the pin out of the shifter coupler. Took a LOT of pressure, but a rap with the hammer freed it up.
Removed the coupler bushings, which were very loose. Replaced with new. Now tight!
All back together..... Wow! Huge difference in shifter feel. Great job to do yourself
Thanks for all the help.
12-28-2020, 07:02 PM
#24
Hello everyone.
Helping a friend with his car. Yvonne and Chet's '90 964 C2.
Transmission is fine. Transmission mount looked fine. Engine mounts are shot but not the culprit...
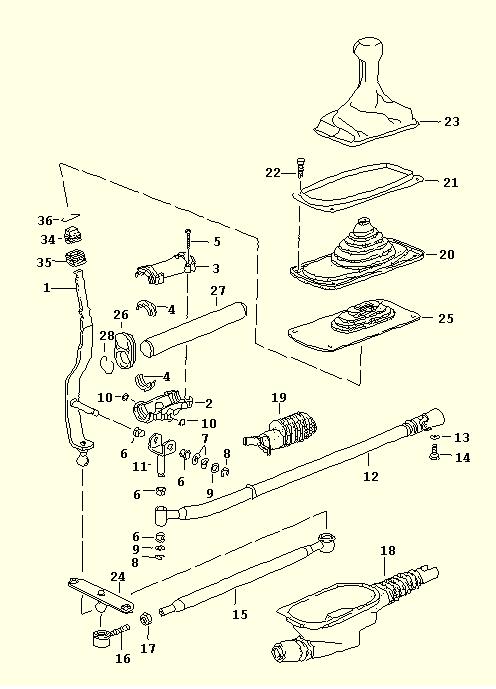
So I am thinking that this must be part #26 on the diagram... since when they go bad they give this type of behavior... inexpensive parts that I can order from the local dealer... So I order 2 #26 and, since I am there, why not change the 4 #6 bushings as well.
!
Helping a friend with his car. Yvonne and Chet's '90 964 C2.
Transmission is fine. Transmission mount looked fine. Engine mounts are shot but not the culprit...
So I am thinking that this must be part #26 on the diagram... since when they go bad they give this type of behavior... inexpensive parts that I can order from the local dealer... So I order 2 #26 and, since I am there, why not change the 4 #6 bushings as well.
!
could anybody help me with parts number to order on PELICAN (or others sites)?
I'll need:
- 16
-15
-6 (x2)
-26
-28
- 30
Or if anybody can direct me to the page where to link the numbers and part codes it's good too.
These parts will go on the 1995 993 C2 manual convertible
thanks a lot