When you click on links to various merchants on this site and make a purchase, this can result in this site earning a commission. Affiliate programs and affiliations include, but are not limited to, the eBay Partner Network.
Here is a collection of some useful threads/references on distributor belt replacement, followed by some commentary:
Brian Smith's writeup with pictures, on p-car.com in the DIY section (technique includes removing the secondary shaft) - http://p-car.com/diy/dualbelt/
Discussion of solid pin vs. roll pin, plus several hints re aligning the distributor rotors and knocking out/drifting one of the locating pins rather than removing the secondary shaft (Dave R.'s thread, titled "Roll pin for distributor shaft gear") - https://rennlist.com/forums/showthre...ht=distributor
Last but not least, Adrian Streather's fine book.
Repair sequence in a blow-by-blow nutshell:
1. remove blower, blower tube, and belt tension sensor to provide access
2. disconnect the Hall sensor on the distributor from the engine wiring harness, and detach the vent tube from the distributor
3. remove distributor caps (OK to leave the plug wires attached)
4. mark the position of the primary rotor (ink, white-out, carve nick in housing with a blade, ...)
5. unbolt and remove the distributor (some folks have needed to apply a pry bar) - and don't allow the engine crankshaft to move until the distributor is properly re-installed
6. mark the new position of the primary rotor (it will have moved slightly as the helical gear moves out of the crankcase)
7. remove the distributor rotors
8. remove the black plastic caps under the rotors
9. gently pull out the black Hall sensor connector
10. remove the translucent plug insert from the black Hall sensor connector, e.g. with needlenose pliers
11. unscrew the three philips head screws inside the main distributor that fasten the Hall sensor mounting plate to the distributor housing
12. push the translucent plug insert & attached Hall sensor wires back throught the hole into the distributor so they won't catch when the primary shaft comes out
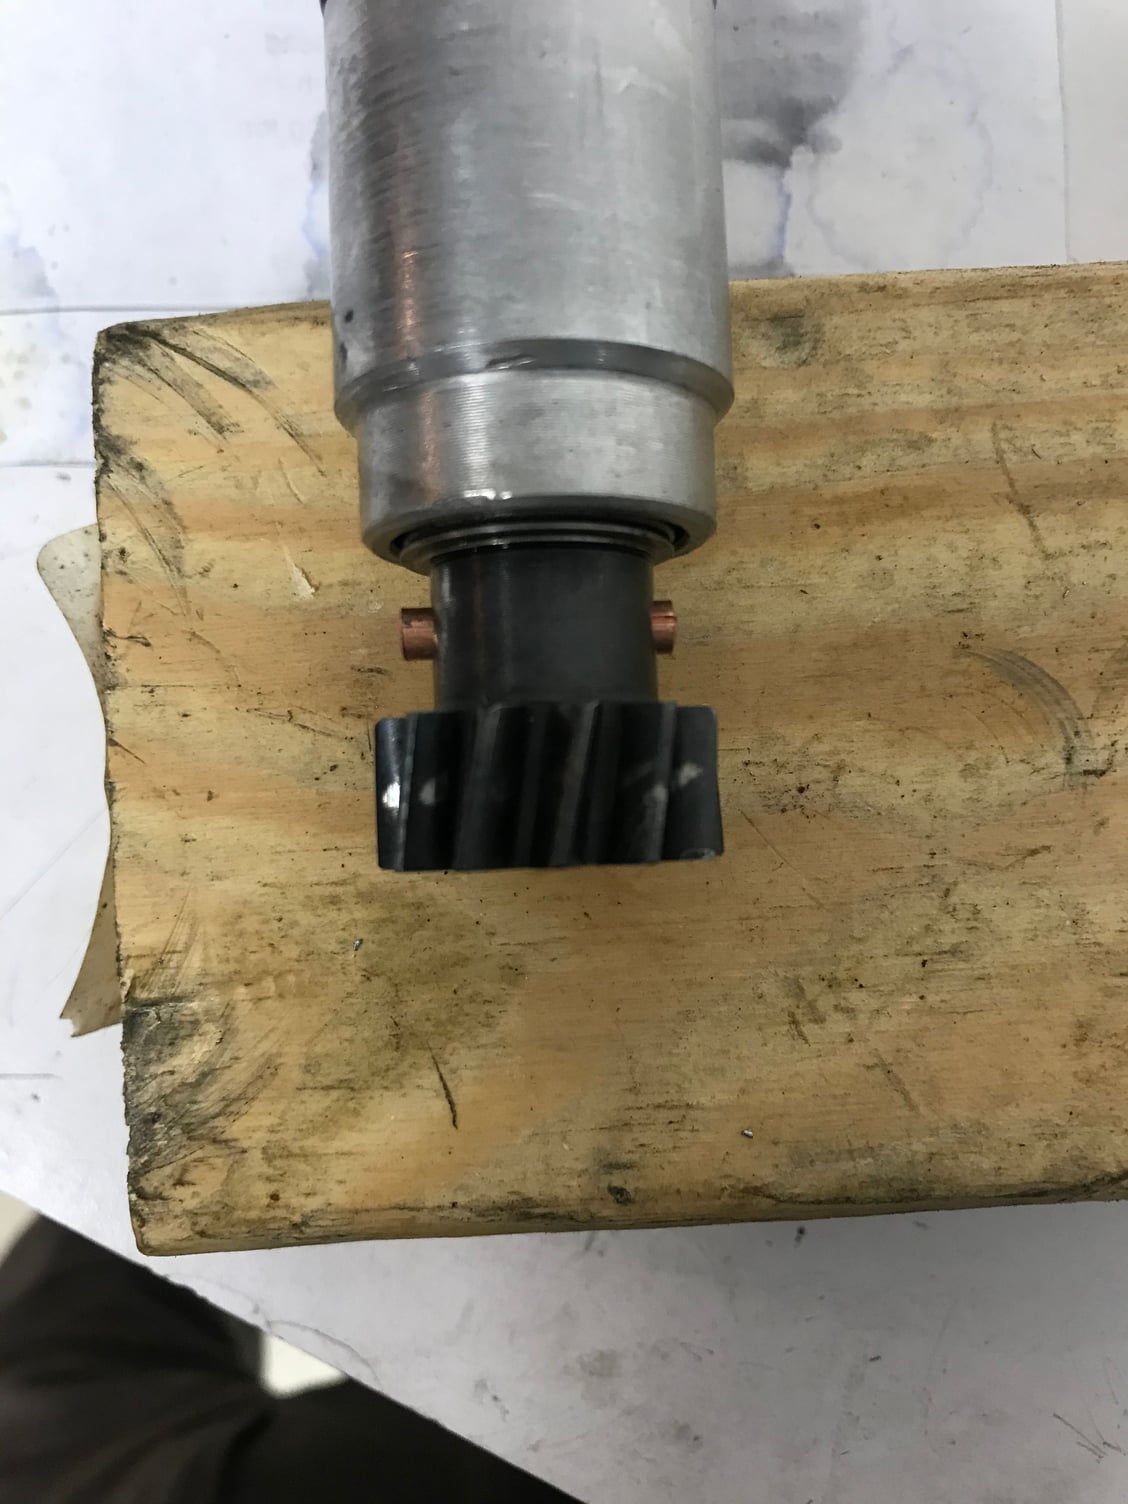
13. drill the pin retaining the helical drive gear (trivia note, the end of the pin with three radial marks at the outer circumference was the larger end before the pin was originally staked in place)
14. remove the helical drive gear (if there are burrs you may need to apply a gear puller) and the spacer washers between the helical drive gear and the first sealed bearing
15. pull the primary shaft assembly up and out of the distributor
16. remove the primary belt gear/cog and the washers underneath it (between the primary belt gear/cog and the second sealed bearing)
17. remove the five allen-head bolts holding the upper and lower distributor case halves together
18. identify the locating pin on the outer edge of the housing near the secondary distributor
19. look inside the secondary distributor and rotate the secondary shaft so that when the locating pin comes up into the housing, it won't bump anything
20. tap the bottom end of the locating pin to drift it up into the upper housing far enough to clear the lower housing
21. separate the case halves (the secondary shaft assembly will continue to link them loosely together)
22. rotate the upper case half with respect to the lower case half, remove the distributor belt
23. install the new belt, don't crimp it
24. reinstall the five allen-head bolts
25. drift the locating pin back into position (half in the upper housing, half in the lower housing, loosen the five allen-head bolts if you need to, then re-tighten when the locating pin is back in position)
26. place the washers and the primary belt cog on the primary upper bearing (order - cog, curved washer, flat washer, bearing OR cog, flat washer, curved washer with convex side facing bearing!, bearing)
27. adjust belt cog so that the distributor rotors will be properly aligned relative to each other (there are two small nubs or bumps on the distributor housing, one for each distributor just to the right of one of the bolt holes that holds the distributor caps in place - when the rotors point simultaneously to the nubs, they are properly aligned with each other - in dunasso's thread in the first picture, the nubs are visible, they are several millimeters wide)
28. insert the primary shaft assembly
29. place the spacer washers and the helical drive gear on the end of the primary shaft
30. squeeze the primary shaft and the helical drive gear together (e.g. with a 12" clamp or vise) until the hole in the primary shaft and the helical drive gear line up
31. insert replacement retaining pin (and then remove the clamp)
32. mushroom or stake the retaining pin (e.g. use a vise to squeeze the ends of the pin together, I used the flat hexagonal shaft faces of two drift punches between the pin ends and the vise jaws)
33. feed the translucent Hall sensor connector back through the aperture of the housing
34. rotate the Hall sensor mounting plate into position and re-fasten with the three screws (e.g. hold screwdriver with tip straight up, place screw on tip, turn distributor upside down and feed screws straight up to start)
35. insert the translucent Hall connector into the black connector and snap the black connector back into place
36. install black plastic caps in the distributors
37. install the distributor rotors
38. replace the distributor O-ring
39. rotate the rotors to the position they were in just after you removed the distributor from the engine block
40. insert the distributor into the block (you may need to help it into place because of the new O-ring, e.g. by tapping with a mallet and a shaft such as a large socket extension)
41. verify that the rotors are in the position you marked just before you removed the distributor
42. bolt the distributor to the block
43. re-install the distributor caps
44. re-install the belt tension sensor
45. re-install the blower and blower tube and corresponding connections (power plug to the blower, resistor/sensor to the tube, tube vent to the tail lights and tube vent to the distibutor)
46. reconnect the Hall sensor to the engine wiring harness
Review, doublecheck, etc... then fire it up.
Man I wish I'd seen that JasonAndreas post about not having to remove the shaft to get the belt out. That was a real PITA. To anyone who's planning on doing this in the future, use Jason's tips. Getting that stupid cap off and all those ring clips, washers, compressing the shaft to get it all back on.....nightmare.
so, i decided to tear my dizzy apart this weekend to possibly change out my dizzy belt using the JasonAndreas method Got the caps and rotors off, but couldn't find a way to pull the silver circular donut thingy(primary) off so I could get off the belt. BUT I did find in the little slot or gap behind the donut thingy and the dizzy shell that a small metal bracket thing was wedged in there! I pull it out and it seems to be some sort of wire bracket possible, with one end broken off. My belt actually looked in good shape and since I couldn't find a way to get at it..i left things alone. Put everything together and the car runs great. I'm wondering if that little metal clip possibly was wonkering up my ignition system. Anyone have any ideas where or what that clip could have come from in the dizzy?
Timely repair? BTW, thanks to this collection thread and great advice i made the repair in just a few hours, so the tips really made things go well. Plus i was lucky i my dizzy slipped right out, no prying needed.
Interesting point:
I am rebuilding a spare distributor to fit in my '89 c4.
The seconadry shaft's bearings are too far worn. Hey, no big deal, I'll drop by the SKF dealer, and get new ones.
Not.
Turns out the bearings have a specifc inner diameter, 12.4mm, instead of the industry standard 12mm. The dealer even called INA, who made the bearings for this distributor in 1995, and they tell us it is a proprietary bearing, sold to Bosch/Porsche only.
Translation: You are welcome to shell out almost 2K for a distributor, but we will not sell you 2 bearings for 20$.
Luckily I found a solution, involving a micro-machine shop.
So: check your bearings when rebuliding. The shafts should turn butter smooth.
Here are a couple of tips that I didn't see mentioned in any of the how-to threads:
1) If your belt broke like mine, then it is likely the sprocket will stay attached to the main shaft as you pull it out of the housing. This caused me a lot of head-scratching, trying to figure out how I was going to re-assemble it and slip the belt over the sprocket at the same time... just give a little tug, and the sprocket will slide off the shaft.
2) Lots of discussion about the order of washers. As far as the sprocket goes, here is what it looks like upside-down. Sprocket, then flat washer, then inverted dish washer. Turn the whole stack over as you place it down onto the bearing, and position the sprocket into the belt. It will all tighten up as the shaft is slid down through.
3) When aligning the two shafts, the end goal is to make sure each rotor is pointing at its respective 'bump'. I found the easiest way to achieve this is by first putting the secondary rotor in place, then aligning the sprocket stack into the toothed belt as shown, making sure the woodruff key slot points at the bolt. When the primary rotor goes onto its shaft, it will now be pointed correctly at it's bump.
**Camera lens is causing some additional perspective here, the rotors are actually pointing right at the alignment marks
Replace my distributor belt over the weekend without removing the secondary shaft, I could not find any pictures of how the belt comes out using this method so I took a couple of photos that might help others.
One thing that I did not expect was the amount of pressure needed to compress the shaft to reinstall the new pin, had to double check everything was in the right order.
The belt was starting to show slight signs of wear, but would probably lasted a few more years, might have been replaced before but no record of it.(1990, 108K vent kit fitted)
Great write up and procedure. A few more pictures from my 91 C2 engine maintenance project.
There should be a step 8.5, which is to remove the clip holding in the hall sensor. Don't just yank it at to pull it out.
I did a crappy job drilling out the pin holding in the gear. I need the assistance of a small gear puller, available for $5 at O'Reilly's, to get it off. Then I deburred the shaft and gear hole and it slides back on with a bit of hand force.
My bought my 1991 C2 with 72k miles. Can't believe the PPI completely missed the distributor vent kit and the fact that the secondary plug were NOT even firing. Look at my belt below.
Everything else in my distributor looks fine. It needs a bit of clean up. I don't just want to replace the belt, it makes sense to clean things up a re-lube as required.
I have a tube of bosch distributor grease. Can anyone confirm this is what to use to relubricate everything.
I second that thanks this thread was very helpful I just completed my 964 distributor. I am using the correct Porsche pin on the base. I did not see anybody describe the peening process. Do you drive the pin flush with one side and only peen the thick side?

 05-05-2005, 12:28 AM


 Got the caps and rotors off, but couldn't find a way to pull the silver circular donut thingy(primary) off so I could get off the belt. BUT I did find in the little slot or gap behind the donut thingy and the dizzy shell that a small metal bracket thing was wedged in there! I pull it out and it seems to be some sort of wire bracket possible, with one end broken off. My belt actually looked in good shape and since I couldn't find a way to get at it..i left things alone. Put everything together and the car runs great. I'm wondering if that little metal clip possibly was wonkering up my ignition system. Anyone have any ideas where or what that clip could have come from in the dizzy?