


Changing Spark Plug Cables
Three Wheelin'
Joined: Jul 2007
Posts: 1,307
Likes: 0
From: Helotes, TX
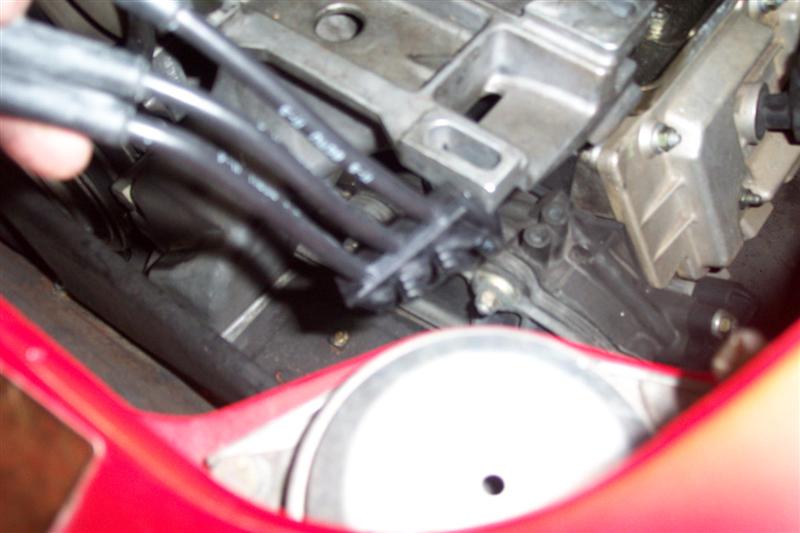
Take the shield and cat off. 4 bolts and a clamp for the cat, 5 or 6 10mm bolts for the shield. Here's what they look like without shields. Lots of room, worth the effort. The rubbet boots where they go through the tin can be pulled out to make replacing wires easier. I used non-conductive dialectric silicone grease to help them through the boot.


Agree that heat shields and cat have to come off. Your pics are very appreciated I'm sure. It's pretty obvious once you get under there.
Rennlist Member

Joined: Jan 2007
Posts: 2,388
Likes: 17
From: Vancouver Island, BC , Canada

Is the engine tin the "cover" over the head...does that also entail removal of power steering pump?
I have had such a difficult time with this project that I once the top 4/5/6 plugs are done I am going to put it back together and get it to a proper lift to do the bottom 1/2/3 as I am having major issues removing the cat (and dont have a cat flange gasket on hand ...yet)
I have had such a difficult time with this project that I once the top 4/5/6 plugs are done I am going to put it back together and get it to a proper lift to do the bottom 1/2/3 as I am having major issues removing the cat (and dont have a cat flange gasket on hand ...yet)
PS. Getting very close to my 911th post.

Burning Brakes

Joined: Jan 2011
Posts: 1,234
Likes: 18
From: chin on taint
Ill give that a try
Yes that was the ticket, next moron who calls my Pcar a glorified VW is gonna get blasted!
Thanks I'll try to remove the tin, cant get the Cat or O2 sensor off so I am gonna have to put it back together and get it to a shop for the 1/2/3 bottom plugs and 02 sensor..
I really think that the instructions for Spark Plug Wire change should start as follows
1. DROP ENGINE
If I had done that I would have been done already!!
Last edited by Silvertarga; Mar 12, 2011 at 02:38 PM.
Burning Brakes
Joined: Jan 2011
Posts: 1,234
Likes: 18
From: chin on taint
I am not the "Pro from Dover" on this but having just completed the job it is not necessary to remove the manifold, just takes a bit of time to free the cables from their moorings (I think it was an 8mm wrench) and feed them through, there was a bracket holding a fitting that I removed to run one of the wires under (and this was under the air box which can also be removed )
It also helps immensely to remove the A/C compressor (dont need to disconnect it, it will swing out of the way when freed from its mount
It also helps immensely to remove the A/C compressor (dont need to disconnect it, it will swing out of the way when freed from its mount
Drifting
Joined: Jul 2005
Posts: 3,363
Likes: 25
From: NY, USA
I recently did this, as well. I had the alternator out and believe that helped. Still, it's a long, slow job to work those hold-downs free with the engine in place. I did manage to route all of the wires without touching the AC compressor. Note that I did have to remove the exhaust and the shields in order to re-install the #6 upper plug wire lead onto the plug. I just couldn't get the leverage to get it seated from above. And, I think I would have dropped the exhaust and shields in order to run the lower wires any way.
Patience.
Cheers
Patience.
Cheers
Burning Brakes
Joined: Jan 2011
Posts: 1,234
Likes: 18
From: chin on taint
Ahh, I forgot about the exhaust on that side as I am running a Fabspeed and that was removed long ago...One thing that I would definitely buy were I to do this again is one of those ratcheting flat wrenches, would have made it easier to remove the screws holding the plug wire retaining clips !!
Definitely remove the shield to get to the top 4/5/6 from the bottom, I was stuck there until I asked for help here (and a magnetic socket can save you a few hours of fishing if you drop a plug!)
As far as seating #6 connector if you managed to get the plug out and reinstalled without all the disassembly a piece of 2X4 and a crow bar will get the connector seated
The job was not so bad, I was not really pressed to finish (even though the car was down for a few of the first "Targa Weather days' we had here...most of the time was spent cleaning and painting everything!!
Was able to replace Oil Return tubes, clean all electrical connections,new belts, oil tank hoses, MAF etc, everything I did would have cost a small fortune and I now know my car much better than I did at the start!
Now all I need is for my hands to heal from all the small cuts. As someone else said it does make you appreciate what a shop charges to do this however I know I would spend near the same amount of time checking and correcting what someone else did so I did it myself

Nordschleife Master
Joined: Jul 2007
Posts: 5,613
Likes: 52
From: DFW, TX
Rennlist Stories
The Best Porsche Posts for Porsche Enthusiasts

10 Porsche Colors That Have More Personality Than Most People
Verdad Gallardo
Guntherwerks' Final Speedster Creation Is the Ultimate Porsche Restomod
Verdad Gallardo
10 Reasons I Hate Going to the Porsche Dealership (& the 1 Reason I Stay)
Joe Kucinski
Porsche Shakes Up The N�rburgring Lap Record Table Once Again
Verdad Gallardo
6 Ways the Porsche 911 GT3 S/C Redefines Performance
Joe Kucinski
10 Wildest Homologation Specials Porsche Ever Sold
Verdad Gallardo
Super Rare RUF BTR III Comes Out of Hibernation, Looking For a New Home
Verdad Gallardo
10 Porsche Opinions That Can Start a Fight
Joe Kucinski
One-Off Porsche 911 S/T Takes Inspiration From Famous '70s Race Car
Verdad Gallardo
Nordschleife Master
Joined: Jul 2007
Posts: 5,613
Likes: 52
From: DFW, TX
To answer the question, the bracket should plug into the top of the cam chain housing with two points. I managed to remove mine by pulling it upward but broke 1 of the 2 points. I think I can still reuse it w/ the 1 working point.
In case you need to replace it, the bottom half that will probably break like mine is part # 911.602.325.00

The top part, which can also be used in pairs for wire guides throughout the ignition cable set is part # 928.602.323.00

In case you need to replace it, the bottom half that will probably break like mine is part # 911.602.325.00
The top part, which can also be used in pairs for wire guides throughout the ignition cable set is part # 928.602.323.00