When you click on links to various merchants on this site and make a purchase, this can result in this site earning a commission. Affiliate programs and affiliations include, but are not limited to, the eBay Partner Network.
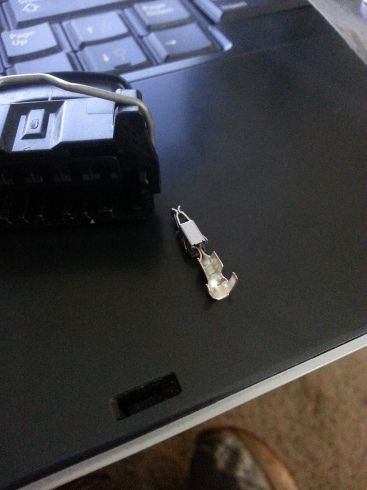
I bought new AFM and TPS connectors from 944Online. They said I wouldn't need any special tools to attach them, but it now that I see the pins, it looks like they are supposed to be crimped. I don't know much about crimping tools - there's a Fry's Electronics near me that has a lot of connector/pin/crimper stuff. Are crimpers generic enough that I can just use whatever they have, or are they specific to the exact connector type? Here's what the pins look like:
I suppose I could just solder the wires and fold down the tabs but I'd prefer to do it neatly with the right tool. Thanks!
Most pins have a specific crimper that will do a perfect factory-original looking job. That said, with plenty of practice you can usually do a decent job using a more universal crimper. I wouldn't solder stranded wire into the connector unless you have to, as it creates a sharp bending spot where the wires are much more likely to fray and break over time. If you didn't get any spare pins to practice on, you might see if you can get some. There are lots of good resources on the internet, so worth poking around for tutorials, etc., like this one:
Stress-riser only a problem if you extend solder out past the strain-relief.
Crimp with pliers, then solder at tip of wire to terminal only (before the strain-relief), then shrink-wrap over that.
Stress-riser only a problem if you extend solder out past the strain-relief.
Crimp with pliers, then solder at tip of wire to terminal only (before the strain-relief), then shrink-wrap over that.
Don't disagree re solder if truly restricted to the barrel of the pin, but it takes a good deal of finesse to avoid the solder wicking up the wire and isn't needed if the crimp is done right. Shrink-wrap? You mean heat-shrink tubing? That's great if there is room, but many connectors are too tight for that. Maybe there's room in the AFM connector though -- I don't know off hand -- I'd just check for sure before using heat-shrink tubing (and don't cover the tangs that hold the pin in the housing).
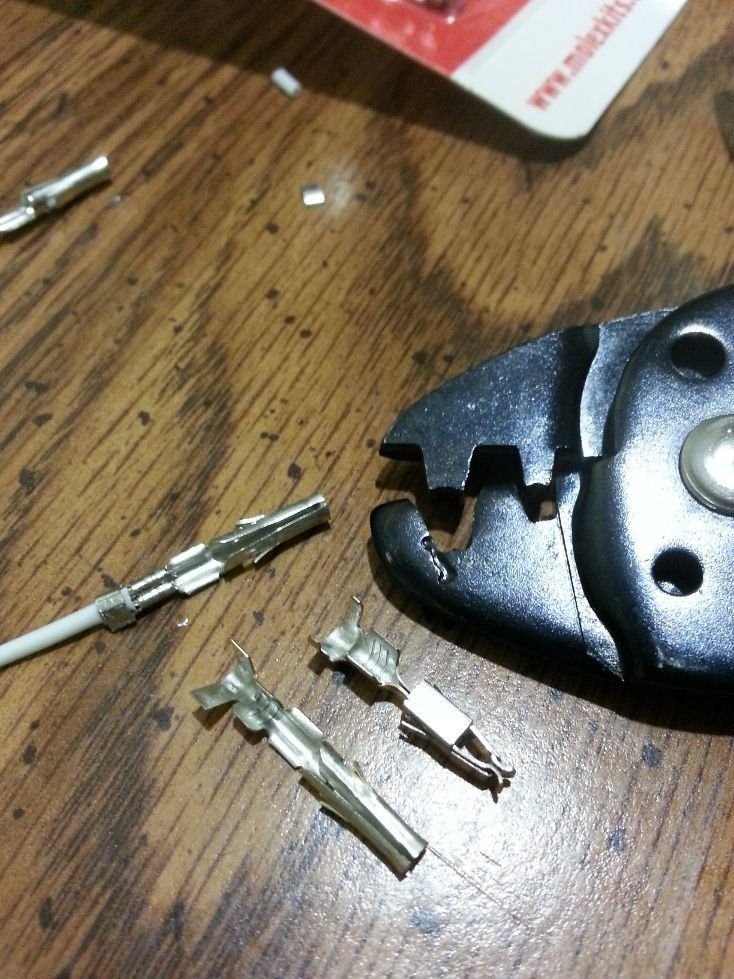
Thanks everyone. I picked up a crimping tool from Fry's that looks like it will do the job. I also found some pin terminals with conductor/insulator tabs that are almost identical to the AFM ones - I think these are Molex pins. They were marked as 0.93" and so was the tool, so it seemed like a good match. So I've done a few practice runs with those pins. The tool seems to do a good job on the conductor tabs but the insulator tab could be neater. It's inclined to fold the bottom part into a sharp corner, but I think I can make it work with a bit more practice, if I'm careful:
When the crimp bunches and folds up around the insulation like that, it means the pin was designed for thicker wire. If you can try thicker wire with that pin, I would. If not, then you can clip off a mm or two of the crimp metal so it wraps around the insulation tightly without bunching up. However, keep in mind that the wire crimp was also designed for thicker wire, so may not be as tight around the copper wire as it should be. Be sure to give it a good solid tug to make sure it won't pull out. A good crimp will be extremely secure and not pull out without a ton of effort.
I found the link I really wanted to post before. It's about fixing pinball machines of all things, but is a great tutorial on crimping. And yes, I'm inexplicably fastidious about getting crimps just right.
OK...the wire in the AFM harness is no bigger than the wire I tested with, and the pins/tabs are around the same size as the actual AFM ones. I was planning to attach this connector to the existing wiring, rather than making a whole new harness...so it sounds like I might have to clip the tabs as you suggested. Maybe I'd be better off making a whole new harness though.
The good news is the conductor crimp is nice and strong though, I can't pull it out.
When the crimp bunches and folds up around the insulation like that, it means the pin was designed for thicker wire.
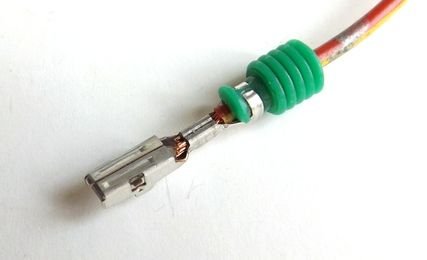
Or for use with a wire seal...
The 944online kits look like they come with connector shells that accept wire seals, but not the wire seals themselves. Given a boot the wire seals aren't strictly necessary. But I would be inclined to use a small section of adhesive-lined heat shrink tubing over the crimped portion to help reduce moisture intrusion.
Originally Posted by Tom M'Guinn
And yes, I'm inexplicably fastidious about getting crimps just right.
The 944online kits look like they come with connector shells that accept wire seals, but not the wire seals themselves. Given a boot the wire seals aren't strictly necessary. But I would be inclined to use a small section of adhesive-lined heat shrink tubing over the crimped portion to help reduce moisture intrusion.
I fear I share the same affliction.
Agreed on all counts! Good call!
And... Pepboys sells "weatherpac" connector sets that come with seals you could probably use for this. Never thought of thickening up the wire with adhesive-lined shrink tubing -- but that's a great trick to remember! Thanks.
Thanks those are great ideas. The connectors do have really big holes for the wires so it looks like those seals would work well. I can't see what the original is like because under the boot, there's another boot glued to the plastic housing and I didn't want to peel it off until I'm ready to replace the connector.
Thanks those are great ideas. The connectors do have really big holes for the wires so it looks like those seals would work well. I can't see what the original is like because under the boot, there's another boot glued to the plastic housing and I didn't want to peel it off until I'm ready to replace the connector.
Beware, the inner boot and glue are a bitch to get off without damaging the wire. Check the existing wire first though. A lot of the time the wire just outside inner boot is damaged due to vibration/heat, which means you'll need to cut it back further until you find a good section. If you do, double check the installed length because if you cut a lot off you may need to splice in a new section of wire to make the connector reach.
Beware, the inner boot and glue are a bitch to get off without damaging the wire. Check the existing wire first though. A lot of the time the wire just outside inner boot is damaged due to vibration/heat, which means you'll need to cut it back further until you find a good section. If you do, double check the installed length because if you cut a lot off you may need to splice in a new section of wire to make the connector reach.
There's no damage outside the inner boot, but I am thinking of splicing in new wire anyway. There's barely enough length as it is, so I think I could put less stress on the connector if I put 6" or so of new wire in.


 05-30-2015, 04:46 PM