When you click on links to various merchants on this site and make a purchase, this can result in this site earning a commission. Affiliate programs and affiliations include, but are not limited to, the eBay Partner Network.
early car has no connection between transmission and gauges.
the MPG-ometer is a calculation based on injector pulse width and MPH, iirc.
There are ways to do it without wheel speed sensors, but I�m not well versed enough to explain them haha. I do know one of them is using time vs rpm gain, but that obviously wouldn�t be as accurate as a speed sensor.
...wouldn't traction control require wheel speed sensors tied into the ECU too?
Yes, it needs to compare the average driven wheel speeds to the average non-driven wheel speeds. In a 944, the ECU could get the average rear wheel speeds from the transmission. Front wheels would require ABS speed sensors. On my '86, I upgraded to 968 spindles and hubs, so I have speed sensors already.
I still like option 2 the best as a starting point. If I want drive by wire for better traction control, I'd go for option 1 later. I don't like option 3...
I forgot that most TC systems use both the front and rear sensors and compare them; based on a percentage of whether one is faster than the other... How would that work for a stock 944? Since the rear input would be the only one it is getting, how would it know if it is actually losing traction vs. just going really fast?
VR6 TB is gonna fit perfect! Thanks JWebber for the tip.
Woooo!! Excellent news. Even though it'll probably be a while before I'm able to add any sort of traction control, seeing as how I would need to convert to a different front hub and spindle setup... unless anyone has any better ideas?
... are not ready yet. If you’ve received your kit and are tempted to mount the engine right away, here are a few pointers:
1. I packed each item with the hardware that it needs. I suggest trying to keep the hardware organized that way until you use it. You’ll probably notice a variety of lengths of bolts that look very similar. Be careful which bolt you put in each hole... the depths do vary a bit. The instructions will detail what length bolt goes in each hole.
2. Run a tap into the 4 holes on the psgr side of the block before mounting the bracket. You’ll need M10x1.5 and M8x1.25 taps. Those holes were a little rusty on my block.
3. On the driver side, I don’t think I had to tap any, but you should check them all as well before running bolts in.
5. All of the fittings are loosely installed in the oil block. They are not even remotely tight; I figured everyone probably has their own methods for this... but please use a lubricant of some sort when you tighten the o-ring boss fittings so the o-rings don’t get damaged.
6. The breather box came with a o-ring seal. According to iAbed, just crank down the 6 bolts in a crisscross pattern and it will seal. It didn’t feel right to me to do that so I left them all loose and up to your discretion. I will cautiously give it a try on mine at some point, but if it feels like it’s going to strip threads or break an ear off, I’ll back it off, remove the o-ring, and seal it with silicone gasket maker.
7. I do not recommend installing the stock 07K coils. They could potentially hit the bottom of your hood. They just barely clear the hood on my car, but for a better fit, I recommend getting the shorter coils from an Audi S4 V8 (B6 or B7), which are about 7 mm shorter. PN is 077905115T. You need to trim the rubber boot to fit the valve cover. This will be detailed in the instructions.
8. You will notice some "unique" nuts on the bottom of engine mount isolators. These are custom made from high strength (grade 10.9) coupling nuts. They were necessary due to the funky shaped underside of the stock cross member casting. I recommend torquing them in the range of 45-50 ft-lb, which is the recommended torque spec for a M10 grade 10 fastener. If you torque them way over that it is possible to break them off at the base of the turned down feature (I found them to yield around 80-90 ft-lb, which is way over-torqued for an M10). I plan to use Loctite blue threadlocker as well.
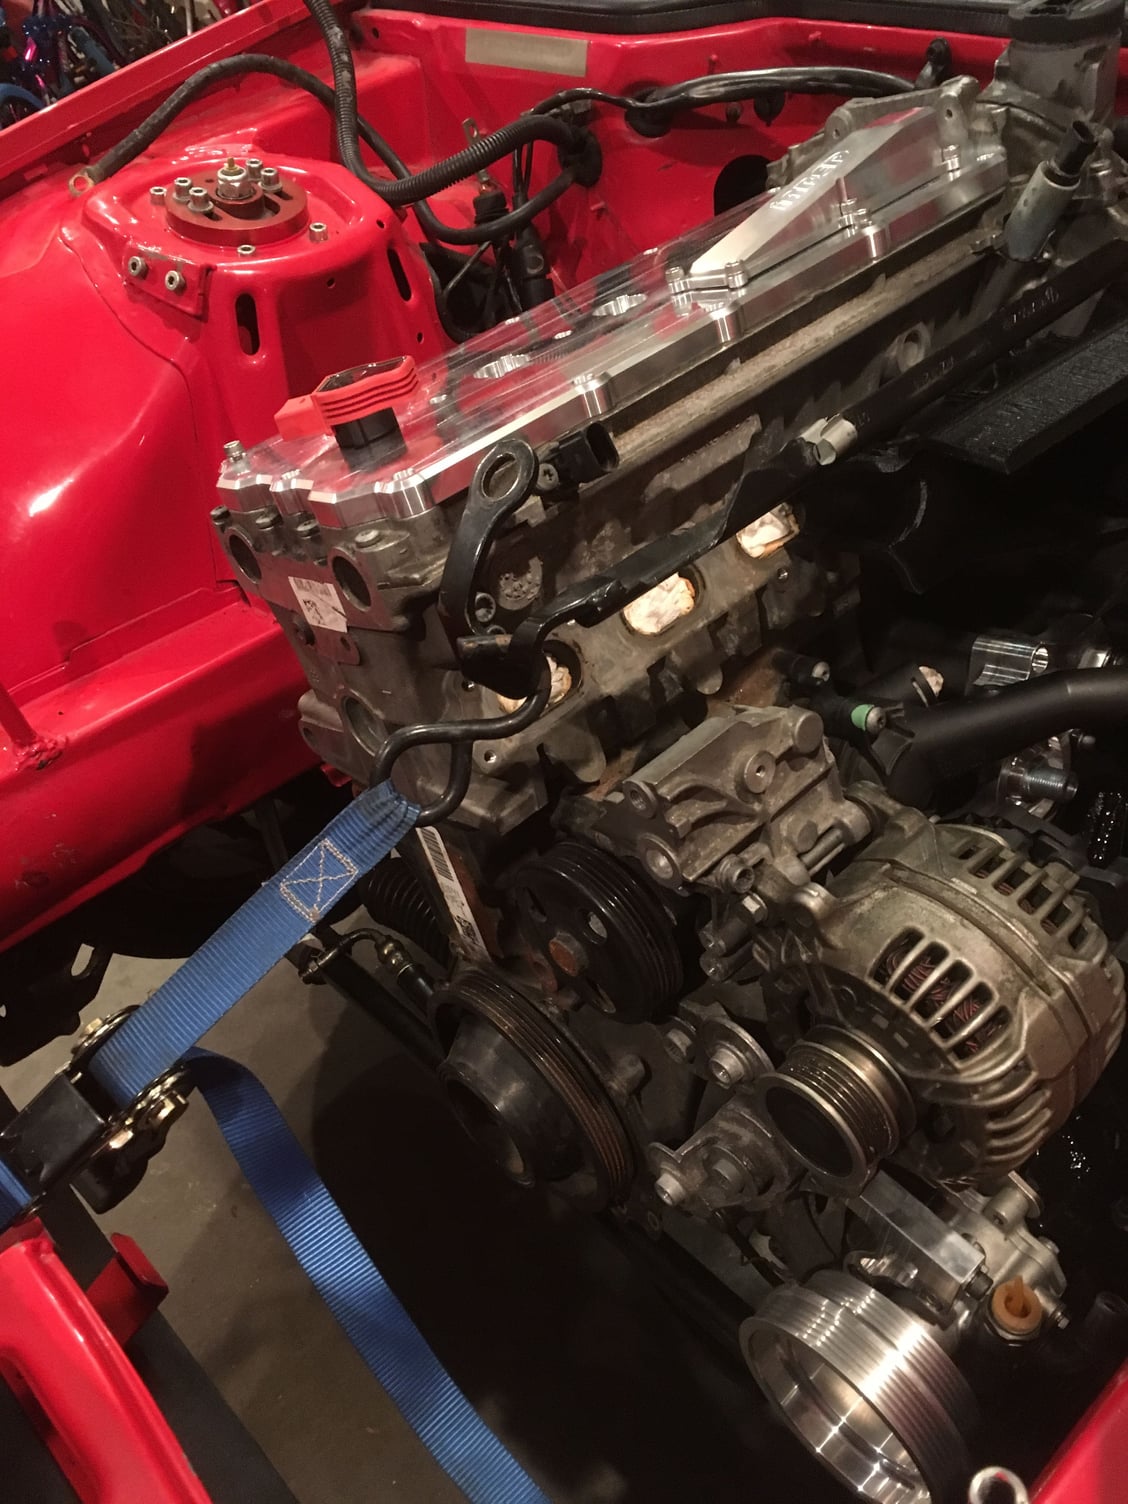
9. There’s no bellhousing to bolt up to the torque tube yet (I know, I’m working on it...), so when you set the engine on the cross member, it will want to fall backwards. In my car, I use a ratchet strap to hold it up for now. I hooked mine around part of the front bumper support.
VR6 TB is gonna fit perfect! Thanks JWebber for the tip.
Just doing my little part I am going to try another idea for the rear coolant flange before spending the money for the CP-S flange . I had another idea today ,,,, just trying to keep it simple and easy to make .
I decided to trim the top of the accessory mounting bracket a bit . Been trying to decide on a color for the block during my cleanup . I�ll be media blasting this bracket along with a a few other bits . I like things to be clean .
I decided to trim the top of the accessory mounting bracket a bit . Been trying to decide on a color for the block during my cleanup . I�ll be media blasting this bracket along with a a few other bits . I like things to be clean .
Nice work. It�s these little things that make all the difference!
...Been trying to decide on a color for the block during my cleanup...
I'm probably going with black again, after I sand blast it and get all the rust off... since the theme of my car is gold with black accents, and also stock/oem colors are more inconspicuous
I'm probably going with black again, after I sand blast it and get all the rust off... since the theme of my car is gold with black accents, and also stock/oem colors are more inconspicuous
Im going to have to patina the s**t out of mine for it to look at home in my track rat 😂
I decided to trim the top of the accessory mounting bracket a bit . Been trying to decide on a color for the block during my cleanup . I�ll be media blasting this bracket along with a a few other bits . I like things to be clean .
Before you put too much time into making that bracket pretty, let me take a measurement in CAD... you might have to cut more off the top for the intake manifold to clear.


 01-31-2019, 06:05 PM


 I am going to try another idea for the rear coolant flange before spending the money for the CP-S flange . I had another idea today ,,,, just trying to keep it simple and easy to make .

