
Oil Filter Housing Seal Replacement - Fixed
 10-08-2011, 07:55 PM
#1
Rennlist Member
Thread Starter
Two Weeks ago I replaced the head gasket on my car, got everything back together and everything seemed good until...
Went for about a 20 mile drive on Wednesday night and when I got back I noticed the coolant was very low, about 3 pints. Checked the oil on the dipstick and it did not look good. Drained a little oil and I looked milky. I take most everything in stride but this was a real bummer.
Did a compression test and everything looked fine. Plugs looked good. Car does not smoke at all. Drained the oil and pressurized the coolant, sure enough, coolant started slowly dripping from the drain plug. No trace of oil in the coolant.
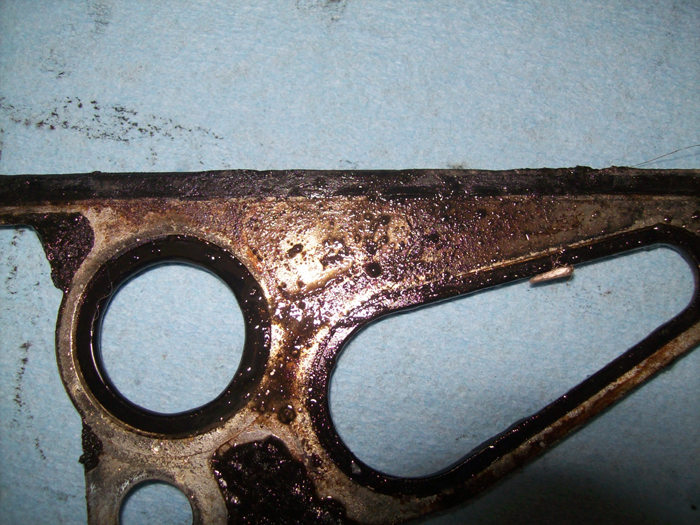
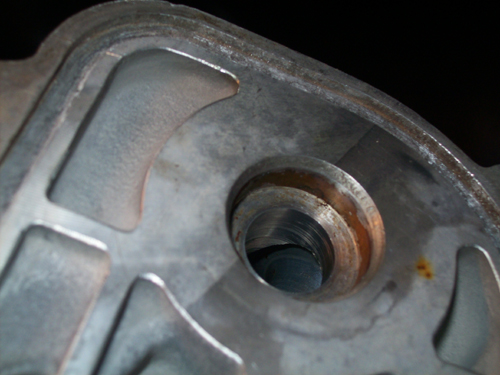
I decided to inspect/replace the oil filter housing seals and here is what I found:
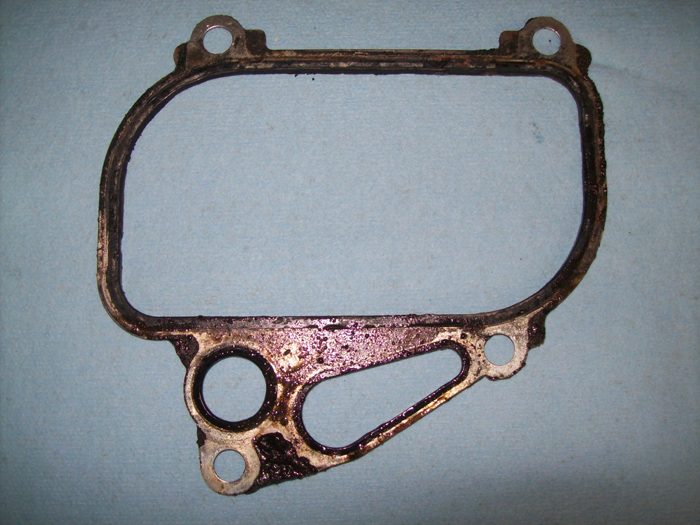
The seal looked pretty bad to me, what say you?
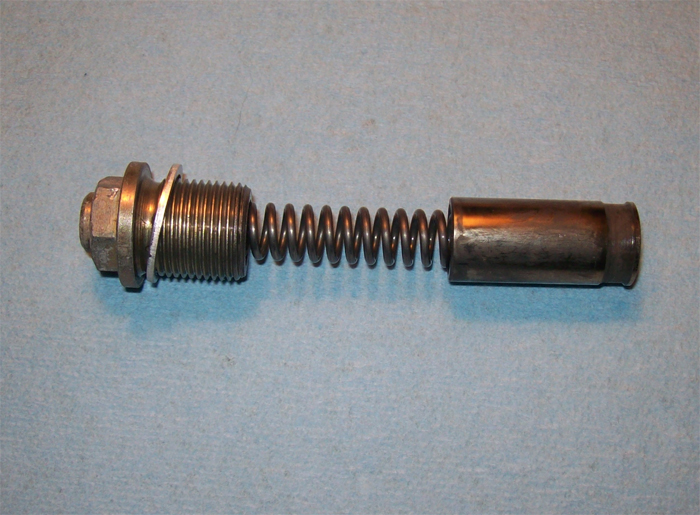
The OPRV does not look like anything I have seen, does this look like the 86 OPRV?
Went for about a 20 mile drive on Wednesday night and when I got back I noticed the coolant was very low, about 3 pints. Checked the oil on the dipstick and it did not look good. Drained a little oil and I looked milky. I take most everything in stride but this was a real bummer.
Did a compression test and everything looked fine. Plugs looked good. Car does not smoke at all. Drained the oil and pressurized the coolant, sure enough, coolant started slowly dripping from the drain plug. No trace of oil in the coolant.
I decided to inspect/replace the oil filter housing seals and here is what I found:
The seal looked pretty bad to me, what say you?
The OPRV does not look like anything I have seen, does this look like the 86 OPRV?
Last edited by refresh951; 10-10-2011 at 10:12 PM.
 10-08-2011, 08:43 PM
#2

Looks like an old seal to me!
It could be the culprit, but hard to say.
That is an 86 three piece OPRV. You will need the alignment tool to re-install the housing.
If I were you, I would locate and purchase the updated 86 one-piece OPRV. You have to be specific, as it was made to retrofit into the early engines. The late OPRVs will not fit.
10-08-2011, 08:53 PM
#4
Rennlist Member
Thread Starter
10-09-2011, 12:18 AM
#5
Addict
Lifetime Rennlist
Member
Lifetime Rennlist
Member
Yup, not much rubber left on that old gasket. You'll be shocked when you compare that to a new one.
FYI - I reinstalled my 3-piece using the alignment tool, everything is working great. 1 vs 3 is subject to debate depending on who you ask... reliability, actual pressure, cause people to take a side. Some old-timers (including the Clarks write-up) say that the old style works better - right up until it stops working properly. In a nutshell, I saw enough comments that said if your 3-piece is working, continue to use it. If you start to see funky things happen, replace it with 1-piece.
FYI - I reinstalled my 3-piece using the alignment tool, everything is working great. 1 vs 3 is subject to debate depending on who you ask... reliability, actual pressure, cause people to take a side. Some old-timers (including the Clarks write-up) say that the old style works better - right up until it stops working properly. In a nutshell, I saw enough comments that said if your 3-piece is working, continue to use it. If you start to see funky things happen, replace it with 1-piece.
10-09-2011, 01:20 AM
#6
Rennlist Member

20 miles with coolant in the oil. I would guess rod bearings are next to go. I admire your resilience! I hope I have better luck than you. My build is very similar. So far mines running OK except for troubleshooting a miss at 2800rpm.
10-09-2011, 01:29 AM
#7
Rennlist Member
Thread Starter
Ya, that definitely crossed my mind. I think I am going to gamble but that has not worked out to well lately. I would recommend replacing the HG and oil filter housing seals if they are original. Adding 100 HP will expose any weakness.
Trending Topics
10-09-2011, 02:47 AM
#8
Rennlist Member
Yeah, that old gasket looks its age.
Just out of curiosity... was there an o-ring on the end of your OPRV? There's supposed to be, and if one didn't come out with it, it's probably still in the hole. Definitely gotta dig it out, a new one won't seat properly if there's an old one or bits of an old one in there.
Also, one important note: The o-ring for the OPRV is not included in the housing kits, so make sure you order one separately. Also, I believe the o-rings are unique to each of the three different OPRV's, so make sure to specify.
10-09-2011, 10:19 AM
#9
Addict
Lifetime Rennlist
Member
Lifetime Rennlist
Member
Just out of curiosity... was there an o-ring on the end of your OPRV? There's supposed to be, and if one didn't come out with it, it's probably still in the hole. Definitely gotta dig it out, a new one won't seat properly if there's an old one or bits of an old one in there.
Also, one important note: The o-ring for the OPRV is not included in the housing kits, so make sure you order one separately. Also, I believe the o-rings are unique to each of the three different OPRV's, so make sure to specify.
Also, one important note: The o-ring for the OPRV is not included in the housing kits, so make sure you order one separately. Also, I believe the o-rings are unique to each of the three different OPRV's, so make sure to specify.
The 3-piece just needs to be cleaned well so that there is no old oil residue before reinstalling. I also slid my valve in and out several times, spraying carb cleaner in the hole each time to clean out the bore. My valve tip was very smooth going in and out, so I was confident that it would work ok.
I'm going on about 1,000 miles since my reassembly now, and my oil pressure has been looking great the whole time. 5 bar when cold, 5 bar at operating revs, and 3 bar (sometimes a tad below) at idle when warm.
Last edited by zerMATT951; 10-09-2011 at 03:04 PM.
10-09-2011, 01:52 PM
#10
Rennlist Member
You need to look at and replace the 2 o-rings on the little transfer pipe between the block and the oil thermostat housing. And maybe replace the pipe. See tips here:
http://members.rennlist.com/tom86951..._seal_repl.htm
http://members.rennlist.com/tom86951..._seal_repl.htm
10-09-2011, 03:06 PM
#11
Addict
Lifetime Rennlist
Member
Lifetime Rennlist
Member
You need to look at and replace the 2 o-rings on the little transfer pipe between the block and the oil thermostat housing. And maybe replace the pipe. See tips here:
http://members.rennlist.com/tom86951..._seal_repl.htm
http://members.rennlist.com/tom86951..._seal_repl.htm
10-09-2011, 03:16 PM
#12
Rennlist Member
10-09-2011, 03:36 PM
#13
Addict
Lifetime Rennlist
Member
Lifetime Rennlist
Member
Great write-up, by the way. I read all of your articles during my rebuild. Very helpful!
10-09-2011, 03:38 PM
#14
Rennlist Member
Thread Starter
Used your write-up to pull the housing. Also had to cut my oil lines. Thanks for your write-ups, I used your HG write-up also.
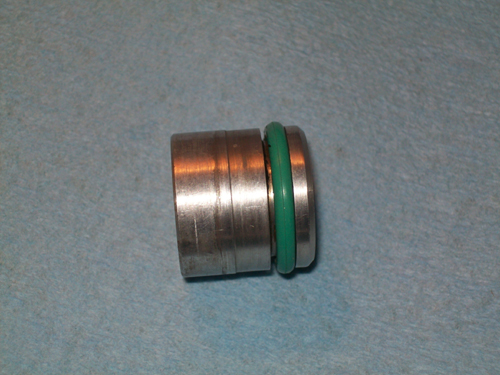
My pipe is different, only has one o-ring which I replaced, the other end appears to be a pressure fit. See Pic below. Some kind of sealant was in the pressure fit. Anyone know what sealant is suppose to be used? It appears pretty hard, I can flake it off.
 10-09-2011, 03:40 PM
#15
Rennlist Member
Thread Starter
I researched this quite a bit before reinstalling my 3-piece and determined that the 3-piece does NOT use an o-ring. The 3-piece is a machine fit in the block that relies on free movement in and out against the spring to regulate pressure. The 1-piece design doesn't move and appears to regulate pressure via the oil flow through the holes in it, which is why it requires an o-ring seal.
The 3-piece just needs to be cleaned well so that there is no old oil residue before reinstalling. I also slid my valve in and out several times, spraying carb cleaner in the hole each time to clean out the bore. My valve tip was very smooth going in and out, so I was confident that it would work ok.
I'm going on about 1,000 miles since my reassembly now, and my oil pressure has been looking great the whole time. 5 bar when cold, 5 bar at operating revs, and 3 bar (sometimes a tad below) at idle when warm.