951 / S2 RSR monobloc front development from DEUTSCH NINE
 01-03-2011, 04:48 PM
#1
Former Vendor
Thread Starter

Hi all
I wish an excellent 2011 to all rennlisters, with many interesting Porsche projects and lots of driving pleasure!
It's time to update you on a product which I myself do look very much forward to as it will also be used on both my racecar (the 951 LS7 V8 project)
and my daily driver (the matte black Martini 951),
it's what we'll call the RSR monobloc front.
Before I started the development of this, I put together the following list of requirements for a completely new front bumper fitting 951 and S2:
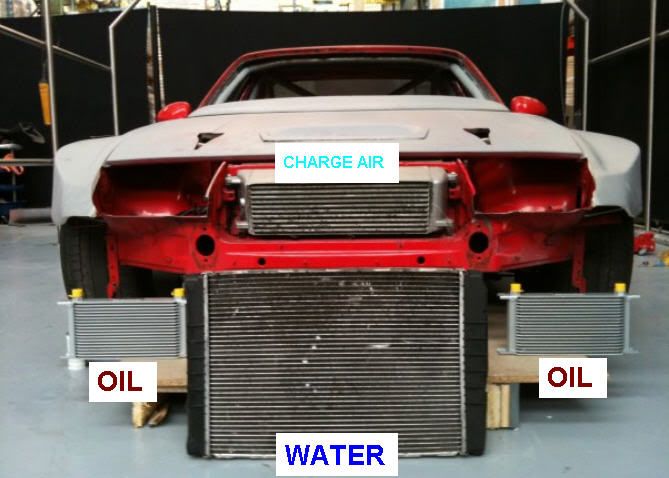
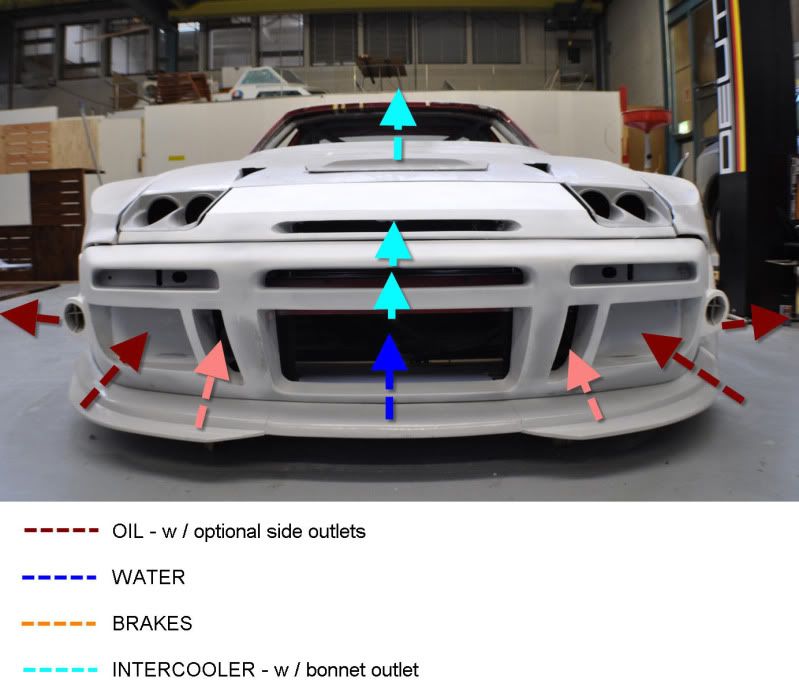
(1) Allow the accomodation of twin oil coolers (not mounted in front of the water cooler but 1 on each side, such as lightweight and high-quality MOCAL units, which we can offer for approx 400 EUR per pair) to provide sufficient cooling for big turbo applications or V8 engines, the intakes need to be positioned towards the side ends of the bumper in order to allow venting them to the side in front of the front wheels to increase cooling flow-through efficiency and have as little air get under the car as possible.
(2) Significantly increase the size of the central cooling intake for the water cooler in order to also keep high hp engines perfectly cool "on the water side"
(3) Implement large size brake cooling intakes for the obvious reasons
(4) Despite the above modifications which all are for cooling, allow best performance lighting with sidewards mounted additional fog and high beamlights with H11 bulbs (in 997 turbo style, but adapted)
(5) Create a new design front splitter with a massively extending lip for maximum downforce, the splitter is separate from the rest of the front in order to allow quick replacement or sufficient clearance when the car has to be pulled on the trailer or clear something...
this is what customers have reported to be a problem with other modified design bumpers.
(5) Shape everything together to a very nice and modern bumper splitter combination which also updates the looks of the otherwise timeless design of the 951 / S2 to the new millenium
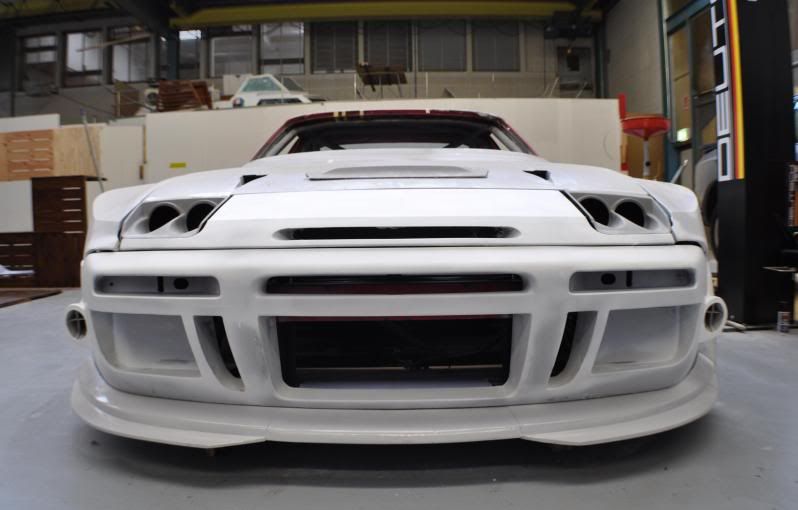
When I was reaching completion of the bumper project, I had the idea that it would be very beneficial in terms of aerodynamics, lightweigt design and acccessibility to combine this bumper with our vented badge panel and the DGTS lights into a monobloc front, so to form one single unit made up from bumper, badge panel and DGTS lights.
This will allow to save approx 30kg's compared to the factory setup of bumper, badge panel, lights, lift bar and motor and as the prototype will be aligned on a perfectly straight car it will also fit perfect out of the box with no aligning required.
The bumper can be fitted together with the factory bumper crash bar and indicator items, it also clears with all items that sit behind a stock car's bumper, and it does not necessarily need a twin oil cooler
setup, you can for example also fit only one larger oil cooler, for example on the right side, and use the left side intake for the engine intake air providing direct cool air and a RAM air effect as well.
The bumper allows several different purposes of use and I would say that it will be a very good choice for any performance minded street or race car project...
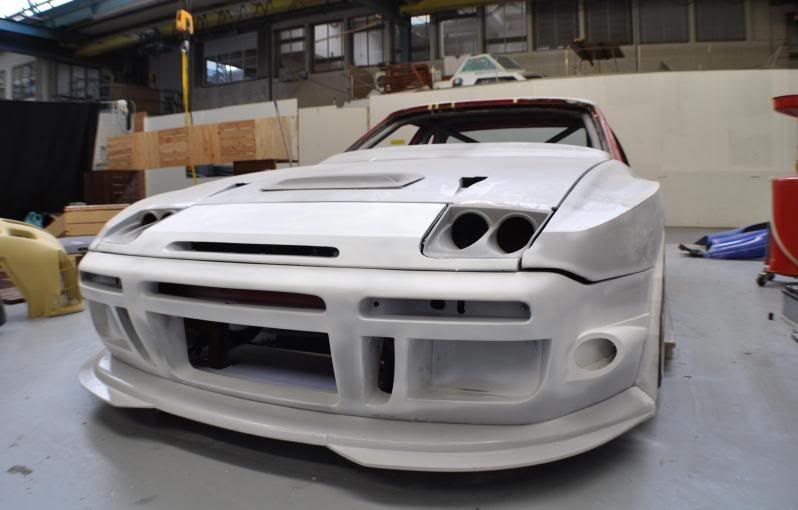
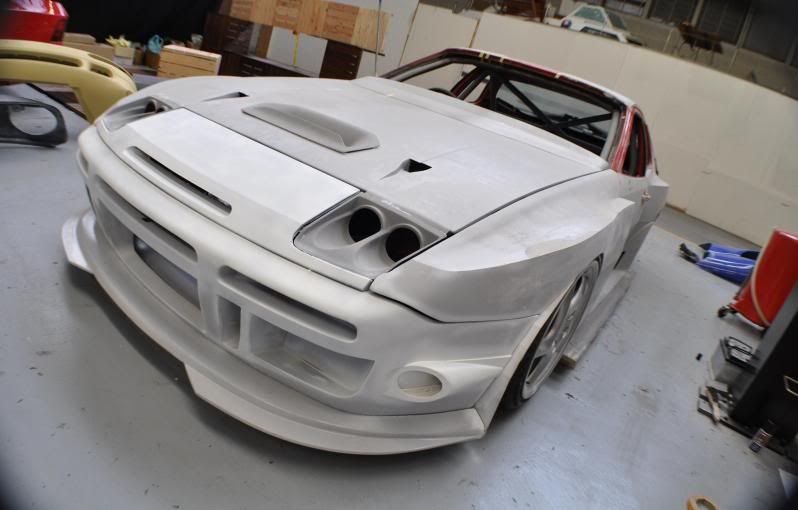
Here's a picture of the stage I am at at the moment. I will perfectly prepare all separate components of the bumper for moulding in the next weeks, and then post pictures here of the finished serial production unit, at first mounted on my 951 Martini racing turbo (which will be a very nice street car, and I can already tell you guys that matte black and the Martini stripes are a fantastic combination ). Moulding this as a one-piece unit will be a challenge as it requires a 7-piece mould but it will be worth it for the result.
So, let's get to the pictures:
FRONT VIEW:

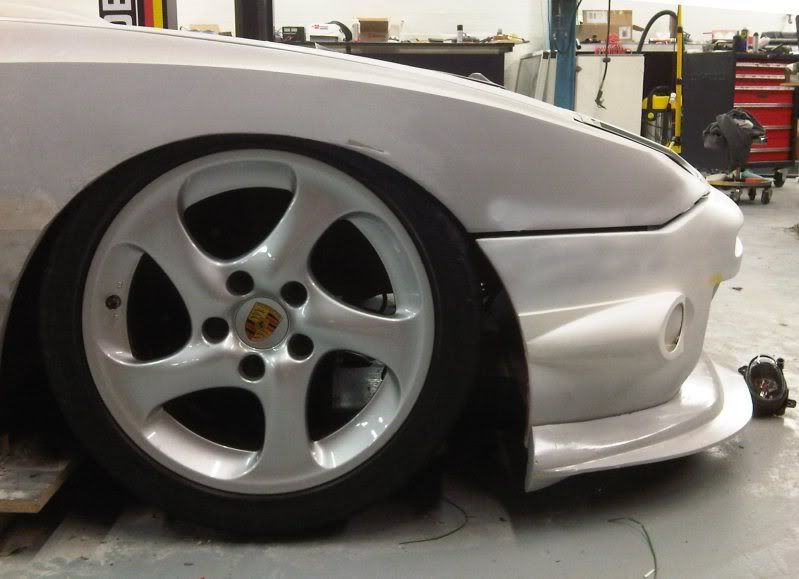
FRONT / SIDE VIEWS:
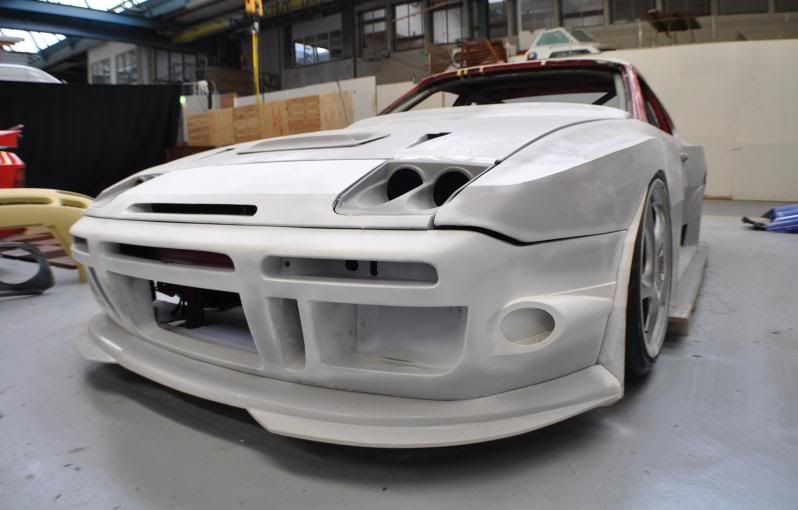
PLEASE NOTE that panel gaps in the above pictures are very far from perfect so please do not take this as a reference yet.
COOLERS TO INTEGRATE (EXAMPLE SETUP):
We will offer this product with the following options:
- Base bumper as shown in the pictures (default)
- optional with moulded in vented badge panel, as shown in pictures
- optional with Dual GTS headlights, as on our website
- optional with MOCAL oil coolers and hardware
- optional with 997 TT style H11 bulbs
- optional with brake cooling ducting
- optional with oil cooler side outlet apertures and ducting
Prices are not defined yet as I first need to see if the first mould works out perfect at first attempt and how much materials and time it takes to produce the different items...
Let me know if you guys do have any additional requirements to implement before I start moulding...
Cheers
Beni
I wish an excellent 2011 to all rennlisters, with many interesting Porsche projects and lots of driving pleasure!
It's time to update you on a product which I myself do look very much forward to as it will also be used on both my racecar (the 951 LS7 V8 project)
and my daily driver (the matte black Martini 951),
it's what we'll call the RSR monobloc front.
Before I started the development of this, I put together the following list of requirements for a completely new front bumper fitting 951 and S2:
(1) Allow the accomodation of twin oil coolers (not mounted in front of the water cooler but 1 on each side, such as lightweight and high-quality MOCAL units, which we can offer for approx 400 EUR per pair) to provide sufficient cooling for big turbo applications or V8 engines, the intakes need to be positioned towards the side ends of the bumper in order to allow venting them to the side in front of the front wheels to increase cooling flow-through efficiency and have as little air get under the car as possible.
(2) Significantly increase the size of the central cooling intake for the water cooler in order to also keep high hp engines perfectly cool "on the water side"
(3) Implement large size brake cooling intakes for the obvious reasons
(4) Despite the above modifications which all are for cooling, allow best performance lighting with sidewards mounted additional fog and high beamlights with H11 bulbs (in 997 turbo style, but adapted)
(5) Create a new design front splitter with a massively extending lip for maximum downforce, the splitter is separate from the rest of the front in order to allow quick replacement or sufficient clearance when the car has to be pulled on the trailer or clear something...
this is what customers have reported to be a problem with other modified design bumpers.
(5) Shape everything together to a very nice and modern bumper splitter combination which also updates the looks of the otherwise timeless design of the 951 / S2 to the new millenium
When I was reaching completion of the bumper project, I had the idea that it would be very beneficial in terms of aerodynamics, lightweigt design and acccessibility to combine this bumper with our vented badge panel and the DGTS lights into a monobloc front, so to form one single unit made up from bumper, badge panel and DGTS lights.
This will allow to save approx 30kg's compared to the factory setup of bumper, badge panel, lights, lift bar and motor and as the prototype will be aligned on a perfectly straight car it will also fit perfect out of the box with no aligning required.
The bumper can be fitted together with the factory bumper crash bar and indicator items, it also clears with all items that sit behind a stock car's bumper, and it does not necessarily need a twin oil cooler
setup, you can for example also fit only one larger oil cooler, for example on the right side, and use the left side intake for the engine intake air providing direct cool air and a RAM air effect as well.
The bumper allows several different purposes of use and I would say that it will be a very good choice for any performance minded street or race car project...
Here's a picture of the stage I am at at the moment. I will perfectly prepare all separate components of the bumper for moulding in the next weeks, and then post pictures here of the finished serial production unit, at first mounted on my 951 Martini racing turbo (which will be a very nice street car, and I can already tell you guys that matte black and the Martini stripes are a fantastic combination
). Moulding this as a one-piece unit will be a challenge as it requires a 7-piece mould but it will be worth it for the result.So, let's get to the pictures:
FRONT VIEW:
FRONT / SIDE VIEWS:
PLEASE NOTE that panel gaps in the above pictures are very far from perfect so please do not take this as a reference yet.
COOLERS TO INTEGRATE (EXAMPLE SETUP):
We will offer this product with the following options:
- Base bumper as shown in the pictures (default)
- optional with moulded in vented badge panel, as shown in pictures
- optional with Dual GTS headlights, as on our website
- optional with MOCAL oil coolers and hardware
- optional with 997 TT style H11 bulbs
- optional with brake cooling ducting
- optional with oil cooler side outlet apertures and ducting
Prices are not defined yet as I first need to see if the first mould works out perfect at first attempt and how much materials and time it takes to produce the different items...
Let me know if you guys do have any additional requirements to implement before I start moulding...
Cheers
Beni


 01-03-2011, 05:06 PM
#4
Race Car
01-03-2011, 05:29 PM
#6

My main interest at this point is the hood vent. A couple of questions for you:
#1, what kind of clearance are you getting relative to the intercooler pipe that runs to the turbo/dist cap? If you look at a 968, it fits between the factory pipes no problem, but it sits at least 6" closer. Its not possible to position it much further in as you'd be at the front edge of the 951 hood if you put it in the same location as the 968, right?
#2, what are you doing with the factory hood latch? I am assuming hood pins, but thought I'd ask.
#2a, any concerns with undue hood flex? You will be cutting away the center support brace to accommodate the hole for the vent.
#3, what are you doing with the ducting from the back side of the intercooler to the relief vent? Again, if you reference the 968 Turbo, you will see that it connects directly to the backside of the intercooler and seals up against the vent. Thats not possible with a 951 unless you cut away the brace behind the intercooler that supports the factory hood latch, and I am assuming its a chassis stress point (altho I need to take a closer look as I am doing this from memory).
I am extremely interested in this as I am planning on doing the exact same thing on my 951 and already have the relief vent. This is, imo, the best possible intercooler mod any sub 450rwhp 951 can do.
By the way, take another look at the front nose piece vent and consider the impact of it from an fluid standpoint on the intercooler. The lower vent is in a higher pressure zone than your nose vent, which will, imo (and I can back this with some numbers as I have done some fluids modeling on this exact thing before), create an air drag in front of the intercooler and will reduce its effectiveness. The lower opening will provide more air than the stock intercooler can accommodate, so having all the entering at the same velocity will help it be more efficient at processing the air thorugh it. Adding the relief vent behind it will speed up the velocity as it creates a low pressure area behind it, but doing the same thing in front will obviously slow it down. For years, racers have been telling us that the front vent work but I have never seen anyone quantify that with empirical data and have serious doubts as to how it could be effective. For the front nose vent to work, you'd really have to build a baffle inside the front of the nose to keep the lower velocity air separated from the higher velocity air.
By the way, I think your products are killer! Great work!
01-03-2011, 07:57 PM
#7
Rennlist Member
As ever a ton of work there Beni. I'd be interested how this caters for larger front mount intercoolers?
Also do you have any pics from the side to show how far out the splitter extends v's the front of the car. (A regulation issue I might have to deal with). Plus is there any reason you chose not to continue the splitter all the way across?
Also do you have any pics from the side to show how far out the splitter extends v's the front of the car. (A regulation issue I might have to deal with). Plus is there any reason you chose not to continue the splitter all the way across?
Trending Topics
01-04-2011, 03:58 AM
#8
Beni,
you have done a lot of work there. I just hate fibreglass jobs too messy but somehow i continue work with that nasty stuff. Hope i can see ready racer next summer when we have our annual Swiss tour
you have done a lot of work there. I just hate fibreglass jobs
too messy but somehow i continue work with that nasty stuff. Hope i can see ready racer next summer when we have our annual Swiss tour
01-04-2011, 10:12 AM
#10
Racer

Join Date: Mar 2004
Location: Baltimore, MD
Posts: 496
Likes: 0
Received 0 Likes
on
0 Posts
While not all of the mods you and your team introduce aren't exactly my preference, I applaud you for pushing development of new and innovative products for our cars. Nice job,
 01-04-2011, 12:31 PM
#12
Intermediate

Join Date: Jul 2008
Posts: 27
Likes: 0
Received 0 Likes
on
0 Posts
Hi Benni, your works looks really great. I was just wondering have you any plans to do something with the rear end like kind of bring it up to date a little. Apart from going down the 968 conversion route no one seems to do any thing for the rear and this is one area where I think a standard 951 is let down. The orange car in the following link https://rennlist.com/forums/944-turb...k-951s-25.html is on the right kind of lines but I feel you guys could come up with something even better going on your other projects. Gary
01-09-2011, 08:37 AM
#14
Former Vendor
Thread Starter
Hi all
Thanks for the feedback and comments.
sh944: the longitudinal positioning of the hood vent is not final yet. As it is at the moment it is a bit of a compromise. I have done some measurements when the 2.5 engine was still in the car, the OEM pipes do not clear it properly, you will have to re-route at least the right one (in driving direction).
The hood on the racecar will be fitted with hood pins, and it will not be a full framed hood but a hoodskin with a helper-frame. I'm not concerned about hood flex, IMHO this really comes down to the attachment points correctly chosen plus some carbon fiber rovings laminated in at the right places. I might also secure the hood in its center via the brace which will be installed, so everything can be combined. If I use 6 normal attachment points, I would reckon that the are where it will most likely tend to flex is its very center. So a simple solution would be to reinforce it there via installing a pin-console on the strut brace.
Also, we might get a factory 968 turbo RS in the CH workshop in the near future to have a close look at some of the OEM parts and I might get some better ideas from there
I did not fully understand your last point, however, it probably would be beneficial to further increase the outlet diameter because from my understanding for perfect air flow this always should be 1:2, so twice the outlet area compared to the inlet...
Patrick: The central front intake uses all the space betwen the very bottom of the factory bumper up to where you do have the crossmember. So anything which is mounted in this area will receive the maximum possible air stream, a lot more than the factory setup. I can calculate for you how much more intake surface we do have factory vs. our bumper. And I'll attach a side view pic for you.
The center section was cut because the side canards are more relevant for downforce, so they were extended further.
DanaT: Please send us an email to sales@deutschnine.com
garylane: Yes, I will do a redesign rear bumper as well...but as I work from front to back this has to wait a bit longer...
piperporsche180944: I will post more pics of the matte black Martini 951 up shortly...
Cheers
Beni