
The jet analogy is true!
 07-24-2008, 09:58 PM
#1
Nordschleife Master
Thread Starter
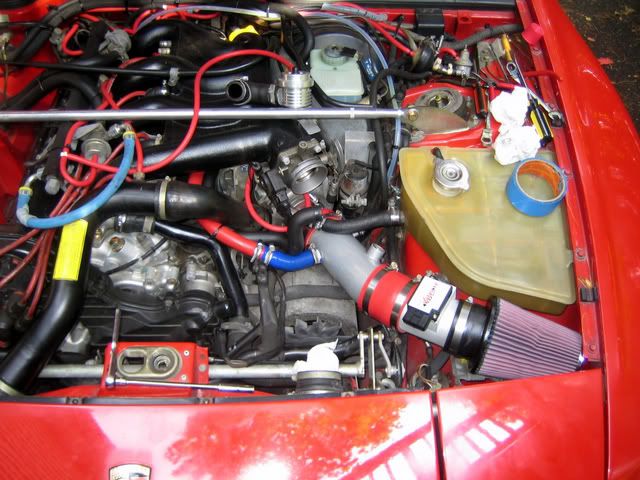
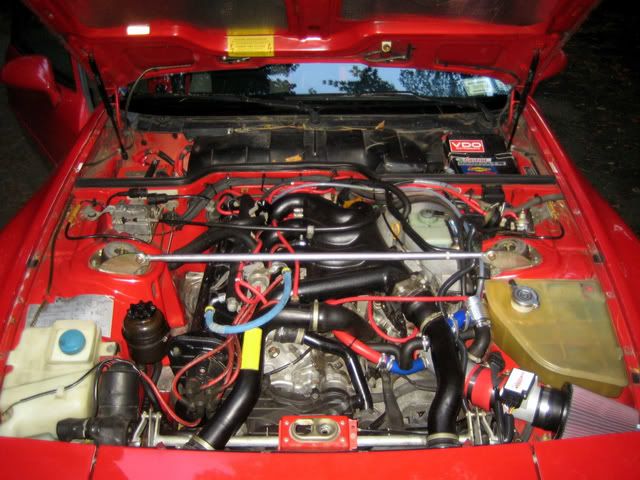
Well after the better part of 5 hours, i finally finished installing a Vitesse MAF and 72# injectors. I would say more than two hours was spent messing around with the bypass valve trying to get it to fit right and another two hours was spent trying to get the J-pipe to fit correctly. I used probably half a can of 'Off!' insect repellent to hold the mosquitoes off also. Theres nothing worse than trying to take the fuel rail out with those buggers buzzing around.
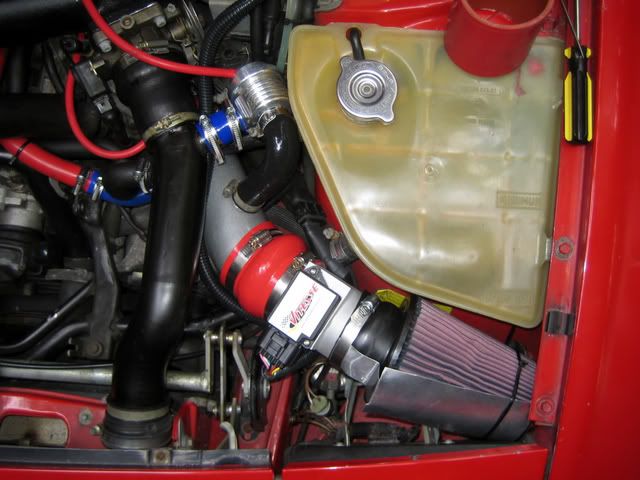
The install was very straight forward and didnt require any special tools or funky home made solutions. Most of it was just trial and error fitment. To properly fit the MAF, i had to grind down a small portion of the alternator shroud so i could get the coupler to fit right. The coupler i used was a 2'' to 3'' as i was using my stock K26. In the following picture you can see the issue i was having...
Anyway i was finally able to get the J-pipe in..
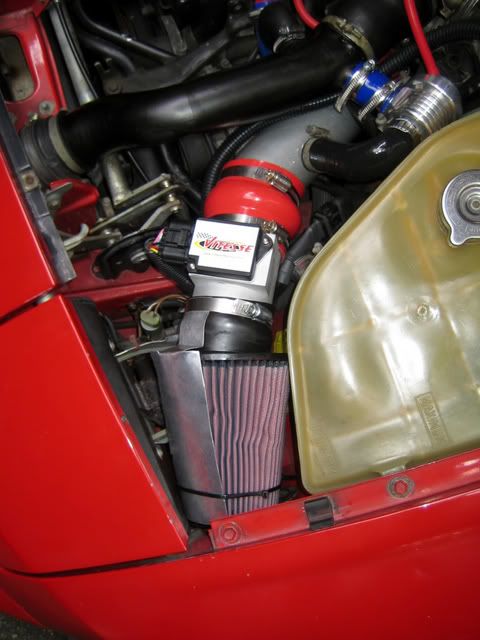
And after another hour or so of cursing i finally was able to get the MAF and filter to fit. It clears the hood and headlight bracket perfectly.
Next came the hell of installing the bypass valve. I have no pictures of the process because it took forever to get this to fit. Even then, im still not to happy with the fitment and plan to redo it when i can pick up an extra 1'' silicone 90* bend. After hooking up the 12v feed and the ground and spilling about $4 in gas all over the top of the engine when i removed the fuel rail, i finally had everything under the hood complete..
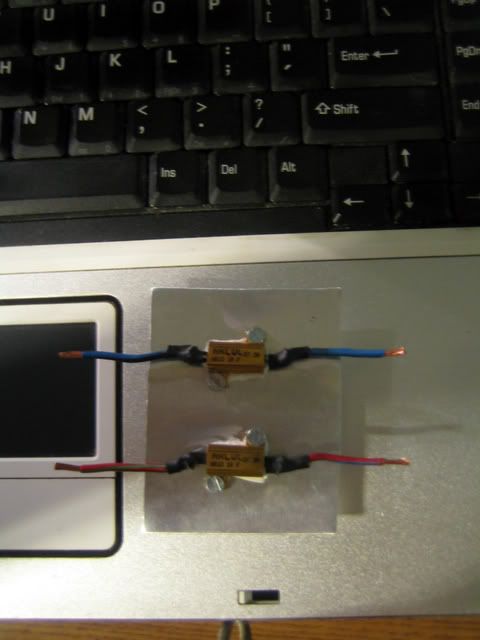
The last parts were the most straight forward, installing the new MAF chip and hooking up the resistors for the injectors. I became a pro at changing the chips having replaced my stock and APE chips a handful of times while trying to get my car to pass inspection. The resistors were very easy to hookup. I read in a few older posts that the wires are grey and grey with a black stripe. You should still check for continuity on pins 14 and 15 of the DME plug to verify this however.
I made a very simple aluminum plate for the resistors to mount on. The white goo is thermal paste from my local computer place to aid in heat transfer.
I took the car out for a quick 3 mile ride around town. I was not able to really get on the car hard yet, but i noticed a few things already..
-The car no longer jerks or bucks when coming off the gas in 2nd gear. With the APE and stock chips, it did this all the time. Not really violent, but enough that you felt it.
-The turbo spool up sound is very loud and sounds pretty cool. Driving through my development, the car usually turns heads..now everyone turns around as i accelerate lightly pass.
-The AFR reacts much faster to my throttle inputs. Before hand, the AFR's on the wideband seemed to react slow to an increase in load, now it varies based on the load much quicker.
I am looking forward to setting up my boost controller for 15lbs again tonight .. . Ive been running 11lbs and 15lbs with crappy AFR's for far to long!
Tomorrow i still need to clean up a few things (mainly clean up the vacuum line and ignition wire routing) and put the DME and KLR back on the bracket. Other than that im quite happy .
.
Next up is replacing the feed and return fuel lines, then new intercooler pipes. I have a K27/6 i was planning on putting in but im currently thinking about selling it and going for something of slightly new tech. But its very nice knowing i dont need to worry about messing around with different chips..etc when replacin the turbo now that i have the MAF.
I am planning on dyno'ing the car saturday if the weather holds out. I am hoping to make around 240-250 whp at 15psi.
The install was very straight forward and didnt require any special tools or funky home made solutions. Most of it was just trial and error fitment. To properly fit the MAF, i had to grind down a small portion of the alternator shroud so i could get the coupler to fit right. The coupler i used was a 2'' to 3'' as i was using my stock K26. In the following picture you can see the issue i was having...
Anyway i was finally able to get the J-pipe in..
And after another hour or so of cursing i finally was able to get the MAF and filter to fit. It clears the hood and headlight bracket perfectly.
Next came the hell of installing the bypass valve. I have no pictures of the process because it took forever to get this to fit. Even then, im still not to happy with the fitment and plan to redo it when i can pick up an extra 1'' silicone 90* bend. After hooking up the 12v feed and the ground and spilling about $4 in gas all over the top of the engine when i removed the fuel rail, i finally had everything under the hood complete..
The last parts were the most straight forward, installing the new MAF chip and hooking up the resistors for the injectors. I became a pro at changing the chips having replaced my stock and APE chips a handful of times while trying to get my car to pass inspection. The resistors were very easy to hookup. I read in a few older posts that the wires are grey and grey with a black stripe. You should still check for continuity on pins 14 and 15 of the DME plug to verify this however.
I made a very simple aluminum plate for the resistors to mount on. The white goo is thermal paste from my local computer place to aid in heat transfer.
I took the car out for a quick 3 mile ride around town. I was not able to really get on the car hard yet, but i noticed a few things already..
-The car no longer jerks or bucks when coming off the gas in 2nd gear. With the APE and stock chips, it did this all the time. Not really violent, but enough that you felt it.
-The turbo spool up sound is very loud and sounds pretty cool. Driving through my development, the car usually turns heads..now everyone turns around as i accelerate lightly pass.
-The AFR reacts much faster to my throttle inputs. Before hand, the AFR's on the wideband seemed to react slow to an increase in load, now it varies based on the load much quicker.
I am looking forward to setting up my boost controller for 15lbs again tonight ..
. Ive been running 11lbs and 15lbs with crappy AFR's for far to long!Tomorrow i still need to clean up a few things (mainly clean up the vacuum line and ignition wire routing) and put the DME and KLR back on the bracket. Other than that im quite happy
. Next up is replacing the feed and return fuel lines, then new intercooler pipes
. I have a K27/6 i was planning on putting in but im currently thinking about selling it and going for something of slightly new tech. But its very nice knowing i dont need to worry about messing around with different chips..etc when replacin the turbo now that i have the MAF.I am planning on dyno'ing the car saturday if the weather holds out. I am hoping to make around 240-250 whp at 15psi.
 07-24-2008, 10:21 PM
#2
Burning Brakes
Join Date: Oct 2006
Location: NE Ohio
Posts: 1,066
Likes: 0
Received 0 Likes
on
0 Posts
Nice work Jon, where did you get 12v for the MAF, the test port plug? I agree, it's quite a trip hearing the rush of air through that set up the first time, I'm still not used to mine.
07-24-2008, 10:26 PM
#3
Advanced
Join Date: Jan 2008
Location: Singapore
Posts: 72
Likes: 0
Received 0 Likes
on
0 Posts
Hi Jon.
I did exactly the same 2 weeks ago! I didn't have a problem with the fitment of the J-pipe but did have the BOV drama.
My install took me 9 hours in total, the bulk of it was towards the BOV puzzle. I did have an a/c hose routed between the expansion tank and J-pipe and that added to the headache.
Prior to this I had never changed injectors nor opened up the DME...baptism of fire, somewhat!
07-24-2008, 10:36 PM
#4
Nordschleife Master
Thread Starter
Jonh, i tapped into the test port as recommended in the install instructions. I got lucky as i bought an old foglight switch from someone. He cut the wiring off with it. I popped open the connector and there were the round type connectors on it. So i spliced the old wire connector onto the AFM replacement harness. It made life alot easier.

Trending Topics
07-25-2008, 02:17 AM
#8
Nordschleife Master
Thread Starter
I took a nice ride tonight. The car is running great. I was resetting the boost controller from 11 to 15psi and kept doing 3rd and 4th gear pulls to dial it in. Man i forgot how fast this damn thing is!! I dont even think the service road i used to do this type of thing on is long enough anymore, i need to find a longer more desolate road!
With the extra turbo spool up sound and the wastegate dumping to atmosphere, the car sound absolutely ridiculous (in a good way). Ill try to get some good fly by video.
Last edited by Techno Duck; 07-25-2008 at 02:40 AM.
07-25-2008, 11:10 AM
#9
Rennlist Member
BOV trick; install it vertically by removing about 1/2 of material from the pipe on the botom of the BOV (inlet pipe?) Use the straight hose, insert now much shorter BOV and use the curved hose to connect to the J-pipe out of the side of the BOV. The gozinta and gozouta's stay the same, just swap the hoses.
 07-30-2008, 05:42 PM
#14
Nordschleife Master
Thread Starter
Well here is an update to benefit those who may install one of these in the future.
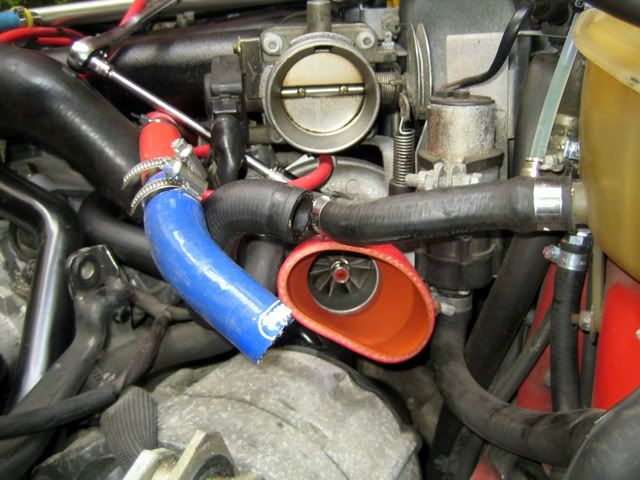
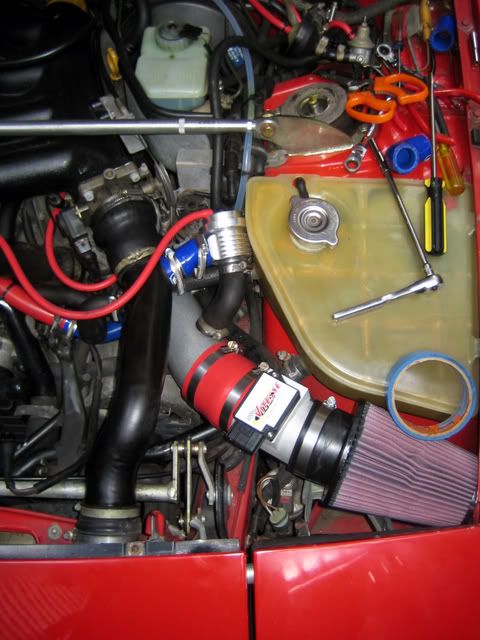
I bought a 90* silicone 1'' elbow aswell as a 3'' 'hump' coupling to finish cleaning up my install. In these pictures you can see how kinked the line for my bypass valve was and how cocked the air filter was on the MAF. The black 90* rubber hose was from my original AFM setup with the j-boot. I decided to not mess around with it much because frankly it was so badly dry rotted i had visions of it turning into dust if i messed around with it to much.
Note, the piece of aluminum sheet on the filter is to prevent water from hitting it in the rain or when i wash the car.
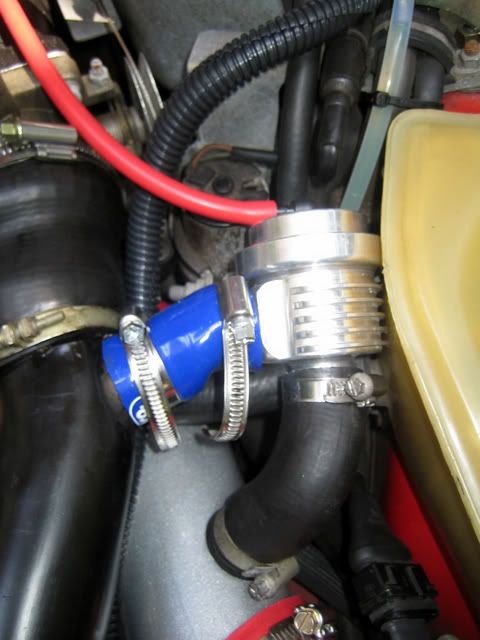
Anyhow, as per an older thread, i cut about 1/4 inch off the side of the bypass valve and ended up with this..
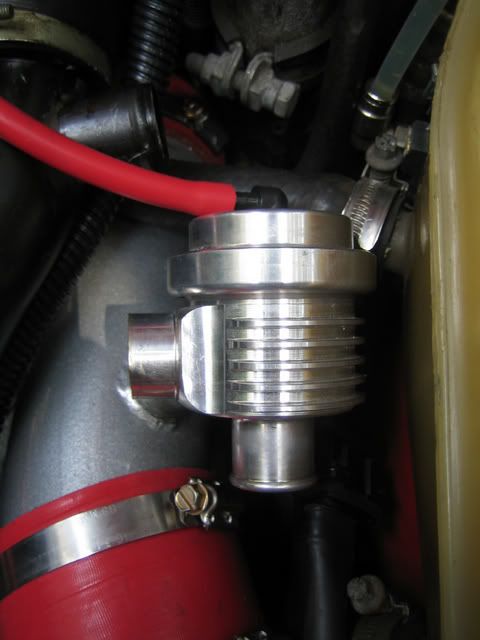
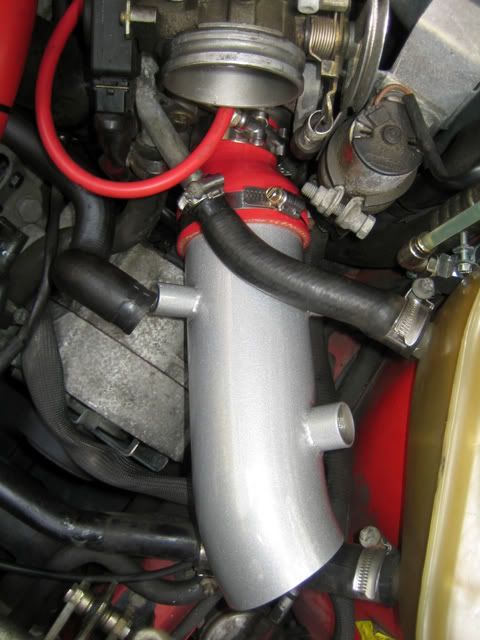
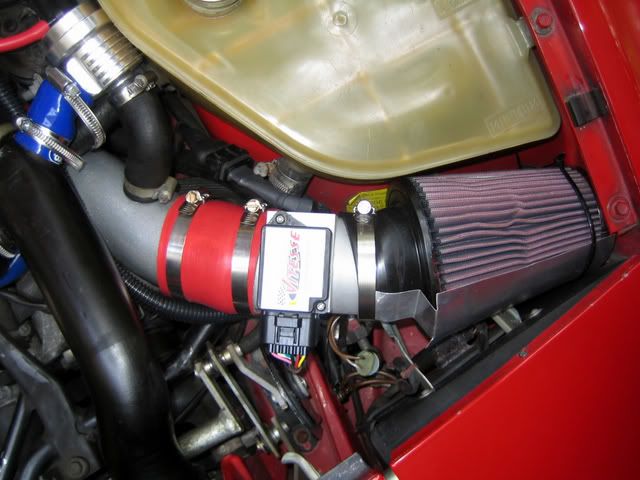
And using about a 2'' piece of silicone tube cut off the 90 * elbow, i was able to attach it very easily to the hardpipe. It fits perfectly with plenty of space on all sides. You can also see in this picture the 90* elbow from Samco cut to size and the original rubber 90*.
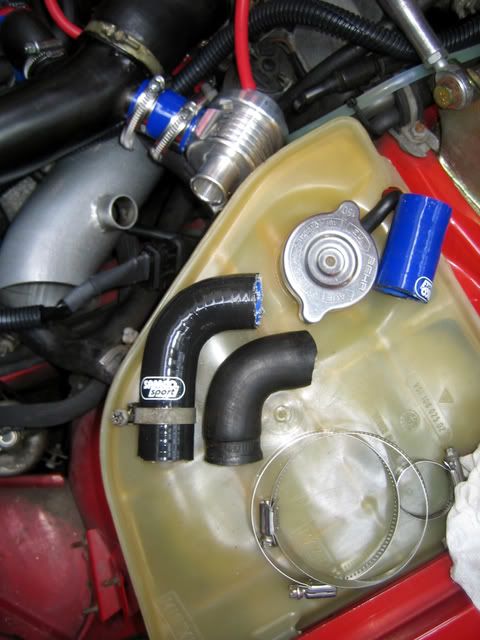
And the finished fitment..
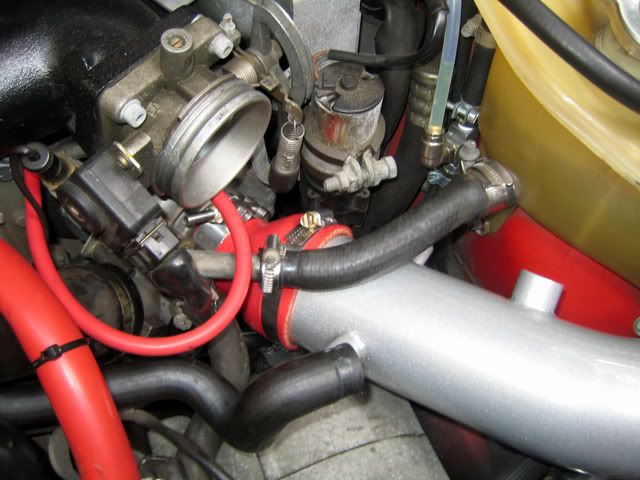
My other objective was to fix the air filter fitment. I used a 3'' hump coupling inbetween the MAF and the j-pipe. The hump couplings are a little more forgiving to misalignment between parts, so i was able to have a slightly larger bend at the end of the j-pipe so the filter fit a little better...
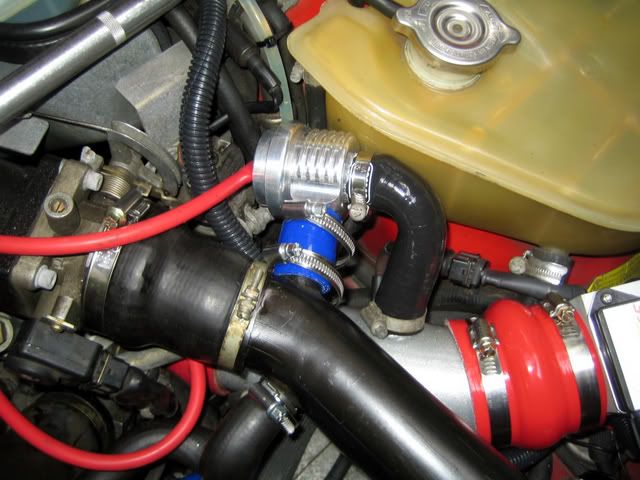
Im much happier with the fitment now. Hopefully this will be helpful to anyone in the future installing one of these.
I bought a 90* silicone 1'' elbow aswell as a 3'' 'hump' coupling to finish cleaning up my install. In these pictures you can see how kinked the line for my bypass valve was and how cocked the air filter was on the MAF. The black 90* rubber hose was from my original AFM setup with the j-boot. I decided to not mess around with it much because frankly it was so badly dry rotted i had visions of it turning into dust if i messed around with it to much.
Note, the piece of aluminum sheet on the filter is to prevent water from hitting it in the rain or when i wash the car.
Anyhow, as per an older thread, i cut about 1/4 inch off the side of the bypass valve and ended up with this..
And using about a 2'' piece of silicone tube cut off the 90 * elbow, i was able to attach it very easily to the hardpipe. It fits perfectly with plenty of space on all sides. You can also see in this picture the 90* elbow from Samco cut to size and the original rubber 90*.
And the finished fitment..
My other objective was to fix the air filter fitment. I used a 3'' hump coupling inbetween the MAF and the j-pipe. The hump couplings are a little more forgiving to misalignment between parts, so i was able to have a slightly larger bend at the end of the j-pipe so the filter fit a little better...
Im much happier with the fitment now. Hopefully this will be helpful to anyone in the future installing one of these.
07-30-2008, 05:57 PM
#15
Race Director
I hacked 1" off the end of my jpipe and used a 45 deg 3" silicone hose to better position the MAF/filter as the fitment always bothered me...looks good man.