When you click on links to various merchants on this site and make a purchase, this can result in this site earning a commission. Affiliate programs and affiliations include, but are not limited to, the eBay Partner Network.
Once you have your seat & steering wheel in place, you can determine if & how you'll install restraint/window nets. I installed these little brackets (that came with the window nets -for the lower aluminum bar stock-but I will not be using). I found the slot width is perfect for the inside restraint net I'll be installing. Decided to also include a passenger side one. These join a common front attachment, located on the "dash bar" just to the passenger side of the shifter (can be seen on the first photo of this thread).
When we built our Chumpcar, we documented the cage build pretty closely. One thing we learned is that there are choices you have to make and there are trade-offs. For example, the roof bar would have been better as an X or a diagonal, but we wanted to be able to take passengers and with our tall drivers, this took away too much helmet clearance, so we went with a single longitudinal tube. All designs are legal in the rule book, so we chose the one that worked best for our needs. The most important tip is to follow the rule books! There are a lot of standard rules, but some times different rule books have different requirements. If you are ever going to race with a different body or want to sell the car, it's better to have a design that can be certified with more than one body. Often there will be options to do something under one rule set that are not allowed under another. We built ours to be chumpcar compliant, but also with an eye on other rule books.
Guys,
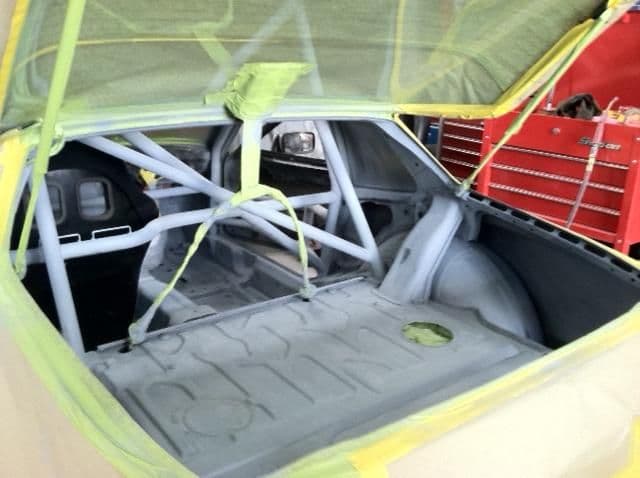
I will have more pictures to follow. We are adding 3 door bars, one along the bottom door jam following the contour.
Then we are going to add an X style Pro Stock set of door bars. This will keep the weight down and allow easy access
Additionally we are going to triangulate the front strut towers with 1" chromoly
Last edited by Max Energy; 05-03-2018 at 02:06 PM.
Reason: spelling
20mm side clearance is good. It's just an exercise of demonstration that you can do it to be any closer than that, it won't serve any further safety purpose.
In a NASCAR or such, being tighter or attaching with sheet ties to a & b pillar allow a crashed car to keep it's panel profile to continue on racing without too much aero handicap, etc.
Up until last year's rule change that allows a driver to continue racing after a body to body contact, we'd have to report to the black flag station so in the event that you were re-released to proceed racing, for all intents and purposes, your race was over anyway.....so for us, minimizing body panel deformation is a non starter.
The roof, for me is a different story, minimum space between outside dimension of the bars and the roof increases driver room in the even of a roll over, however rare an event that might be.
It's key to keep in mind that the unexpected is always a possibility and the cage is a safety item to protect you from injury as it's foremost important duty.
When weighing a decision between weight savings and strength, always err on the side of strength.
T
That does make a lot of sense. I plan to tie in the A-Pillar bars with the front of the cage with 1mm dimple pressed plate.
Originally Posted by Noahs944
Once you have your seat & steering wheel in place, you can determine if & how you'll install restraint/window nets. I installed these little brackets (that came with the window nets -for the lower aluminum bar stock-but I will not be using). I found the slot width is perfect for the inside restraint net I'll be installing. Decided to also include a passenger side one. These join a common front attachment, located on the "dash bar" just to the passenger side of the shifter (can be seen on the first photo of this thread).
Yep, window nets will be last thing i worry about. I'll only have one on the drivers door. I dont plan to have passengers in my car on track, But having the X on the main hoop does allow for passengers on a cams / fia event.
Originally Posted by JustinL
When we built our Chumpcar, we documented the cage build pretty closely. One thing we learned is that there are choices you have to make and there are trade-offs. For example, the roof bar would have been better as an X or a diagonal, but we wanted to be able to take passengers and with our tall drivers, this took away too much helmet clearance, so we went with a single longitudinal tube. All designs are legal in the rule book, so we chose the one that worked best for our needs. The most important tip is to follow the rule books! There are a lot of standard rules, but some times different rule books have different requirements. If you are ever going to race with a different body or want to sell the car, it's better to have a design that can be certified with more than one body. Often there will be options to do something under one rule set that are not allowed under another. We built ours to be chumpcar compliant, but also with an eye on other rule books.
Looks like you did what i did which i personally didn't like.
Your front "roll bar" fell to low for my liking so i had to re do the "lateral side bars". I'll add photos of where i'm at tomorrow.
In my CAMS regulation book helmet to the top of the hoop clearance must be min 50mm. But having the front roll bar low, i was worried about hitting my head if i did an X or a diagonal bar. So i've lifted mine much higher.
Originally Posted by Max Energy
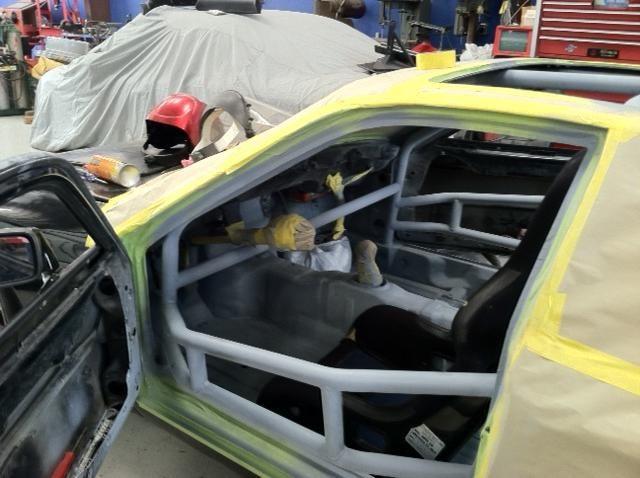
We are working on a chromoly cage for a GT3 Porsche 944 target weight is 2000-2100 lbs. without driver
Pauly
Thank you, It's a slow process.
We did order the rear wing and are in the process of designing the uprights.
I also just ordered a set of half shafts and stub axles from the drive shaft shop.
I will forward the latest cage process within the next day.
Your Red car looks nice, what class are you building it to run in?
Max
Absolutely! We re-did that bar for exactly that reason. Version 1 was too low.
Lol, reading down the thread and if Paulyy wouldn't have said something, I was gonna write - "hey, you know, there's no rule that says that windshield bar has to be straight"
T,
Looking forward to seeing some pictures when you start on the new 968 cage
Max
You mean the burn and dipped tub 968...?
Yeah, that one will be fun.
Always wanted to start a car with a bare metal stripped tub on a stand.
You coulda meant the Yellow 111 or even maybe Dave's new DE prospect, the black 968.
Two months ago, he didn't have one functioning 968, now he'll have 3 of 'em...
Cramming for Barber still. Converting to turbo fenders and front nose meant I had to redo brake and engine oil cooler ducts and change a lot of stuff.
Just got back the custom ground diff pressure rings yesterday.
You can't possibly shim a 944 rear diff clutch pack more precisely than I did Eon's SP2 diff.
The alternate plates are only in .1mm increments.
Factory clearance between clutch pack stack height and actual diff housing depth is 4.2mm.
Mine is 4.20mm with the thicker 2.5mm Turbo S clutches and non Turbo S pressure rings.
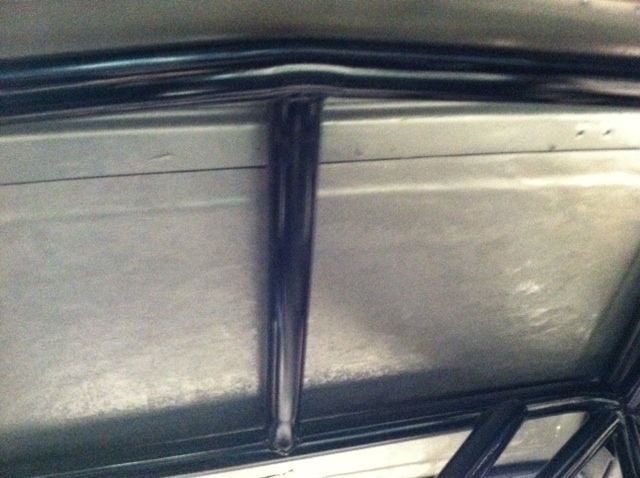
Windshield Bar
As you can see we are tucked up pretty tight across the top of the windshield
top picture from front of vehicle, lower picture from the rear of the vehicle
Hey Pauly,
Whatever you choose upon get it done within the year, I would guess a national spec cage would be best as i don't know your racing category your aiming for. Specs change every year and its best to have it certified as soon as possible so that you don't have to modify it
Regards
Sean
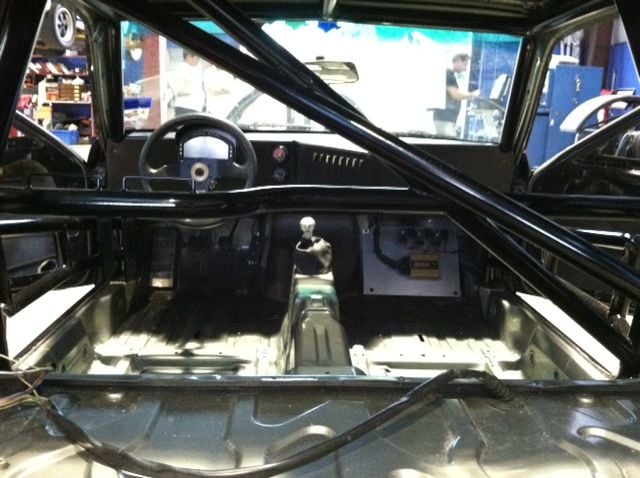
Windshield Bar
As you can see we are tucked up pretty tight across the top of the windshield
top picture from front of vehicle, lower picture from the rear of the vehicle
That's a nice tight fit! And a good looking cage. We just stuck to one diameter tubing for all our pieces for price and simplicity. It looks like your cage has some smaller diameter tubing for the optional pieces. One other thing that is really important in installing the cage is that the undercoating is flammable and although it looks really cool when it's on fire from underneath... be ready to put that sucker out!

 05-03-2018, 11:14 AM