When you click on links to various merchants on this site and make a purchase, this can result in this site earning a commission. Affiliate programs and affiliations include, but are not limited to, the eBay Partner Network.
Preventing transmission oil pan leaks (great site)
I think the "ears" or "tabs" or "tightening stops" on my pan are bent from previous hands over tightening the pan. It causes a slight leak around the pan gasket on the right side. Found this great info on preventing warping and fixing the tabs (if not too badly bent).
If the $85 pan on his site will fit on our transmissions - I'll buy two! (Doh! They won't work simply because ours have the pipe leading from the pan to the reservoir. That pipe costs more than $700 (apparently).
Last edited by Captain_Slow; 01-16-2017 at 10:28 PM.
I always thought that mechanics bent the ears after they left Porsche, until I bought some brand new transmissions, directly from Porsche.
Those ears got bent the first time the pans get installed.....at Porsche.
Terribly weak design. Once the ears are bend back and then re-bent a couple of times, the metal gets soft and won't begin to hold the proper shape. The holes for the bolts get out of round and the bolts won't pass through, without threading the bolts in.
When the pans were cheap, it wasn't any big deal. I used to stock and replace badly fitting pans on a routine basis.
Good info Greg... Just happened to talk to a coworker last week who is taking an auto body course. They were shown how after a lot of hammering to reshape sheet metal it becomes very soft and will pop like a soda can (very weak). Then the instructor connected some electrodes and pressed a button - restoring the original stiffness of the sheet metal. I'll ask for more info on this tool. I imagine it restores the domains in the metal (Curt..you're the metallurgist...do you know of this technique?). It would be great news if we could restore original integrity of the pan metal with a quick zap.
This sounds very interesting. If it wasn't so god awful expensive I would have put a new pan on by now. It's a really slow leak but I know it's there and that's enough. I suspect my pan is like Greg describes- I have to thread in a few of the bolts past the pan.
Seems an enterprising soul with a bit of tubing, a drill and some brazing skills could magically transform a $100 M-B pan into a $700 Porsche pan. Oh, and a bit of black spray paint would complete the transformation I think.
I don't know much about the material of this pan, or how it's been treated. The strength requirements are low, while workability requirements are high. I would think it started as cold rolled, so it's already a bit work hardened, then it gets a little more, here and there, during pressing.
Strain hardening makes a material stronger as you plastically deform it, right up until it breaks. Unless you change the geometry in the process (in tensile testing, the gage section area gets smaller with plastic strain, then locally necks down quickly, then BAM!). It may be relevant here that bending a tab back and forth may make it thinner, and it's perceived strength will decrease. What you really feel is a change in stiffness from the thinning - bending stiffness is wildly affected by thickness, proportional to t^3. Forming a lot of small cracks will also reduces stiffness.
Moderate heating won't affect this, but can remove the work hardening to allow further abuse. Fundamentally, plastic deformation involves forcing a bunch of organized crystal defects through the material. They run into each other, and into microstructural features, making a tangled mess that the next defects have trouble getting through. The mess can be cleaned up with heat, putting all the atoms back into their regular positions. Or something like that.
Pan-killing is typically from distortion of the "rail", the part that sits inside the U of the gasket, when a mounting tab is pulled up from over-tightening a mounting bolt. Once in a while, gently bending the mounting tab back will correct enough of that distortion to allow the gasket to seal again. If I wanted to get a good evaluation of the condition of a pan, I'd spray a piece of window glass with something, and press the pan against it to see from the other side where it is not in contact with the glass. Then decide how to try and bend the tab again to restore that contact. In the end, the rail needs to offer full contact, and the tab needs to be in the correct alignment so that normal tightening of the bolt there doesn't distort the pan again. Annealing the work-hardened metal will often soften it some so that won't happen.
For those playing along at home, my recommendation in one of the linked threads stands tall: Torque Wrench, Torque Wrench, Torque Wrench, Torque Wrench. The recommended 7 lbs/ft on the bolts is the same torque recommended to 6mm capscrews, the ones with the 10mm heads like water pump bolts. With the small bolts, stretching the bolt with too much torque is rewarded with easy breakage during removal. On the transmission pan, it's an expensive replacement pan, plus the mess from the leak, cleaning effort, a new gasket, and a load of ATF thrown in. If you don't have a 1/4"-drive torque wrench or torque-limiting screwdriver in your collection, buy one. Even the $10-on-sale clicker from Harbor Freight is way better than none. 7 lbs/ft is the same as 84 lbs/in on the small wrench. Don't bother trying to get your 3/8"- or 1/2"-drive torque wrench to go this low, by the way; clickers don't get close to reliable until they are somewhere north of 15% of span. So that 3/8"-drive 0-100 lbs/ft wrench is OK for tensions starting around 15 lbs/ft, barely low enough for a standard 8mm (13mm head) bolt at 16 lbs/ft. Use your torque limiting tools religiously, and you can avoid a slew of problems. Learn from my mistakes!
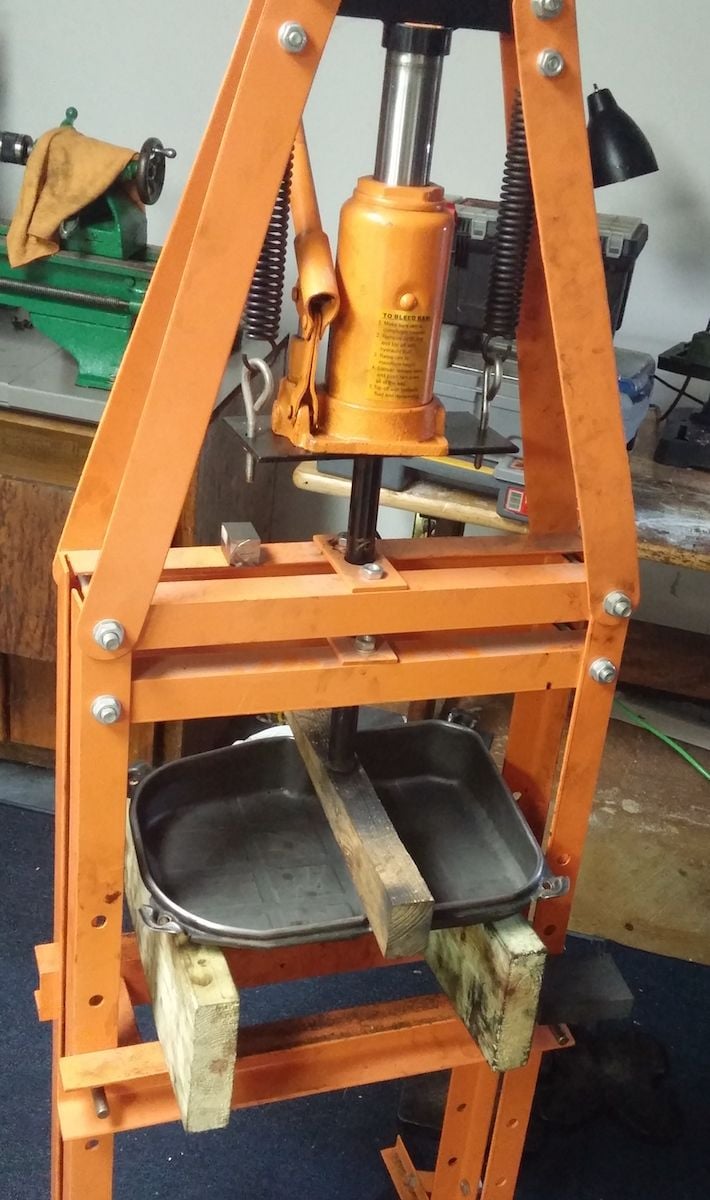
From a Mercedes Benz forum. This person used Dr. Bob's technique for finding segments of the sealing lip not touching plate glass. Then used this delicate machine to make corrections. He identified the "high" spots around the lip of the pan (traces of powder). The pressing board was cut at an angle to accommodate the high and low sides of the pan. He placed the board across the pan, spanning from powdered high spots on opposite sides of the pan. Very small corrections...then check on glass plate with powder...repeat. It worked.
Last edited by Captain_Slow; 01-23-2017 at 05:53 PM.
Reason: details on process


 01-16-2017, 09:47 PM