When you click on links to various merchants on this site and make a purchase, this can result in this site earning a commission. Affiliate programs and affiliations include, but are not limited to, the eBay Partner Network.
That's what threads are for .. Argument to be continued to recover or refinish !
Perhaps but clearly not intended for fishing without a license...at a minimum become a member...but in reality to sell on an ongoing basis as a for profit business you need to be a sponsor....
Leather covered pods were always a factory option...and look quite nice.
Itoolio i apologize for feeding into the thread hijacking, I will continue my communication through PM.
I definitely think you should go with a stitched pod to match your beautiful new dash
I've got no problem with anyone adding anything to my threads. I try to learn as much as I can here, and I welcome any/all education I can get.
And agreed re: stitched pod. The other solution looks nice, but not sure how well it would fit with all the leather that would surround it. Email already sent to Budd
Well unfortunately some people on this site take it personal when outsiders have an opinion ... I notice it only happens on the 928 page ... I been driving 928's since 1985 and truly love the cars .. Didt mind adding my own personal style to the cars until after I had a talk with a car designer .. I have soften a bit since . Now I just need to find another set of 16 inch phone dials ...lol
I've got no problem with anyone adding anything to my threads. I try to learn as much as I can here, and I welcome any/all education I can get. And agreed re: stitched pod. The other solution looks nice, but not sure how well it would fit with all the leather that would surround it. Email already sent to Budd
you definitely will have a nice looking interior .. Looking forward to seeing the pics
As a Vegan Environmentalist, (aka Vegamentalist) I add my voice in objection to this heartless unwarranted massacre of countless Baby Cotton Bolls in the making of your precious stitching thread.
How many Cotton Boll lives are enough for you? Philistine !
As a Vegan Environmentalist, (aka Vegamentalist) I add my voice in objection to this heartless unwarranted massacre of countless Baby Cotton Bolls in the making of your precious stitching thread.
How many Cotton Boll lives are enough for you? Philistine !
Dan, I didn't want to say anything, but, I happen to know that he also requested "special" grain leather, made from baby harp seals.
So...no more interior pics for a few days. Next thing I need to put in is the console, and it has some issues I need to fix.
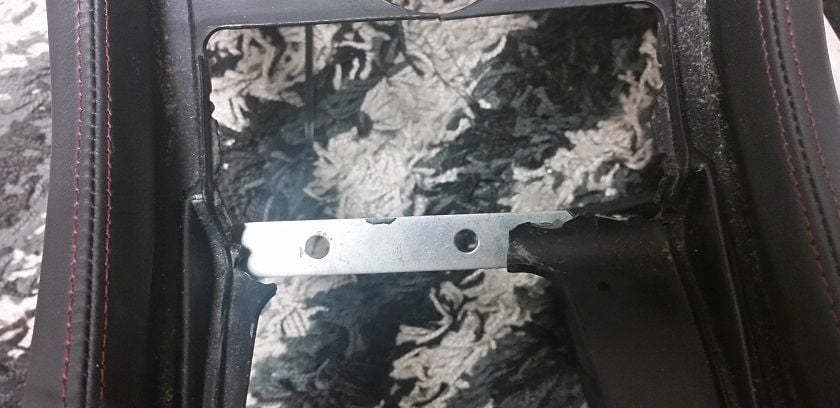
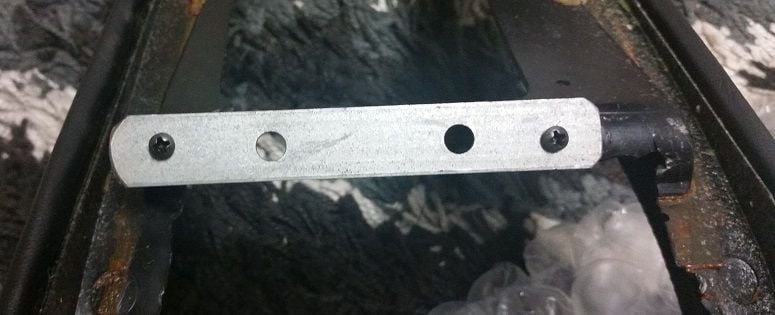
First - the frame that the shift boot attaches to is cracked towards the top and as a result, there's nothing there to hold it in place. Also, that section being broken allows the console to shift outward a bit, so I cut and drilled a metal bind strip and then attached it to the bottom screw holes:
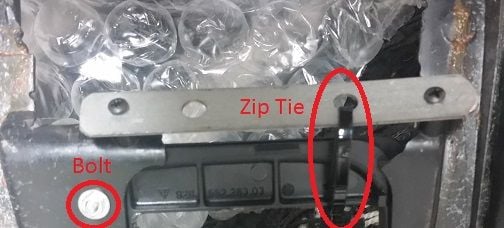
I had read some other threads about repairing the upper connector with a concave piece of sheet metal, but I didn't think that one of the sides had enough plastic remaining to connect the sheet metal to. So....I drilled a hole through the console and through the shift boot frame, inward enough to not interfere with the boot itself. I also melted a slit in the console with a heated-up flat-head screwdriver, and then looped a twist tie through it and through one of the holes on the metal binding strip.
I'm hoping that I'll be able to reach through the hole for the ash tray and tighten them up once the shift **** and boot are installed.
Next up - repairing the area for the window / sunroof / rear-wiper switches. A couple of the flanges that the switches tension to are broken, so doing some thinking about how to address those.
And Dan - I had Harp Seal steaks for dinner, with a side of koala steak tartar. Both were delicious.
Hi Ryan,
The flanges for my window switches were in pretty bad shape. I picked up a couple 1/2" x 6" pieces of thin brass at the hardware store. I used what was left of the existing flanges to make the two strips into the upper and lower apertures for the switches. There was plenty of area to JB weld the strips in place. The switches sit maybe a 1/32" high but since they're all the same, you don't notice it.
Good luck, and keep up the good work,
Dave
Last edited by j.kenzie@sbcglobal.net; 04-14-2016 at 03:23 PM.


 04-12-2016, 06:15 PM