When you click on links to various merchants on this site and make a purchase, this can result in this site earning a commission. Affiliate programs and affiliations include, but are not limited to, the eBay Partner Network.
Hang the AC compressor somewhere near its location use a coat hanger,
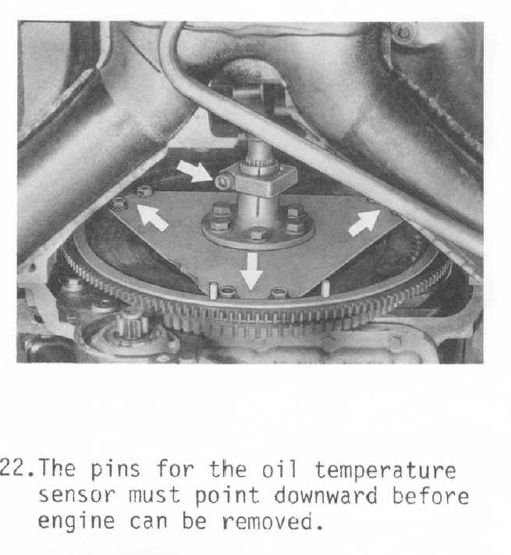
there is not a oil temperature sensor,
the part in the WSM is mislabeled, it is a crank position sensor , it can stay in position ..
It is suggested to remove it so it wont get damaged
BUT you are taking the engine out along with the harness correct?.
NOTE the 2 pins are for the reference sensor used by the dealer to get RPM readings,
this sensor is about 3 inches behind the crank position sensor and should stay in the bell housing.
To move the trans back remove the two bolts that attach the lower trans mounts to the cross member .
with the 4 bolts out of the front bell housing to engine and the 6 flex plate bolts disconnected and flex plate marked to the flywheel and the front pinch bolt removed,
the flex plate will slide back on the shaft.
Put a small 2x4 under the front part of the TT at the chassis cross member,
the TT will sit on this lever the trans axle rearwards it should move about 2 inches.
NOTE some cars have a mid TT muffler bracket holding the exhausts,
if so then this clamp should be removed so the trans will slide back and not be held by the bracket.
BUT and OR if the exhaust has been removed then disregard this note
I'm planning on leaving the harness in the car, as we really struggled to pull the harness through the firewall on Speedtoy's car and I'd like to avoid that here if possible. In that case I can just disconnect the CPS at the harness correct?
The flex plate is disconnected, the bell housing and transmission mount bolts are out, the exhaust is removed and I have the 2x4 in place, what I'm wondering about is where exactly should I lever the transmission? I don't see any easy candidates for the required leverage.
go to behind the rear cross member with a big prybar lever the trans against the rear side of the cross member it should slide easily about 2 to 3 inches rearward.
The engine harness is easy to remove with the engine,
Try This,
to remove the connectors,
put the smallest connectors through the hole first, followed by the largest.
to install the harness,
fit the largest connectors first followed by the smallest.
This procedure works great.
NOTE it also helps if their is a helper inside the car feeding the wires out ,
and pulling the wires in.
NOTE lift the engine about 1 foot before final wire removal or initiating installation
Finally found the PET diagram with the proper bolt size for the lift brackets.
Now predictably I'm struggling with getting the bolts started with the lifting brackets properly positioned on the locating pins. Best I can tell this operation requires 4 sets of tiny triple jointed hands to pull off and after a couple of hours of fiddling I called it quits. Any tips for getting these installed with the limited access available?
install the bolts that hold the lift brackets from underneath the car. you will need an long ratchet extension and a flexible elbow. That's how I got mine back on.
good luck
I had a helluva time getting the bolt on the right side started and ended up needing to recruit my wife to come hold the bracket flush against the block and on the locating pin while i reached up from below to get the bolt started with my fingers. Luckily I am blessed with relatively small hands and could barely make it work, no way was I ever going to be able to get it started at the end of a wobbly socket. The left side was much easier and went on without issue starting it from above by hand and then finishing it off with the socket from below.
Done for the night, tomorrow I will attempt to yank it out after I pick up the correct bolts for the engine stand.
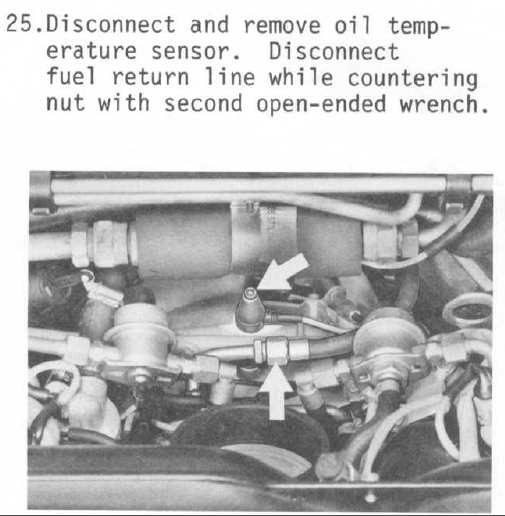
OK I must be dense, but while triple checking that I got everything disconnected I realized for the power steering I only see references in the WSM to disconnecting the hoses at the reservoir, there's no mention of disconnecting any of the lines at the pump or the rack. This can't be correct right?
Official Bay Area Patriot Fuse 24 Assassin Rennlist Member
Joined: Nov 2001
Posts: 31,682
Likes: 125
Unless you are dropping the crossmember, I see no reason the lines should be disconnected at the rack. Just make sure they are also disconnected at the pump.
Two things to note:
1) remove the power steering reservoir to make room for the engine to come out.
2) The other is a cable holder that holds the electrical cable for the starter motor that needs to be removed. The only way you can get access to the nut that retains the cable holder is to remove the steering rack. To get access to this nut you need to drop down the steering rack. On the driver side you will see the 10mm nut that needs to be removed.
I've removed the reservoir already after reading your previous posts and evidently the starter has been out at least once because the electrical cable to it was zip tied to the rack hard lines only so the cable is already disconnected and pulled all the way out the front. The WSM for 85-86 doesn't even show disconnection at the pump, only at the reservoir, but clearly I need to disconnect the lines at the pump as well, not the first mistake I've caught in these instructions.
After that I think I'm ready to hook the picker up and give it a go.