When you click on links to various merchants on this site and make a purchase, this can result in this site earning a commission. Affiliate programs and affiliations include, but are not limited to, the eBay Partner Network.
*UPDATED WITH PHOTOS* concerning acceptable cylinder bore wear/ irregularities ?
Hi !
1981 928S Euro M28.11 4.7L M220 LSD 5SPD CIS/KJET
(Odometer shows 79 000, engine out for leaking cam tower, ran fine prior to arterial bleed LOL)
These irregularities are the worst I can find in my cylinder bores.
The "scratches" seen in the following images can be felt with a fingernail, barely, but cannot really be noticed by fingertip (I don't know if that helps?) ...
So I have a specific and then a general question, please...
1) Would these bores be "OK" for service in a normally-aspirated 928 for street use?
2) What are the guidelines/ inspection findings for unacceptable wear in cylinder bores? Are there actual measurements, or is it based on observation alone?
Thanks so much for educating me. I am ignorant but eager to learn, and I don't want to be "the guy" who kills this dear 928.
I very greatly appreciate your time and expertise.
Dan
Last edited by Daniel5691; 01-26-2016 at 09:23 PM.
Minor scratches as you observe are very common.... it would not be a concern to me. Is it ideal no ! but the net effect is minimal....run the bitch and enjoy . Fixing it is a very expensive alternative with little gains.
Semi-retired, as of Feb 1, 2023.
The days of free technical advice are over.
Free consultations will no longer be available.
Will still be in the shop, isolated and exclusively working on project cars, developmental work and products, engines and transmissions.
Have fun with your 928's people!
Many years ago my engine budget was near 0 so Tom put together a euro s engine out of stuff we could not sell. The bores were much worse than what I see above. That engine last for many years, never smoked and had " reasonable" compression which only got better over time. As Ed use to say " your mileage may vary"
I've seen the same "scratches" that had no problem being used in a rebuild. that is probably the worst i would allow before i would take the block in for a little re-fresh . (just the normal alusi paste treatment) It looks like a normal old block r-ring it, and have some fun with it.
If you want to get down to details, clean the varnish ridge out of the top (gasket remover was mentioned recently), wipe the bores dry and measure them.
But.... What are your alternatives at this point? Unless you bore the block and put new pistons and rings in it, nothing is going to change even after you measure it. Do as others recommend: Clean the dirt off it, re-gasket everything so it all stays dry, and go enjoy driving it.
Daniel, Do you think the 79K miles is correct? If so, this puppy is almost new...
The heads had some corrosion and are out for welding, correct? Is that why #6 is cleaner than #5, a bit of hydro-cleaning? Is the liquid sitting in that cylinder oil or coolant?
What is the history of the motor, how did it come to be disassembled?
Jim, the odometer has been functional for the 1.5 yr that I have owned it, nevertheless I would not be surprised if the actual mileage were higher. The engine has been out at least once before, a cam tower bolt on the front outboard passenger side had been replaced with an oversized stud repair.
The liquid visible in the cylinders is new clean engine oil, I rubbed them down just to keep a film on the surfaces after head removal. i haven't done any sort of "cleaning" to the bores or pistons otherwise.
Concerning the heads, The head surfaces all around all of the flame rings are solid, true, and flat,
NO GOUGING OR CORROSION anywhere within at least .75- 1.0 centimeters of the flame ring surfaces.
There is some very shallow surface corrosion back away from the flame rings, sparsely distributed. The machinist considered the extent inconsequential to the flame ring surfaces.
He would like to remove between 5 and 10 thousandths to prep the head surfaces.
If you can take a straight edge metal known true put it across the head area and see how thick a feeler gauge will go under it.If its only a couple of thou i would not touch it. if its more have it ground that much and check it again. just my 02
I had a very similar looking engine when I took it apart. Had a destroyed piston in #1 hole. A nut was dropped down in there sometime in its life. Ate the nut and spit it out. No valve damage. Piston was toast and the top of the head was all beat up. Scratches that looked way worse than that.
Got a new used piston, had it balanced to match the weight of the old one to .1 grams including wrist pin.
Put on new rings and I have over 30,000 supercharged miles on it since then.
don't worry about the scratches. Just put it back together and drive it.
There's a few basic things you need to understand, in order to interpret what you are looking at.
1. From the very top of a piston to the first ring there is about 10mm of space.
2. On the piston itself, this 10mm area is machined undersize...it is never supposed to touch the cylinder.
3. Except to control normal rocking of the piston (which is at the bottom of the piston), the only thing that touches the cylinder walls is the rings.
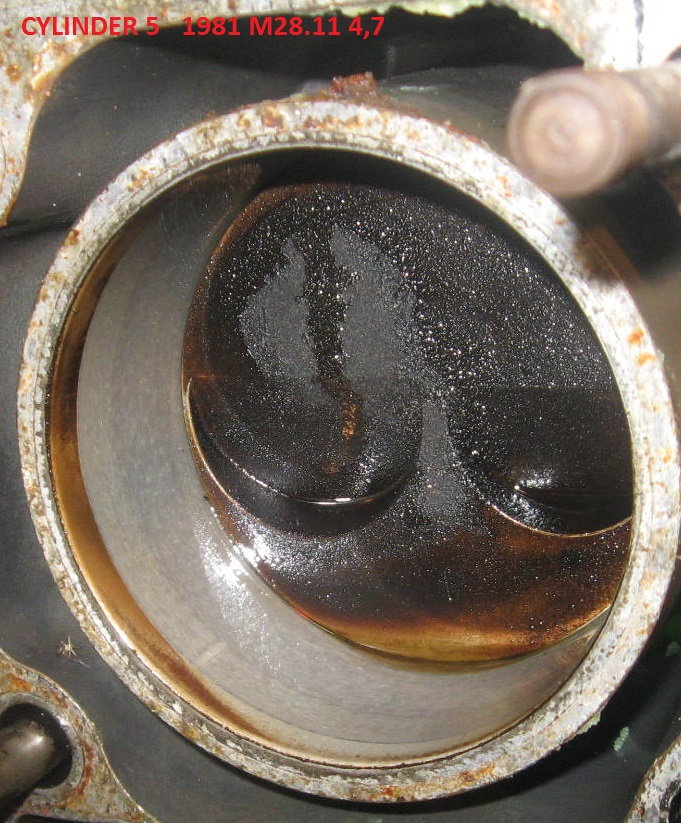
Now, if you look at your picture of cylinder #5, you can clearly see there is a 10mm area at the top of the cylinder that is partially covered with carbon. That area corresponds with the 10mm area on the piston, that is never supposed to touch the cylinder. There's a few minor scratches in the bore, one at about 8 o'clock, below the carbon line (ring area). Probably from dirt. There's some scratches in the 6 o'clock area, above the top ring...also probably dirt.
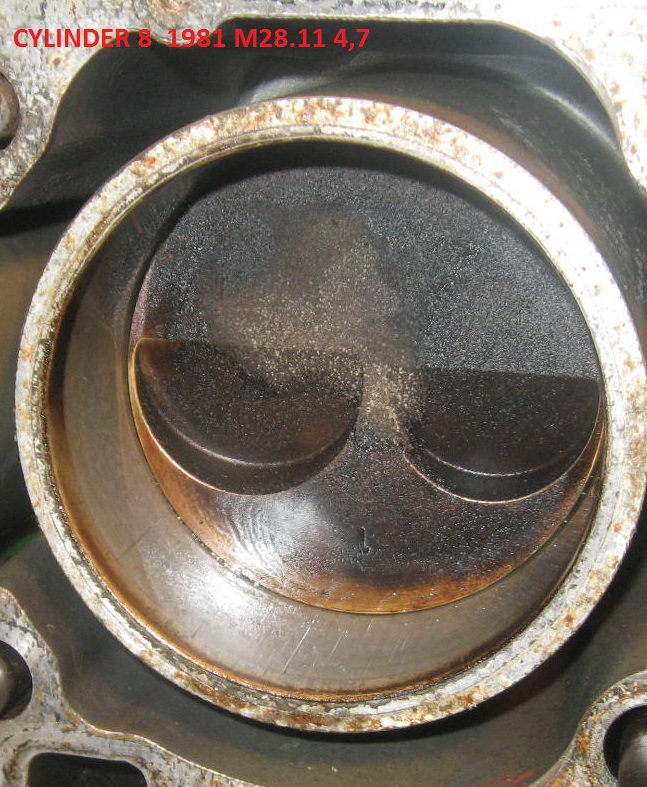
#6 cylinder looks about the same. There's a mark at about 8 o'clock above the top ring...again, probably dirt. Can't see much more, in that cylinder.
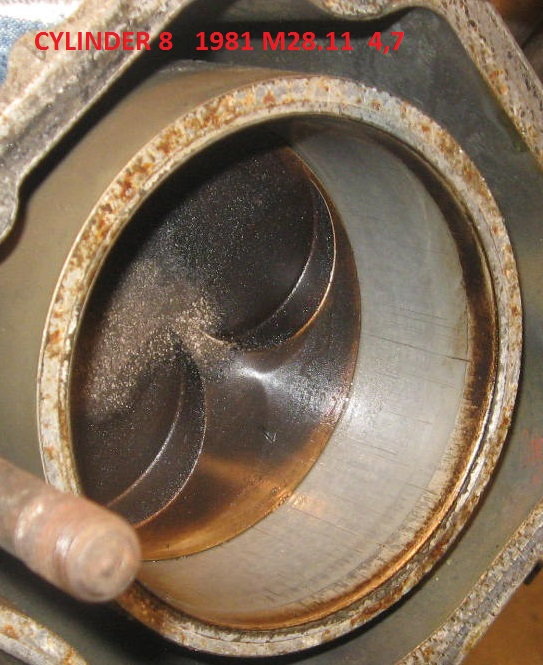
Cylinder #8 is a completely different story. Those are pretty big scratches both above and below the 10mm area (where the piston should never touch.) Could those be from dirt and the dirt just got drug down into the cylinder, making the marks below the carbon line? Pretty deep and lots of damage in a large area. Probably not dirt.
So what else causes the area that should never touch the cylinder wall do this?
1. When the piston wears on the skirt, the increased dimension allows the piston to rock more. If the piston rocks enough, that area can touch the cylinder. This wear/increased rocking shows up as scratches at 12' o'clock and 6 o'clock, initially. The damage doesn't generally travel down into the cylinder. (So, this is likely not what caused the damage to your #8 cylinder.)
2. The piston gets hot and expands. The area above the rings (the 10mm area) is subjected to the most heat and expands the most...it can and will contact the cylinder....and will scratch the cylinder both above the top ring and below the top ring (like your #8 cylinder.) Most likely, this is what happend to your engine.
Why only in #8?
1. Bad injector. not delivering enough fuel. Causes cylinder to run lean.
2. Bad fuel distributor. Not enough fuel reaching #8 injector.
3. Poor rebuild on fuel distributor. "Early" fuel distributors are completely dependent upon spring pressure and height setting, internally. Not adjustable. Very few people even understand this, much less addesss it when they rebuild a fuel distributor. "Late" fuel distributors are adjsutable....and very sensitive to adjustments. Again, very few people are aware of this or address it when they rebuild a fuel distributor.
4. Engine got hot at some point in time. #8 cylinder piston expanded and started to seize, before the engine got shut off.
At any rate, the thing you need to do is to remove the piston from #8 cylinder, see how extensive the damage is above the top ring, make sure that the top ring moves freely (not stuck), and measure the piston to wall clearance.
I have to agree with Greg on the wear spots but not on the cause. Colors look the same as the others. lean mixtures rarely cause damage. airplanes run much higher percentage of full power than street autos and are routinely adjusted by the pilot to the very leanest mixture before rpm falloff.
I have to agree with Greg on the wear spots but not on the cause. Colors look the same as the others. lean mixtures rarely cause damage. airplanes run much higher percentage of full power than street autos and are routinely adjusted by the pilot to the very leanest mixture before rpm falloff.
I listed 4 different potential causes....if you have another one, please add it.
Lean will not only expand the piston in one of these 928 engines, but will eventually burn a hole in a piston. These two valve high compression Euro engines running on crap octane fuel are famous for this kind of damage.
I don't know anything about small low stressed airplane engines. But I'm guessing that they are different than a street engine. Don't generally they run 100 octane fuel, with less compression, have twin plugs, run less ignition advance, and turn lower rpms?
I do have a really good friend with a bit of a higher performance airplane engine in his P-51. He's on his 4th set of pistons.....and the damage in the bores and the pistons look a lot like this....in the ones that are not melted.

 12-12-2015, 09:34 PM