
Motor mount options
 10-26-2014, 05:20 AM
#46
Rennlist Member
Schocki, can you please post the height (bolt length excluded) of the three MM in your picture. The Volvo mounts (part no. 137 86 57 for the 700 and 900 series) I have in stock are 86mm high.
http://jenniskens.livedsl.nl/Technic...9/MyTip913.htm
http://www.proparts.se/dokument/bibl...1707_VOLVO.pdf
Tsch�ss
�ke
http://jenniskens.livedsl.nl/Technic...9/MyTip913.htm
http://www.proparts.se/dokument/bibl...1707_VOLVO.pdf
Tsch�ss
�ke

From left to right again 7 cm, 8 cm and 8.8 cm.
I also made a short video of the change and how the motor rocks with new mounts. Go to YouTube and search for "Porsche 928 Motorlagerumbau auf Volvo Lager".
Hasta luego
Schocki
 10-26-2014, 10:52 AM
#47
Drifting
These will be my primary resources:
1. HarborFreight engine support bar: http://www.harborfreight.com/1000-lb...bar-96524.html (I got mine on sale for $60 I think).
2. Dwayne's MM write up: https://rennlist.com/forums/928-foru...-tomorrow.html
3. From MrMerlin (Stan) https://rennlist.com/forums/928-foru...-pictures.html
4.This thread
Have the motor mounts and silicone gasket (both from Roger) ready to go. Just waiting for all this nice weather to go away so I have reason to put the car up on stands awhile.
NOTE: Lots of folks doing this job notice some interference with the safety hooks. Two or three pages into the thread started by Stan you will find this solution, provided by Stan:
"Bart Jan asked a question and i now have more info to address his concerns
That is the the fingers touching after the mounts have been installed,
this is due to the mount being a bit taller than some of the previous versions,
and or the mount not settling as much as the earlier versions.
Here is how to fix it.
once the mounts are installed and you have aligned the fingers of the lower pads to the mount hooks,
(this can be done by tapping the finger pad with a screwdriver)
If the fingers are touching then it is easily fixed.
To do this you need a 1/2 inch drive extension and a 17MM socket and a jack.
the extension has to be about 6 inches long.
so put the socket and extension on the 17mm bolt thats next to the mount hook.
Put the jack under the extension and very carefully jack the extension onto the bolt,
this will lift the engine and the hook,
thus pulling the finger pad with it,.
NOTE.... WARNING .....you dont need much lift ,
you only need to see the finger move ever so slightly.
You can jack the car off the stands if your not careful.
If, after a few tries this still isnt enough,
get a drill bit or dowel and slide it between the finger and the mount hook,
then jack the socket extension,
this will easily bend the finger just enough to clear,
as the mounts settle in there will be more clearance.
Last edited by Captain_Slow; 10-26-2014 at 11:18 AM. Reason: Important tip
10-26-2014, 02:05 PM
#48
Nordschleife Master
I think maybe you guys who have done this job a few times forget what it's like to be a newbie. Seriously, I'm reading Dwayne's write-up right now, and...damn, this looks like an all-day, serious pain-in-the-*** job. Any time you have to build your own thing-a-ma-jig out of Home Depot odds and ends, it's not a "straightforward project." At least, not to me. I need to do this, but I'm freaking out a little lol.
I didn't say "simple", "easy" or "fast."
On purpose.
It is at minimum an "all day" project.
I didn't use the "Timber & Eyebolt" motor support, I used a standard cherry picker hoist. I also used a lift for much of the job. We had an engine support that goes across the fenders - it didn't fit. So when we got to the "Support the motor and unbolt the crossmember" part, we lowered the car to the point that the cherry picker would work and spent a lot of the time on our backs with the car about 3' up.
And I don' t forget what it's like to be a newbie. I remember it well.
You are more intimidated than you realize.
Take a deep breath.
Take another.
Say to yourself "It's just parts bolted to parts."
Because that's what it is.
Read through the writeups a couple times.
Someone posted a link to a MrMerlin thread. That's the one I was referring to, not Bill Ball (edited previous post).
Make sure you have a workspace that isn't terribly time limited. Expect it to take a while. (it will take longer than you plan, even when you plan for it to take longer than you expect).
Expect to get frustrated. Be willing to walk away from it for a bit if you need to.
Don't be afraid to come on here if you get stuck.
You can do this.
10-26-2014, 02:18 PM
#49
Rennlist Member
Thread Starter
I think I'm going to print out this pep talk post and keep it in my car at all times :-) Thank you
10-26-2014, 02:24 PM
#50
Rennlist Member
I said "straight forward.'
I didn't say "simple", "easy" or "fast."
On purpose.
It is at minimum an "all day" project.
..........
You are more intimidated than you realize.
Take a deep breath.
Take another.
Say to yourself "It's just parts bolted to parts."
Because that's what it is.
..........
Expect it to take a while. (it will take longer than you plan, even when you plan for it to take longer than you expect).
Expect to get frustrated. Be willing to walk away from it for a bit if you need to.
Don't be afraid to come on here if you get stuck.
You can do this.
And definitely expect to get dirty!
10-26-2014, 02:27 PM
#51
Rennlist Member
Yes the DIY engine support looks like a job by itself, or do what I did and just buy a used engine support bar on eBay! I'm struggling to think of other jobs I would use it for, so now I've done mounts/gasket it may be going back on eBay, and cost little/nothing in the end.
I only used one (I bought 2;front and rear) for the front lifting the engine by the bracket on the front of engine so the load is evenly balanced.
10-26-2014, 02:40 PM
#52
Rennlist Member
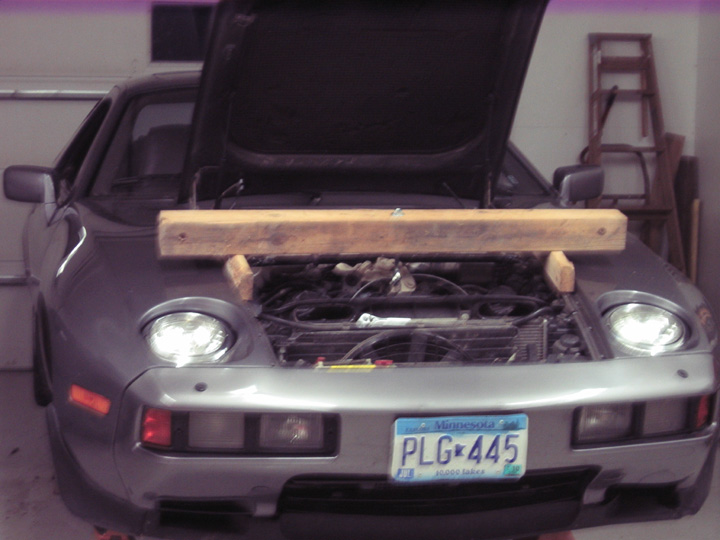
Not so bad if the source of the wood provides cutting service. The critical dimension is the length of the 4x4 beam so it fits the front hood (bonnet) opening and rests on the 2x4 supports at either end.
I only used one (I bought 2;front and rear) for the front lifting the engine by the bracket on the front of engine so the load is evenly balanced.
I only used one (I bought 2;front and rear) for the front lifting the engine by the bracket on the front of engine so the load is evenly balanced.
 10-26-2014, 02:57 PM
#53
Rennlist Member
 10-26-2014, 03:03 PM
#54
Rennlist Member
10-26-2014, 03:18 PM
#55
Archive Gatekeeper
Rennlist Member
Rennlist Member
I think maybe you guys who have done this job a few times forget what it's like to be a newbie.
https://rennlist.com/forums/928-foru...alignment.html
I never would have been able to finish the job without Bob's help, been trying to pay it forward ever since.
Make no mistake, this is a dirty, multiple day, PITA job. If your undercarriage has any residual dirt or grime on it, let step #1 be a professional steam cleaning job before you start taking anything apart. This job is tough enough without being covered head to toe in 28 years of oil, ATF, and dirt. Especially if you're going to drop the pan and install a new OPG. Cleanliness is king for that job....

 10-26-2014, 03:23 PM
#56
Rennlist Member
I threw clothes away when done. ^^^
Also, I ended up doing it twice because I didn't know my mounts were defective until I had them installed. The second time was a breeze.
Also, I ended up doing it twice because I didn't know my mounts were defective until I had them installed. The second time was a breeze.
10-26-2014, 03:49 PM
#57
Pro
The cleaning is what takes the longest. You'll probably spend some time with the oil pan too getting to all the fasteners, some of which on the front are particularly tough to get to with a wrench.
The HF hoist that goes across the fender lips works just fine. Engine should lift easily. If no movement make sure you are not missing any bolts.
It is a very satisfying job when you are done, with a smooth engine and knowing everything is clean.
The HF hoist that goes across the fender lips works just fine. Engine should lift easily. If no movement make sure you are not missing any bolts.
It is a very satisfying job when you are done, with a smooth engine and knowing everything is clean.
10-26-2014, 04:43 PM
#58
Rennlist Member
sorry I should also have included clothes, rags, cleaning etc etc...........its a project that when you get into it and the effort to get all apart you will take great pride and pleasure in getting it all back to factory (and better with the new mounts).
print off Dwaynes write up and read it twice or three times so when under the car all shall be clear.....we are here to help..........good luck
print off Dwaynes write up and read it twice or three times so when under the car all shall be clear.....we are here to help..........good luck
10-26-2014, 05:01 PM
#59
Rennlist Member
Thread Starter
I think that advice on cleaning first is particularly relevant with my car. It is absolutely filthy under there! I'm sort of afraid that the caked-on grime is sealing up all the oil leaks, but better to find out sooner than later. So step one, clean that crap off, or my friend with the lift will never let me come back...
10-26-2014, 07:04 PM
#60
Archive Gatekeeper
Rennlist Member
Rennlist Member
When you are having it professionally steam cleaned, make sure that they lift the hood and blast the top front lip of the oil pan and the front face of the oilpan. The front five oil pan bolts are the hardest to get to, and are usually the most deeply embedded in grime.
At least 10% of this crap will end up on your hands/face/eyelids, and your spousal unit/GF/dog will not let you back in the house:

At least 10% of this crap will end up on your hands/face/eyelids, and your spousal unit/GF/dog will not let you back in the house: