
New to me, supercharger install
 05-26-2014, 01:35 AM
#1
Instructor
Thread Starter
Join Date: May 2013
Location: Manassas Va
Posts: 244
Likes: 0
Received 0 Likes
on
0 Posts
Today was day one of my MURF stage 3 supercharger install.
I was able to get the MAF modification done, the
new injectors installed and the breather hoses connected and the elbow on for the MAF. I also began to remove the computers.
Just a few notes for those who embark on this type of endeavor, patience is key. Removing the fuel rails is, let's say, less than easy. Ok it's a bit#%!!! Getting the 8 injectors out of a 28 year old car is also no simple task. It's amazing how fused things become after so many years.
Hoping to make more progress tomorrow. Right now all I wanna do is sleep. I had the fleeting thought of finishing the computers tonight but the inner voice says don't mess with the guts of your car when you're only half awake .
.
I was able to get the MAF modification done, the
new injectors installed and the breather hoses connected and the elbow on for the MAF. I also began to remove the computers.
Just a few notes for those who embark on this type of endeavor, patience is key. Removing the fuel rails is, let's say, less than easy. Ok it's a bit#%!!! Getting the 8 injectors out of a 28 year old car is also no simple task. It's amazing how fused things become after so many years.
Hoping to make more progress tomorrow. Right now all I wanna do is sleep. I had the fleeting thought of finishing the computers tonight but the inner voice says don't mess with the guts of your car when you're only half awake
.

 05-26-2014, 03:40 PM
#5
Range Master
Pepsie Lite
Lifetime Rennlist
Member
Pepsie Lite
Lifetime Rennlist
Member

My records say I did mine in 2003..........
I cannot believe it was that long ago............ Still pulls like a freight train!
I cannot believe it was that long ago............ Still pulls like a freight train!
05-26-2014, 08:16 PM
#7
Instructor
Thread Starter
Join Date: May 2013
Location: Manassas Va
Posts: 244
Likes: 0
Received 0 Likes
on
0 Posts
Day 2.
Got the computer chips installed
Removed fans and replaced hoses. Trying to figure out how to get the pulleys on and then mounting the bracket for the supercharger. I should have the SC in tonight if all goes well. Will post a pic then.
Got the computer chips installed
Removed fans and replaced hoses. Trying to figure out how to get the pulleys on and then mounting the bracket for the supercharger. I should have the SC in tonight if all goes well. Will post a pic then.
Trending Topics
05-28-2014, 08:07 AM
#8
Instructor
Thread Starter
Join Date: May 2013
Location: Manassas Va
Posts: 244
Likes: 0
Received 0 Likes
on
0 Posts
Finally installed the supercharger bracket and mounted the supercharger. It is tight in there for sure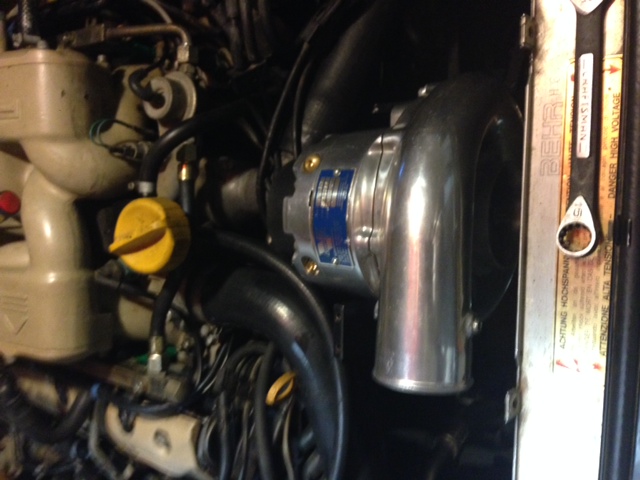
Next step is to adjust hoses for clearance and install the airbox and airfilters.
The install so far has been tougher than I thought it would be. It's not complicated it is simply more difficult to get to things and figure out how to get stuff off than the instructions indicate To his credit, Tim has been there every time I've called him with stupid questions.  Although when he told me "You'll have fun putting the air box and filters in" my shoulders slumped...LOL
Oh well. one step at a time.
Next step is to adjust hoses for clearance and install the airbox and airfilters.
The install so far has been tougher than I thought it would be. It's not complicated it is simply more difficult to get to things and figure out how to get stuff off than the instructions indicate
To his credit, Tim has been there every time I've called him with stupid questions. Although when he told me "You'll have fun putting the air box and filters in" my shoulders slumped...LOLOh well. one step at a time.
05-28-2014, 10:45 AM
#10
Instructor
Thread Starter
Join Date: May 2013
Location: Manassas Va
Posts: 244
Likes: 0
Received 0 Likes
on
0 Posts

I think I have around 16 hours in it so far. I figure I am a little past half way done. Having done most of the maintenance myself has made all the difference. If I hadn't done the timing belt/WP, fuel lines and other stuff, It would have taken me even longer to do this.
I have learned that I should stop working after 6 hours because I get sloppy. I think I should have the car together and running by next weekend.
I am also replacing the brake pads and cleaning the ABS sensors to try and remedy the heavy brake petal issue I've been having.
Out of curiosity Mark, why did it take you 1.5 years to get to this point?
05-29-2014, 10:33 AM
#12
Instructor
Thread Starter
Join Date: May 2013
Location: Manassas Va
Posts: 244
Likes: 0
Received 0 Likes
on
0 Posts
Making some progress. I've now resigned myself to the fact that this is going to be a much longer project than I first thought.
Airbox and air filters next. Then working on overall plumbing for intercooler.
Airbox and air filters next. Then working on overall plumbing for intercooler.
06-02-2014, 10:38 AM
#13
Instructor
Thread Starter
Join Date: May 2013
Location: Manassas Va
Posts: 244
Likes: 0
Received 0 Likes
on
0 Posts
On the final leg of the install. Just have the intercooler to install and belts to tighten. Should be done by this weekend. Also doing front rotors and pads and cleaning ABS sensors. Rotors appear to be shot.
06-02-2014, 12:10 PM
#14
Rennlist Member
 06-02-2014, 04:47 PM
#15
Burning Brakes
Word of caution.....do not assume that the SC has the proper amount of lubricant....my Vortec SC as part of my MURF stage one came with NO fluid on board. The little dipstick had a slight pink wash on it so i believed the note which said the SC comes with full fluids. 100 miles later the bearings are fried.....i had to ship the SC down to CA where they replaced the bearings for me and shipped it back....again with no fluid. The red lube should show strongly on the dipstick, much like oil on an engine dipstick.