

A 86.5 Intake Refresh Picture Thread from a first-timer

Thread Starter
Burning Brakes
Joined: Jul 2007
Posts: 946
Likes: 5
From: Columbia, MO / San Luis Obispo, CA
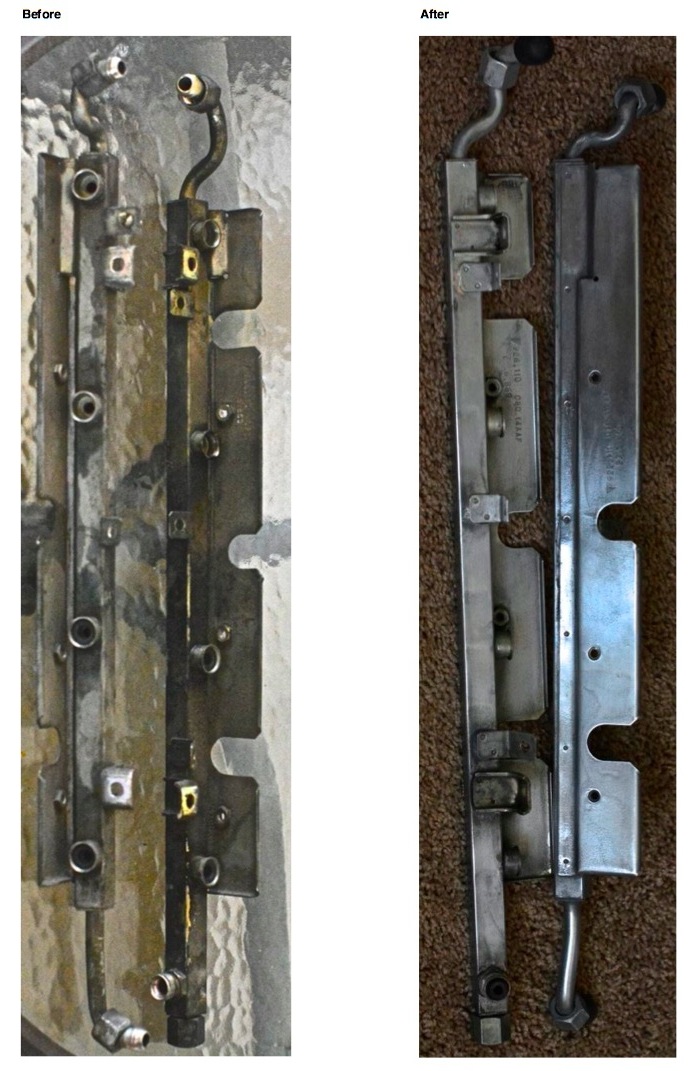
BC or Shane, do you powder coat the fuel rails as well? Mine were nasty so I cleaned them up, but they were missing the protective cadmium plating. My plating unit is not big enough (nor is my rectifier powerful enough) to plate the fuel rails.
Screen Shot 2013-09-01 at September 1, 2013 1.18.51 PM .jpg
Screen Shot 2013-09-01 at September 1, 2013 1.18.51 PM .jpg


Banned
Joined: Apr 2013
Posts: 850
Likes: 6
From: Humble, TX
I used a brass wire wheel to strip the fuel rails on my 82 5 speed to an almost chrome shine. It takes a while after you degrease them, but ends up with a brushed chrome look. Then sprayed the rails with high temp clear brake caliper paint. It still looks great months later.
Sharkaholic
Lifetime Rennlist
Member
Lifetime Rennlist
Member

Joined: May 2002
Posts: 5,162
Likes: 2
From: Rochester, WA
I did the fuel rails on Zelda with red powder coating, the trick is to get someone who knows how to mask them so none of the coating gets in the rails. or on the seat of the connections.
Thread Starter
Burning Brakes
Joined: Jul 2007
Posts: 946
Likes: 5
From: Columbia, MO / San Luis Obispo, CA
Things are on a bit of a hold right now. I removed the oil filler and covered it with the plate from the 928 Specialists kit, cleaned up the valley a bit, and received a few more parts from Roger (including new rubber boots for the Bosch 2 and 3 prong connectors.) I am going on a business trip so I won't be seeing the car for a little while.
A couple of things to ask the board:
1) OIL FILLER BAFFLE
After removing the oil filler neck (to be powder coated) I read this thread:
https://rennlist.com/forums/928-foru...il-baffel.html
Am I better off:
a) reusing the existing oil baffle that is in the car now
b) buying the 928 Specialists SharkVent Crankcase Ventilation System
https://www.928gt.com/pc-40580-9-sha...85-86-32v.aspx
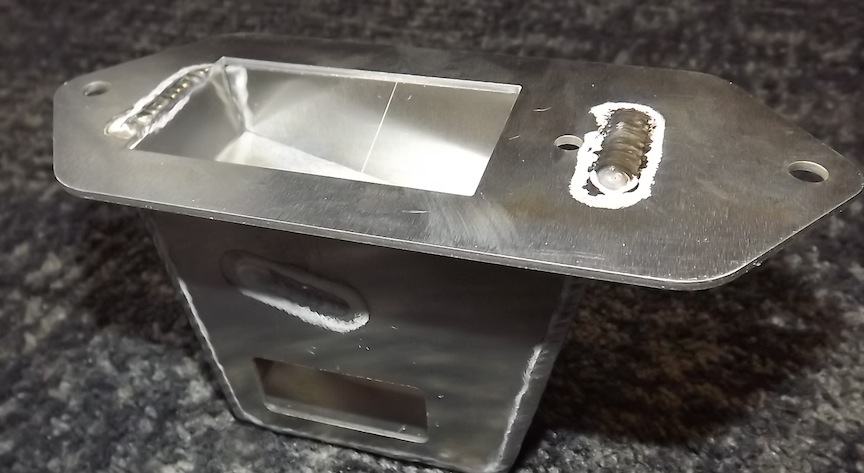
c) buying Greg Brown's improved baffle (shown below)?
DSCF1521.JPG
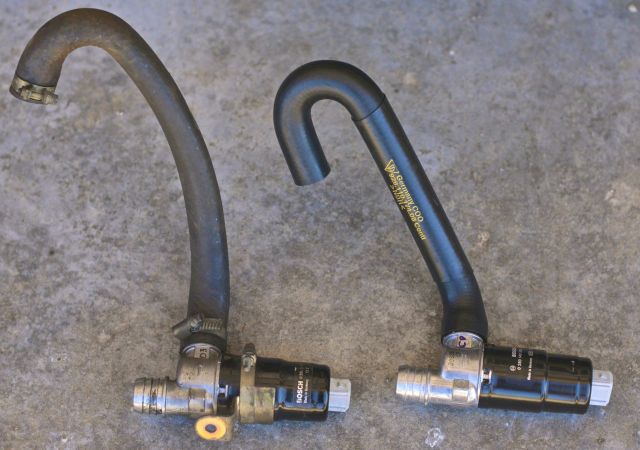
2) FUEL LINES
My fuel lines were changed by my mechanic in 2010. The lines on the car were very brittle, and probably one earthquake or sudden stop away from becoming an engine fire.
Should I change them to Greg Brown's lines, since everything is apart?
How long do you guys wait before changing fuel lines? Every four years? Six? Two?
A couple of things to ask the board:
1) OIL FILLER BAFFLE
After removing the oil filler neck (to be powder coated) I read this thread:
https://rennlist.com/forums/928-foru...il-baffel.html
Am I better off:
a) reusing the existing oil baffle that is in the car now
b) buying the 928 Specialists SharkVent Crankcase Ventilation System
https://www.928gt.com/pc-40580-9-sha...85-86-32v.aspx
c) buying Greg Brown's improved baffle (shown below)?
DSCF1521.JPG
2) FUEL LINES
My fuel lines were changed by my mechanic in 2010. The lines on the car were very brittle, and probably one earthquake or sudden stop away from becoming an engine fire.
Should I change them to Greg Brown's lines, since everything is apart?
How long do you guys wait before changing fuel lines? Every four years? Six? Two?
Craic Head
Lifetime Rennlist
Member
Lifetime Rennlist
Member

Joined: Sep 2006
Posts: 8,795
Likes: 7
From: Jersey Shore, USA
1. I think B and C are a bit of overkill for a street car, but if you're into that sort of thing it's something that couldn't hurt and could potentially help.
I would (and did) go with A.
For 2. I think the right fuel lines should last 15-20 years of normal use. If they were done properly in 2010 you're good to go. If, as Shane mentions, they are at all suspect it's definitely a good idea to make sure the proper ones are in there. Then you should be good for the rest of this decade and well into the 2020s. (!)
Thread Starter
Burning Brakes
Joined: Jul 2007
Posts: 946
Likes: 5
From: Columbia, MO / San Luis Obispo, CA
Back from a couple of weeks of work-related inactivity�
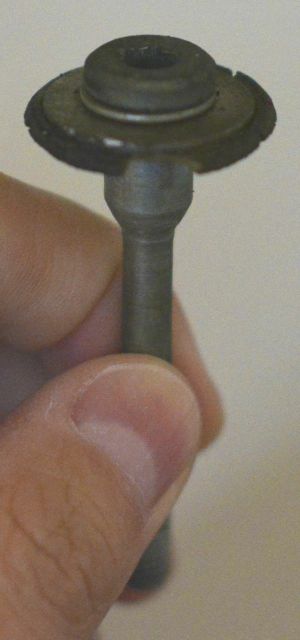
I spent some time this afternoon carefully removing cam cover bolts. They seem to be coming out without much resistance.
130921 Cam Cover Bolt.png
Question: I see a dried-out ring (pictured above) around the circumference of the cam cover bolt. However, I don't see this ring in the PET (pictured below)
Screen Shot 2013-09-21 at September 21, 2013 5.45.25 PM .jpg
28 is a washer, part number 928.104.417.02
29 beneath the washer is an O-ring, part number 999.701.731.40
Any ideas what this is?
Thread Starter
Burning Brakes
Joined: Jul 2007
Posts: 946
Likes: 5
From: Columbia, MO / San Luis Obispo, CA
A few updates this weekend.
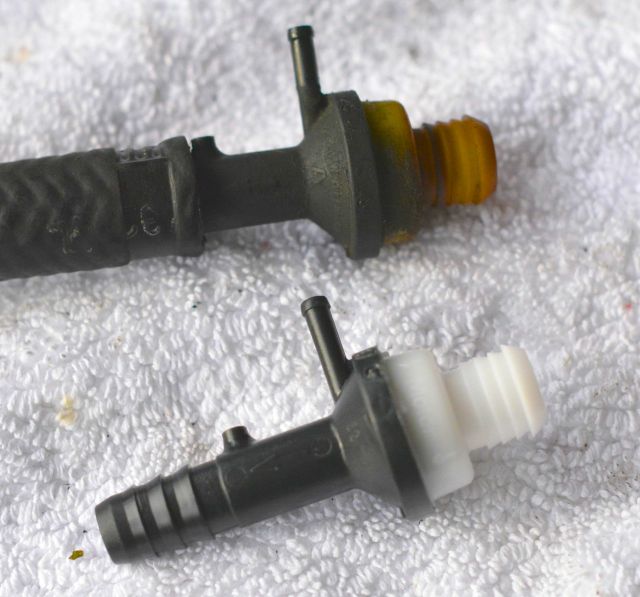
Roger supplied me with a new check valve (928 355 660 03):
130920 Check Valve Old New.jpg
…and a new idle speed adjuster (928 606 161 00)
130921 Idle Stabilizer Valve.jpg
…and has aftermarket rubber washers that fit underneath the valve cover bolts
130922 Cam Bolt 2.jpg
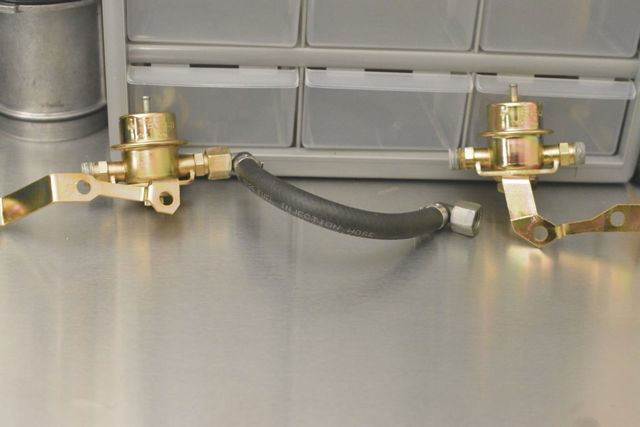
I also used my Caswell CopyCad to plate the fuel pressure damper and fuel pressure regulator (928 110 198 01)
130922 Fuel Dampener 6.jpg
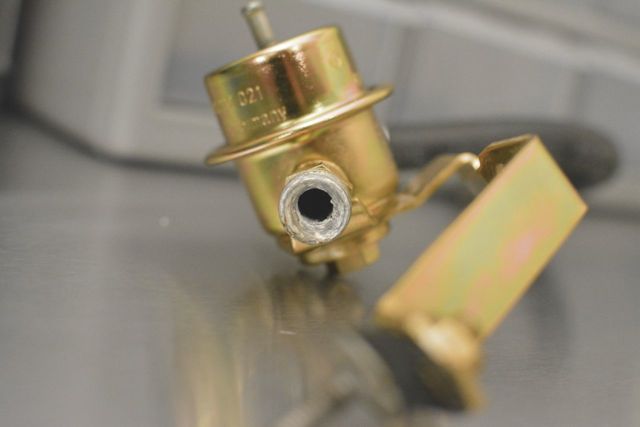
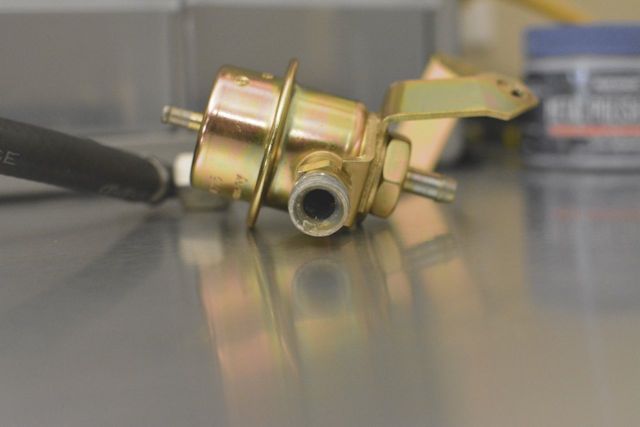
I put rubber stoppers on the regulators to keep them from getting dirty. The stoppers have been on the regulator and damper for almost a month. When I removed the stoppers I found some crap inside:
130922 Fuel Dampener 7.jpg
130922 Fuel Dampener 8.jpg
It is a clear sludge.
Is that some pickling solution that leaked into the regulator and damper, or is that dried gas? I don't know.
How does one clean out the inside of the regulator, without damaging? Gasoline? Alcohol?
Roger supplied me with a new check valve (928 355 660 03):
130920 Check Valve Old New.jpg
…and a new idle speed adjuster (928 606 161 00)
130921 Idle Stabilizer Valve.jpg
…and has aftermarket rubber washers that fit underneath the valve cover bolts
130922 Cam Bolt 2.jpg
I also used my Caswell CopyCad to plate the fuel pressure damper and fuel pressure regulator (928 110 198 01)
130922 Fuel Dampener 6.jpg
I put rubber stoppers on the regulators to keep them from getting dirty. The stoppers have been on the regulator and damper for almost a month. When I removed the stoppers I found some crap inside:
130922 Fuel Dampener 7.jpg
130922 Fuel Dampener 8.jpg
It is a clear sludge.
Is that some pickling solution that leaked into the regulator and damper, or is that dried gas? I don't know.
How does one clean out the inside of the regulator, without damaging? Gasoline? Alcohol?
Last edited by syoo8; Jan 15, 2014 at 09:49 PM.
Team Owner
Joined: May 2004
Posts: 31,138
Likes: 4,147
From: Philly PA
what does it smell like? could some of the plating compound have gotten into the dampers?
they look pretty on the outside ,
and at this point you risk clogging the fuel injectors,
it might be a good idea to replace all 3 of these units as they are 25 yo
they look pretty on the outside ,
and at this point you risk clogging the fuel injectors,
it might be a good idea to replace all 3 of these units as they are 25 yo
Nordschleife Master
Joined: Jul 2011
Posts: 5,662
Likes: 25
From: North Country
And, get some Loctite 574 for the mating surfaces of the fuel line units throughout. Even in experienced hands, the re-mating of these units is made with more surety with this material. It is a must have with your equipment. You can pick it up on Amazon. Thin coating over the mating surfaces. It cures quickly. Search it on the Forum. You'll see who's using it and for what.
Thread Starter
Burning Brakes
Joined: Jul 2007
Posts: 946
Likes: 5
From: Columbia, MO / San Luis Obispo, CA
Thanks for the tip, MainePorsche. I read about that in an earlier thread, and apparently it (or something called DreiBond) is what Greg Brown uses. Obviously I'll be using it as well.
Thread Starter
Burning Brakes
Joined: Jul 2007
Posts: 946
Likes: 5
From: Columbia, MO / San Luis Obispo, CA
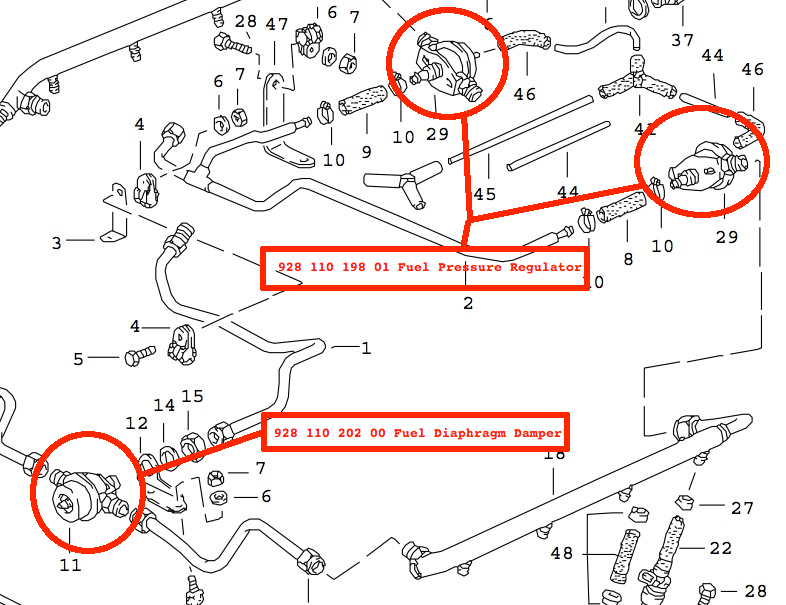
I was confused about the layout of the fuel pressure regulator and fuel pressure dampers.
PET is CORRECT about the layout of the FPR/dampers. I was reading the wrong diagram.
The layout I posted below is for ROW cars in 85-86 with the the 16-valve engines. I should have noticed that the fuel rails in this diagram looked nothing like the rails I've been cleaning for the past week.
Screen Shot.png
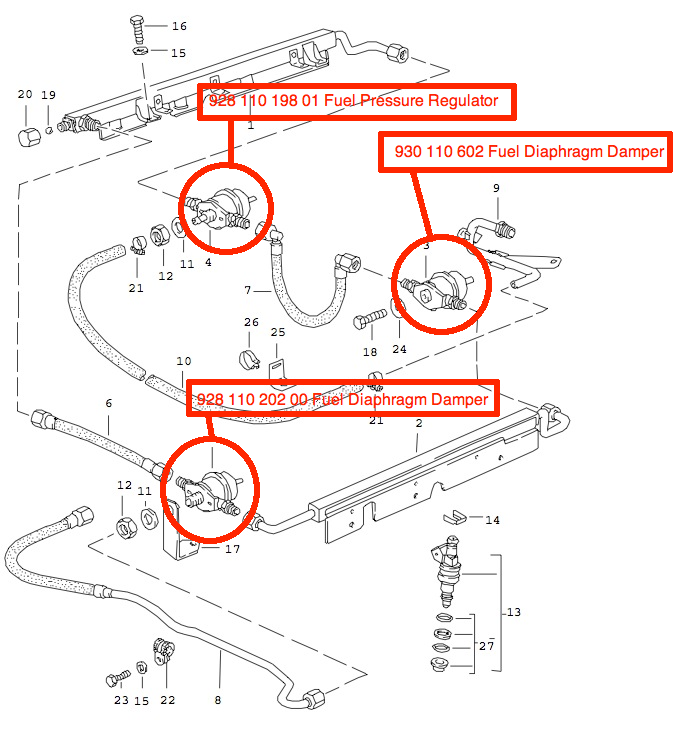
The layout for 85-86 32V US cars is below, and the pressure/damper layout is congruent with what I had in my car.
Correct FPR Layout.png
Advice to other newbies: make sure you are looking at the right diagram in PET, since there are more than one in some instances to cover differences in a given model year.
PET is CORRECT about the layout of the FPR/dampers. I was reading the wrong diagram.
The layout I posted below is for ROW cars in 85-86 with the the 16-valve engines. I should have noticed that the fuel rails in this diagram looked nothing like the rails I've been cleaning for the past week.
Screen Shot.png
The layout for 85-86 32V US cars is below, and the pressure/damper layout is congruent with what I had in my car.
Correct FPR Layout.png
Advice to other newbies: make sure you are looking at the right diagram in PET, since there are more than one in some instances to cover differences in a given model year.
Last edited by syoo8; Jan 15, 2014 at 09:51 PM.