

'84 US head gasket failure...suggestions?
 08-14-2013, 06:49 PM
#31
Nordschleife Master
Join Date: Dec 2004
Location: Guelph, Ontario, Canada
Posts: 6,164
Likes: 0
Received 5 Likes
on
5 Posts
Completely valid.
No question that it is better to remove it....and the support network, here on Rennlist, is amazing!
If he has some "local help" and the support network here, there is no question he can do it. Hell, from what I've seen, I think people would "travel" to help him
Alone (and your first ever engine project) can be very overwhelming.
A 928 engine is not as simple as an American V-8.....
I remember my first ever automatic transmission (350 Turbo Hydramatic....long before there was any interent). It was pretty overwhelming......and I had a pretty good set of hands and an even better memory, back then.
No ****, no WSM... My youngest is 23 and I still don't know what I am doing....


 08-14-2013, 06:53 PM
#32
Nordschleife Master
Join Date: Dec 2004
Location: Guelph, Ontario, Canada
Posts: 6,164
Likes: 0
Received 5 Likes
on
5 Posts
I'll give you good advice both the Greg's gave me (RIP one of them). BEG, BORROW, OR BUY A GOOD TORQUE WRENCH.
Don't forget to unbolt the wiring harness on the left side that runs over the crossmember or you'll end up trying to pick up the car with the wiring harness when you remove the engine. It's a little M6 bolt hidden under the steering rack. You'll see it and swear at it.
Marvel at how easy everything in the engine bay is to work on when you have the engine out.
Greg Nettles told me the way he got the top bellhousing bolts off was 4' of extensions and coming up from the bottom. Of course he had a lift. Rob Edwards found the perfect wrench for getting them off from the top. Here's a thread I did just on those bolts:
https://rennlist.com/forums/showthre...ferrerid=75372
08-15-2013, 01:38 AM
#33
Pro
Thread Starter
Yeah, those wrenches look like they would be huge time savers. Did you buy those locally by any chance? If so, where?
08-15-2013, 08:16 AM
#34
Nordschleife Master
Join Date: Dec 2004
Location: Guelph, Ontario, Canada
Posts: 6,164
Likes: 0
Received 5 Likes
on
5 Posts
I bought them off the internet and had them shipped to a friend in the US. Then just picked them up there. I want to say it was around 140$ for the set of 5 wrenches. Is actually ten sizes, because there are different sizes on each end.Worth twice that IMHO. Just do a search for that one wrench part number and then find the set.
08-15-2013, 06:42 PM
#35
Pro
Thread Starter
Well, I started taking stuff apart last night. No major hurdles yet, so that's good. I think I'm about half way through the "engine removal prep" process. I noticed that one of the hoses on the passenger side of the car has been kind of crushed by the radiator. It's not worn through, though it looks as if that could very well happen in the not too distant future. What does this hose do?
08-21-2013, 09:27 PM
#38
Pro
Thread Starter
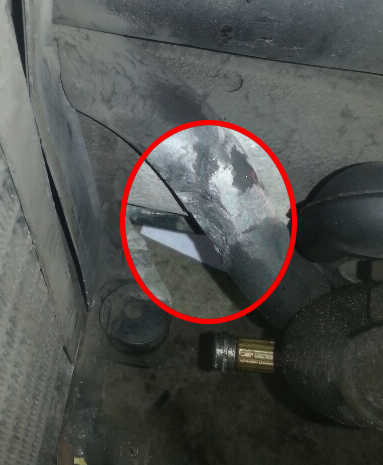
Well, I've been plugging along with the engine removal with the little time that I have. I'm about ready to pull the engine, but I just have to disconnect the motor mounts and the drive shaft. I assume that to get the drive shaft separated I have to remove the bolt shown here, but I'm having a hell of a time getting it to budge. The fact that it's on top gives me even less room to maneuver. I tried to do the wrench on allen key trick but there is barely any room to move it with a breaker bar. Is there any way to rotate the clamp? Or maybe just a better way to get at the thing?
08-21-2013, 10:05 PM
#39
Nordschleife Master
Join Date: Dec 2004
Location: Guelph, Ontario, Canada
Posts: 6,164
Likes: 0
Received 5 Likes
on
5 Posts
Turn the engine. Put the 27mm socket on the nut and turn it in the direction to tighten it. Rotate until the nut is facing down.
Word of caution here: That bolt is TIGHT! make sure then double make sure that the hex socket is all the way seated to the bottom. It's takes quite an arm to move it.
Word of caution here: That bolt is TIGHT! make sure then double make sure that the hex socket is all the way seated to the bottom. It's takes quite an arm to move it.
08-21-2013, 11:40 PM
#40
Pro
Thread Starter
Turn the engine. Put the 27mm socket on the nut and turn it in the direction to tighten it. Rotate until the nut is facing down.
Word of caution here: That bolt is TIGHT! make sure then double make sure that the hex socket is all the way seated to the bottom. It's takes quite an arm to move it.
Word of caution here: That bolt is TIGHT! make sure then double make sure that the hex socket is all the way seated to the bottom. It's takes quite an arm to move it.
So in order to move the drive shaft away from the engine, I guess I have to pry the shaft and the transmission away together. I unbolted the two bolts that hold the transmission down to the crossmember. Is that all I have to take apart for this to happen? And where is the best place to pry?
I also noticed a lot of that white cheesy stuff (from the coolant mixing with the oil) in my oil filler canister and the attached breather hoses on the top of my engine. I didn't notice any in the oil catch pan when it was draining though. What do you think is the best method of cleaning all of this crap out of my engine? Should I be expecting an engine filled with this milky gunk, or should it just be mainly limited to what I've already seen and maybe the oil pan?
08-23-2013, 02:11 AM
#41
Pro
Thread Starter
Well, my car has given birth! After a few evenings of work, the engine has come out without too much difficulty. I broke the wire going to the AC and a couple of vacuum hoses disintegrated as soon as I touched them, but if that's all that happened then I guess I can't complain.
So now comes the next part of my project...off with the heads! Any sage advice for this next part of my journey?
So now comes the next part of my project...off with the heads! Any sage advice for this next part of my journey?
08-23-2013, 08:35 AM
#42
Nordschleife Master
Join Date: Dec 2004
Location: Guelph, Ontario, Canada
Posts: 6,164
Likes: 0
Received 5 Likes
on
5 Posts
Well, my car has given birth! After a few evenings of work, the engine has come out without too much difficulty. I broke the wire going to the AC and a couple of vacuum hoses disintegrated as soon as I touched them, but if that's all that happened then I guess I can't complain.
So now comes the next part of my project...off with the heads! Any sage advice for this next part of my journey?
So now comes the next part of my project...off with the heads! Any sage advice for this next part of my journey?
When doing the rest of the project, get freezer ziplock bags and go slowly and label each bag with what you took off and where it goes. Also take lots of pictures so you can see how wires and hoses are routed.
08-23-2013, 10:30 AM
#44
Rennlist Member
Sage advice is now to clean everything inside there that you can. Get some purple power cleaner and get it spotless. Rinse well. Or if you want to go the fast and easy (expensive way), get a couple cases of brake kleen and spray away till everything is spotless. Clean engine bay makes working on it later much, much better. Also, clean out the drain under the blower motor (above where the wiring harness goes in the firewall. Probably full of leaves, etc. With the motor out it is super easy to clean and vac out.
I know you don't want to hear it but now is the time to put a superclamp on the torque tube. Order it from Constantine at Black Sea R&D. Better yet, rebuild the Torque tube since you can easily get it out. I wish I had done this two years ago. I am taking my TT out and rebuilding in about 30 days or so.
Since you'll have the engine on a stand, get a new oil pan gasket and stud kit from Roger at 928sRus. Super easy to do with engine out, just spin 'er over while on stand. DON'T DO THIS WITH CAM COVERS OFF AND CAMS OUT BUT LIFTERS STILL IN. BAD IDEA AND YOU DON'T WANT TO KNOW HOW I KNOW THIS. Do it with the heads off, engine is much lighter.
Replace any iffy hoses or lines now, they are there and accessible so take advantage of this. Same with repairing any iffy spots in wiring harness cover. Use self sealing rubber/silicone tape to fix the spots (get appropriate color at Lowes/Home Depot).
Take pictures of the crossmember before you take the motor mount shields off. They are buggers to remember which way to put them back on just by looking at them.
Get a paint marker and put a dab on each bolt on the frame, etc as you retorque it. Just like the factory did.
Do you have the torque values sheet from Andrew? If not, here's the link. Print it out, get it laminated, it will be your best friend. https://docs.google.com/file/d/0BzC7...TM2/edit?hl=en
08-23-2013, 02:12 PM
#45
Pro
Thread Starter
Good job! When you are ready to do the install I will give you a weatherpak connector to fix that wire. They are hard to disconnect with the connector they put in there. There is a picture in my rebuild thread of what I did.
When doing the rest of the project, get freezer ziplock bags and go slowly and label each bag with what you took off and where it goes. Also take lots of pictures so you can see how wires and hoses are routed.
When doing the rest of the project, get freezer ziplock bags and go slowly and label each bag with what you took off and where it goes. Also take lots of pictures so you can see how wires and hoses are routed.
 Thanks so much for offering a replacement! That is very generous of you, and if you're cool with sending one my way I'd be happy to take you up on your offer. I have a whole pile of ziplock bags and a camera full of pictures already in progress! I'm sure I will have a few hose/wire routing questions along the way though, as a couple of the hoses were broken before I could photograph them.
Jeff, thanks for the advice as well! I actually already have the pan gasket and motor mounts in my possession, so that will be one of the first jobs that I do. The engine is filthy, so I will be giving it a good cleaning using the methods you described. I've also bought a bunch of rubber vacuum hose, so all of the lines that I am touching are getting replaced.
And thanks for those torque specs! I have them in my files, but now I don't have to go digging for them.
Onto Stage 2 now...wish me luck! Thanks again for all of your continued help everyone.