
alternator and powersteering
 06-06-2013, 04:14 PM
#31
Instructor
Thread Starter
Join Date: Sep 2012
Location: Philadelphia, PA
Posts: 115
Likes: 0
Received 0 Likes
on
0 Posts
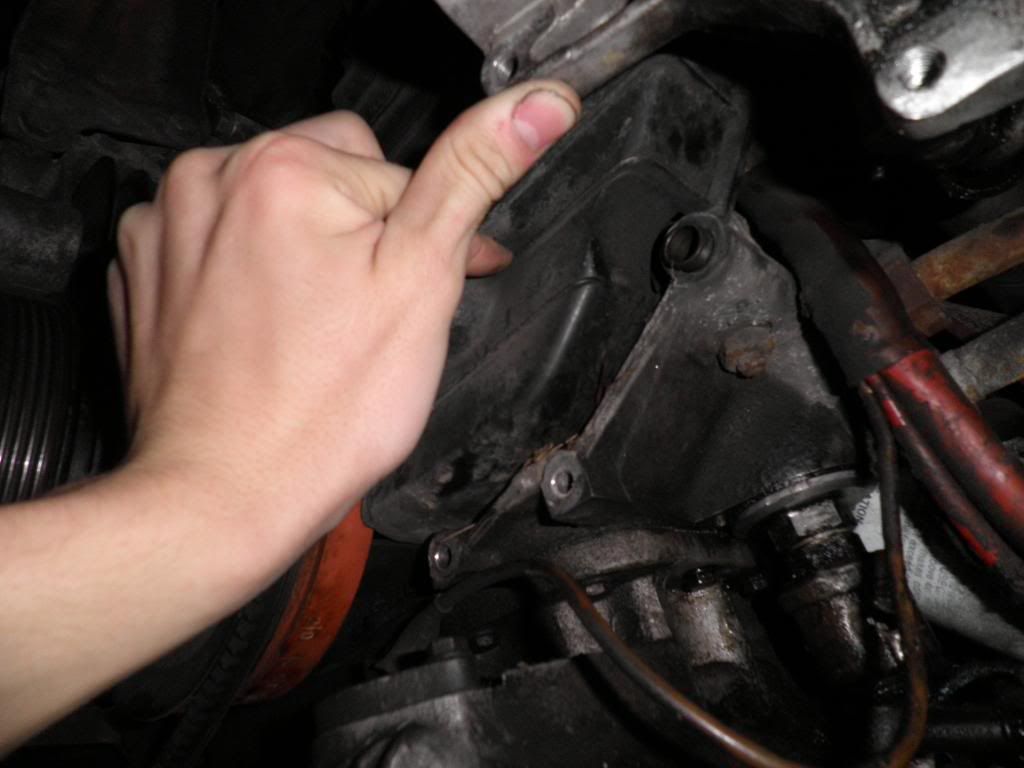
lizard928 had asked for more detailed photos of the upper bolt hole so here it is.
also I'm a bit confused about where to measure the height from. I see the little flat spot on the suspension, but then you're supposed to measure to a contact patch- that's just where the tire hits the road, right?
also how critical is the adjustment after changing the height.
also I'm a bit confused about where to measure the height from. I see the little flat spot on the suspension, but then you're supposed to measure to a contact patch- that's just where the tire hits the road, right?
also how critical is the adjustment after changing the height.
 06-06-2013, 06:31 PM
#32
Nordschleife Master
I see slight damage on the top side of the hole, but it looks safe.
As to the suspension measurement.
Factory ride height is 160-180mm
Measurement points are
Front, rear inner retainer of lower control arm. In the center of this piece (between outer ribs) is a flat spot. This is front measuring location.
On the rear you have the large aluminium cross member. Where to lower control arm attachs to this you will find a little knub. This is the measuring point for the rear.
An alignment is manditory after or you will nuke your tires.
A corner balance is recommended prior to the alignment.
06-06-2013, 06:35 PM
#33
Nordschleife Master
06-06-2013, 06:37 PM
#34
Nordschleife Master
Timbuktoo,
I have a spare alternator that had fried diodes. So I have an entire replacement housing. I also have a TIG welder and know I could likely just weld yours up.
I have a spare alternator that had fried diodes. So I have an entire replacement housing. I also have a TIG welder and know I could likely just weld yours up.
06-06-2013, 07:03 PM
#35
Under the Lift
Lifetime Rennlist
Member
Lifetime Rennlist
Member
Boy, you lucked out that the bracket cracked in two instead of the block! I saw one even more miraculous result of a hard bottom out where the bolts stretched and nothing broke.
As to ride height:
I'd be interested to hear what yours is now. I know of cars as low as 125 mm up front but with stiff shocks that are occasionally driven on the street, but with some scraping if not bottoming hard going into some driveways or over speed bumps. Ideally for driving in a spirited way on public roads I would run ~170 rear and no less than 160 front.
The first pic below shows the front measurement point at the front lower A-arm's rear bracket. It's a spot you can't get to very easily in the valley between the two flanges of the bracket, indicated with a black arrow . If you are using a ruler, it is far easier to use the lowest part on the flange instead, indicated with a red arrow, which I have measured as 10 mm below the factory point. So, putting a short ruler against the rear face of that flange and adding 10 mm to the measurement will give you the ride height. Others have cut various lengths of wire and used them instead to get to the factory measurement pad.
The 2nd pic shows a front ride height measurement I did. I get to the spot with the car on the ground, reaching in from behind the front tire, aided by a flashlight. If your ride height is super low this could be difficult to do except on a 4-post rack. Correcting for the angle of view you'll see I measured 139 mm (the thin red line). Add 10 mm to get the actual ride height of 149 mm. I had the front this low once with some experimental coilovers. For adjustment, the thread pitch of the collars are 1 mm and each turn provides about 2 mm of ride height change. For the front, the wheels must be removed to get to the adjusters, and due to the stickiness of the front A-arm bushings, the car will not settle down to actual ride height if it has been jacked off the ground until it is driven for between 30-100 miles. I found driving 30 miles on roads around my house brought the ride height down about 50% of the way.
The 3rd pic shows the rear check point. If you zoom in you'll see my ruler is indicating 163 mm. The rear adjusters can be accessed without removing the rear wheels, but it helps immensely to jack the rear up, removing spring tension on the adjuster. The rear settles after just a short roll in the driveway.
06-06-2013, 07:09 PM
#36
Instructor
Thread Starter
Join Date: Sep 2012
Location: Philadelphia, PA
Posts: 115
Likes: 0
Received 0 Likes
on
0 Posts
@Lizard, I know where it is on the car, but what confuses me is where on the ground, striaght down from the spot on the control arm or to the wheel contact patch. also thanks for the offer on fixing the alternator. I will talk with my dad and PM you later this evening about it.
EDIT: thanks for clarifying about the measurements Bill Ball. I'll try and measure now, but the thing is up on ramps, and I dont want to take it down right now, so maybe a taught string from one ramp to the other.
EDIT: thanks for clarifying about the measurements Bill Ball. I'll try and measure now, but the thing is up on ramps, and I dont want to take it down right now, so maybe a taught string from one ramp to the other.
06-06-2013, 07:35 PM
#37
Instructor
Thread Starter
Join Date: Sep 2012
Location: Philadelphia, PA
Posts: 115
Likes: 0
Received 0 Likes
on
0 Posts
06-06-2013, 07:50 PM
#38
Under the Lift
Lifetime Rennlist
Member
Lifetime Rennlist
Member
YIKES! Although I said I know of cars as low as 125, these are race cars, with super stiff coilovers, driven very carefully on the street. You need to get about 15 full turns on the adjusters. NOTE: I may be off a bit on the ratio between turns and change in ride height. It's been a while and there may be some variability with aged springs. Somebody else should pipe in if they have better information, but I'd get a quite a few turns in those adjusters before I'd go across that bridge again!
06-06-2013, 08:06 PM
#39
Chronic Tool Dropper
Lifetime Rennlist
Member
Lifetime Rennlist
Member

The workshop spec for front height starts at about 190mm highest/new, allows for a maximum of 20mm sag before adjustment is needed. There's an additional 10mm thrown in there, probably to allow for tire wear. IMHO, the minimum practical height is 170mm with good shocks on smooth roads. 180mm would be better, especially considering your great roads in Pa. Toe-in will need to be corrected very soon after you get the ride height correct. It takes 75-100 miles of driving after the final height adjustment, to get the car fully settled for both the final height verification and the toe adjustment.
The workshop manual tells you how to test for dsagged motor mounts, by feeling between the two hooks at each motor mount. As the mount collapses, the space between the hooks gets big enough to feel with your fingers. Can you slip a fingertip between the hooks? If there's more than 8-10mm gap, think about replacement. Besides getting the engine up an extra inch, ride quality improves a lot when engine vibrations aren't transmitted to your butt and arms. Makes it a new car, almost.
06-06-2013, 09:10 PM
#40
Burning Brakes
I've found that the easiest tool for measuring ride height is a collapsible metal pointer (kinda like a radio antenna). A Harbor Freight collapsible magnetic pick up tool works equally well. Just place one end on the ground and extend it up to the measuring point. Plop it down next to a ruler and you've got your ride height.
James
James
06-07-2013, 10:44 AM
#42
Rennlist Member
Rennlist Site Sponsor

"On the early cars it is to help keep debree out of the belts. No more."
Also helps prevent recirculation of hot air back thru the condenser/radiator.
Also helps prevent recirculation of hot air back thru the condenser/radiator.
06-13-2013, 12:26 AM
#43
Instructor
Thread Starter
Join Date: Sep 2012
Location: Philadelphia, PA
Posts: 115
Likes: 0
Received 0 Likes
on
0 Posts
so I recently found this thread (https://rennlist.com/forums/928-foru...l#post10534554) here on rennlist and decided that I liked the concept of one thread documenting everything on the car, so I will do this here as I figured it better to do here on the thread that I already have, then to start a new one.
Work to be done:
-replace alternator bracket and alternator when they come in the mail. I'm going to get all new bolts for it because some are bent and it seems like a good idea.
-clean the circuit board https://rennlist.com/forums/928-foru...f-grounds.html
-lift it to WSM heightsstuff about measuring sticks. lifting guide
-check thrust bearing thingy. I found this from Dwayne's garage, but there was also some other guide that I read a while back, but I cant find it any more... oh well
-drive it 5-100 miles before realignement otherwise it wont get aligned right http://members.rennlist.com/captearlg/928align.html
-I'd like to paint and freshen up the air intake with new gaskets and seals and stuff because it isnt too pretty at the moment, but this is the least pressing issue at the moment. http://dwaynesgarage.norcal928.org/1...%20Refresh.htm
I'll put up pics of the entire car tomorrow if my dad doesn't have the camera hostage lol. but it's not that impressive compared to some of the other cars on here
06-13-2013, 01:07 PM
#44
Team Owner
you might be well off to contact the Fixer here on RL he seems to be pretty handy at fixing things he is in your area.
For the cassette bolts make sure to measure the hole depth and have the both thread in as far as possible with the cassette in place,
this so you use the correct bolts as they are easily stripped if the the bolt used is too short ,
NOTE the bolts are both different lengths so this is a critical step to installing the bolts,
so they wont be stripping out the holes in the mounting pads
06-13-2013, 02:58 PM
#45
Instructor
Thread Starter
Join Date: Sep 2012
Location: Philadelphia, PA
Posts: 115
Likes: 0
Received 0 Likes
on
0 Posts
I'm sorry, but I don't know what you mean by casette. I was just going to take all my old bolts to the hardware store and find the same sized ones there.
also is it possible with a shark tuner to put a switch somewhere that tells the computer to change engine maps from one to another while driving. so you could have one for low/mid range torque for stop and go performance and then flip a switch and get higher range power for on the highway, or a map that will try to use the least fuel?
and is it possible to change the thread name to be more apropriate since this is becoming more of a build/documentation thread.
also
is it possible with a shark tuner to put a switch somewhere that tells the computer to change engine maps from one to another while driving. so you could have one for low/mid range torque for stop and go performance and then flip a switch and get higher range power for on the highway, or a map that will try to use the least fuel?and is it possible to change the thread name to be more apropriate since this is becoming more of a build/documentation thread.