

Rant mode ON-Fvcking alignment techs chap my arse!!
 05-07-2013, 11:09 AM
#31
Chronic Tool Dropper
Lifetime Rennlist
Member
Lifetime Rennlist
Member

Correct on all counts.
"Modern" tires tend to like a little more negative camber than those available when the 928 suspension design was hatched. Especially for spirited driving, a little extra camber (~-1� total) will help avoid some of the outer-edge scrubbing particularly on the fronts. As you allude though, camber 'issues' need to be balanced with correct and even more precise toe control.
I suspect that 90+ percent of tire wear and alignment 'issues' are caused by worn/tired suspension and steering components. Adjustments can compensate for some wear, but ultimately no adjustment can correct for extra movement going down the road. We preach regularly that we don't want the front-end guys to raise the car and check for wear, but it's really a good idea to let a pro test for worn parts. Follow the guidance you receive and replace the worn parts. Then go drive the car to settle the suspension after the worn bits are replaced, and dial in the final adjustments on the settled car.
More than a few accounts of suspension restoration are here on RL, where the owner cites the fabulous improvement seen with upper control arm and ball joint replacement, tie rod and rack bushing replacement, and upper link replacement in the rear. If you car has passed 75-100k miles, these parts are due for replacement without question. Ditto tired springs and shocks at the same mileage.
Absolutely not. Many modern cars, including the Porsche suffer from camber issues. It is even more affected when a wider wheel or different offset is used. As I'm pretty sure you already know, the Weissach axle is notorious for camber related 'issues' as it was designed to minimize deceleration toe changes. While effective, it also places a greater burden on the camber plate, truss, bushing, and trailing articulation joint. In the front, the 928 tends to spread the lower control arm slowly, and the top of the shock often wears inward thus changing the camber of the front wheels. It is not just related to toe, although sometimes toe is used to overcome mistakes or defects in camber.
Not 928 related, but I've had rear camber issues on a GTI, Focus, Mini.
Not 928 related, but I've had rear camber issues on a GTI, Focus, Mini.
 05-07-2013, 12:40 PM
#32
Racer

Join Date: Mar 2013
Location: San Diego, CA
Posts: 304
Likes: 0
Received 0 Likes
on
0 Posts
Dr Bob, I would love to be able to do my own wheel alignments. I have followed the several threads on the subject here for some time, and from what I read the equipment would not cost much more than what one typical four wheel alignment costs. It would be money well invested. However, it is the type of procedure I would want to observe being done before jumping into it myself. I think this would be an excellent candidate for a tech session during Sharktoberfest if those with the equipment and knowledge would be willing to demonstrate it. I am sure it would be of great interest to many who attend.

Oh and nice meeting you Mark.
 05-07-2013, 02:26 PM
#33
Drifting
Alignments are a PITA. I always watch to make sure they don't lift the car, no matter what they say, that's what they're used to doing.
Hadn't thought of it until now, but probably worth also re-torquing the BJ bolts to 88 fl-lbs when you get home afterwards.
Rears are the toughest b/c getting 140 on those buggers isn't a reach underneath with one arm type of deal. On my last alignment I pointed out the spec to the mgr. He nods to me, turns to the tech and says "make those good and tight in back" ...
Who's the guy in Austin and what info do you pass along.
i've got a completely new set of upper/lower ball joints and all rubber.
Mine also has aftermarket shocks/struts -- so I'm not 100% what info you
have will work -- but at least they will be familiar.
I've got a small highway vibration I'd like to get checked out.
Would like to check/get alignment.
thx,
mike
05-07-2013, 03:48 PM
#34
Chronic Tool Dropper
Lifetime Rennlist
Member
Lifetime Rennlist
Member
There's still the minor challenge of finding a flat/level floor to demo on at 928 Int'l.
In the DIY alignment thread, I diagrammed the fixtures I use, made from locally-sourced aluminum stock. It's hacksaw and hand drill stuff for assembly. You'll want a couple laser levels, plus a standard 24" carpenter's bubble level for camber. Substitute at least one digital angle finder if you want to adjust caster, and it can do camber too. And a good tape measure and a 6" pocket machinist's scale/ruler. Masking tape and a pen too.
Earl Gilstrom shared a DIY alignment method using strings for the toe measurement. Mark K uses a stick against the tire. Both require very exact determination of measurement, since the differences between front and rear of a 16-18" rim for 15 minutes of toe angle is less than 1/16" total, smaller than I can reliably pick out with pen marks or string width. I'd be tempted to use coat-maker's heavy black thread for the string. Mark's stick-against-the-tire method adds the variable of sidewall flex to the toe difference measurements too. He has a way that works for Mark.
05-07-2013, 04:07 PM
#35
Racer
Join Date: Mar 2013
Location: San Diego, CA
Posts: 304
Likes: 0
Received 0 Likes
on
0 Posts
There are enough third-party tools and varying DIY techniques floating around in the market now that there's not much need for Mark to sell something more 928-centric.
There's still the minor challenge of finding a flat/level floor to demo on at 928 Int'l.
In the DIY alignment thread, I diagrammed the fixtures I use, made from locally-sourced aluminum stock. It's hacksaw and hand drill stuff for assembly. You'll want a couple laser levels, plus a standard 24" carpenter's bubble level for camber. Substitute at least one digital angle finder if you want to adjust caster, and it can do camber too. And a good tape measure and a 6" pocket machinist's scale/ruler. Masking tape and a pen too.
Earl Gilstrom shared a DIY alignment method using strings for the toe measurement. Mark K uses a stick against the tire. Both require very exact determination of measurement, since the differences between front and rear of a 16-18" rim for 15 minutes of toe angle is less than 1/16" total, smaller than I can reliably pick out with pen marks or string width. I'd be tempted to use coat-maker's heavy black thread for the string. Mark's stick-against-the-tire method adds the variable of sidewall flex to the toe difference measurements too. He has a way that works for Mark.
Tools just for the 928, kinda like the LiftBars, and other tools which makes our life easier to preform the task and/or easier to store.
I don't mean the measuring tool, I mean the tools to adjust/do the alignment (especially for those who just got 928 this year and have zero tools.... like me sadly)
05-07-2013, 05:41 PM
#37
Chronic Tool Dropper
Lifetime Rennlist
Member
Lifetime Rennlist
Member
Some people want exactly that.
Tools just for the 928, kinda like the LiftBars, and other tools which makes our life easier to preform the task and/or easier to store. I don't mean the measuring tool, I mean the tools to adjust/do the alignment (especially for those who just got 928 this year and have zero tools.... like me sadly)
Tools just for the 928, kinda like the LiftBars, and other tools which makes our life easier to preform the task and/or easier to store. I don't mean the measuring tool, I mean the tools to adjust/do the alignment (especially for those who just got 928 this year and have zero tools.... like me sadly)
I made a couple metal fixtures that sit in the wheel lip/faces to hold laser levels. The fixtures support the lasers so they point exactly perpendicular to the wheel axis. Others have made similar fixtures out of wood with OK results. I recently added a couple digital angle gauges to the mix to make it possible to calculate caster angles, when used in conjunction with the lasers equipped with beam-splitters to measure steering angles. I bought the metal pieces at a local metal supply place (Industrial Metal Supply in Sunland). The laser levels and the angle gauges came from Harbor Freight. Total material investment is around $100, with an hour or two needed to assemble the pieces depending on your shop skills and hacksaw-rowing capability.
Others have made there own equipment, some more elegant, some a little more simple. Herman K in Texas has wheel mounts that attach a rotary laser to each wheel. Bill Ball has a three-legged frame to support the lasers, more easily adjustable for different wheel sizes (one screw) than mine which take three screws to change. The string/square method needs some supports for the strings to make sure they are parallel and close to the wheels, plus a tape measure and a small machinists scale/ruler to measure the distance from string to wheel lips. There are commercial DIY fixtures that span the spectrum of easy/expensive through complex to use/cheap to build. Look a SmartRacing Products for some pretty good DIY pieces if you don't want to make your own.
Keep in mind that I already knew well how to do alignments before I started looking at the 928 DIY option. My goal was and remains a simple system and method that doesn't require the user to remember multiple-keystroke trig calculations; measurements and calculations are all simple subtraction of tape-measure readings, or subtraction of angle readings from the little digital angle gauges. If you can subtract fractions read from a tape measure, that's all the high-level math you need to know.
05-07-2013, 08:57 PM
#38
Three Wheelin'
Fairly new at Harbor Freight is this thing- digital angle gauge-
http://www.harborfreight.com/digital...uge-95998.html
Also- instead of using string along side the car, try
using monofiliment fishing line. You can get some
lower test line that is very thin & won't cover up the
graduations on your ruler.
http://www.harborfreight.com/digital...uge-95998.html
Also- instead of using string along side the car, try
using monofiliment fishing line. You can get some
lower test line that is very thin & won't cover up the
graduations on your ruler.
05-07-2013, 10:28 PM
#40
Chronic Tool Dropper
Lifetime Rennlist
Member
Lifetime Rennlist
Member
Fairly new at Harbor Freight is this thing- digital angle gauge-
http://www.harborfreight.com/digital...uge-95998.html
<<...>>
http://www.harborfreight.com/digital...uge-95998.html
<<...>>
The H-F angle gauge that Jim points to above has a magnetic base that makes fitup a breeze if you happen to have a steel fixture. Mine is made from extruded aluminum square stock, so I use a simple plastic spring clamp to hold the angle gauge to it. Simple-cheap-easy-effective for the duty.
05-09-2013, 06:53 AM
#41
Advanced
Join Date: May 2005
Location: Stockholm, Sweden
Posts: 62
Likes: 0
Received 0 Likes
on
0 Posts
I made a "toe fork" out of a carbon fiber tube and some aluminum tube and flat bar. It works like a charm. Very rigid, very light and very little risk of denting the car. It can be used with a ruler as in the picture or a slide caliper for better precision. I've used it on my own cars, and it's been used quite a lot on race cars.
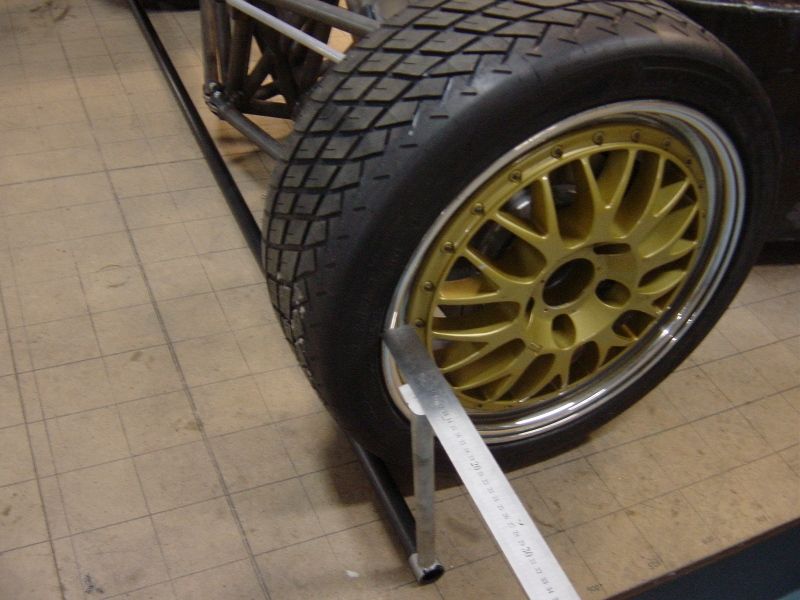
Toe angle is the difference in measured distance at front and rear of wheel.
/Peter
Toe angle is the difference in measured distance at front and rear of wheel.
/Peter