

Driver's side wheel well cover question
 04-16-2012 | 02:51 PM
#1
Thread Starter
Burning Brakes
Joined: Mar 2010
Posts: 812
Likes: 0
From: Brooklyn, NY
Hi guys,
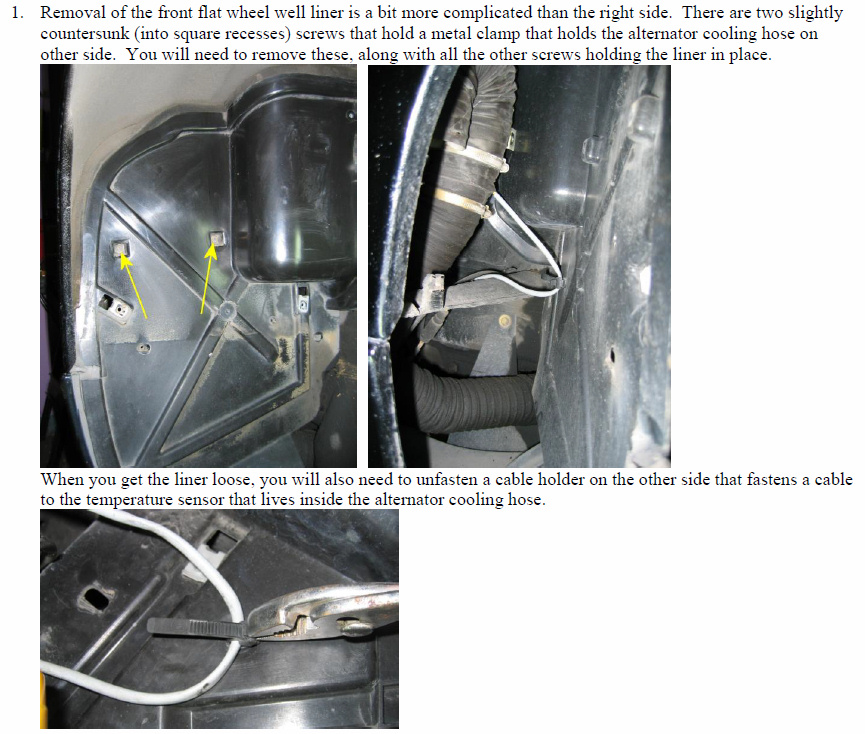
Yesterday I was about to remove front wheel well cover (928 504 221 11), when I noticed that there were a couple of things attached to the back side of it. I tried to peak inside, but couldn't see much...
Spoke with Roger today and confirmed that one is a U shaped hose that is held to the back of the cover with a screw.
What is the other item? On my car it's attached to the cover with a white zip tie. I couldn't pull the panel out without first cutting the tie and I figured I'd rather ask here first before doing that.
Any ideas?
Thanks!
04-16-2012 | 03:04 PM
#2
Addict
Rennlist Member
Rennlist Member
Joined: Jul 2001
Posts: 7,330
Likes: 110
From: Shawnee, KS, USA
Clipped from a guide I wrote related to something else (HID lighting installation):
Also, while you're in there, you might want to replace that often-rotted-out alternator hose.
Also, while you're in there, you might want to replace that often-rotted-out alternator hose.
04-16-2012 | 04:01 PM
#3
Thread Starter
Burning Brakes
Joined: Mar 2010
Posts: 812
Likes: 0
From: Brooklyn, NY
Perfect! Thanks a lot. Can the alternator cooling hose be easily removed and replaced once wheel well cover is out or is it a bit more involved? Gotta love all these small projects that start to pop up once you decide to replace one small thing...
04-16-2012 | 04:57 PM
#4
Electron Wrangler
Lifetime Rennlist
Member
Lifetime Rennlist
Member
Joined: Mar 2002
Posts: 13,442
Likes: 441
From: Phoenix AZ
Do yourself a favor and don't mount it back on the splash shield when you put it back together. Fabricate a new bracket to mount it to the fender cross member that the splash shield attaches to. Mounting this to the splash shield was a stupid idea in the first place - real "B" team work. There is plenty of space to do it properly.
With the correct sized hose its not hard to replce the alternator hose - but of course you do need the car up and the lower engine shield (if you have one) removed to get to the alternator.
Alan
With the correct sized hose its not hard to replce the alternator hose - but of course you do need the car up and the lower engine shield (if you have one) removed to get to the alternator.
Alan
04-16-2012 | 10:18 PM
#5
Rennlist Member
Joined: Dec 2002
Posts: 5,283
Likes: 49
From: Australia
04-17-2012 | 12:21 AM
#7
Thread Starter
Burning Brakes
Joined: Mar 2010
Posts: 812
Likes: 0
From: Brooklyn, NY
Hi Alan,
Do you happen to have pictures of the bracket you made? My problem is - I don't have private garage, whatever fixes/replacements I do, all need to be done in one set; car must be back on 4 wheels at the end of the day. It would help if I can have everything ready prior to jacking up the car...
Thanks!
Trending Topics
04-17-2012 | 05:16 PM
#8
Thread Starter
Burning Brakes
Joined: Mar 2010
Posts: 812
Likes: 0
From: Brooklyn, NY
How many hoses are attached to the alternator? Looking over at PER, it lists 2 separate hoses:
928 603 143 01 (flexible pipe 320mm)
928 603 143 04 (flexible pipe 900mm)
However there is only 1 on the PET image...
928 603 143 01 (flexible pipe 320mm)
928 603 143 04 (flexible pipe 900mm)
However there is only 1 on the PET image...
04-17-2012 | 05:19 PM
#9
Basic Sponsor
Rennlist
Site Sponsor
Rennlist
Site Sponsor
Joined: Jan 2003
Posts: 16,843
Likes: 900
From: Double Oak, TX
The Porsche hose is about $90 and not very good at all.
We have a much better hose for $24.75.
We have a much better hose for $24.75.
__________________

Does it have the "Do It Yourself" manual transmission, or the superior "Fully Equipped by Porsche" Automatic Transmission? George Layton March 2014
928 Owners are ".....a secret sect of quietly assured Porsche pragmatists who in near anonymity appreciate the prodigious, easy going prowess of the 928."
Does it have the "Do It Yourself" manual transmission, or the superior "Fully Equipped by Porsche" Automatic Transmission?
George Layton March 2014928 Owners are ".....a secret sect of quietly assured Porsche pragmatists who in near anonymity appreciate the prodigious, easy going prowess of the 928."
04-17-2012 | 05:22 PM
#10
Addict
Rennlist Member
Rennlist Member
Joined: Jul 2001
Posts: 7,330
Likes: 110
From: Shawnee, KS, USA


... and get the hose from Roger or get something else similar: non-permeable hose that will fare better in the presence of grime and oil.
Last edited by Ed Scherer; 04-17-2012 at 06:35 PM.
04-17-2012 | 05:52 PM
#12
Addict
Lifetime Rennlist
Member
Lifetime Rennlist
Member
Joined: Jul 2007
Posts: 4,539
Likes: 3
From: Germany
My way was to ziptie the hose under the cross support, making a U turn back towards the inside fender (sorry no pic available). Very easy, no brackets needed, just two zipties. Very clean install.
04-17-2012 | 08:17 PM
#13
Rennlist Member
Joined: Dec 2002
Posts: 5,283
Likes: 49
From: Australia
The temp sensor is fitted ~12" in from the end, so the 320mm part is the U shaped part clamped on the shield, and 900mm runs down to the alternator - hence 2 pieces. Pic above sort of hides the sensor with tape, but you can see the lead going under the tape, and the two hose clips holding the hose on the sensor. If you buy ~ 1M you should be able to fit it all.
jp 83 Euro S AT 54k
jp 83 Euro S AT 54k
04-17-2012 | 09:08 PM
#14
Electron Wrangler
Lifetime Rennlist
Member
Lifetime Rennlist
Member
Joined: Mar 2002
Posts: 13,442
Likes: 441
From: Phoenix AZ
Assuming you have the 'UU' bracket still - then you really only need one small "L" shaped angle bracket, a drill, 3 bolts and ideally 3 nylock nuts.
Bolt one end of the 'UU' bracket to the existing outboard double support and then locate where the 'L' bracket needs to go to drill the cross member - mount the 'L' bracket and bolt it all together. Really it only takes a few minutes. Really simple - what should have been done in the first place.
I mounted the bracket (as in the picture) with a self tapper - bolt & nylock would be better.
Alan