

Rekeying 928 Locks Procedure by Wayne Strutt
 03-13-2012, 01:50 AM
#16
Rennlist Member
Okay, tell me if I'm wrong with this theory. If I were to place a key into the lock barrel, and the keys stick out, couldn't you grind the teeth down to the point to where the key would turn? Wouldn't that help without having to take each key and spring out? I'm just asking, and have never taken a lock barrel out or worked with keys.
 03-13-2012, 04:28 AM
#17
Under the Lift
Lifetime Rennlist
Member
Lifetime Rennlist
Member
I only would grind the lock pins if they were SLIGHTLY high from lock and key wear. That's what I did with one car where the lock would not turn in one direction, and it ended up working fine.
https://rennlist.com/forums/928-foru...larm-lock.html
https://rennlist.com/forums/928-foru...larm-lock.html
03-13-2012, 01:53 PM
#18
Rennlist Member
Bill
I am sure you can do this and get a satisfactory result. But if the number on the pin is a 4 then when you remove the key the pin probably won't rise high enough to have any locking effect so thats why I suggested just leaving that position void of pin and spring. Besides who wants to spend time filing deburing cleaning etc when you could be driving.
I am sure you can do this and get a satisfactory result. But if the number on the pin is a 4 then when you remove the key the pin probably won't rise high enough to have any locking effect so thats why I suggested just leaving that position void of pin and spring. Besides who wants to spend time filing deburing cleaning etc when you could be driving.
03-13-2012, 02:30 PM
#19
Under the Lift
Lifetime Rennlist
Member
Lifetime Rennlist
Member
Bill
I am sure you can do this and get a satisfactory result. But if the number on the pin is a 4 then when you remove the key the pin probably won't rise high enough to have any locking effect so thats why I suggested just leaving that position void of pin and spring. Besides who wants to spend time filing deburing cleaning etc when you could be driving.
I am sure you can do this and get a satisfactory result. But if the number on the pin is a 4 then when you remove the key the pin probably won't rise high enough to have any locking effect so thats why I suggested just leaving that position void of pin and spring. Besides who wants to spend time filing deburing cleaning etc when you could be driving.
03-13-2012, 04:05 PM
#20
Three Wheelin'
..., boy o boy, they don,t come round too often, but when they do, they are certainly worth the wait ! absolutely perfect !
Ken
80 928 S
5 Speed
UK
Ken
80 928 S
5 Speed
UK
03-13-2012, 04:18 PM
#21
Rennlist Member
awesome!!
03-23-2012, 01:51 PM
#23
Racer
Join Date: Jul 2006
Location: Denver, CO
Posts: 343
Likes: 0
Received 0 Likes
on
0 Posts
Holy Sh*t... that's an incredible procedure. Nice Work! I wish I had time to do this myself, but I
actually logged on (been a while) to find the guy that does this for $$... anybody know if he's still
around? I will keep looking.
FYI, My car has different keys for driver, passenger and trunk.. very annoying!
actually logged on (been a while) to find the guy that does this for $$... anybody know if he's still
around? I will keep looking.
FYI, My car has different keys for driver, passenger and trunk.. very annoying!
05-08-2012, 10:54 PM
#25
Three Wheelin'
Thread Starter
Join Date: Sep 2007
Location: Ridgecrest, California
Posts: 1,363
Likes: 0
Received 149 Likes
on
33 Posts
Hello all,
Wayne Strutt has created an excellent addendum to his lock procedure to include the door locks. I'm posting his write up with pictures as an addition to his original post. Please feel free to comment or ask questions of Wayne on this new material.
PORSCHE 928 DOOR LOCKS
The door lock was damaged by someone attempting to gain access to my car. I ordered a used lock from 928 International. It would have to be changed internally to use my key.
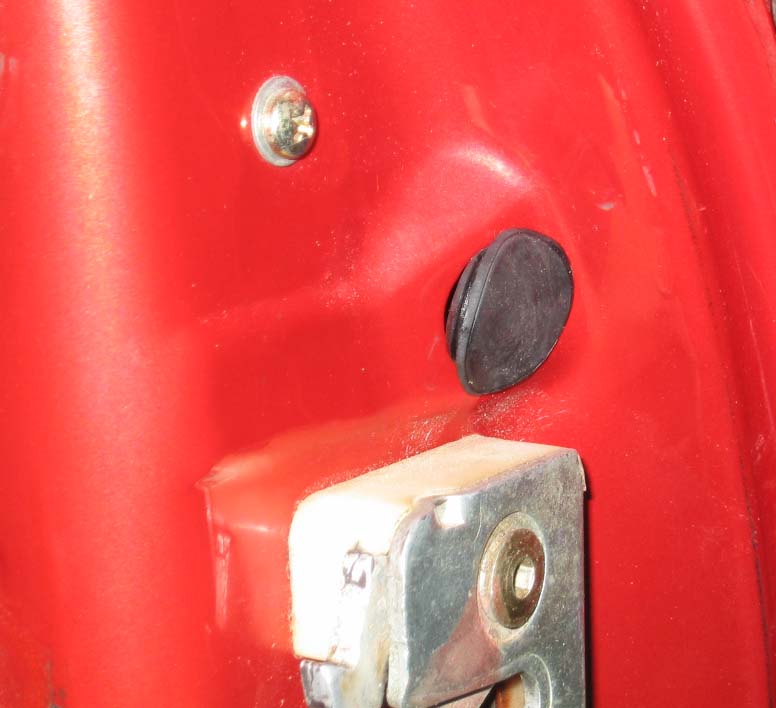
To access the door locks first open the door and remove the rubber plug just above the latch in the end panel.
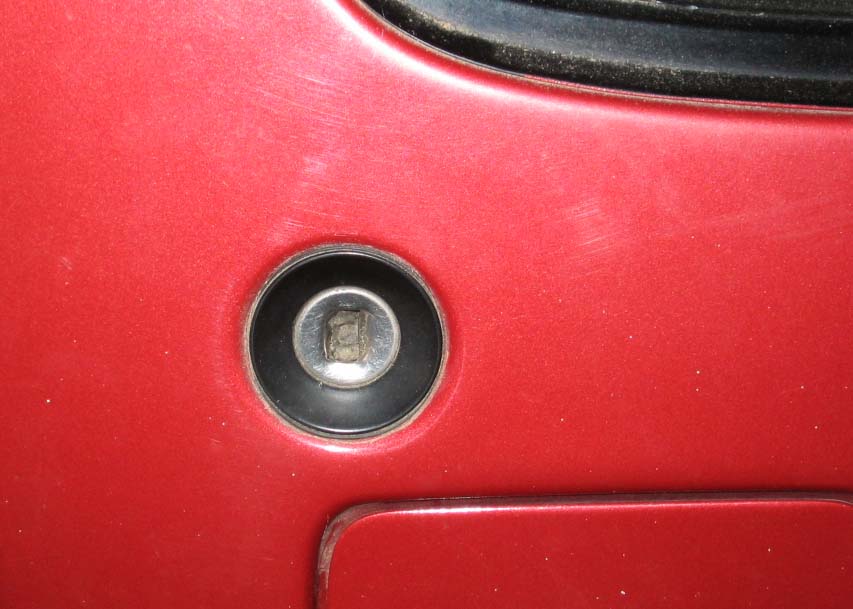
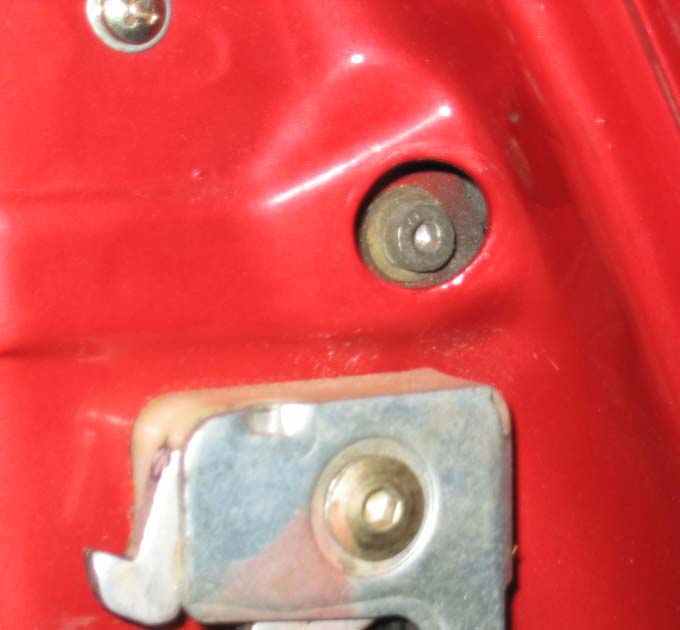
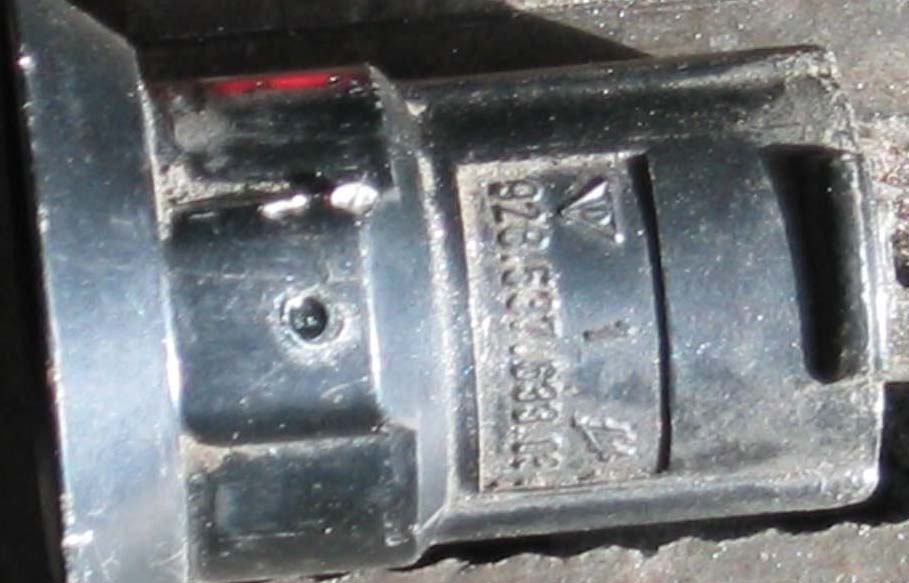
You will now see a 5mm Allen drive machine screw. Remove that screw carefully without dropping it or the 2 washers in to the door cavity or you will have to remove the inner door trim and panels to retrieve them.
Now through that hole manipulate the lock body out through the outside of the door. Be careful not to damage the now old and brittle sealing washer around the back of the lock body. (If you plan on reusing it)
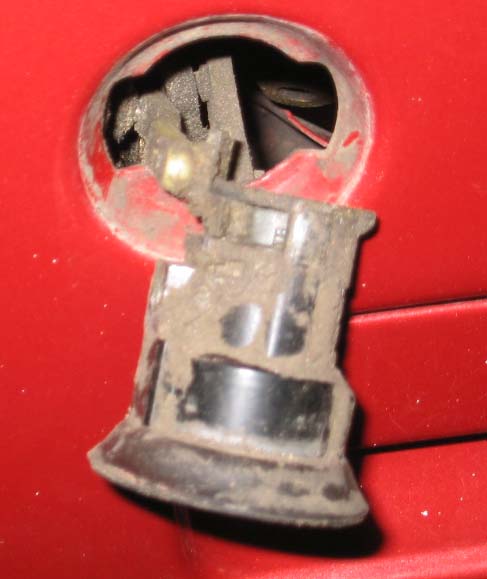
Once you can grip the lock with your fingers gently pull it out of the door far enough to facilitate removing the ball end from the socket in the lever. Tie something to the nylon lever so that it does not drop beyond reach inside the door, or you will have to remove the inside door panels to reinstall the lock. NOTE THE ACCUMULATION OF DIRT.
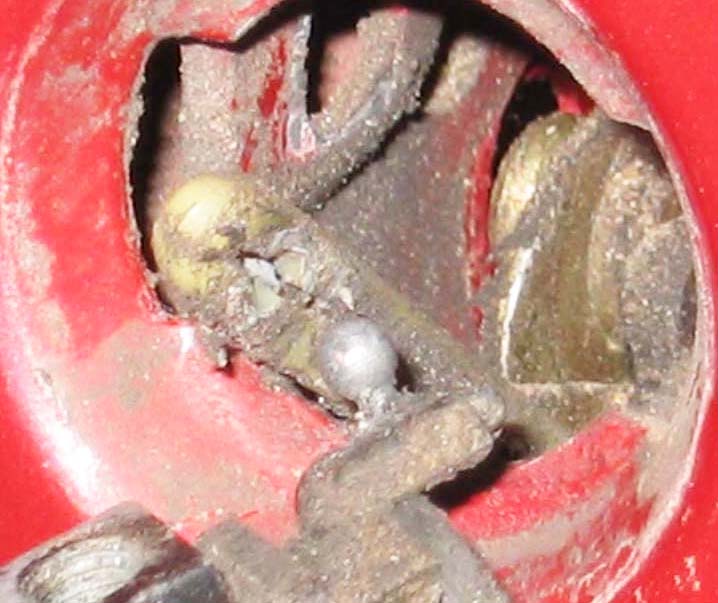
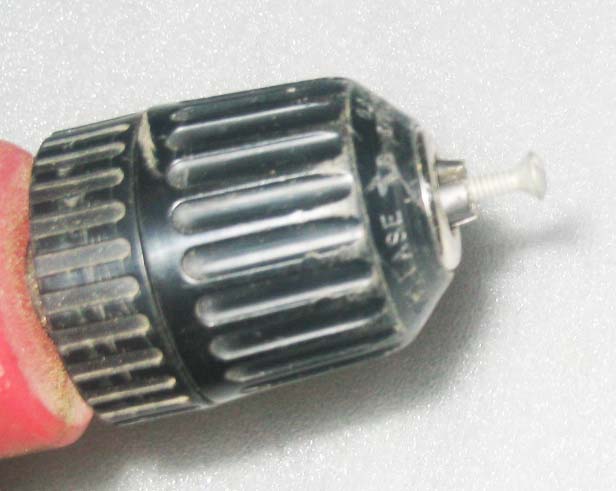
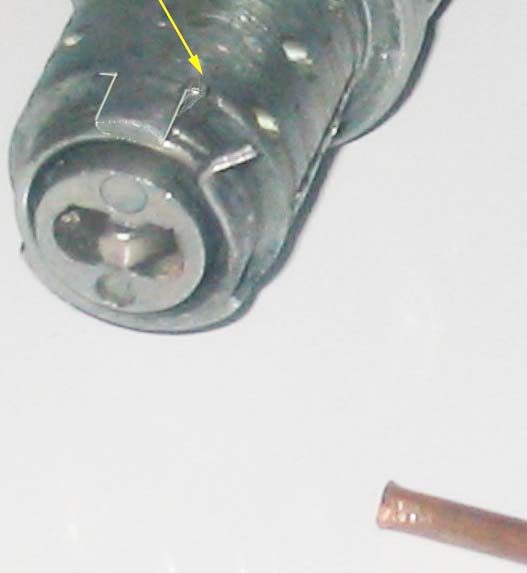
The below picture shows one of the pins that hold the core in the barrel
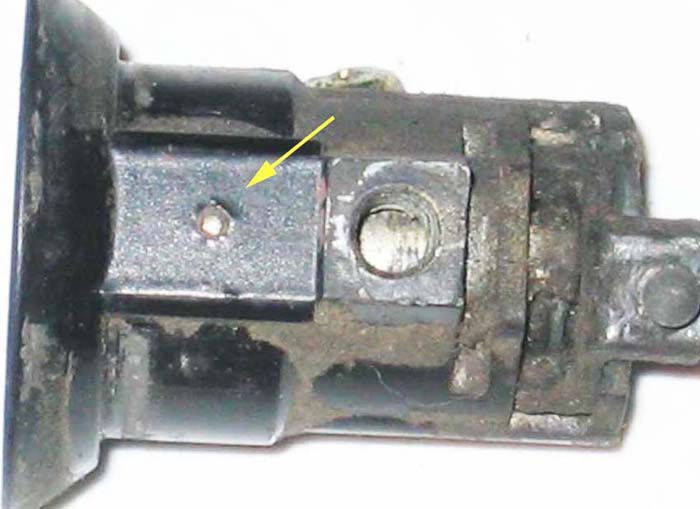
The next step is to use a spring loaded centre punch on the tiny pins in the sides of the lock body. (About a million times).
This will drive the pins down far enough to create enough of a recess to allow you to drill the pin on centre with a 1/16" drill bit. The lock body is about 3mm thick at this point but unlike the hatch lock if you hit the core you will not touch the area where the wafer pins are located, so drilling through will hurt nothing. Original pins fit through the lock housing and locate between the black arrows and rest against the shoulder of the core at the yellow arrow preventing the core from coming out of the housing
Drilling out pins
Using a diamond bit to erode the steel pin that I drilled off centre.
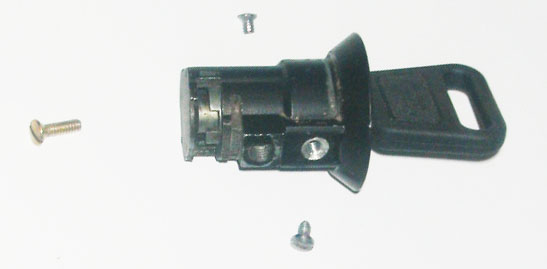
Once drilled out the core will be free to withdraw from the lock body. Keep the key in if you can as you do this. The spring on the end will be released. Don't panic this is easier to reinstall than the spring in the hatch lock. Again we have an actuator this time with a ball end that removes out the side of the lock body.
The pins that were drilled need to be replaced somehow. The internal depth of the pins is critical. The new pins when installed must be long enough to locate in the recess of the core to keep the core from coming out of the lock body but not so long as to jam the core and prevent it from rotating. Alternately you could tap the drilled holes and fabricate proper length screws that do this job. However they need to be nearly flush with the outer surface of the lock body so that they will fit through the cutout in the door. You could open the cut out in the door a bit if necessary. I drilled the body of the lock with a 1/8" bit and tapped the holes 6-32 and then using a 3/8 bit cut a bit of a recess for the screws.
Drilling counter sink recess for screws
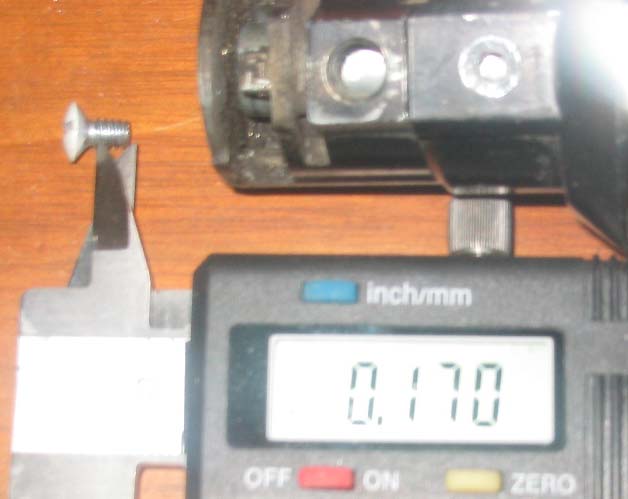
I used screws for home wall switch plates and shortened them for rotation clearance. Diameter of the screw where the thread is not needed is reduced with a file before shortening
Continued...
Wayne Strutt has created an excellent addendum to his lock procedure to include the door locks. I'm posting his write up with pictures as an addition to his original post. Please feel free to comment or ask questions of Wayne on this new material.
PORSCHE 928 DOOR LOCKS
The door lock was damaged by someone attempting to gain access to my car. I ordered a used lock from 928 International. It would have to be changed internally to use my key.
To access the door locks first open the door and remove the rubber plug just above the latch in the end panel.
You will now see a 5mm Allen drive machine screw. Remove that screw carefully without dropping it or the 2 washers in to the door cavity or you will have to remove the inner door trim and panels to retrieve them.
Now through that hole manipulate the lock body out through the outside of the door. Be careful not to damage the now old and brittle sealing washer around the back of the lock body. (If you plan on reusing it)
Once you can grip the lock with your fingers gently pull it out of the door far enough to facilitate removing the ball end from the socket in the lever. Tie something to the nylon lever so that it does not drop beyond reach inside the door, or you will have to remove the inside door panels to reinstall the lock. NOTE THE ACCUMULATION OF DIRT.
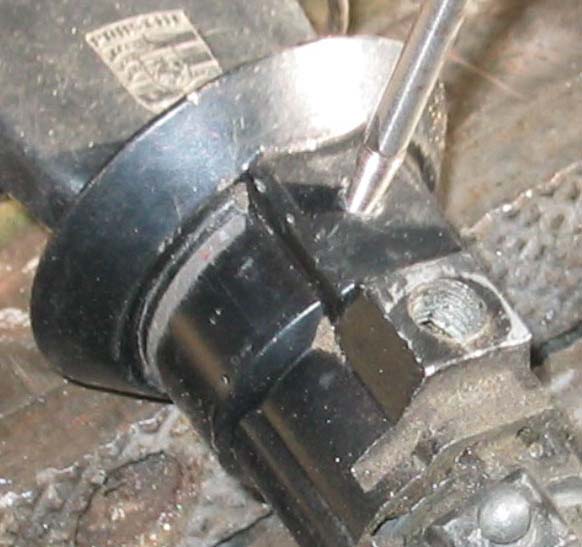
The below picture shows one of the pins that hold the core in the barrel
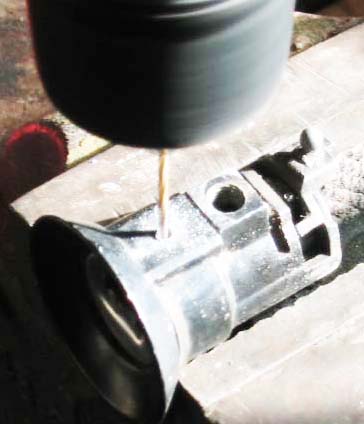
The next step is to use a spring loaded centre punch on the tiny pins in the sides of the lock body. (About a million times).
This will drive the pins down far enough to create enough of a recess to allow you to drill the pin on centre with a 1/16" drill bit. The lock body is about 3mm thick at this point but unlike the hatch lock if you hit the core you will not touch the area where the wafer pins are located, so drilling through will hurt nothing. Original pins fit through the lock housing and locate between the black arrows and rest against the shoulder of the core at the yellow arrow preventing the core from coming out of the housing
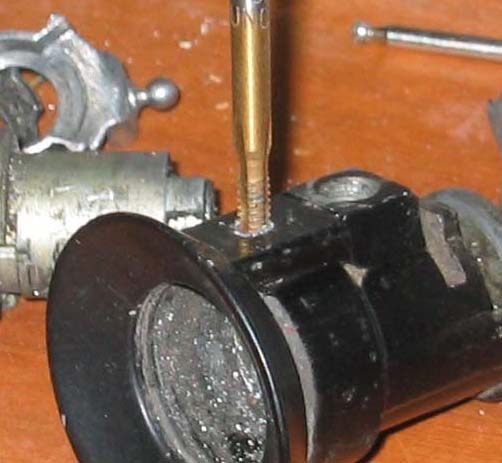
Drilling out pins
Using a diamond bit to erode the steel pin that I drilled off centre.
Once drilled out the core will be free to withdraw from the lock body. Keep the key in if you can as you do this. The spring on the end will be released. Don't panic this is easier to reinstall than the spring in the hatch lock. Again we have an actuator this time with a ball end that removes out the side of the lock body.
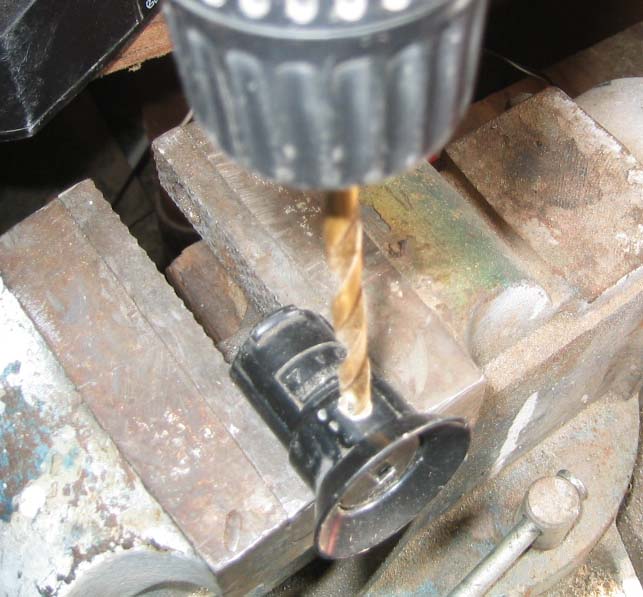
The pins that were drilled need to be replaced somehow. The internal depth of the pins is critical. The new pins when installed must be long enough to locate in the recess of the core to keep the core from coming out of the lock body but not so long as to jam the core and prevent it from rotating. Alternately you could tap the drilled holes and fabricate proper length screws that do this job. However they need to be nearly flush with the outer surface of the lock body so that they will fit through the cutout in the door. You could open the cut out in the door a bit if necessary. I drilled the body of the lock with a 1/8" bit and tapped the holes 6-32 and then using a 3/8 bit cut a bit of a recess for the screws.
Drilling counter sink recess for screws
I used screws for home wall switch plates and shortened them for rotation clearance. Diameter of the screw where the thread is not needed is reduced with a file before shortening
Continued...
05-08-2012, 11:08 PM
#26
Three Wheelin'
Thread Starter
Join Date: Sep 2007
Location: Ridgecrest, California
Posts: 1,363
Likes: 0
Received 149 Likes
on
33 Posts
You might get by using just one screw on the same side as the tapped hole that bolts the lock to the door. The barrel of the lock is thicker on the tapped hole side, so the pin or screw on that side will be longer.
Once you have this under control turn your attention to the lock core. The core is very much like the hatch core with the basic 10 pins and additional alarm pins. Follow the same procedure for rekeying as outlined previously in this write up for the hatch lock. Again record your code as before.
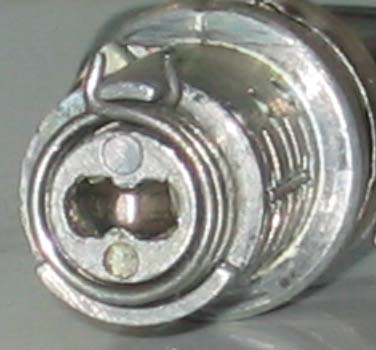
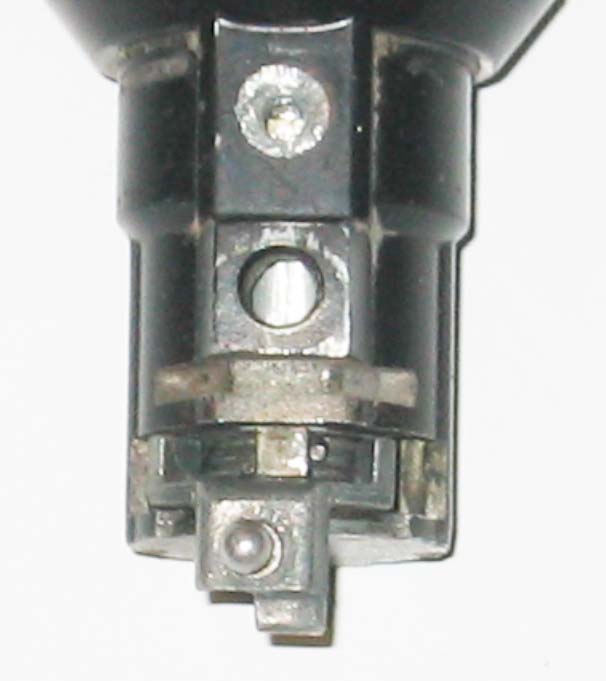
If you are rekeying to other locks that you have done use the same pins as you have already recorded in your chart. Check that you have smooth rotation. If you have an alarm lock there will be wires to unplug and the usual contact carrier as shown in the photo. Again be mindful of the fragile copper finger. Spray the pins and core with ptfe .
Once the core is rekeyed and the screws fit as needed you can begin reassembly. Apply a slight amount of lithium grease on the surface of the core. Not too much or it will just attract dirt.
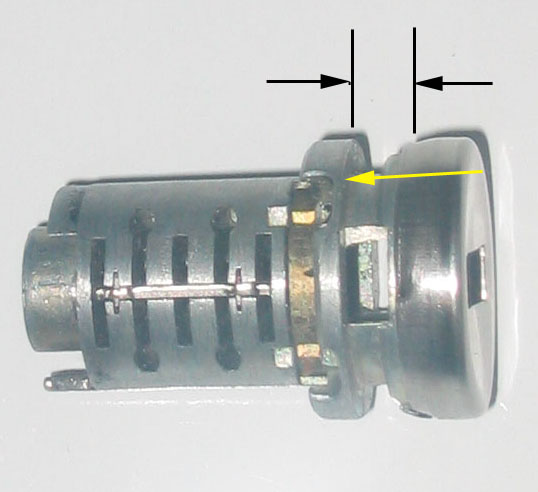
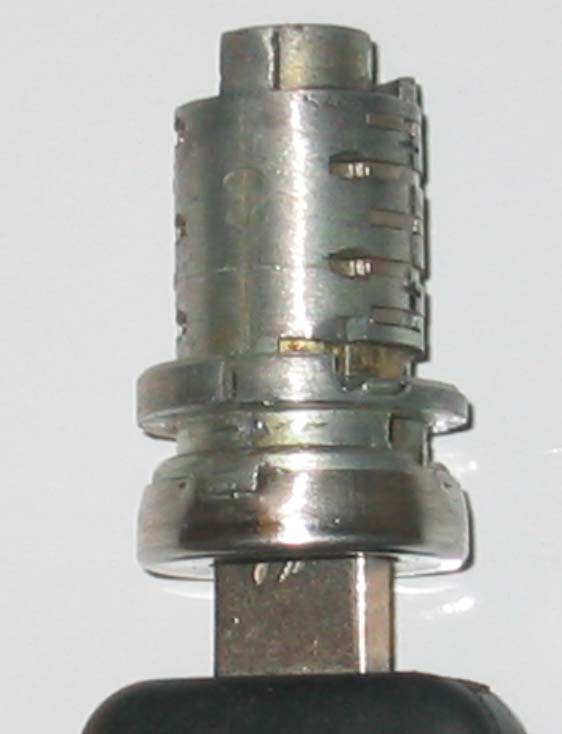
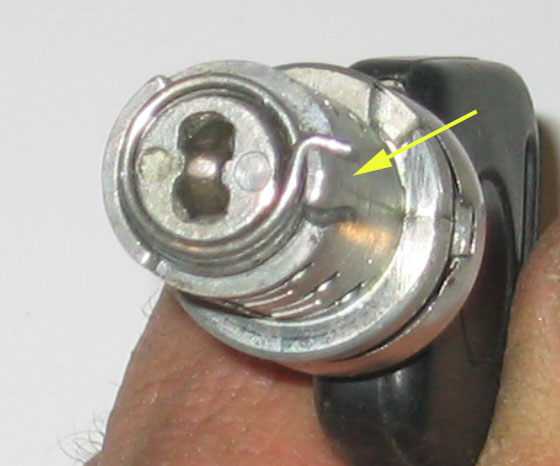
With the key removed the flat pins are pushed up by the springs to lock on to each side of the barrel ridges preventing the core from rotating. Shown in the picture below is the alarm contact of a door lock.
Once the core is rekeyed and the screws fit as needed you can begin reassembly.
Put the spring on the end of the core with one tang against the side of the small lug as shown in the picture at the yellow arrow.
Then using something suitable (I used a piece if 1/16th copper tubing) move the other tang over to the other side of the same lug.
Install the actuator with the ball end into the side of the lock body. Now align the two small lugs one on the core and one on the barrel and push the core into the barrel. The spring will automatically be in the correct position.
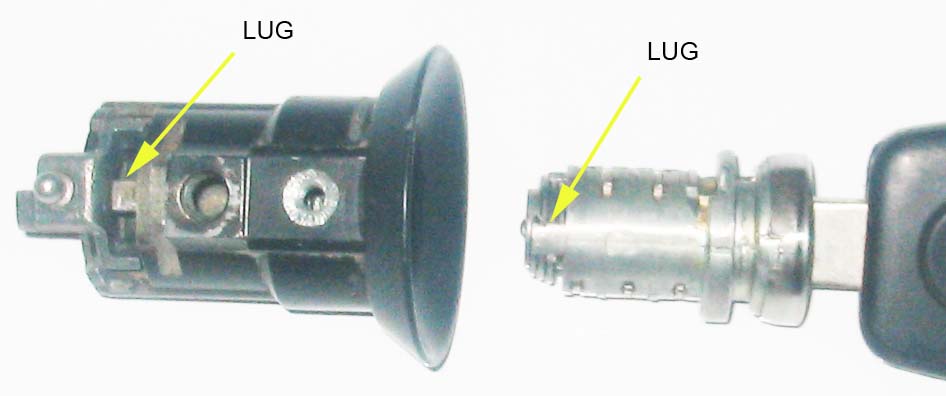
ALIGN LUGS WHEN INSTALLING CORE.
Spring installed, actuator installed, waiting for custom screws. With the screws tight turn the key left and right. It should turn smoothly and the spring should return the key to the vertical position.
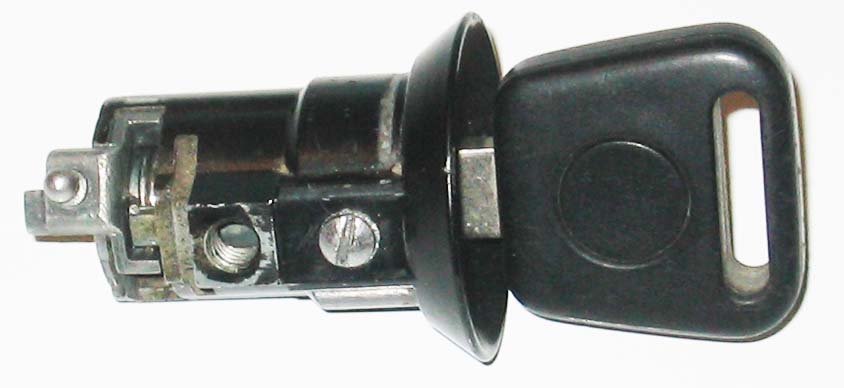
COMPLETED DOOR LOCK
If you are satisfied with the action, then unscrew the screws just enough to put some red loctite in and then tighten them. Put the gasket on the back of the lock barrel and push the ball into the socket of the lever. Install the lock into the door. Replace the 5mm socket head cap screw. Replace the access plug and you are finished.
"You don't own a Porsche 928, it owns you �.You�re just maintaining it for the next guy."
WAYNE STRUTT
Once you have this under control turn your attention to the lock core. The core is very much like the hatch core with the basic 10 pins and additional alarm pins. Follow the same procedure for rekeying as outlined previously in this write up for the hatch lock. Again record your code as before.
If you are rekeying to other locks that you have done use the same pins as you have already recorded in your chart. Check that you have smooth rotation. If you have an alarm lock there will be wires to unplug and the usual contact carrier as shown in the photo. Again be mindful of the fragile copper finger. Spray the pins and core with ptfe .
Once the core is rekeyed and the screws fit as needed you can begin reassembly. Apply a slight amount of lithium grease on the surface of the core. Not too much or it will just attract dirt.
With the key removed the flat pins are pushed up by the springs to lock on to each side of the barrel ridges preventing the core from rotating. Shown in the picture below is the alarm contact of a door lock.
Once the core is rekeyed and the screws fit as needed you can begin reassembly.
Put the spring on the end of the core with one tang against the side of the small lug as shown in the picture at the yellow arrow.
Then using something suitable (I used a piece if 1/16th copper tubing) move the other tang over to the other side of the same lug.
Install the actuator with the ball end into the side of the lock body. Now align the two small lugs one on the core and one on the barrel and push the core into the barrel. The spring will automatically be in the correct position.
ALIGN LUGS WHEN INSTALLING CORE.
Spring installed, actuator installed, waiting for custom screws. With the screws tight turn the key left and right. It should turn smoothly and the spring should return the key to the vertical position.
COMPLETED DOOR LOCK
If you are satisfied with the action, then unscrew the screws just enough to put some red loctite in and then tighten them. Put the gasket on the back of the lock barrel and push the ball into the socket of the lever. Install the lock into the door. Replace the 5mm socket head cap screw. Replace the access plug and you are finished.
"You don't own a Porsche 928, it owns you �.You�re just maintaining it for the next guy."
WAYNE STRUTT
05-09-2012, 08:18 PM
#28
Rennlist Member
I'd like to say thank you to Dwayne for helping me post this instruction. I was unable to get them uploaded here and he was very kind to take on this task.
Thank you Dwayne.
I would also like to mention that if anyone would prefer a pdf version to just email me.
Thank you Dwayne.
I would also like to mention that if anyone would prefer a pdf version to just email me.