When you click on links to various merchants on this site and make a purchase, this can result in this site earning a commission. Affiliate programs and affiliations include, but are not limited to, the eBay Partner Network.
Thanks guys.
I have the hazet socket from when I worked for VW in ontario.
I think I used it for the first head and then the Mac socket (which is new) on the passenger head.
I was useing a large round drift to shock them Greg and found that some of the inner bolts that had teflon paste on them had to be worked back n forth.
I don't know why they had the white paste on them?
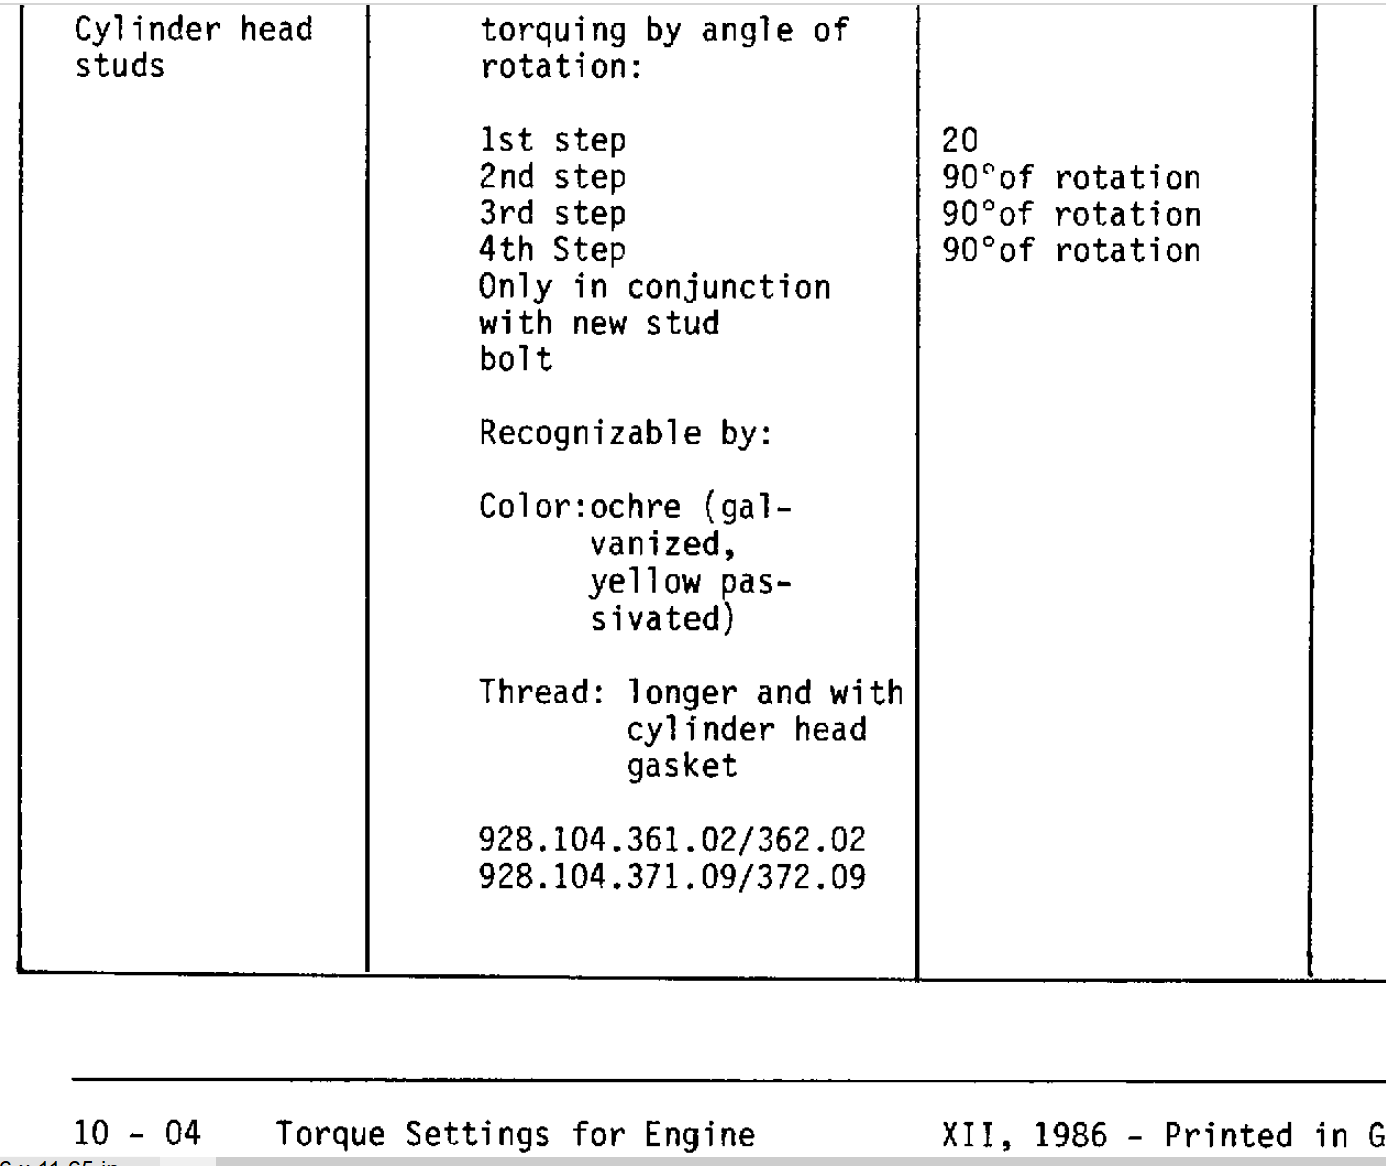
The early 32Vs have studs but the torque procedure ispretty much the same as the S4. I can't beleive the studs would need changing every time the head is off. I had mine off twice and kept the original studs. With the amount of force it takes to get the last 90, they didn't feel like they were at the yield point.
I refreshed my 1985 32V engine to address timing belt, water pump, motor mounts and did it engine out. Compression was good prior but I removed heads to inspect for corrosion while at it. Good news is there was minimal and resurfacing the heads to ensure no warpage took care of it. Reassemble and car started right up but ran rough. Compression test indicated very low (50 and 90) compression on cylinders 1 and 2.
Obviously, new head gaskets, skimmed heads, but per this thread I did not replace the head studs. I was advised that since they were already stretched to do (2) 90 degree sequences instead of 3 for new bolts. Should I have done (3) on old bolts? Can someone translate this into a torque figure? Its an 85 and has studs so I don't think I can remove this head in the car - can I? Am hoping that retorquing in place might resolve. Thoughts?
The notion that the studs have streched and therefore you should only torque them through two 90 degree rotations instead of three after the initial torque of 20 ft lbs or whatever is complete and utter nonsense and sounds as though you have found this out the hard way!
You have nothing to lose by going back in and adding the additional 90 degree sequence but do not be surprised if it does not work. Unfortunately it does not take much to etch the face of the fire ring/head surface leak path in a scenario like this and much less to damage the klingerite gasket face outboard of the fire ring [much less of a problem but not good either].
There is also another potential concern in that if and when the cylinder head corrosion process sets in the corrosion process appears to liberate hydrogen and that will pass directly through the alloy and in the case of heads with set bolts they have been demonstrated to exhibit hydrogen embrittlement - the external signs of this are when the finish coating turns from a bright finish to a blackish appearance. Were the studs blackish by any chance? If the head corrosion was minimal hopefully this scenario has not happened.
If this happens to stud bolts the good news is it would be much less of a problem in that the problem can easily be reversed by removing them and baking them in an oven for an hour or so at about 200C to expunge the hydrogen. With set bolts the problem is compounded in that if they have embrittled and the set bolt is undone in that condition, there is a good chance it will initiate micro cracking at the base of the bolt head thus why replacing them in a corroded head scenario is a much sounder option.
Fred - thank you! I do not recall any unusual "blackish" color. I was pleased to see comments saying the studs did not need replacement, not so much because of the cost per stud, but because I was worried about removing steel studs from an aluminum block - and having threads strip.
You seem very knowledgeable on this topic - why can these studs not be torqued to a "value" like other studs and bolts - why do they require this 90 degree sequence approach? Is not the point to ensure "tightness" and can this not be achieved with a torque spec? I suspect you are correct on the gasket being etched but I will try it first in car as I can tighten it there. However, if the gasket has been damaged and I cannot get compression, I think I have to pull the engine to do so. Any experience on an '85?
The sequence specified by Porsche is intended to ensure the correct bolt tension is achieved every time . A torque specification is inferential and in most cases it is adequate because the bolt will do its desired job over a wide range of stresses. In the case of head bolting the system has to seal with the engine in both the hot and cold conditions over a potential temperature range of minus 30C to 100C and given that the aluminium alloy has a coefficient of thermal expansion twice that of carbon steel getting that to work is not as easy as it may seem . A torque wrench can easily be out of calibration and the condition of the bolt and block interface can vary the resulting stresses quite significantly. Not sure of the figures but greasing the threads of a bolt and applying a constant torque can increase the stress in the bolt by up to 60% over what it would be on a dry bolt interface
As I understand 928 engines with studs have to be removed to get the heads. I believe it is also fair to say that you can tighten the bolts some more with the engine in-situ.
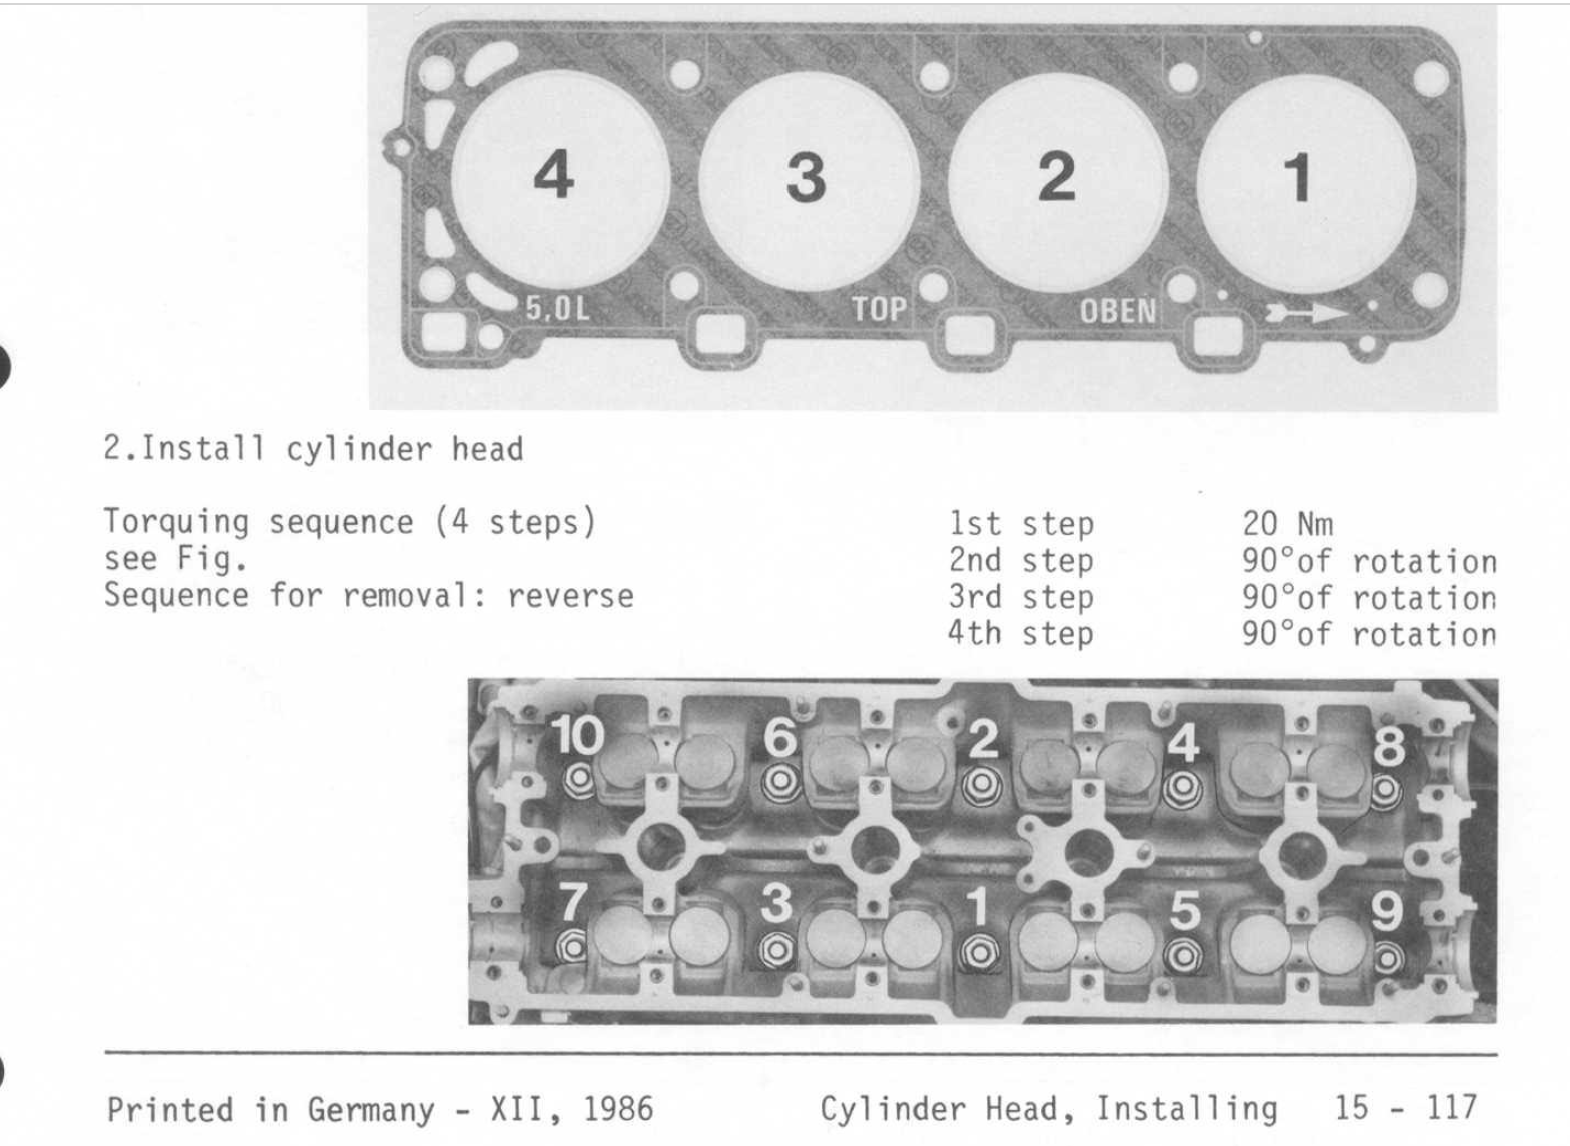
I replaced the head gaskets and skimmed the heads on my 1985 32V 928, and reused the existing studs. After complete - have great compression on all cylinders except 1 and 2 - 50PSI and 90 PSI respectively. The Porsche WSM says to torque the head as follows:
I followed these instructions, except I was advised by a 928 mechanic not to do the fourth sequence if reusing the old studs. I followed this advice. In an entirely different part of the WSM I find this advice with no further explanation:
So which one is it? Is it safe to do another 90 degree sequence on a used head stud? I did not replace my head studs because I feared removing 40 year old steel studs from an aluminum block and the risk of thread problems. Now the engine is back in car, and with new gaskets, carefully skimmed heads, inspected block - I have low compression on 2 cylinders after skipping the last 90 degree sequence
first do the 20 NM then the first 90degrees,
set the torque wrench to 75 ft lbs then do the second 90 you should be very close to hearing the wrench click.
I believe if you do that last 3rd 90 degree,
you will stretch the stud past its breaking point or pull it out of the block.
For the low compression you might have a bent valve or a warped block and a leak down test will confirm that.
NOTE if the engine was ever overheated then the chance is possible that the block could be warped.
NOTE this engine should be set to 45BTDC so when the belt is removed the cam cant snap a valve into a piston.
Did you check the deck for flatness?
I know its a bit difficult with the studs in the way.
IIRC there was similar thread about someone else torquing the nuts to 3 x 90 ,
and pulling out a stud from probably 7 to 10 years ago.
Greg Brown was also involved in that discussion.
NOTE most heads that have these size bolts get torqued to 75 to 85 ft lbs,
so you should be very close to the that after the second 90.
At any rate dont tighten the bolts until you have done a leak down test to find out where the cylinder is leaking from.
Finally - just do what the workshop manual recommends!
DO NOT do it the way the WSM recommends!
Do it the way Stan has suggested above, or use the method Colin has suggested in the past.
Both of these guys will also tell you to let the engine sit for a bit after the final sequence, then back off the torque & re-torque to completion. This compensates whatever amount the new gasket is compressed.


 02-07-2011 | 11:25 AM