
How to repair a broken comb flap actuator arm?
 01-28-2011, 08:49 PM
#16
Rennlist Member
Thanks.
You have clearly entered what we consider the nether-regions of the 928.
Like climbing Everest.
Be safe in there.
Godspeed.
(And take photos.)
You have clearly entered what we consider the nether-regions of the 928.
Like climbing Everest.
Be safe in there.
Godspeed.
(And take photos.)
 01-28-2011, 11:32 PM
#17
Nordschleife Master
Thread Starter
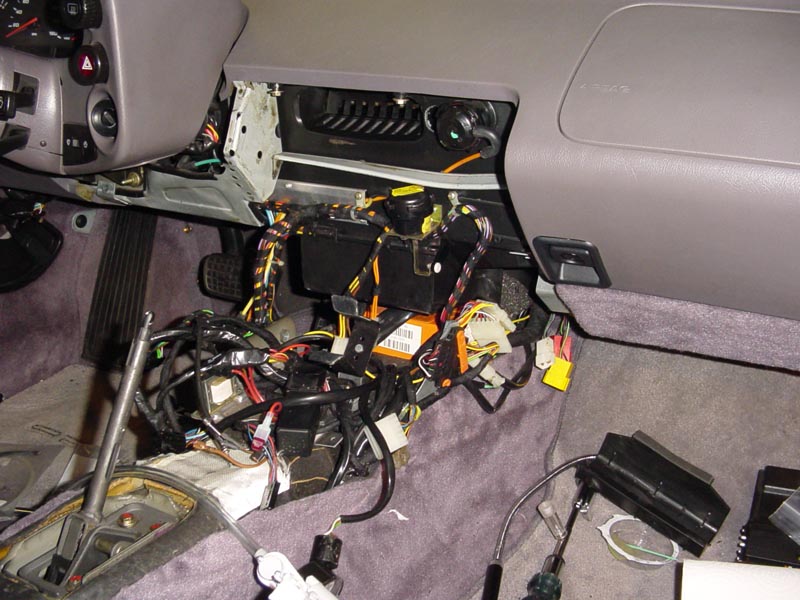
Ok - just spent 30 mins after lunch poking around and examining it all..
Firstly, the differences between LHD and RHD are actually fewer than I expected. Here's a picture of my RHD one, and a picture from Nicole's thread of a LHD one. They actually use the same part, and its just finished differently for installation by drilling the holes and riveting the actuators in different places.
RHD:

LHD: (thanks Nicole)
The defrost actuator and comb flap ones swap sides, but the footwell one is in the same place.
OK - some more on getting the front off.
There's 8 of these clips:

Pop them off with a screwdriver. Here's what one looks like on its own:

Two of them are hiding under the footwell flap box - which is actually separate and clipped onto the main heater box. Undo the two clips - I used a screwdriver, and pull it down a little.

Inside there, on the base of the main part of the box, are two more of the same clips:

You can't easily remove the lower footwell flap box - its held very firmly in place by the drain tube, to which its zip-tied. If I removed the cruise brain I may be able to take it off, but I don't think its needed. This pc shows the tube, and the blurry box underneath is the cruise brain.

The last gotcha taking the front off the box is there are two very small brass clips on each of the top corners. You can just push them to one side with a small screwdriver.

OK - almost ready to pull the front off the box. You just need to remove the two inner screws on the top demister vents.

Then pull the vents up slightly to disengage where they sit in the heater box outlet, and you're free to hinge the front of the heater box upwards from the base until the top outlets clear.
The front cover will not however be free yet - you need to disconnect the vacuum actuators from their vacuum lines, and also the demister flap, to be able to remove the front of the box. Next post--->
Firstly, the differences between LHD and RHD are actually fewer than I expected. Here's a picture of my RHD one, and a picture from Nicole's thread of a LHD one. They actually use the same part, and its just finished differently for installation by drilling the holes and riveting the actuators in different places.
RHD:
LHD: (thanks Nicole)
The defrost actuator and comb flap ones swap sides, but the footwell one is in the same place.
OK - some more on getting the front off.
There's 8 of these clips:
Pop them off with a screwdriver. Here's what one looks like on its own:
Two of them are hiding under the footwell flap box - which is actually separate and clipped onto the main heater box. Undo the two clips - I used a screwdriver, and pull it down a little.
Inside there, on the base of the main part of the box, are two more of the same clips:
You can't easily remove the lower footwell flap box - its held very firmly in place by the drain tube, to which its zip-tied. If I removed the cruise brain I may be able to take it off, but I don't think its needed. This pc shows the tube, and the blurry box underneath is the cruise brain.
The last gotcha taking the front off the box is there are two very small brass clips on each of the top corners. You can just push them to one side with a small screwdriver.
OK - almost ready to pull the front off the box. You just need to remove the two inner screws on the top demister vents.
Then pull the vents up slightly to disengage where they sit in the heater box outlet, and you're free to hinge the front of the heater box upwards from the base until the top outlets clear.
The front cover will not however be free yet - you need to disconnect the vacuum actuators from their vacuum lines, and also the demister flap, to be able to remove the front of the box. Next post--->
01-28-2011, 11:32 PM
#18
Nordschleife Master
Thread Starter
OK - to have the front cover be free, you just need to disconnect the vacuum actuators and lines.
First pry the demister actuator arm off the flap gently with a screwdriver. Sorry about the pic - might see if I have a better one somewhere.

Then disconnect the green line off the vacuum actuator, and unscrew the cover plate that holds the vacuum lines in place (RHD has this on the other side).

Disconnect the orange line off the comb flap actuator (not needed in this case as mine's already partly disassembled)

Then disconnect the yellow line for the footwell actuator, and gently pry the arm off the flap with a screwdriver (mine is broken - needs a new rivet).

OK - now you can finally pull the front away, and here's what you'll see.. the whole heater core.

And the inside of the front cover:

So.. I put the front cover on the bench, and had a look. You can see the plastic molding includes the places for LHD comb flap actuator. The factory or manufacturer just drilled and riveted the actuator on the other side, and riveted the demister actuator on the opposite side.

So turning the box over, the inside is pretty simple:
So turning the box over

And here's what I'm chasing.. the damn broken comb flap where the actuator attaches to it.

And on the other end of the flap - the LHD attachment point. This explains why its a 928 part number - its the same flap. Sadly it can't just be flipped over.

Ok - I've got to pop out to the shops with family, so I'll leave the voyeur shots of the various flaps, motor, foam etc. for a later post. And will try for a repair of the flap too. If the repair doesn't go well I'll just pick up a LHD heater box cheaply for the part (we get a fair few parts cars from Japan, so LHD heater boxes are fairly easy to come by locally).
It doesn't look like the heater core can be removed without taking the whole box out of the firewall. I can't investigate that any further as my heater core is full of coolant
First pry the demister actuator arm off the flap gently with a screwdriver. Sorry about the pic - might see if I have a better one somewhere.
Then disconnect the green line off the vacuum actuator, and unscrew the cover plate that holds the vacuum lines in place (RHD has this on the other side).
Disconnect the orange line off the comb flap actuator (not needed in this case as mine's already partly disassembled)
Then disconnect the yellow line for the footwell actuator, and gently pry the arm off the flap with a screwdriver (mine is broken - needs a new rivet).
OK - now you can finally pull the front away, and here's what you'll see.. the whole heater core.
And the inside of the front cover:
So.. I put the front cover on the bench, and had a look. You can see the plastic molding includes the places for LHD comb flap actuator. The factory or manufacturer just drilled and riveted the actuator on the other side, and riveted the demister actuator on the opposite side.
So turning the box over, the inside is pretty simple:
So turning the box over
And here's what I'm chasing.. the damn broken comb flap where the actuator attaches to it.
And on the other end of the flap - the LHD attachment point. This explains why its a 928 part number - its the same flap. Sadly it can't just be flipped over.
Ok - I've got to pop out to the shops with family, so I'll leave the voyeur shots of the various flaps, motor, foam etc. for a later post. And will try for a repair of the flap too. If the repair doesn't go well I'll just pick up a LHD heater box cheaply for the part (we get a fair few parts cars from Japan, so LHD heater boxes are fairly easy to come by locally).
It doesn't look like the heater core can be removed without taking the whole box out of the firewall. I can't investigate that any further as my heater core is full of coolant
Last edited by Hilton; 01-28-2011 at 11:51 PM.
01-28-2011, 11:44 PM
#19
Team Owner
Wow Hilton this is great that your posting all of this,
I for one have never had to go this far. you rock!
I for one have never had to go this far. you rock!
01-29-2011, 07:43 AM
#20
Nordschleife Master
Thread Starter
Ok.. done for the night, all the repairs are made - epoxy is curing for reassembly tomorrow.
So.. on with the internals of the box.
First, a recap of the actuators.
There's an electric stepper motor which adjusts the temperature mixer flap.
There's a vacuum actuator for each of:
The temperature mixer motor is on the driver's side of the heater box, beneath and forward of the demister actuator. It moves a large flap that sits directly behind the heater core, and either blocks it off (i.e. no heat), or opens the flap to allow air through the heater.
The temperature flap has foam all over it - its not reachable to replace without removing the heater core - something I'm not tackling as I don't want to cause leaks where there are none
Here's the motor:

The comb flap is the one shaped like, well, a comb .
.
Seen clearly in the picture here, it sits right behind the center air vent in the dash, and controls the flow of mixed (warm) and unmixed (outside or cabin temperature air), by occluding the center vent and thus directing more or less air to the other flaps.
When the center vent is open, air is also directed through the cabin from the door vents - these are fed by the rectangular openings shown in the picture below. This picture shows the passenger side - other side is the same. Air passes through the 90-degree elbow and goes out the large round ports on the side of the heater box.

Also visible in the picture above, is one of the demister flaps - on the top of the passenger door feed vent. Here's a shot of it open to make it clearer:

The other side is the same - both flaps are lifted by a single rod attached to the demister actuator on the side of the heater box. When the actuator pulls the lever towards it (i.e. vacuum is applied), it opens the flaps and air is directed upwards through the vents on the dash and onto the windscreen.
Here's both demister flaps open:

The last actuator in the heater box is the footwell flap actuator. This gets a few photos because it joins two separate boxes.
First a picture of it as it sits in its own box at the base of the heater box. This is the closed position, so no air goes down into the vents that direct air to the footwells (where the drip drain is).

When it opens, you can see into the area beneath the main heater box that feeds the footwell.

Here it is on the heater box side in the default closed position:

Here I'm pushing the arm inwards , emulating vacuum - it lifts the flap open, and directs air out the bottom of the main part of the heater box.

That about covers the internals of it - its actually pretty straightforward.
So.. on with the internals of the box.
First, a recap of the actuators.
There's an electric stepper motor which adjusts the temperature mixer flap.
There's a vacuum actuator for each of:
- Comb Flap
- Footwell flap
- Windscreen demister flaps
- Recirculation flap (this is actually in the box above the passenger footwell - but its one of the coloured lines, so gets an honourable mention)
The temperature mixer motor is on the driver's side of the heater box, beneath and forward of the demister actuator. It moves a large flap that sits directly behind the heater core, and either blocks it off (i.e. no heat), or opens the flap to allow air through the heater.
The temperature flap has foam all over it - its not reachable to replace without removing the heater core - something I'm not tackling as I don't want to cause leaks where there are none
Here's the motor:
The comb flap is the one shaped like, well, a comb
.Seen clearly in the picture here, it sits right behind the center air vent in the dash, and controls the flow of mixed (warm) and unmixed (outside or cabin temperature air), by occluding the center vent and thus directing more or less air to the other flaps.
When the center vent is open, air is also directed through the cabin from the door vents - these are fed by the rectangular openings shown in the picture below. This picture shows the passenger side - other side is the same. Air passes through the 90-degree elbow and goes out the large round ports on the side of the heater box.
Also visible in the picture above, is one of the demister flaps - on the top of the passenger door feed vent. Here's a shot of it open to make it clearer:
The other side is the same - both flaps are lifted by a single rod attached to the demister actuator on the side of the heater box. When the actuator pulls the lever towards it (i.e. vacuum is applied), it opens the flaps and air is directed upwards through the vents on the dash and onto the windscreen.
Here's both demister flaps open:
The last actuator in the heater box is the footwell flap actuator. This gets a few photos because it joins two separate boxes.
First a picture of it as it sits in its own box at the base of the heater box. This is the closed position, so no air goes down into the vents that direct air to the footwells (where the drip drain is).
When it opens, you can see into the area beneath the main heater box that feeds the footwell.
Here it is on the heater box side in the default closed position:
Here I'm pushing the arm inwards , emulating vacuum - it lifts the flap open, and directs air out the bottom of the main part of the heater box.
That about covers the internals of it - its actually pretty straightforward.
01-29-2011, 07:44 AM
#21
Nordschleife Master
Thread Starter
So.. a reminder why I even started this expedition..
The orange vacuum line wasn't holding vacuum. Here's the culprit:

And when I tried to remove the arm the usual way without opening the heater box, I found that it was broken.. like this
So, next step in the repair, after the opening gambit of:
eek! we do this for fun??!? be right back

Anyway.. the next step is to drill out the two rivets holding the comb flap to the heater box front.. 4mm drill bit, and 2 mins, and its done. Head pops off, and I just push the rivets out.

After looking carefully at the pieces - looks like the best way is going to be to use a bracket to strengthen the join, and provide a backup in case the epoxy fails, so the flap remains functional and I don't ever have to face these demons again.
I used some 0.5mm thick aluminium sheet to make a small bracket, and drilled a couple of 2.5mm holes in it to accept some 3/32 rivets. The holes are big enough that there's a little room for expansion without just cracking the plastic

Then roughen the outer surface of the bracket, and also the plastic pieces. Then clean the plastic with some wax and grease remover, and spread a good amount of epoxy on the back of the bracket.
Getting the holes in the right place took some effort - I had to get Cherie to come draw marks while I held it all together.

And here's the back side - where you can see the head of one of the rivets in this shot, I filled in around the rivet with more epoxy after this shot.

So the comb flap is sitting downstairs curing.. and I'm confident the repair will hold up.
I also mentioned I found the footwell flap was disconnected from the actuator.. a closer examination showed the rivet had failed.

I took the actuator apart to drill out the rivet in it - it looks like a 3/32 rivet (measures 2.4mm), and certainly the hole in the arm is too small for a 1/8 rivet.
One important gotcha here - beware!! You have to put the actuator together and rivet the arm onto it with the diaphragm installed, as the J shape of the arm will not fit through the actuator housing while its all assembled!!
Here's the various bits:

Oh, and I replaced the foam on the footwell flap with some open-cell weatherstip foam. The original stuff had mostly fallen off.

Anyway - tomorrow night its all "reassembly is the reverse of disassembly", oh, and actually replacing the comb flap diaphragm with the new one I have somewhere here. I probably won't get the whole interior back together for a couple of days - but my plan is to reinstall everything except the pod tomorrow (I need to do some instrument cluster work.. for which Dwayne did an excellent writeup! Thanks Dwayne)
Oh - and thanks all for the encouragement. 928 owners are a special breed, and its good to have some motivation with this stuff, so it gets done at a decent rate instead of dragging out.
The orange vacuum line wasn't holding vacuum. Here's the culprit:
And when I tried to remove the arm the usual way without opening the heater box, I found that it was broken.. like this
So, next step in the repair, after the opening gambit of:
- remove console
- remove glovebox
- remove pod
- remove dashboard
- take apart heater box
eek! we do this for fun??!?
be right back Anyway.. the next step is to drill out the two rivets holding the comb flap to the heater box front.. 4mm drill bit, and 2 mins, and its done. Head pops off, and I just push the rivets out.
After looking carefully at the pieces - looks like the best way is going to be to use a bracket to strengthen the join, and provide a backup in case the epoxy fails, so the flap remains functional and I don't ever have to face these demons again.
I used some 0.5mm thick aluminium sheet to make a small bracket, and drilled a couple of 2.5mm holes in it to accept some 3/32 rivets. The holes are big enough that there's a little room for expansion without just cracking the plastic
Then roughen the outer surface of the bracket, and also the plastic pieces. Then clean the plastic with some wax and grease remover, and spread a good amount of epoxy on the back of the bracket.
Getting the holes in the right place took some effort - I had to get Cherie to come draw marks while I held it all together.
And here's the back side - where you can see the head of one of the rivets in this shot, I filled in around the rivet with more epoxy after this shot.
So the comb flap is sitting downstairs curing.. and I'm confident the repair will hold up.
I also mentioned I found the footwell flap was disconnected from the actuator.. a closer examination showed the rivet had failed.
I took the actuator apart to drill out the rivet in it - it looks like a 3/32 rivet (measures 2.4mm), and certainly the hole in the arm is too small for a 1/8 rivet.
One important gotcha here - beware!! You have to put the actuator together and rivet the arm onto it with the diaphragm installed, as the J shape of the arm will not fit through the actuator housing while its all assembled!!
Here's the various bits:
Oh, and I replaced the foam on the footwell flap with some open-cell weatherstip foam. The original stuff had mostly fallen off.
Anyway - tomorrow night its all "reassembly is the reverse of disassembly", oh, and actually replacing the comb flap diaphragm with the new one I have somewhere here. I probably won't get the whole interior back together for a couple of days - but my plan is to reinstall everything except the pod tomorrow (I need to do some instrument cluster work.. for which Dwayne did an excellent writeup! Thanks Dwayne
)Oh - and thanks all for the encouragement. 928 owners are a special breed, and its good to have some motivation with this stuff, so it gets done at a decent rate instead of dragging out.
Last edited by Hilton; 01-29-2011 at 08:11 AM.
01-29-2011, 08:16 AM
#22
Nordschleife Master
Thread Starter
One question for the brains trust to answer while I sleep - I've taken apart all the actuators in the heater box so that when I cleaned the box, the springs didn't get wet and rust inside them.
What should I use on the original rubber diaphragms when reassembling?
They have what looks like talc on them. Clean them up and apply more talcum powder? Or clean them up and cover with Dow 111 lube? Or synthetic rubber grease, or something else?
What should I use on the original rubber diaphragms when reassembling?
They have what looks like talc on them. Clean them up and apply more talcum powder? Or clean them up and cover with Dow 111 lube? Or synthetic rubber grease, or something else?
03-19-2011, 10:40 PM
#24
Rennlist Member
bump - anyone know the answer to Hilton's last question? Doing this job right now on my old 86.5 (owned by a friend).
PS - Hilton - this is an awesome write up - very Dwayne-esque
PS - Hilton - this is an awesome write up - very Dwayne-esque
03-20-2011, 03:01 AM
#25
Nordschleife Master
Thread Starter
Ed, I decided after looking at the new parts in their bag, and the ones that came out to install them dry.
I didn't want to put anything in there that might damage the rubber (i.e. mineral-based grease), or anything which might abrade the rubber (talc or dry lubricant).
The only other alternative I considered (read: had on the shelf) was using some dow-111, but it's too thick and I didn't want bits of the diaphragm sticking to itself.
oh - the repair worked, hvac vacuum system and temperature controls all work now, except the AC needs to be gone through and converted to r134a as its still got bits in for R12 (which is both illegal and unobtainable in Australia). I'm about to pull that car apart for intake refresh and TBWP and will deal with flushing the AC, new o-rings etc. while its apart and access is good.
03-20-2011, 09:35 AM
#26
Rennlist Member
Great writeup, goes into the RL928 Shop Manual! And timely, as I have to deal with this this summer, along with other dash issues. Among other things, I think I can see why my footwell heat doesn't work. Many thanks, Hilton!
03-20-2011, 09:49 AM
#27
Rennlist Member
Thank you Hilton!
03-20-2011, 10:40 AM
#28
Three Wheelin'
Great writeup & very timely for me!!! My comb actuator won't hold vacation & further investigation turned up broken hinge on comb flap. I didn't get a real answer to this fix When I asked here last Fall. Now I know why. "Where no man has gone before". Thanks again.
07-14-2011, 09:38 PM
#30
Rennlist Member
Hilton,
Beautiful stuff! Hope I never have to go this far.
Question - I have the pod off for ignition switch replacement (intermittent starting). I can see one actuator on the RHS of the heater case - looks like the green line one in your pics - is this the centre comb unit ?
I dont have any problems with HVAC at the moment, but I have an attack of the WYAIT. Are there any other things I should look at replacing now its apart ?
thanks.
jp 83 Euro S AT 53k.