
Frayed cable - How do I fix this? (Fixed!)
 05-18-2010, 11:38 PM
#16
Rennlist Member
Thread Starter
So here is what I did to fix this.
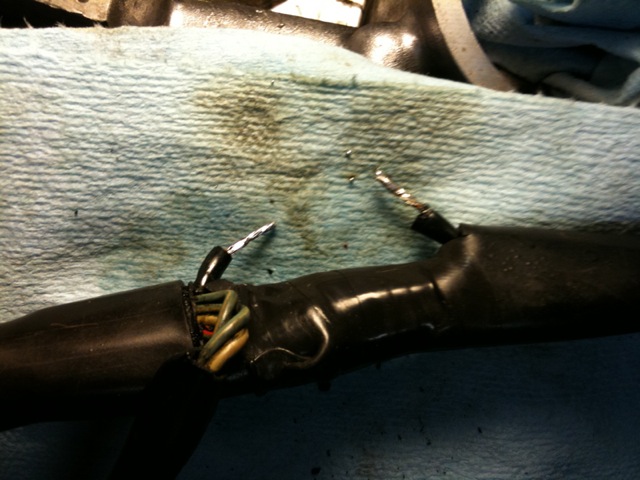
Here is a better close up of what we're dealing with.
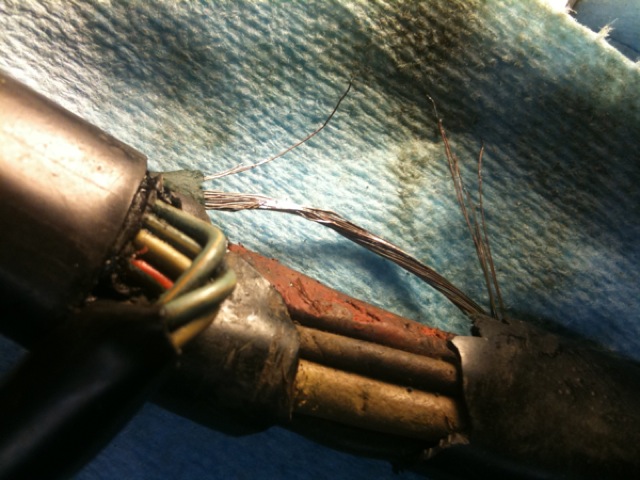
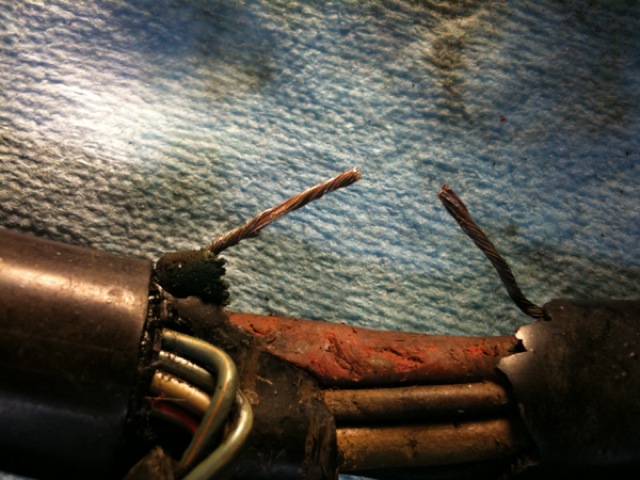
With multiple broken strands and really weak insulation I decided to cut the wire in the middle so I could dress each end and beef up the insulation. Cutting the wire allowed me to catch all the broken strands and twist them together.
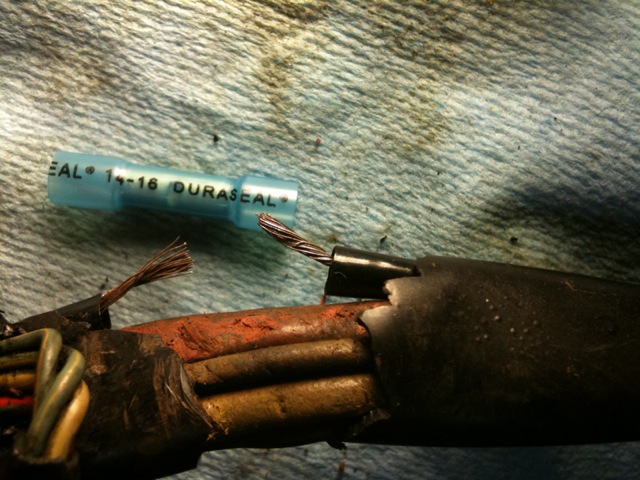
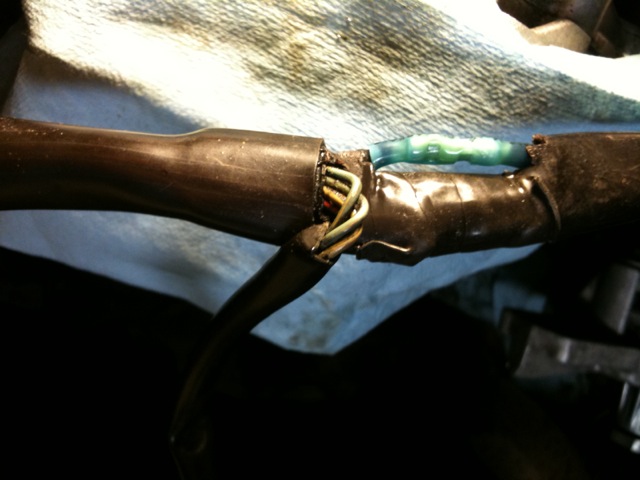
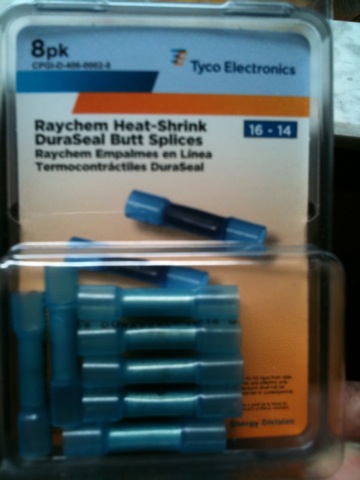
Then I cut some 1" lengths of heat shrinkable tubing and push them over the existing insulation. Also shown is the heat shrinkable crimp that I'm going to use.
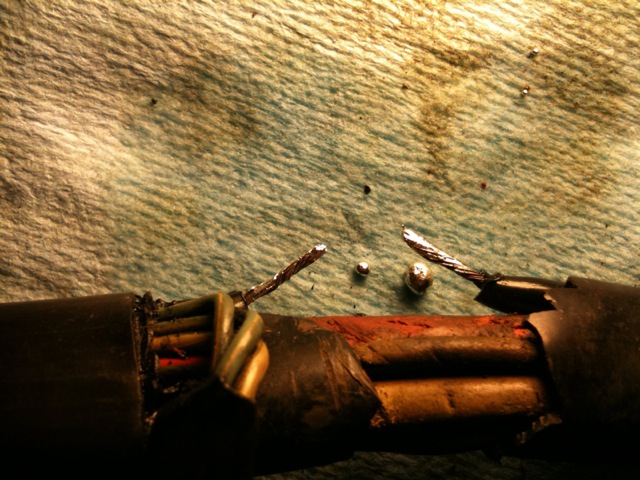
Then I soldered the ends to give them some structure.
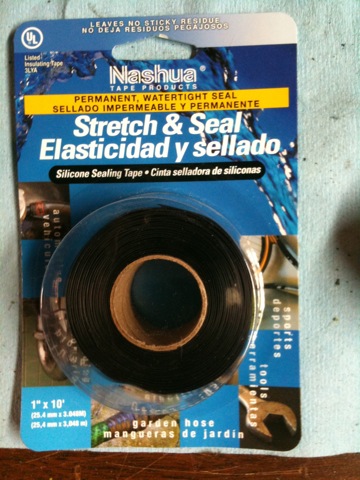
Here is the tape that I used. It's a self-vulcanizing silicone tape that sticks to itself and forms a waterproof and electrically insulated seal. I found this in HomeDepot in the plumbing department. I told them they should stock this in electrical also.
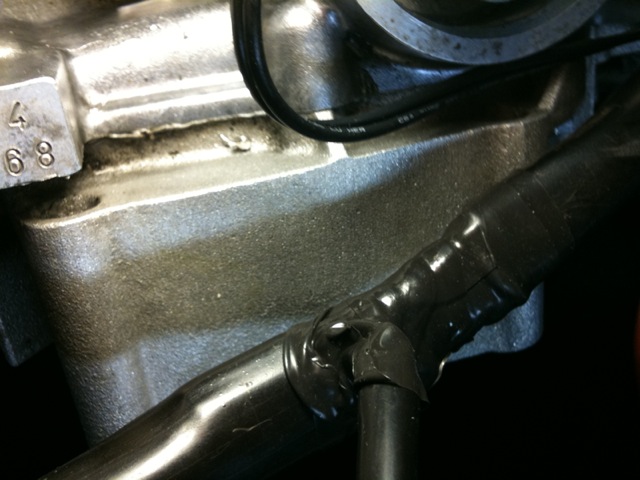
First, I wrapped all the other wires.
Then I applied the heat shrinkable crimp, crimped it on both ends and then heated with a heat gun on high. The heat shrinkable tubing and crimp shrink together and form a tight bond.
Then I finished it by wrapping the entire cable and crimp together.
Here is a better close up of what we're dealing with.
With multiple broken strands and really weak insulation I decided to cut the wire in the middle so I could dress each end and beef up the insulation. Cutting the wire allowed me to catch all the broken strands and twist them together.
Then I cut some 1" lengths of heat shrinkable tubing and push them over the existing insulation. Also shown is the heat shrinkable crimp that I'm going to use.
Then I soldered the ends to give them some structure.
Here is the tape that I used. It's a self-vulcanizing silicone tape that sticks to itself and forms a waterproof and electrically insulated seal. I found this in HomeDepot in the plumbing department. I told them they should stock this in electrical also.
First, I wrapped all the other wires.
Then I applied the heat shrinkable crimp, crimped it on both ends and then heated with a heat gun on high. The heat shrinkable tubing and crimp shrink together and form a tight bond.
Then I finished it by wrapping the entire cable and crimp together.
 05-18-2010, 11:49 PM
#17
Drifting
Nice mini write up.
Heat shrink crimp is a new one on me... I'll have to look for those. I've used regulat crimps then covered with heat shrink tubing.
I totally agree with H-P... electical tape shold only be used in a pinch and only temporary.
Heat shrink crimp is a new one on me... I'll have to look for those. I've used regulat crimps then covered with heat shrink tubing.
I totally agree with H-P... electical tape shold only be used in a pinch and only temporary.
 05-19-2010, 01:12 AM
#19
Rest in Peace
Rennlist Member
Rennlist Member
Join Date: May 2006
Location: Bird lover in Sharpsburg
Posts: 9,903
Likes: 0
Received 2 Likes
on
2 Posts
I hate butt connectors, they work great for a while, and some work great forever, but they can and will drive a mechanic nuts trying to find a problem that only happens once in a while.
05-19-2010, 01:43 AM
#20
Not the sharpest tool in the shed
Rennlist Member
Rennlist Member
Nice Job Bob. Thanks for the write up.
As it seems a few have had this same green wire fail what is the reason? Should that wired be a thicker lower gauge strand? Weird to me none of the other wires next to it failed or had their insulation missing. Tells me it is not a local heat issue but something to do with the wire being unable to carry the load it was designed for. Will repairing it here just mean it will fail some other less capable place?
Greg, how would you have repaired that frayed wire? I agree sometimes but joints can cause hard to trace intermittent problems, though I think Bob did it the best way possible. I too have never heard of heat shrink connectors. Great idea but makes me wonder about the long term integrity of whatever the metal was used in the connector. If heatgun is enough to get it to shrink must be a very soft alloy with low melting point.
05-19-2010, 01:54 AM
#21
Archive Gatekeeper
Rennlist Member
Rennlist Member
Only the outer sheath is heat shrinkable. You crimp the butt connector as usual and then heat shrink the plastic over the end of the wires to seal the connection. Per Alan's prior mention of Waytek making quality stuff I bought a couple bags of these from Waytekwire back in March. I used them to repair some alarm taps into the CE panel and to install my fuel pump relay.
http://order.waytekwire.com/products...%20Connectors/
FWIW, these ratcheting crimpers make a nice consistent crimp without breaking the bank.
http://order.waytekwire.com/products...%20Connectors/
FWIW, these ratcheting crimpers make a nice consistent crimp without breaking the bank.
 05-19-2010, 01:54 AM
#22
Administrator - "Tyson"
Lifetime Rennlist
Member
Lifetime Rennlist
Member
As it seems a few have had this same green wire fail what is the reason? Should that wired be a thicker lower gauge strand? Weird to me none of the other wires next to it failed or had their insulation missing. Tells me it is not a local heat issue but something to do with the wire being unable to carry the load it was designed for. Will repairing it here just mean it will fail some other less capable place?
When I pulled my harness apart, there wasn't much left of the original insulation for that wire. One part of the wire was down to 4-5 strands. The rest were curled up. It's amazing my car ever started!!!
I fear his cable isn't in much better shape than mine was. I used 10 guage to fix it but hind-site I should have gone bigger.
Greg, how would you have repaired that frayed wire? I agree sometimes but joints can cause hard to trace intermittent problems, though I think Bob did it the best way possible. I too have never heard of heat shrink connectors. Great idea but makes me wonder about the long term integrity of whatever the metal was used in the connector. If heatgun is enough to get it to shrink must be a very soft alloy with low melting point.
Bob patched it up to get the car going again. Nothing wrong with this on a temporary basis but it's far from permanent. It's only a matter of time before another piece of that wire frays apart.
05-19-2010, 02:09 AM
#23
Rennlist Member
Those butt connectors are better than the ones without the heat shrink but I prefer prefer to solder to terminals, or if repairing a wire like this I'll twist them together tightly and solder, covering with a small enough heat-shrink to seal completely with no gap at the end. I also use butt connectors, but I'll choose one that is a very tight fit on the wire, strip the plastic "shell" off, then lightly crimp the wire just to hold it while I solder it. Finish off with correct size heat-shrink.
05-19-2010, 09:40 AM
#24
Rennlist Member
Thread Starter
Yes, I agree this is, at best, a temporary fix. The best solution is to replace the entire harness. The next best is to remove the harness and replace the bad wire, but that would probably require removing and replacing the entire outer jacket, which wouldn't be very easy. Of course, what is easy on these cars?
Also the butt connector was not the best way to do this, but I thought it might be good enough for now. The normal procedure for connecting to wires is to bend the ends, hook them together and solder. Since there wasn't any extra wire to pull out to do this splice, I thought the butt connector would do it. In hind sight, it might have been better to splice in another piece of wire. We'll see.
Like Hacker, I've never had a problem with the starter not kicking in so I'm guessing that this bare wire had enough grease and dirt under it (oh boy was there) that it acted like an insulator.
Based on what I saw and where this is, my thinking is that this degradation is a multi-step process. First the outer jacket gets very hard from repeated heat cycles. Remember, in the 85 this harness goes right over top of the water pump and underneath the water crossover. So once this outer jacket gets hard and brittle, the constant expansion-contraction of the engine cracks this open right in this spot. That exposes the wire insulation to the same environment. This green wire is on the bottom of the harness and the insulation is gradually worn down by rubbing against the sharp edge of the top of water pump and eventually you have a bare wire. Then the bare wire starts rubbing against that sharp edge and begins to fray. If left long enough, I'm sure it will wear completely through.
I don't think this problem is cause by over loading the wire. I think it's just a bad combination of environmental conditions and wear, deteriorating the jacket, then the insulation, then the wire.
Like I mentioned before, this is probably why they moved this harness to in front of the water pump on the S4's.
05-19-2010, 10:12 AM
#25
Administrator - "Tyson"
Lifetime Rennlist
Member
Lifetime Rennlist
Member
Replacing the upper loom wasn't too bad, removing the old one was the worst part.
Starting with a very small wire cutter and moving slow, it didn't take all that long to cut it off.
The lower portion is covered in a silicone / fiberglass heat sleeve. I used a similar sleeve from DEI to cover the upper part:
http://www.summitracing.com/parts/DEI-010474/
I sealed the two halfs together with some industrial grade heat shrink.
I'm still on the fence on the cause since every other wire in the loom had perfect insulation and the wires still very pliable. I was fully prepared to replace every wire.
After SITM I'm going to pull this harness again to install a larger wire in place of the green one and run a larger gauge from the alternator to the jumper post.
05-19-2010, 04:32 PM
#26
Racer
Join Date: Jul 2009
Location: Byhalia, MS
Posts: 380
Likes: 0
Received 0 Likes
on
0 Posts
I see the same thing on my car. The heat from the engine just bakes the insulating jacket on the smaller wires. I've sectioned out the bad places temporarily but plan on replacing all the small wires from the passenger side of the harness to the accessories; starter, alternator, etc. The heavy gauge wires seem to be doing much better.
The self fusing silicon tape is the only way to go in the engine bay. It's known also as F4 tape and centerline tape. You can get it at most industrial suppliers. I got mine from Uline. There is also website selling F4 tape; its pretty much all the same.
F4 will withstand something like 400F. You can tell from my icon why I know its called F4 tape. Used it all the time when I was in the service.
D
Last edited by DanielD; 05-19-2010 at 04:35 PM. Reason: grammer cleanup
05-19-2010, 04:44 PM
#27
Rennlist Member
Thread Starter
I'm guessing the combination of heat and oil, with some coolant mixed in for flavor, is probably what is eating at the insulation and making it very weak and thereby contributing to it's demise.
We can talk more about this at SITM over an adult beverage.

Last edited by underdog928; 05-19-2010 at 04:45 PM. Reason: fix f'ing typos again.
05-19-2010, 06:34 PM
#28
Administrator - "Tyson"
Lifetime Rennlist
Member
Lifetime Rennlist
Member
Found my images - yellow is the new 10 gauge wire. I found green 8 gauge after fixing it......oh well.
This is what the wire looked like after pealing back the rock hard plastic sleeve. As you can see, almost half the wire the original insulation was gone.
-
This is what the wire looked like after pealing back the rock hard plastic sleeve. As you can see, almost half the wire the original insulation was gone.
-

 05-19-2010, 08:40 PM
#30
Racer
Join Date: Jul 2009
Location: Byhalia, MS
Posts: 380
Likes: 0
Received 0 Likes
on
0 Posts
