
Timing Belt and Water Pump Procedure w/pics
 01-02-2010, 07:55 PM
#46
Rennlist Member
Thread Starter
Join Date: Sep 2007
Location: Ridgecrest, California
Posts: 1,363
Likes: 0
Received 143 Likes
on
28 Posts
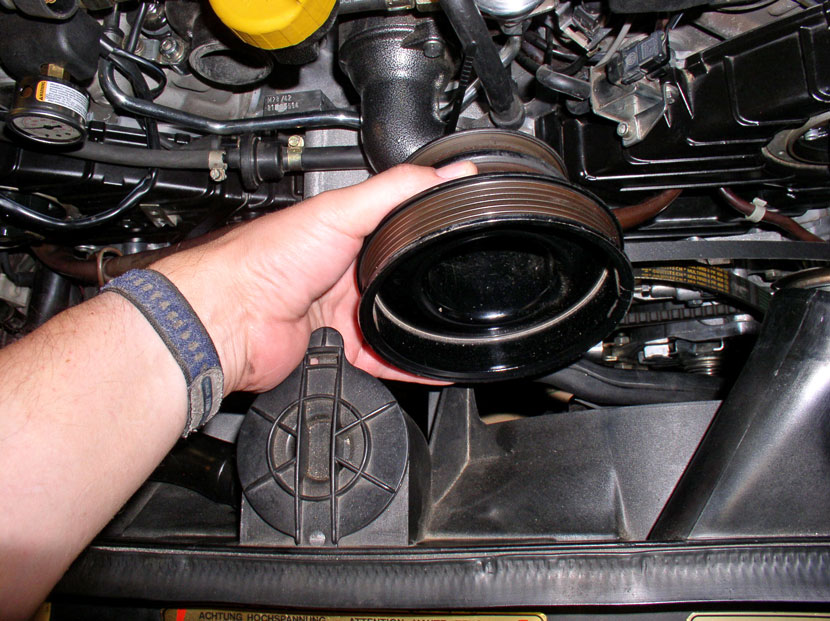
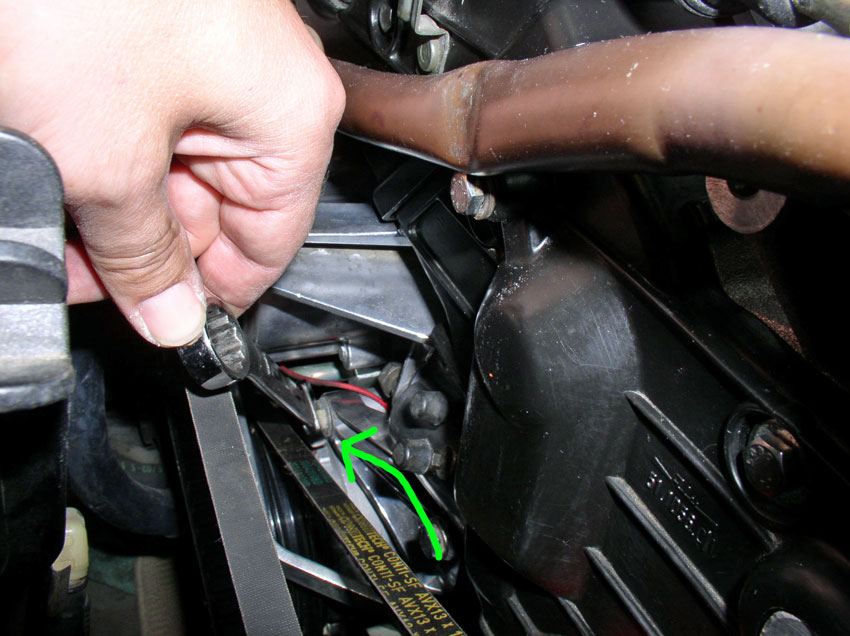
Start installing the accessory belts from the inside out (A/C compressor first and Alternator last). Position the A/C belt pulley into place.
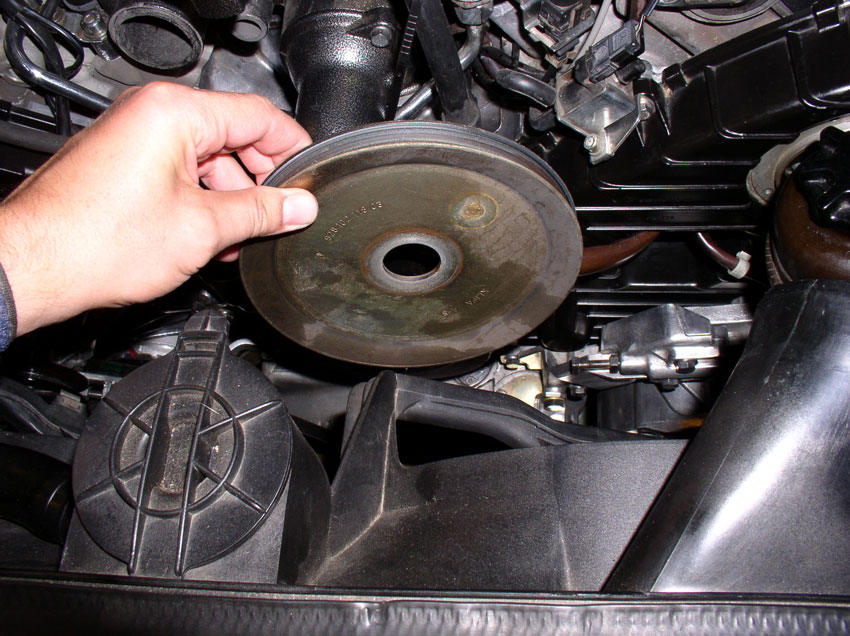
Place the belt on the pulley as shown.
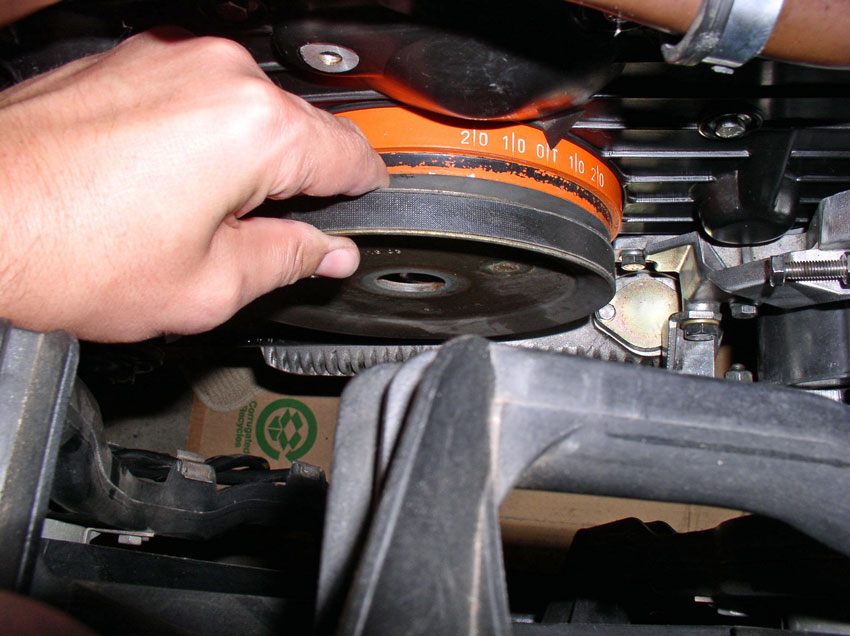
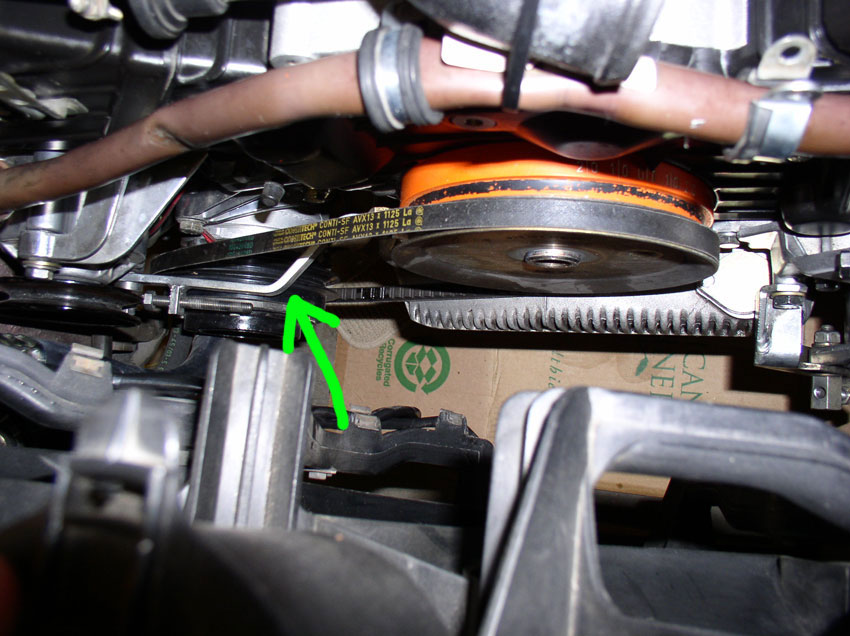
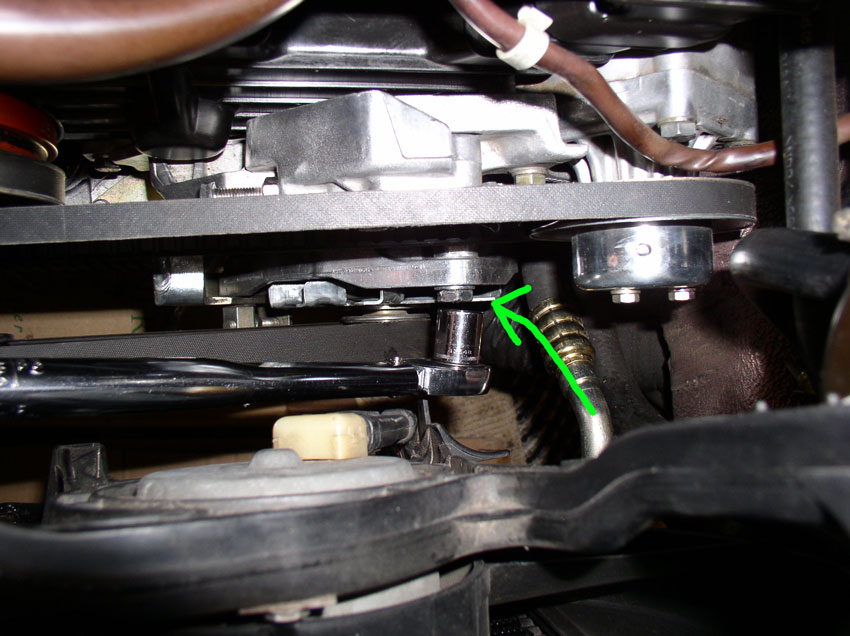
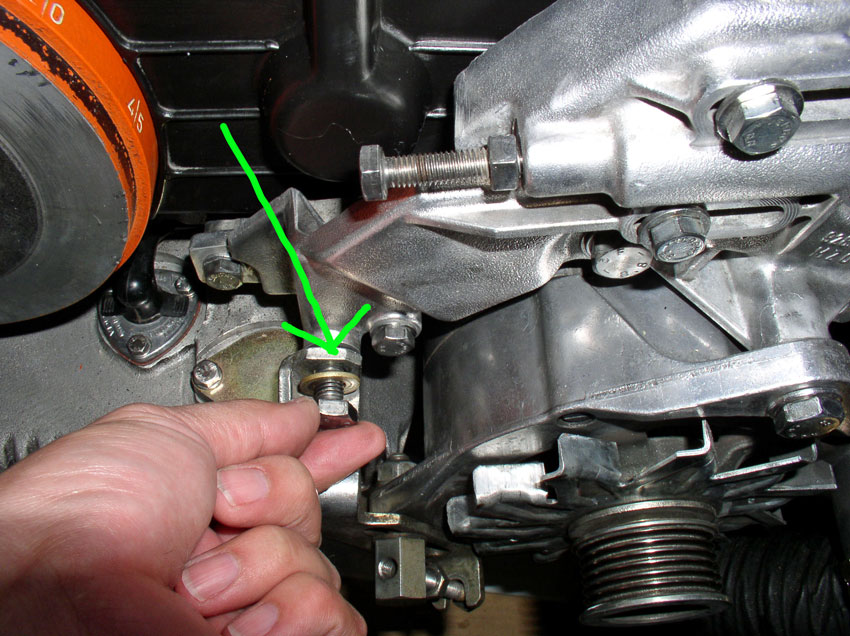
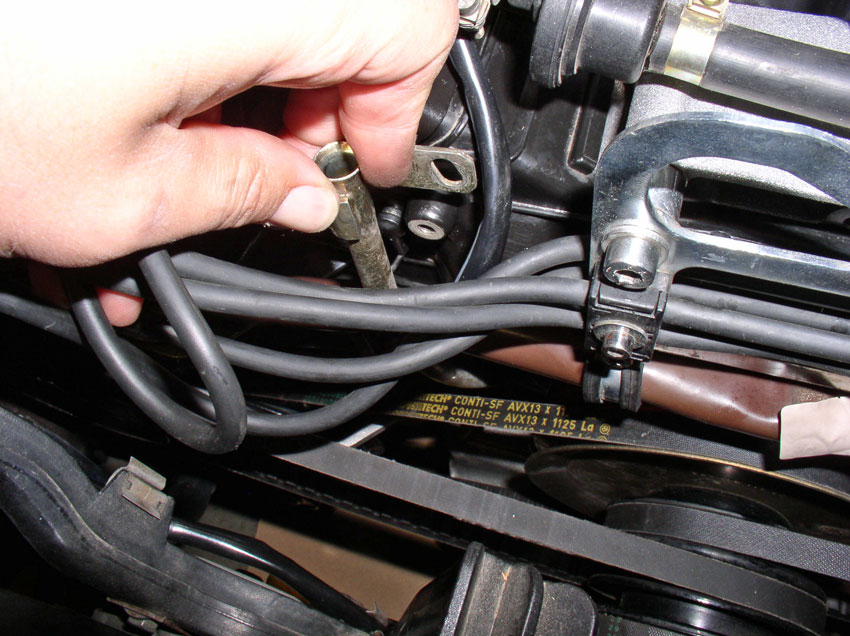
Place the pulley on the crankshaft as shown below. Also ensure the air pump belt adjusting bracket is positioned between the A/C belt as shown by the arrow in the pic below. Install the 13mm bolt that secures both support brackets to the engine block and hand tighten.
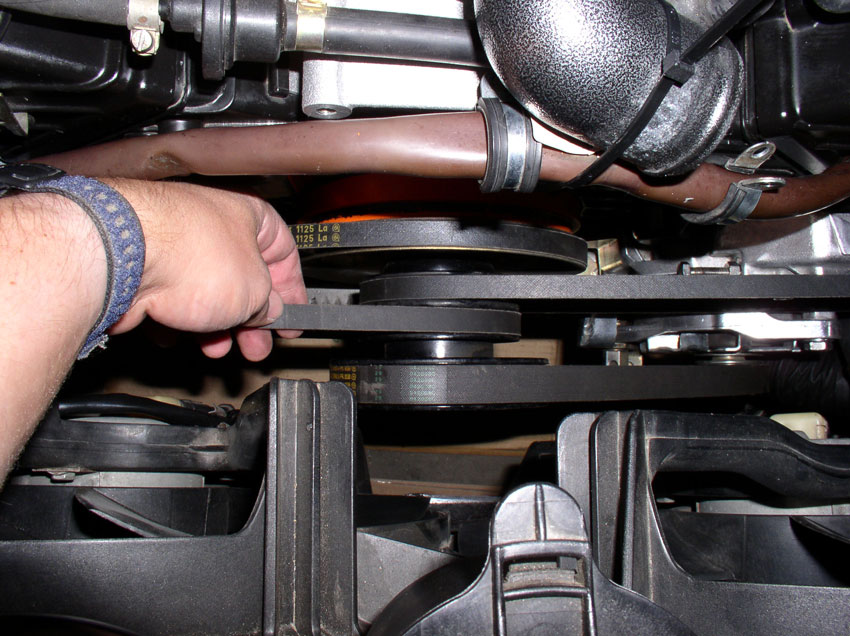
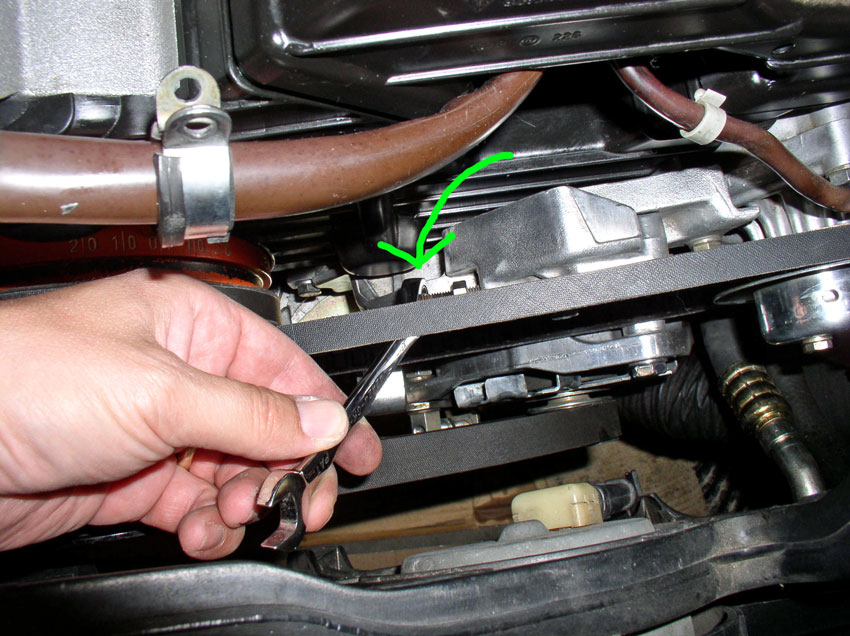
Install the PS and air pump belts on their respective accessory pulleys and lay the belts at rest as shown below.
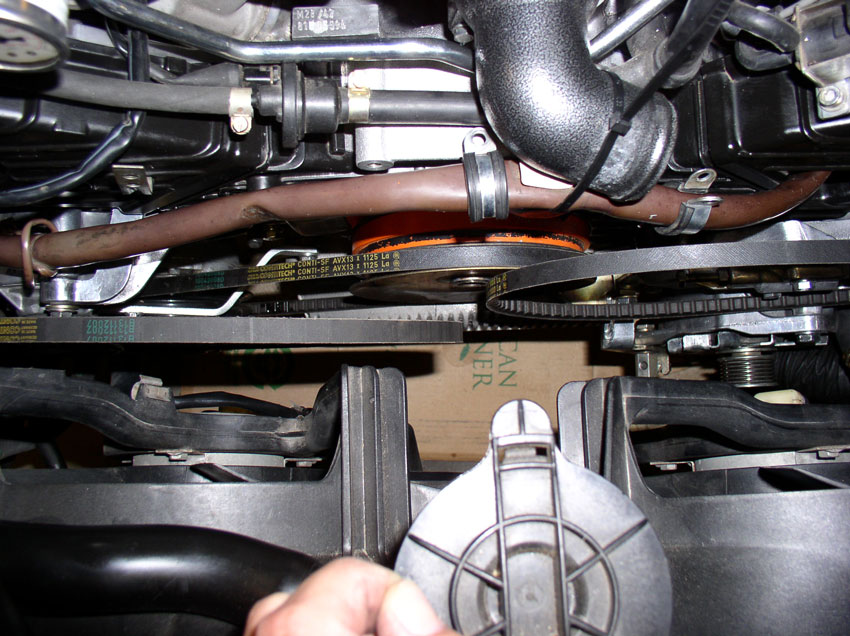
Position the accessory pulley into position as shown.
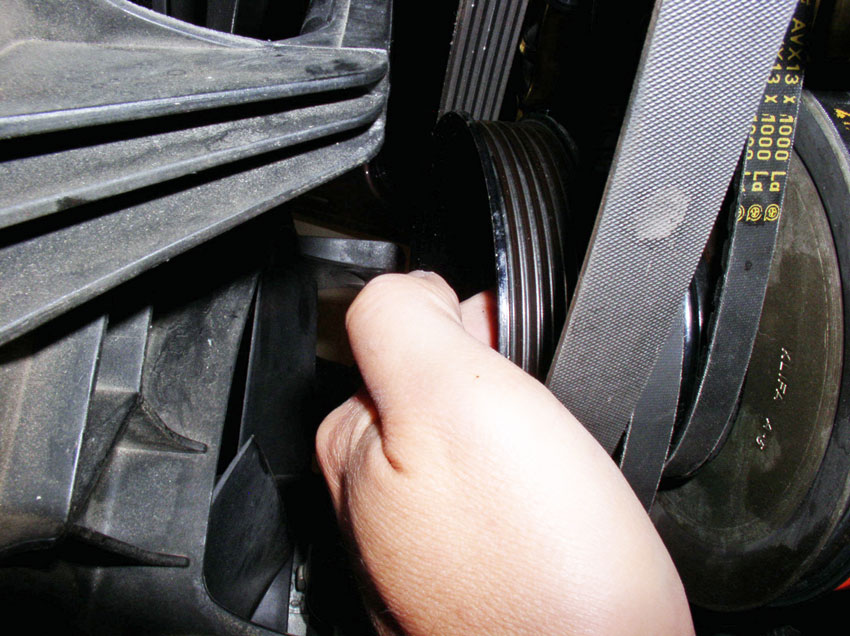
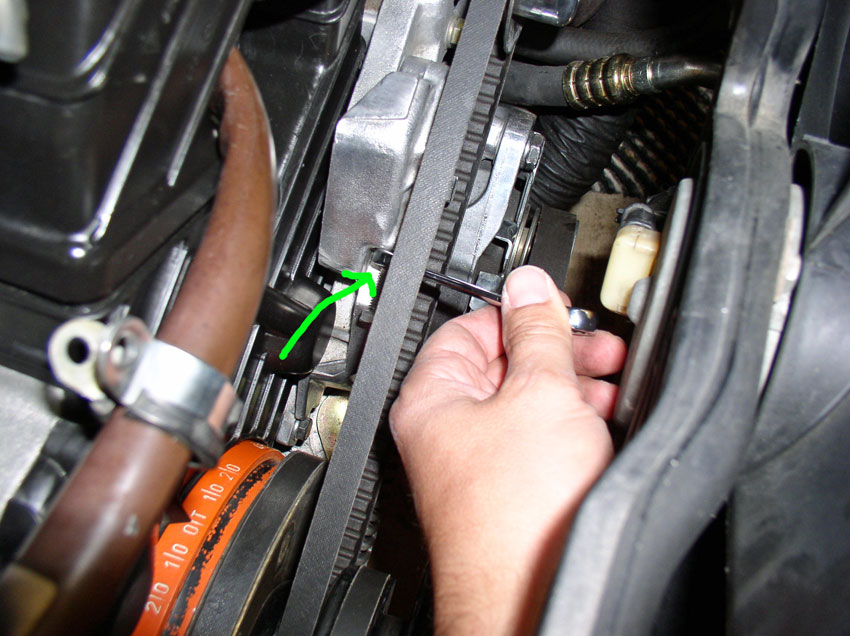
Attach the PS and Air pump belts to the pulley as shown below. The opposing forces of the belts will keep the pulley suspended.
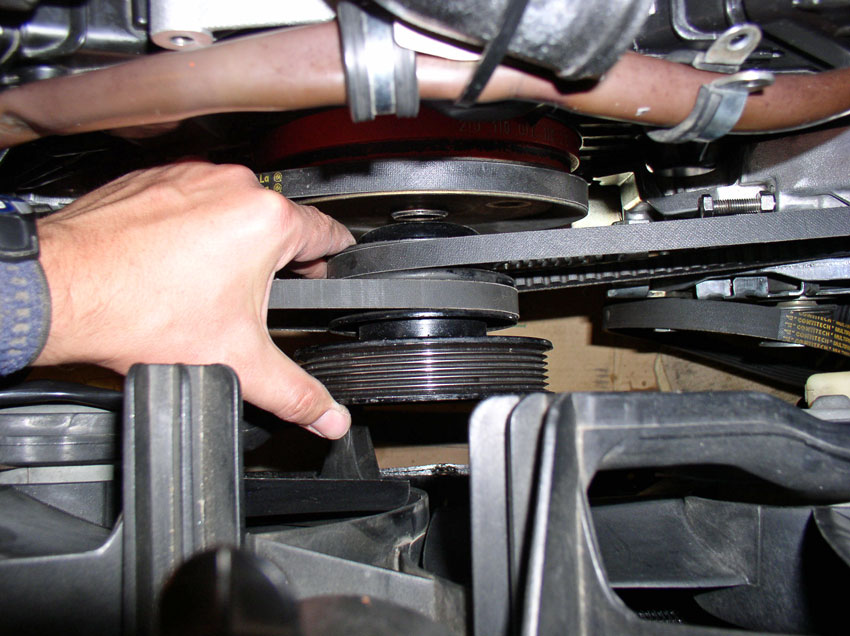
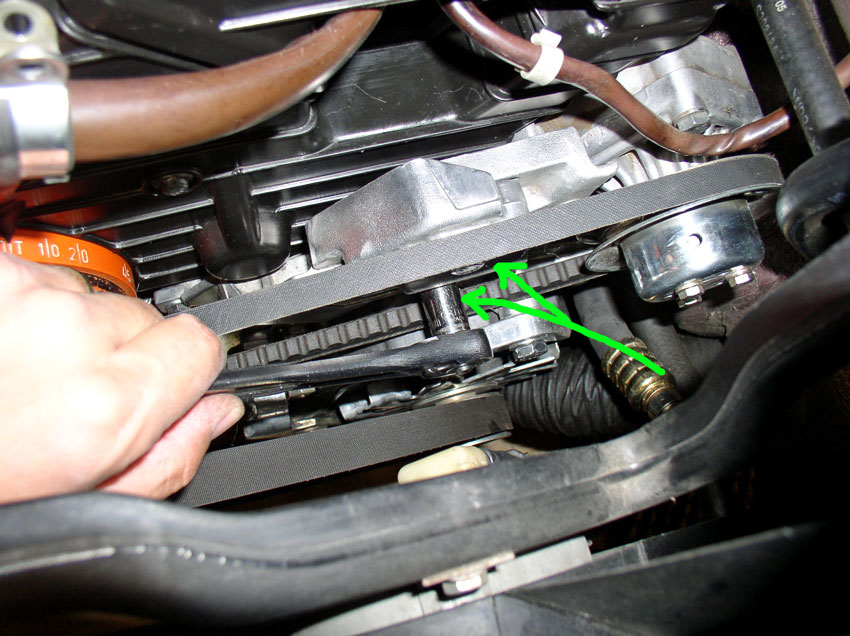
Install the alternator belt on the alternator and attach it to the pulley as shown below. Then place the pulley onto the end of the crankshaft.
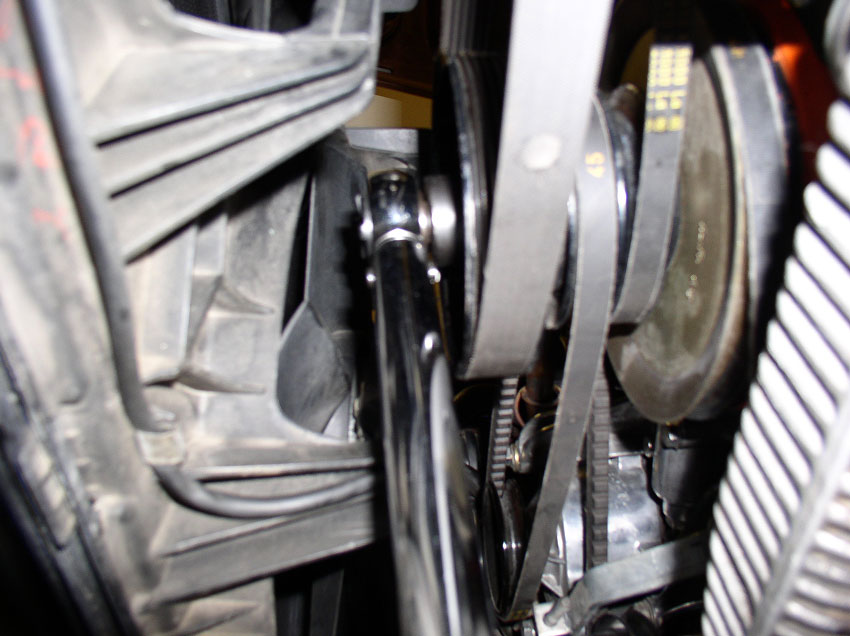
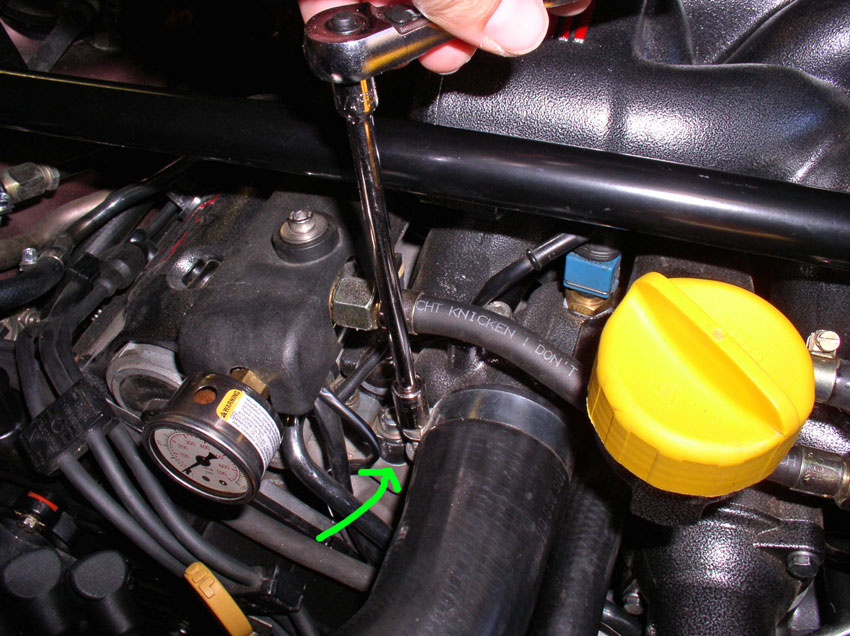
Install the 27mm crankshaft bolt and washer next.
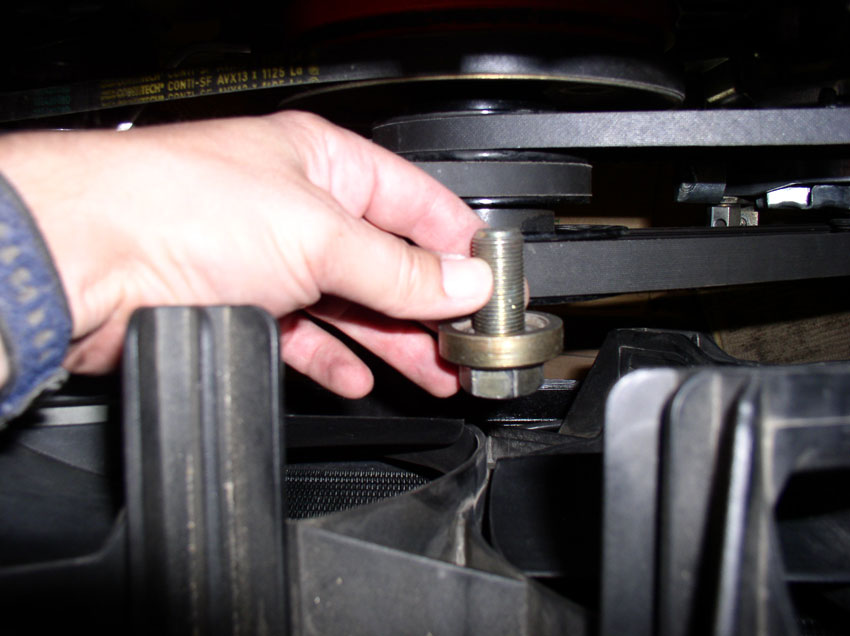
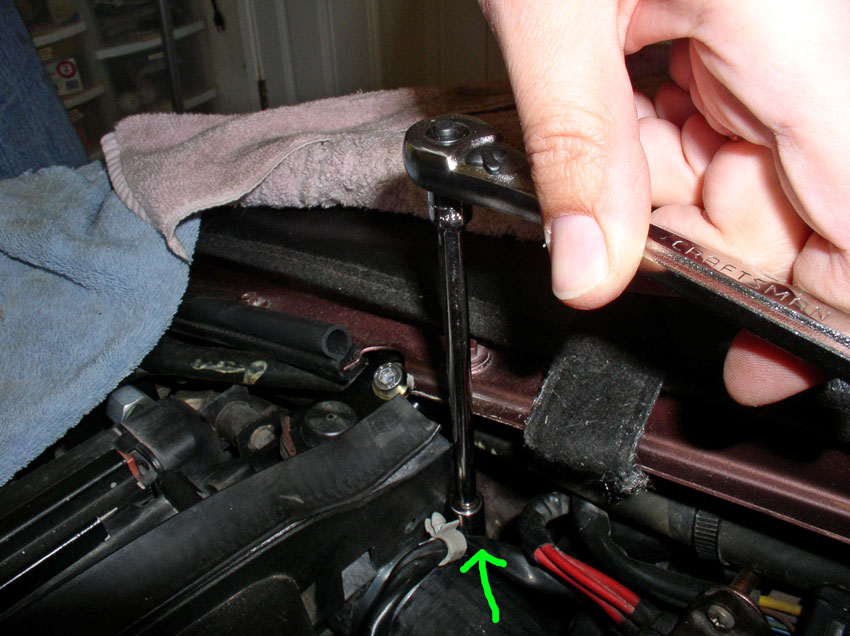
It was easier to start threading the bolt into the crankshaft from underneath the car.
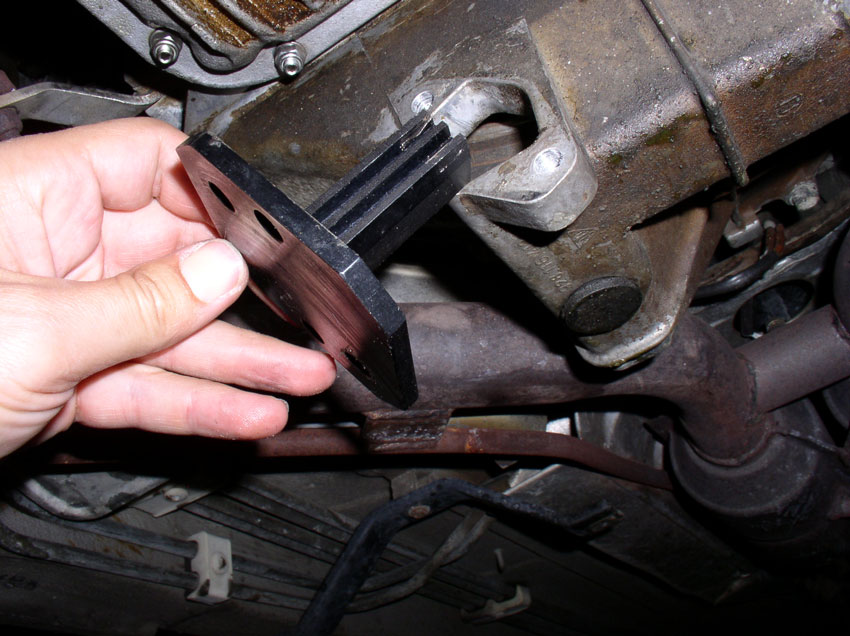
Re-install the flywheel locking tool in the flywheel inspection opening and secure with bolts.
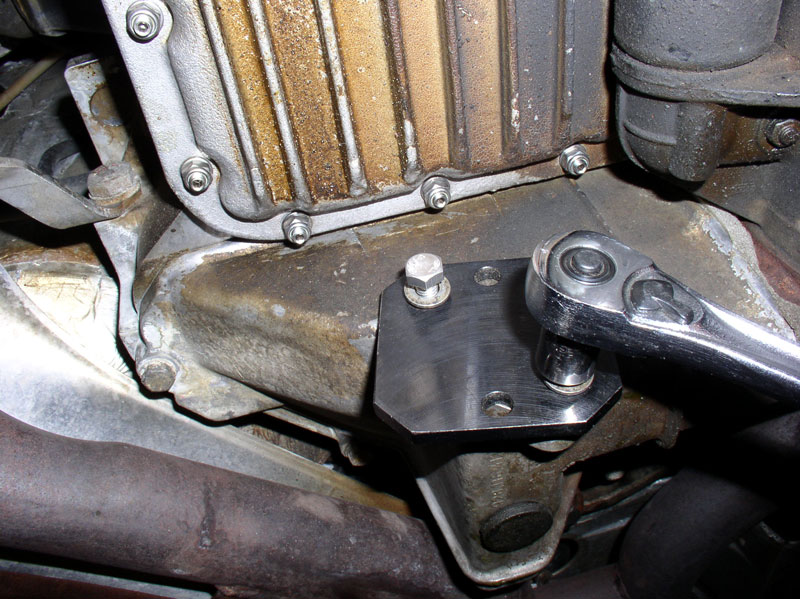
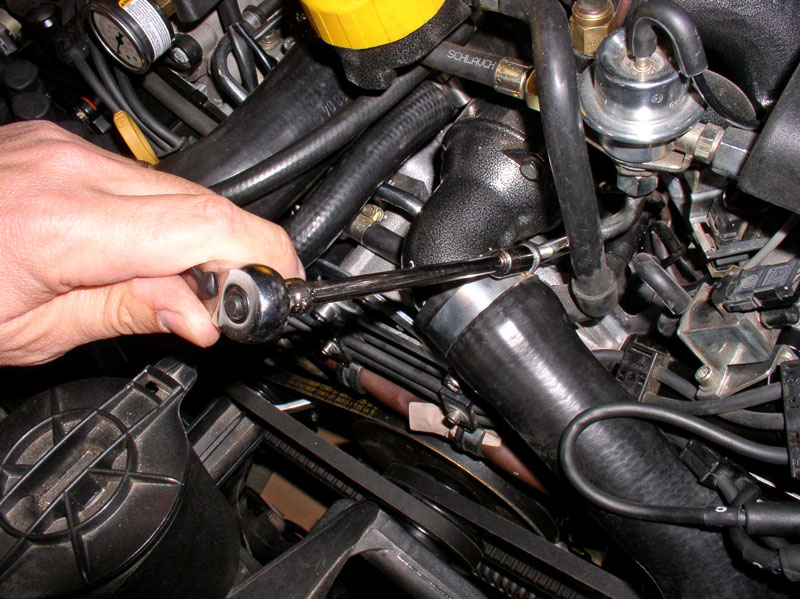
Using a 27mm deep 6-point socket and long handle torque wrench, torque the crankshaft bolt to 295 Nm or 217 Ftlbs.
Remove the flywheel locking tool.
Re-install the flywheel inspection cover plate and 13mm bolts.
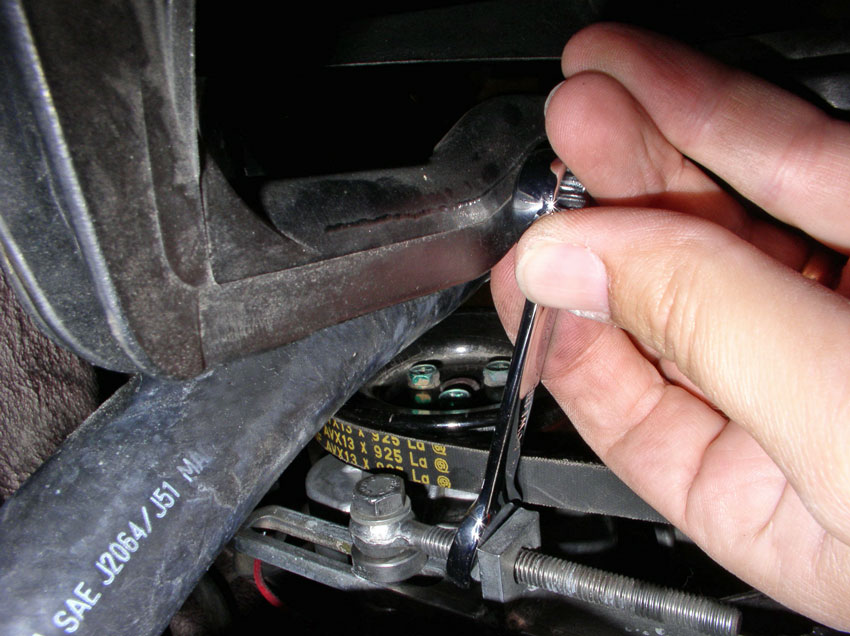
Now you can start tensioning the belts. I started with the A/C compressor belt. Use a 13mm gear wrench to turn the adjusting nut until the tensiion is correct.
Then tighten the 17mm locking bolt a shown.
Continued.....
Place the belt on the pulley as shown.
Place the pulley on the crankshaft as shown below. Also ensure the air pump belt adjusting bracket is positioned between the A/C belt as shown by the arrow in the pic below. Install the 13mm bolt that secures both support brackets to the engine block and hand tighten.
Install the PS and air pump belts on their respective accessory pulleys and lay the belts at rest as shown below.
Position the accessory pulley into position as shown.
Attach the PS and Air pump belts to the pulley as shown below. The opposing forces of the belts will keep the pulley suspended.
Install the alternator belt on the alternator and attach it to the pulley as shown below. Then place the pulley onto the end of the crankshaft.
Install the 27mm crankshaft bolt and washer next.
It was easier to start threading the bolt into the crankshaft from underneath the car.
Re-install the flywheel locking tool in the flywheel inspection opening and secure with bolts.
Using a 27mm deep 6-point socket and long handle torque wrench, torque the crankshaft bolt to 295 Nm or 217 Ftlbs.
Remove the flywheel locking tool.
Re-install the flywheel inspection cover plate and 13mm bolts.
Now you can start tensioning the belts. I started with the A/C compressor belt. Use a 13mm gear wrench to turn the adjusting nut until the tensiion is correct.
Then tighten the 17mm locking bolt a shown.
Continued.....
Last edited by Dwayne; 01-02-2010 at 08:20 PM.
 01-02-2010, 08:17 PM
#47
Rennlist Member
Thread Starter
Join Date: Sep 2007
Location: Ridgecrest, California
Posts: 1,363
Likes: 0
Received 143 Likes
on
28 Posts
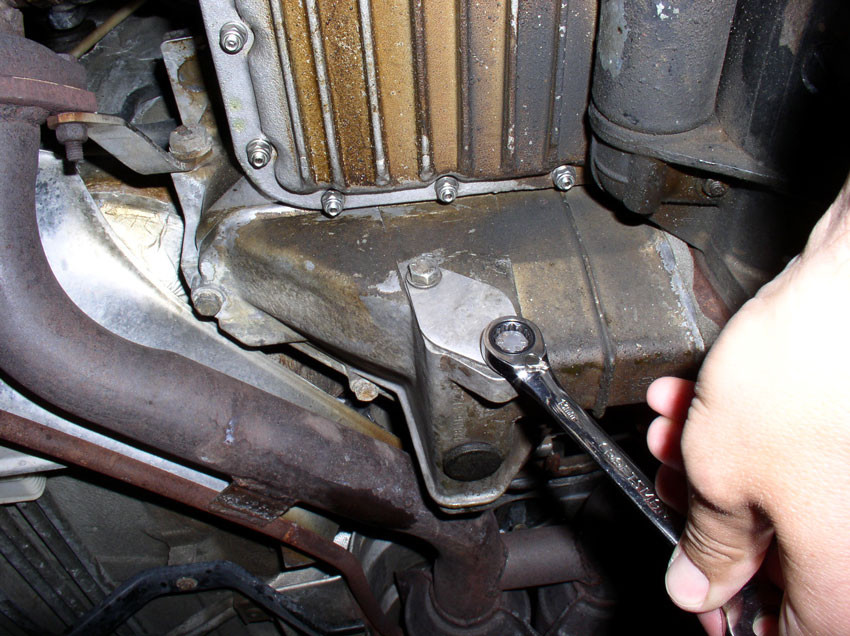
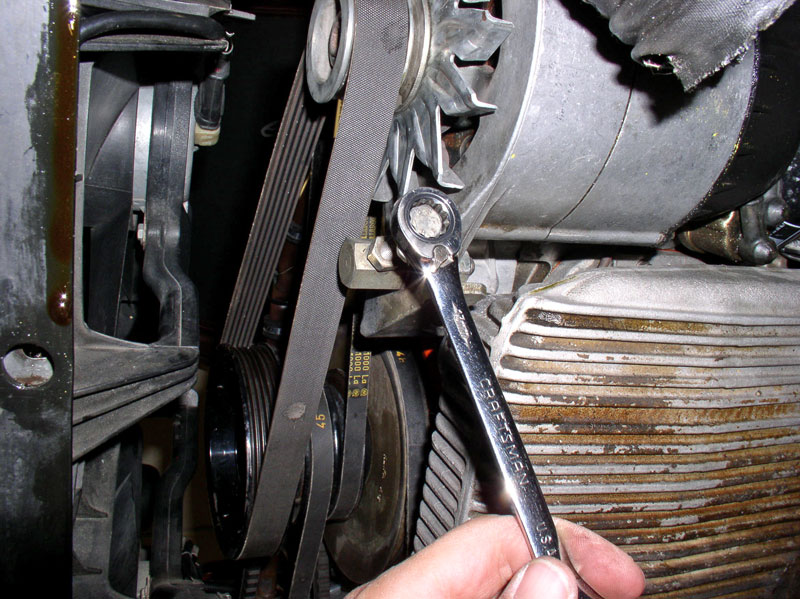
Tighten the rear A/C compressor pivot bolt - 17mm.
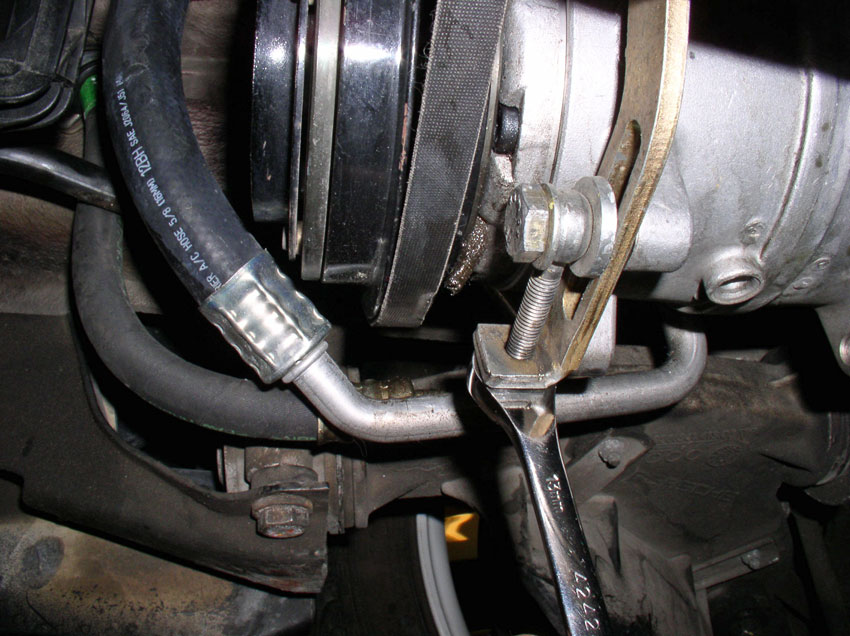
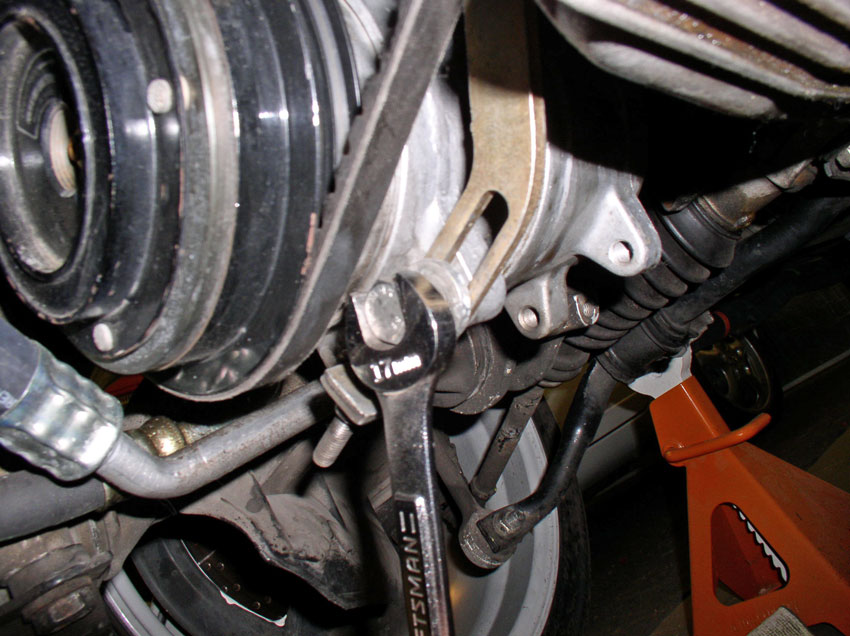
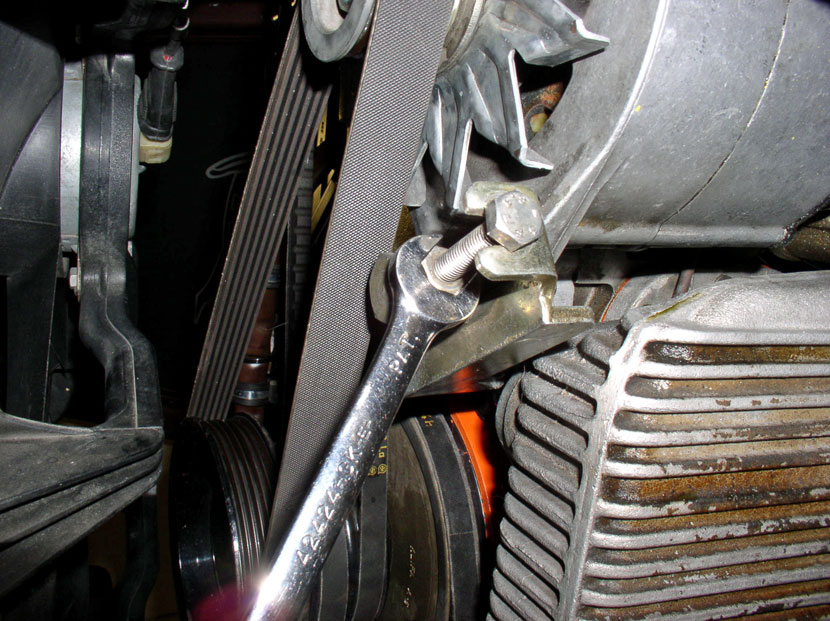
Followed by tightening the front A/C compressor pivot bolt - 17mm. The front is a little tight to get to with the wrench.
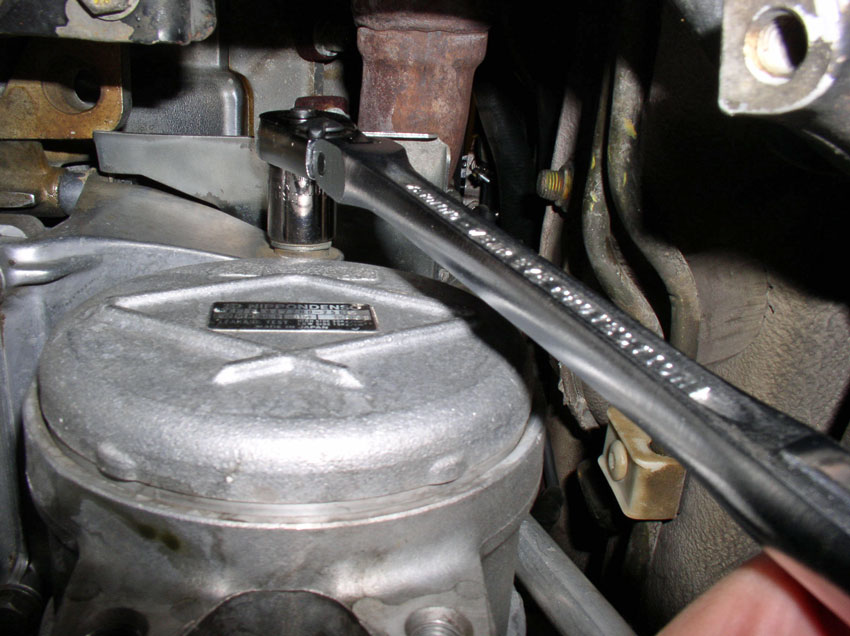
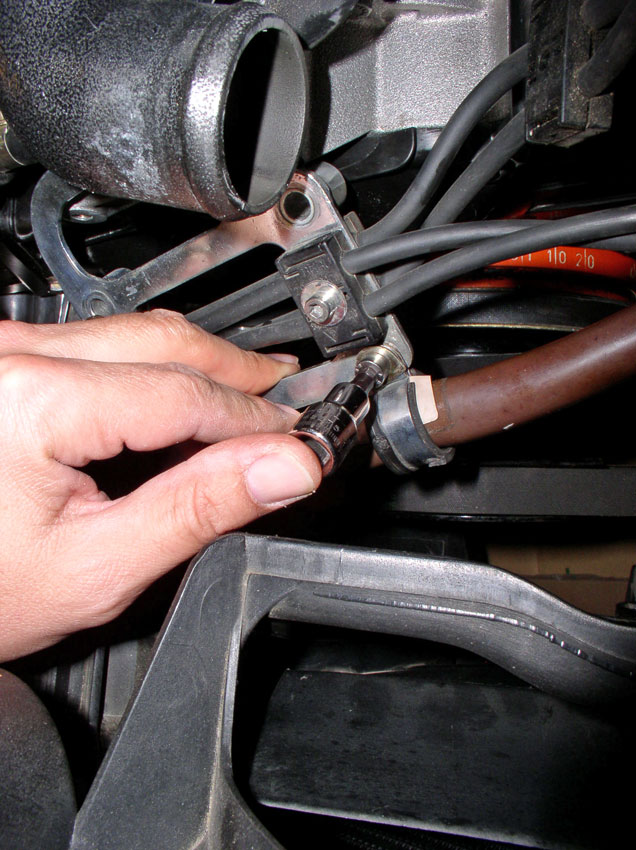
Tighten the PS pump belt next. Use a 13mm gear wrench to tighten the tension adjustment bolt until the belt tension is correct.
Then tighten the 13mm lock nut on the adjustment bolt as shown.
Lastly, tighten the two 13mm locking bolts on the front of the PS bracket as shown. You can torque to 20 Nm or 15 Ftlbs.
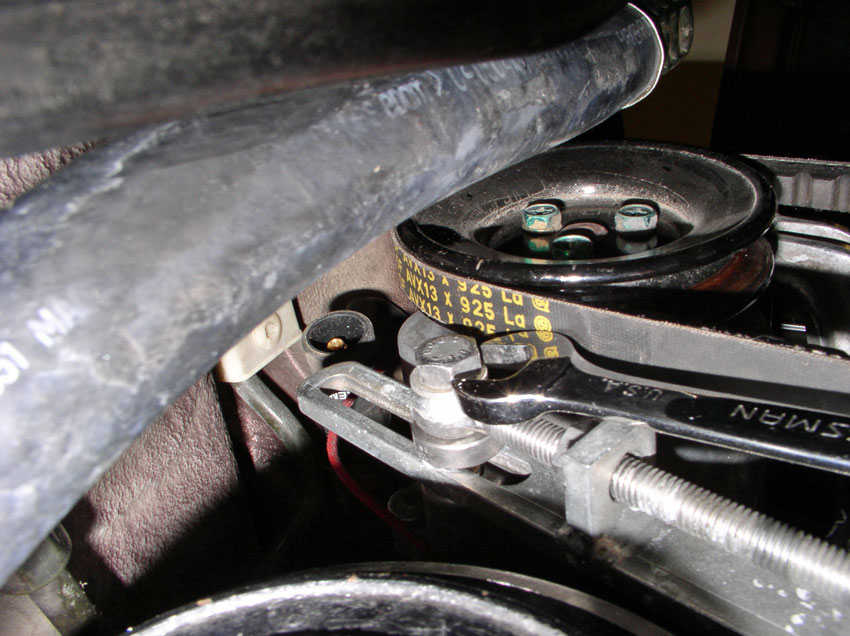
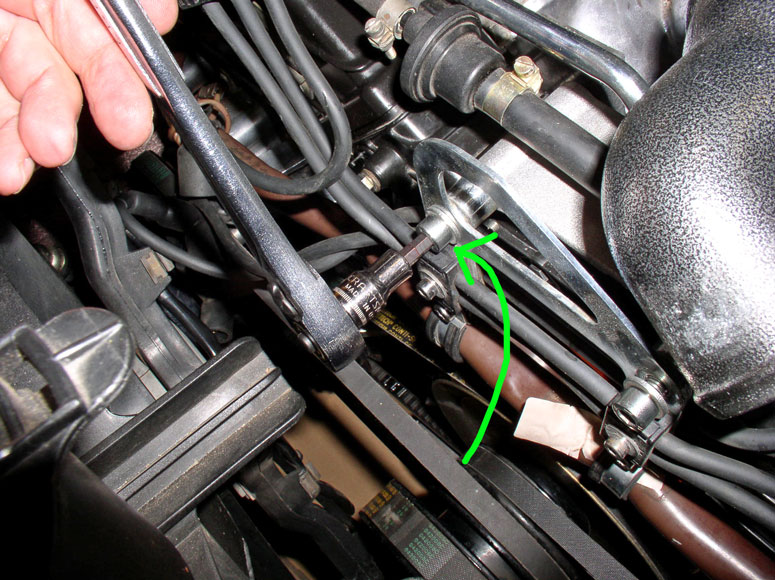
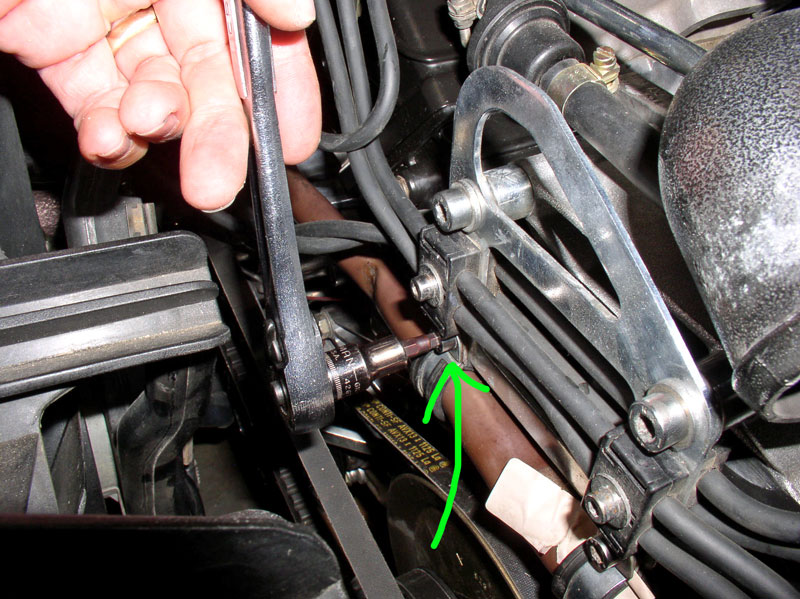
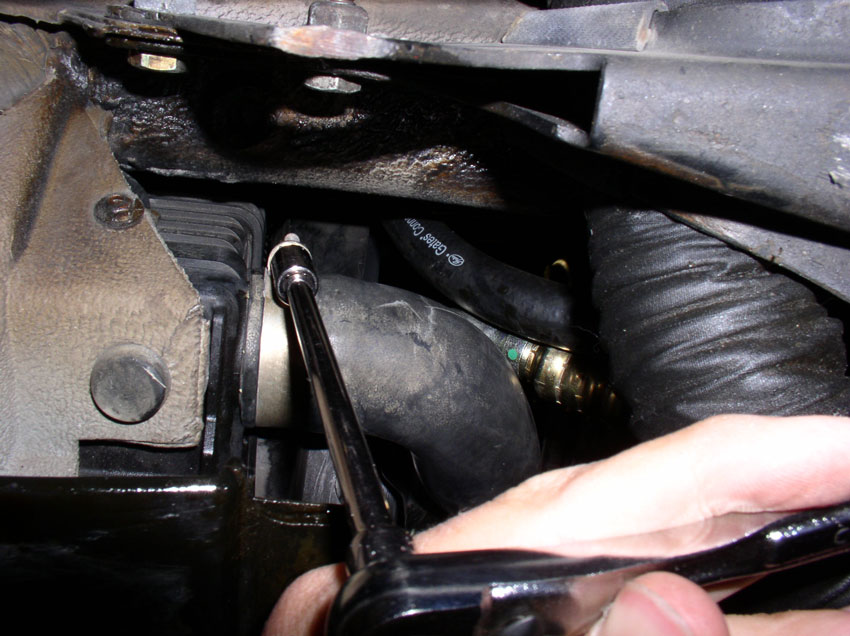
Air pump belt is next. Using a stubby 13mm wrench, tighten the tension adjustment nut as shown in the pic below until the tension is correct.
Then tighten the 13mm locking bolt as shown.
Tighten the 13mm bolt that secures the air pump and A/C pump belt tension adjustment support brackets. You can torque to 20 Nm or 15 Ftlbs.
Lastly, tighten the 13mm air pump pivot bolt as shown. You can torque to 20 Nm or 15 Ftlbs.
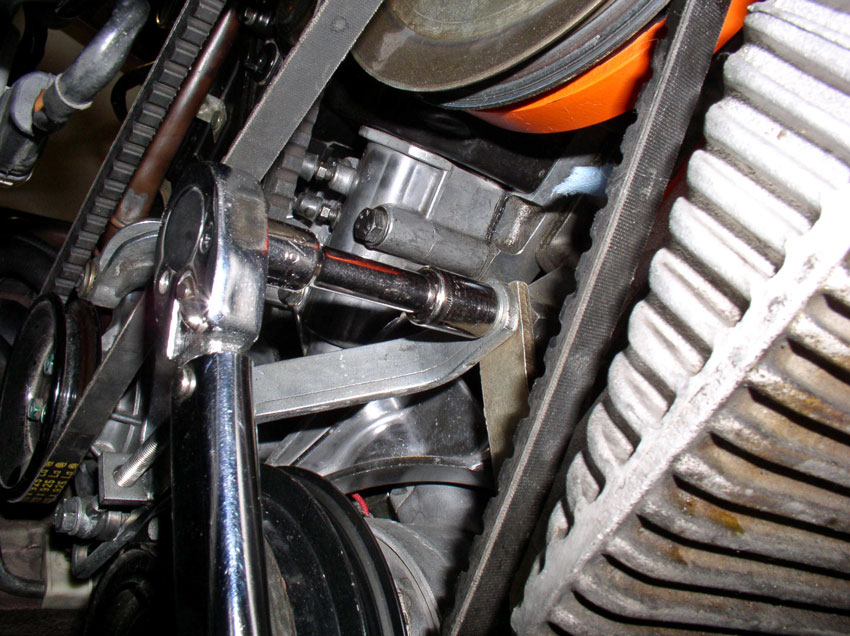
Alternator belt is next. Using a 13mm gear wrench, tighten the tension adjustment bolt until the belt tension is correct.
Then tighten the 13mm adjustment bolt lock nut.
On the backside of the lower tab, tighten the 17mm lock nut as shown.
Tighten the 17mm alternator pivot bolt as shown.
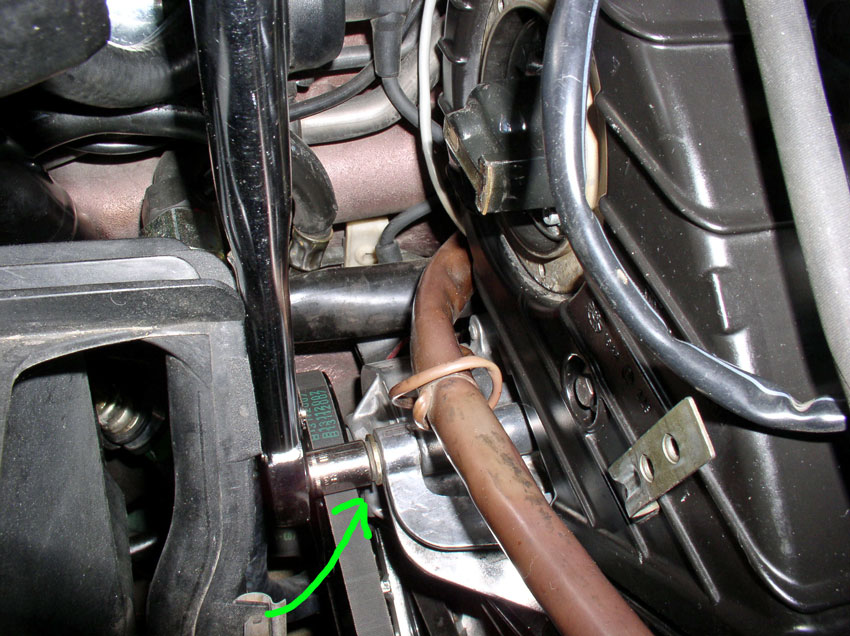
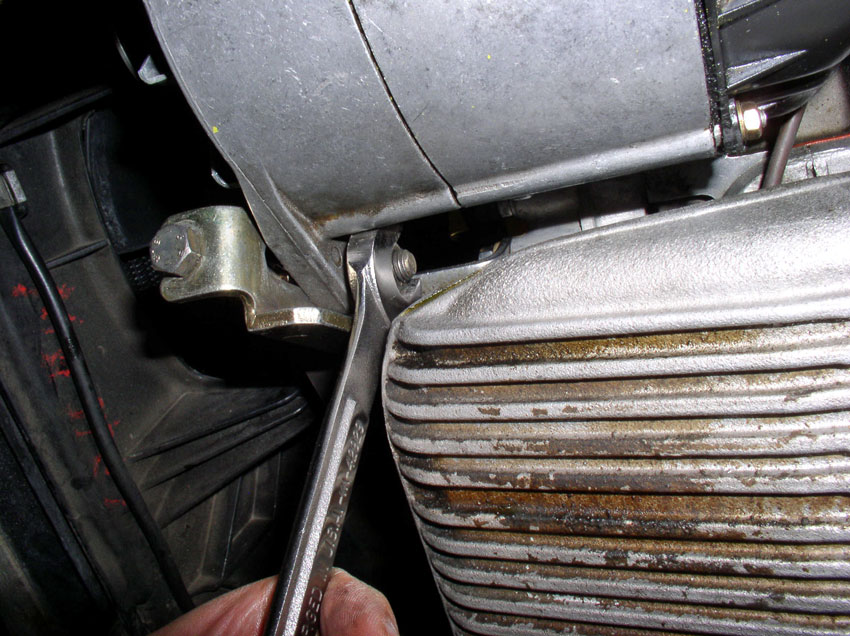
The last bolt to tighten on the alternator is the adjustment bracket to engine block bolt - 17mm. I do not have a clear picture of the bolt but here is a picture for reference.
Tighen down this bolt as shown.

Continued....
Followed by tightening the front A/C compressor pivot bolt - 17mm. The front is a little tight to get to with the wrench.
Tighten the PS pump belt next. Use a 13mm gear wrench to tighten the tension adjustment bolt until the belt tension is correct.
Then tighten the 13mm lock nut on the adjustment bolt as shown.
Lastly, tighten the two 13mm locking bolts on the front of the PS bracket as shown. You can torque to 20 Nm or 15 Ftlbs.
Air pump belt is next. Using a stubby 13mm wrench, tighten the tension adjustment nut as shown in the pic below until the tension is correct.
Then tighten the 13mm locking bolt as shown.
Tighten the 13mm bolt that secures the air pump and A/C pump belt tension adjustment support brackets. You can torque to 20 Nm or 15 Ftlbs.
Lastly, tighten the 13mm air pump pivot bolt as shown. You can torque to 20 Nm or 15 Ftlbs.
Alternator belt is next. Using a 13mm gear wrench, tighten the tension adjustment bolt until the belt tension is correct.
Then tighten the 13mm adjustment bolt lock nut.
On the backside of the lower tab, tighten the 17mm lock nut as shown.
Tighten the 17mm alternator pivot bolt as shown.
The last bolt to tighten on the alternator is the adjustment bracket to engine block bolt - 17mm. I do not have a clear picture of the bolt but here is a picture for reference.
Tighen down this bolt as shown.
Continued....
01-02-2010, 08:23 PM
#48
Rennlist Member
Thread Starter
Join Date: Sep 2007
Location: Ridgecrest, California
Posts: 1,363
Likes: 0
Received 143 Likes
on
28 Posts
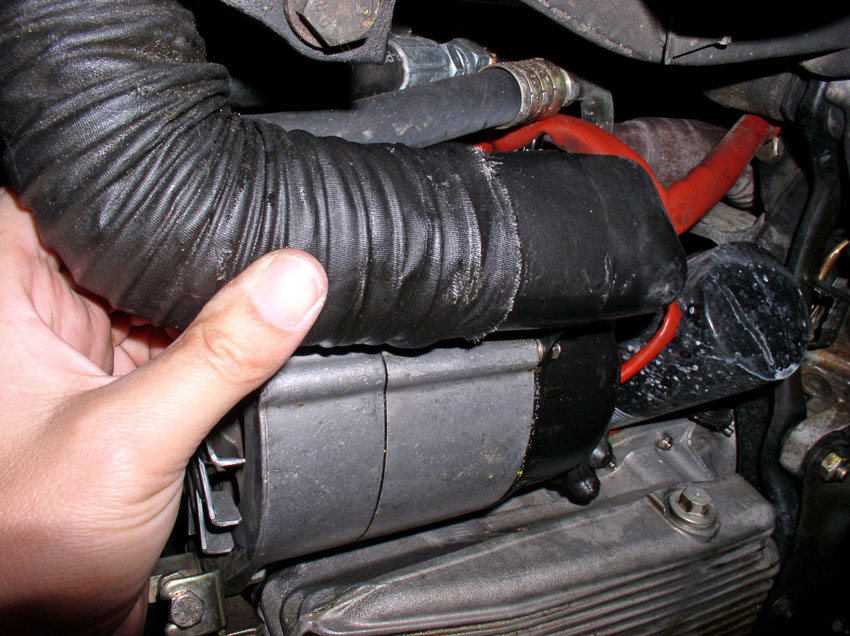
Connect the alternator cooling hose to the air guide as shown.
Next we'll install distributor caps, dipstick and spark plug wires....
Continued.....
Next we'll install distributor caps, dipstick and spark plug wires....
Continued.....
01-02-2010, 08:54 PM
#49
Rennlist Member
Thread Starter
Join Date: Sep 2007
Location: Ridgecrest, California
Posts: 1,363
Likes: 0
Received 143 Likes
on
28 Posts
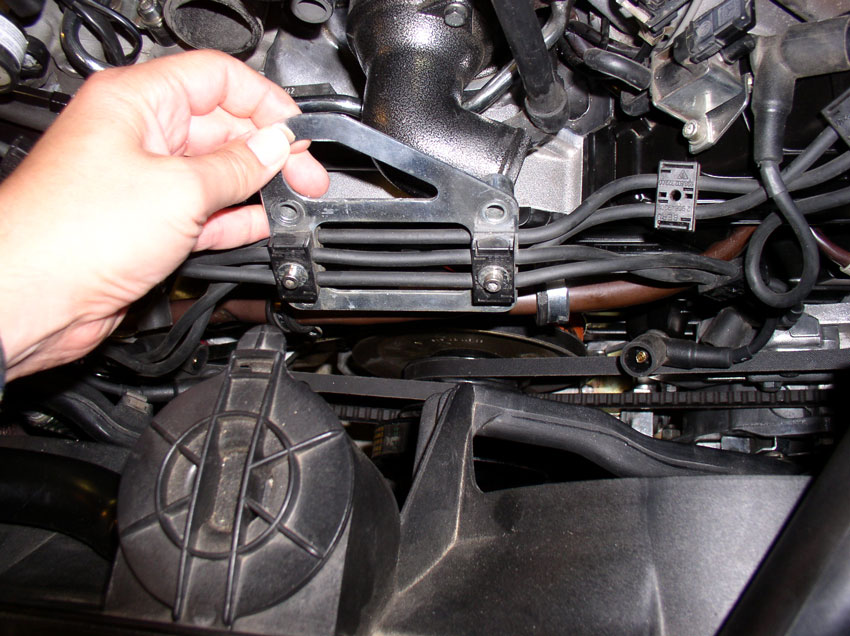
Position the center engine lift hook and spark plug wire bracket toward the front of the engine.
Install the small 5mm allen head bolts into the engine harness clamps - there are two of them.
Install the bolts/clamps onto the engine lift hook and hand tighten as shown.
Next, attach the engine lift hook to the water pump casing with the two 6mm allen head bolts as shown. Tighen down the two bolts.
Then tighten down the two 5mm allen head bolts for the engine harness clamps.
Secure the small front engine harness to the driver's side cam cover with the plastic clip as shown.

Starting with the passenger side distributor cap, attach the coil wire to the bottom of the distributor as shown.
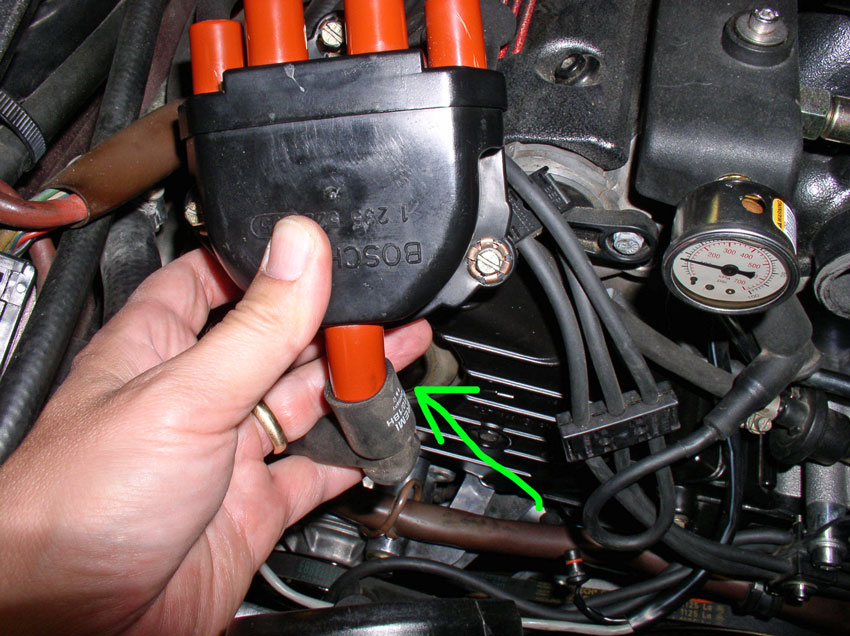
Secure the distributor cap to the cam cover using an 8mm socket or flat blade screwdriver. Tighten all three screws. Install the driver's side distributor cap in the same manner next.
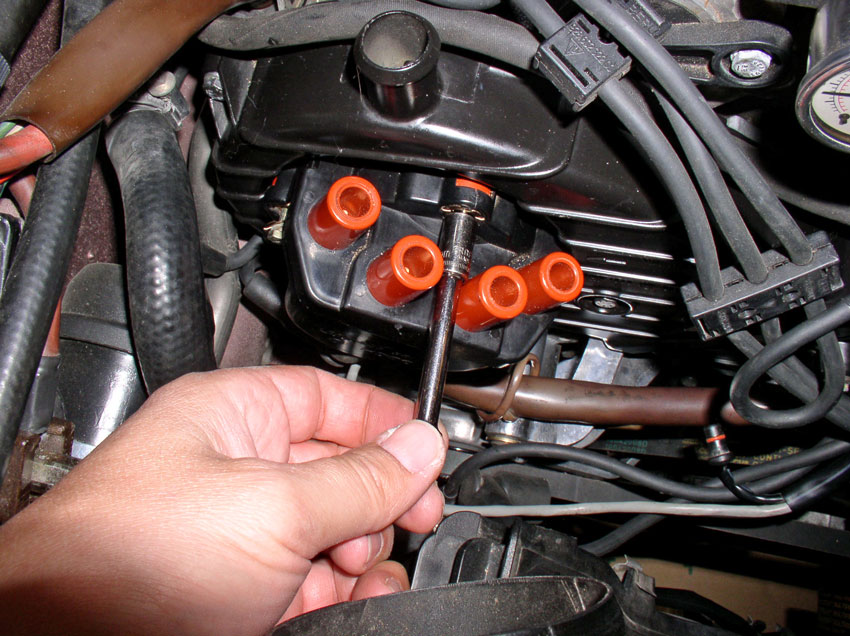
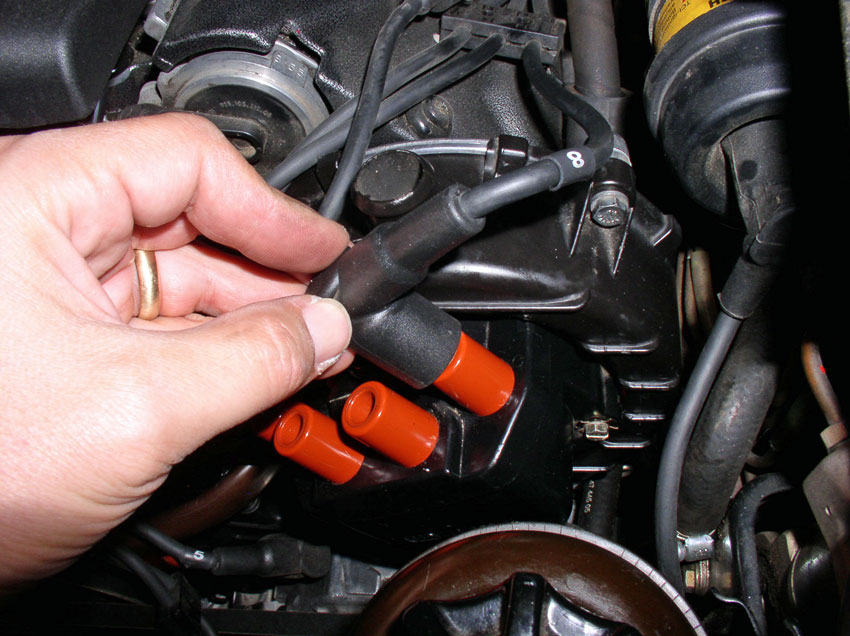
Connect all the spark plug wires to their respective distributor in their respective order. If you still have the sticker on top of the radiator, it will show you which order the spark plug wires should be connected to the distributor. If not, for the passenger side distributor (standing in front of the car), the plug order on the distributor from left to right should be 4, 6, 7, and 1. For the driver's side distributor (standing in front of the car), the plug order on the distributor from left to right should be 5, 2, 3, and 8.
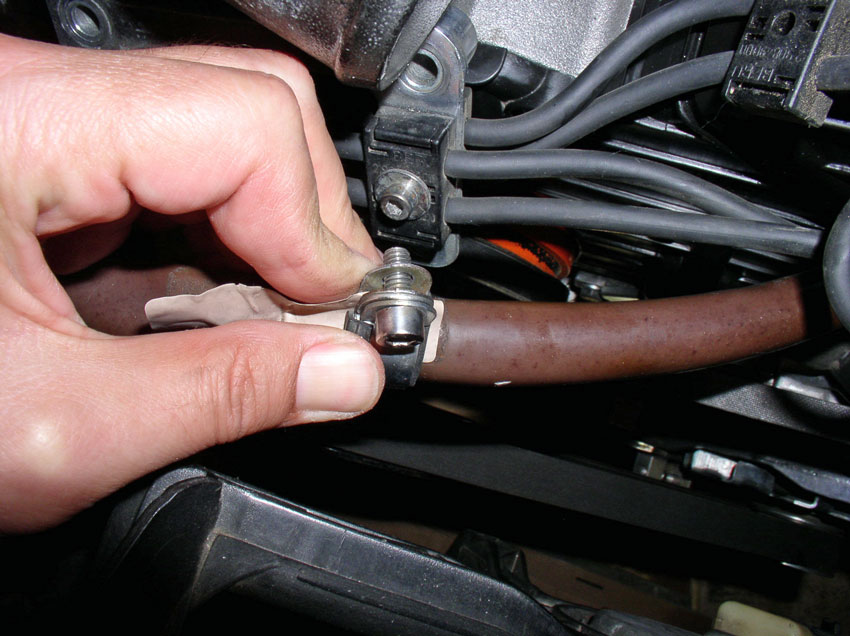
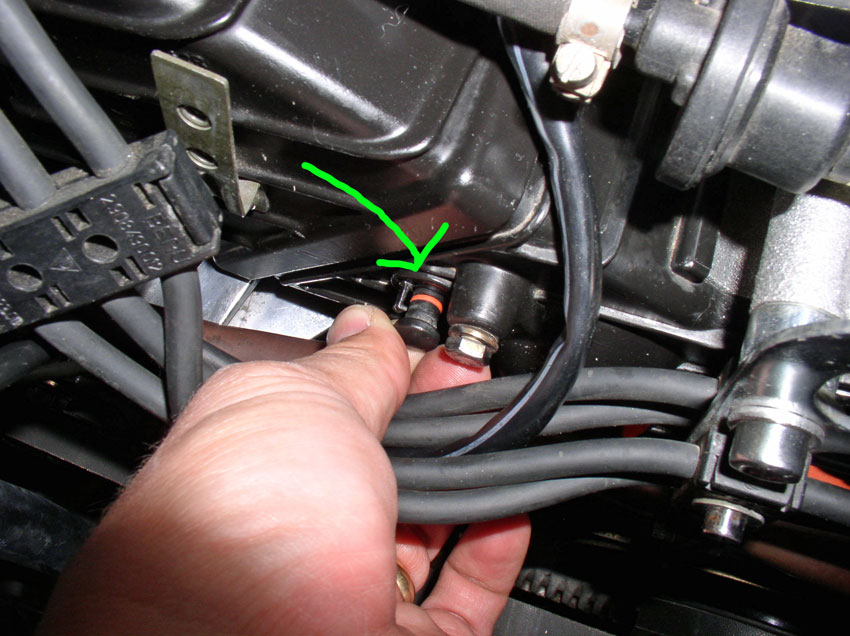
Connect the belt tension warning harness lead to the connector on the cam cover as shown. Push the plug in until the locking tab clicks.
Ensure the dipstick tube o-ring is seated on the bottom of the tube as shown.
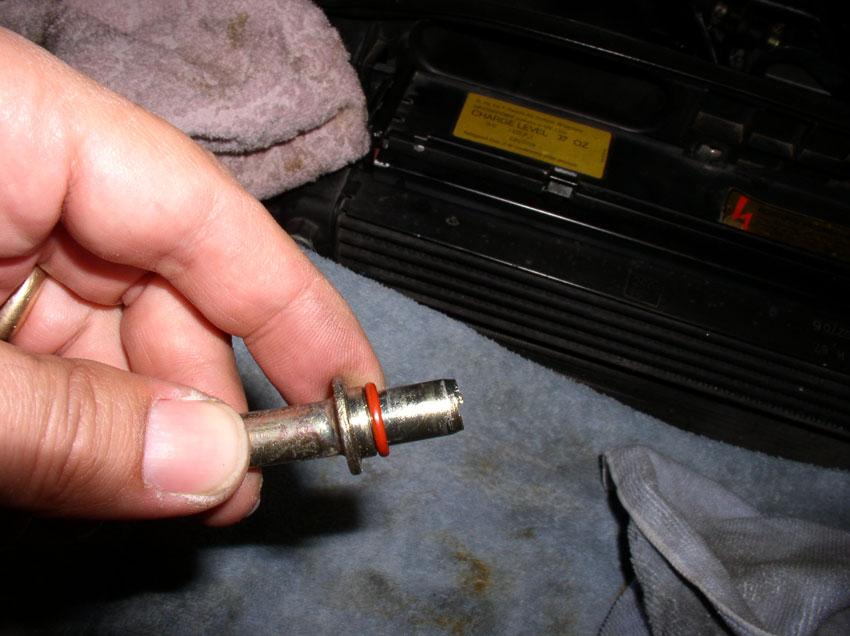
Manuever the tube down the front of the cam covers and insert the end into the oil pan.
Ensure the tube is fully seated in the oil pan as shown.

Install the 10mm bolt that secures the dipstick tube to the cam cover as shown. Install the dipstick into the tube.

Next, we'll install the coolant hoses....
Continued....
Install the small 5mm allen head bolts into the engine harness clamps - there are two of them.
Install the bolts/clamps onto the engine lift hook and hand tighten as shown.
Next, attach the engine lift hook to the water pump casing with the two 6mm allen head bolts as shown. Tighen down the two bolts.
Then tighten down the two 5mm allen head bolts for the engine harness clamps.
Secure the small front engine harness to the driver's side cam cover with the plastic clip as shown.
Starting with the passenger side distributor cap, attach the coil wire to the bottom of the distributor as shown.
Secure the distributor cap to the cam cover using an 8mm socket or flat blade screwdriver. Tighten all three screws. Install the driver's side distributor cap in the same manner next.
Connect all the spark plug wires to their respective distributor in their respective order. If you still have the sticker on top of the radiator, it will show you which order the spark plug wires should be connected to the distributor. If not, for the passenger side distributor (standing in front of the car), the plug order on the distributor from left to right should be 4, 6, 7, and 1. For the driver's side distributor (standing in front of the car), the plug order on the distributor from left to right should be 5, 2, 3, and 8.
Connect the belt tension warning harness lead to the connector on the cam cover as shown. Push the plug in until the locking tab clicks.
Ensure the dipstick tube o-ring is seated on the bottom of the tube as shown.
Manuever the tube down the front of the cam covers and insert the end into the oil pan.
Ensure the tube is fully seated in the oil pan as shown.
Install the 10mm bolt that secures the dipstick tube to the cam cover as shown. Install the dipstick into the tube.
Next, we'll install the coolant hoses....
Continued....
01-02-2010, 09:13 PM
#50
Rennlist Member
Thread Starter
Join Date: Sep 2007
Location: Ridgecrest, California
Posts: 1,363
Likes: 0
Received 143 Likes
on
28 Posts
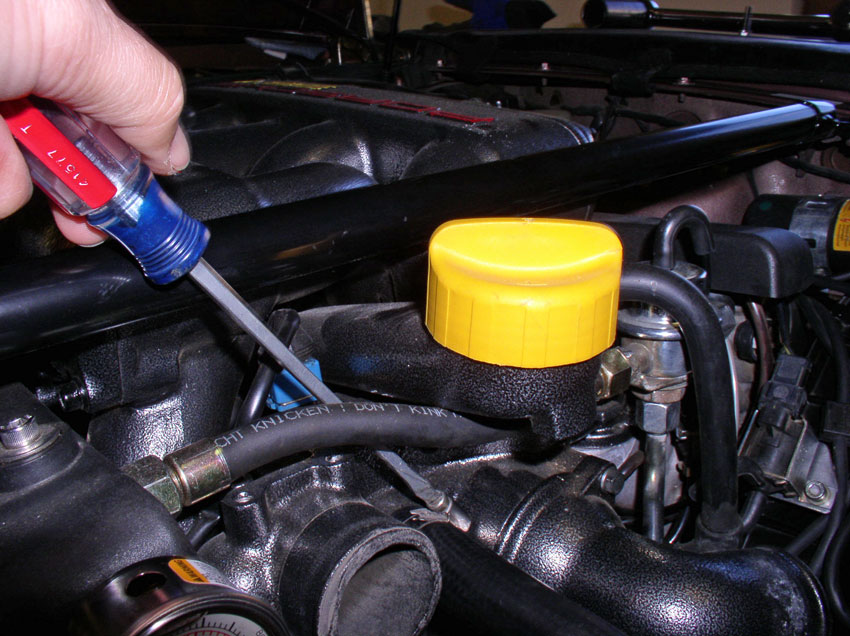
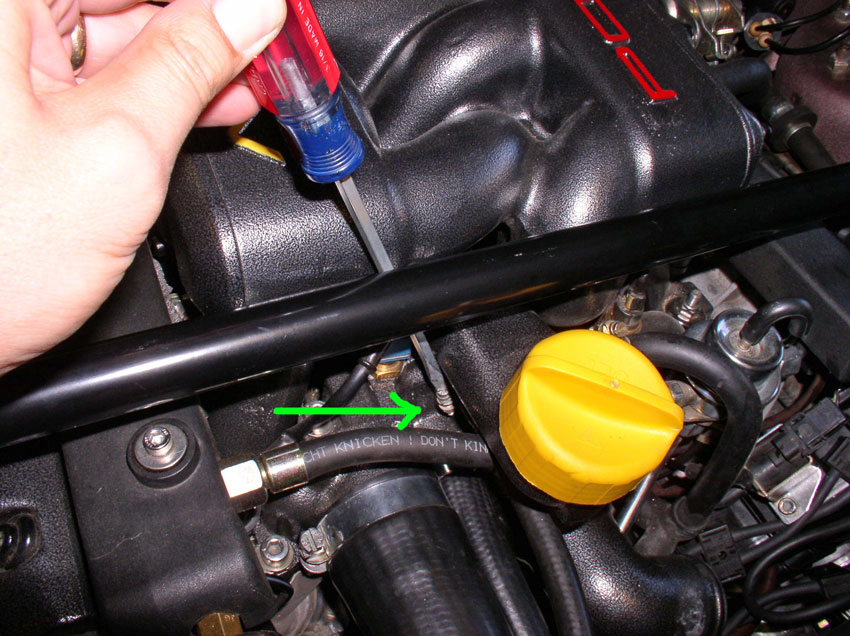
I started by installing the heater return hose. Install the hose onto it's fitting on the thermostat housing as shown. Ensure the clamp is oriented so you can access it with a screwdriver from above.

Tighten the hose clamp with a flat blade screwdriver as shown.
Intall the upper radiator hose next.

Install the hose on the radiator and ensure the clamp can be accessed from above and to the left of the hose. Then tighen the clamp with a 10mm socket or flat blade screwdriver.
Attach the other end to the thermostat housing as shown. Ensure the clamp can be accessed from above. Tighten the clamp with a 10mm socket or flat blade screwdriver as shown.
Install the bleeder hose next. Ensure the clamp can be accessed from above with a screwdriver. Also ensure the hose lays on top of the upper radiator hose.
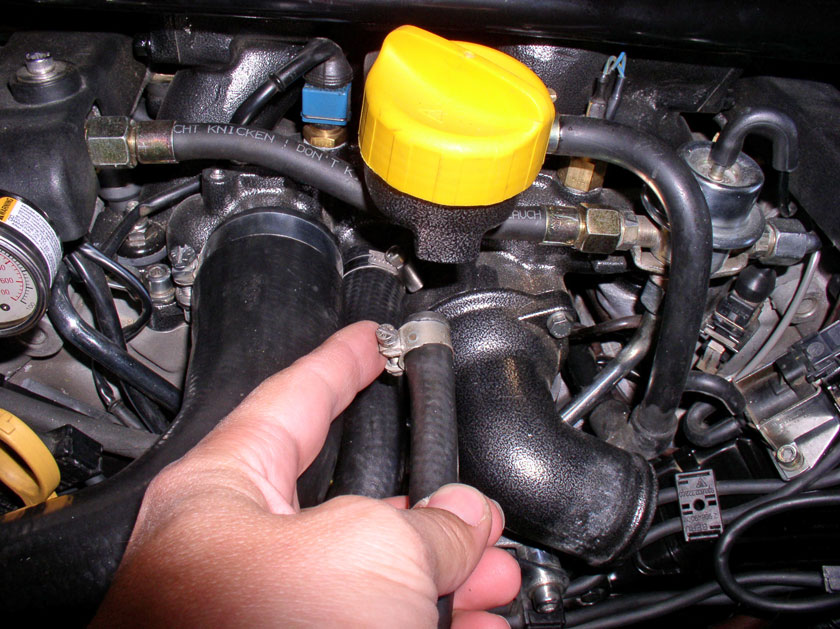
Tighten the bleeder hose clamp with a flat blade screwdriver as shown.
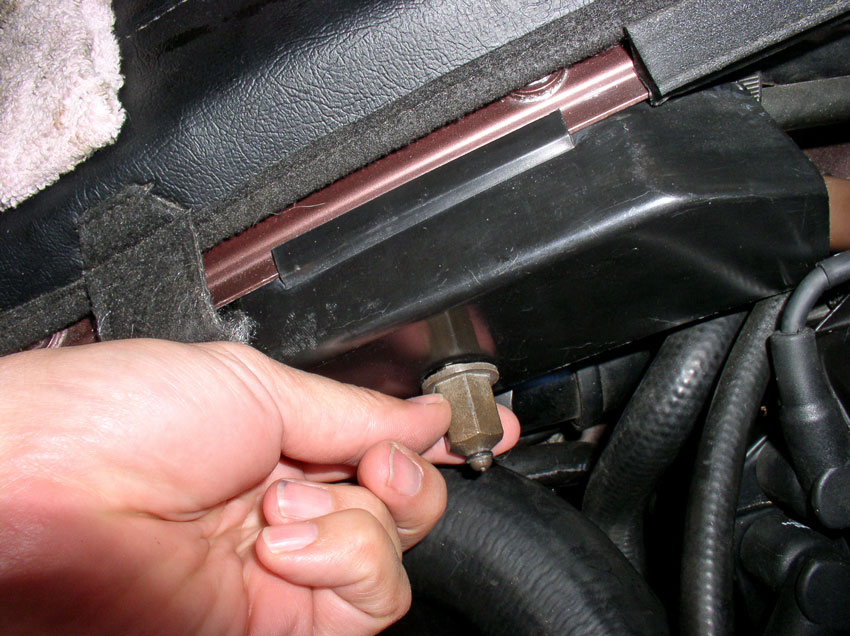
Attach the fan shroud harness to the fan shroud using the plastic harness clip as shown.
Install the charging post plastic cover and secure it with the plastic cover nut as shown.
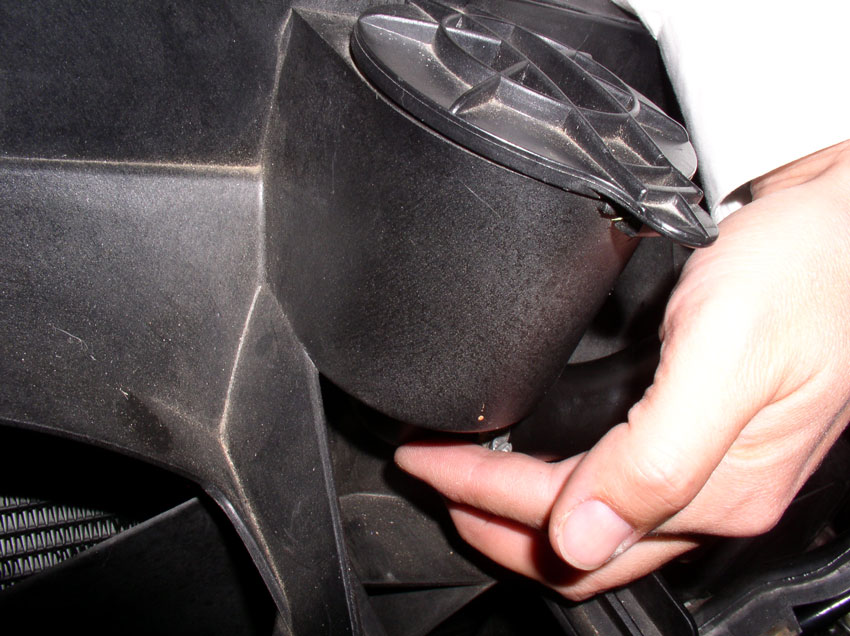
Attach the air pump filter elbow pipe to the air pump hose as shown.
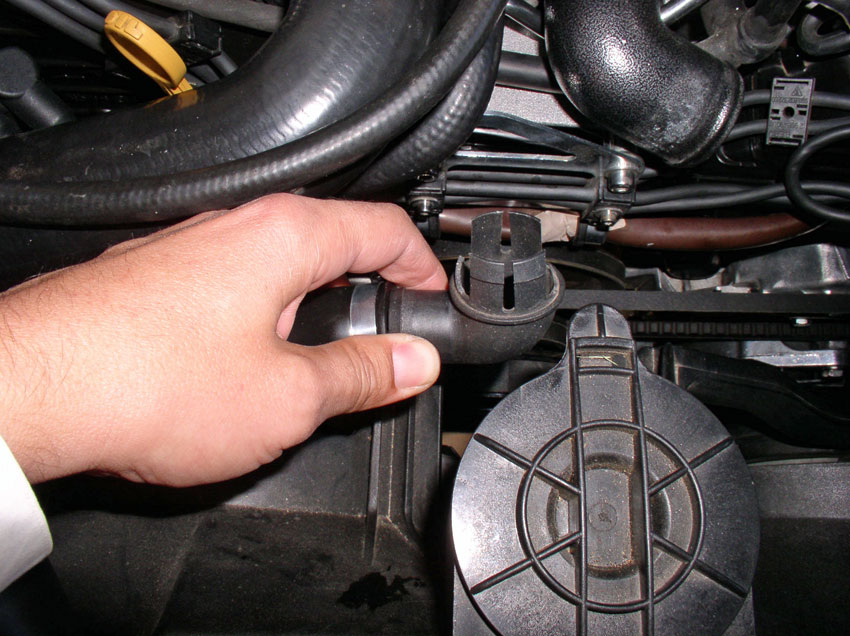
Install the elbow into the bottom of the filter housing as shown. Tighten the clamp with a flat blade screwdriver.
Manuever the lower radiator hose down between the engine and fan shroud as shown.
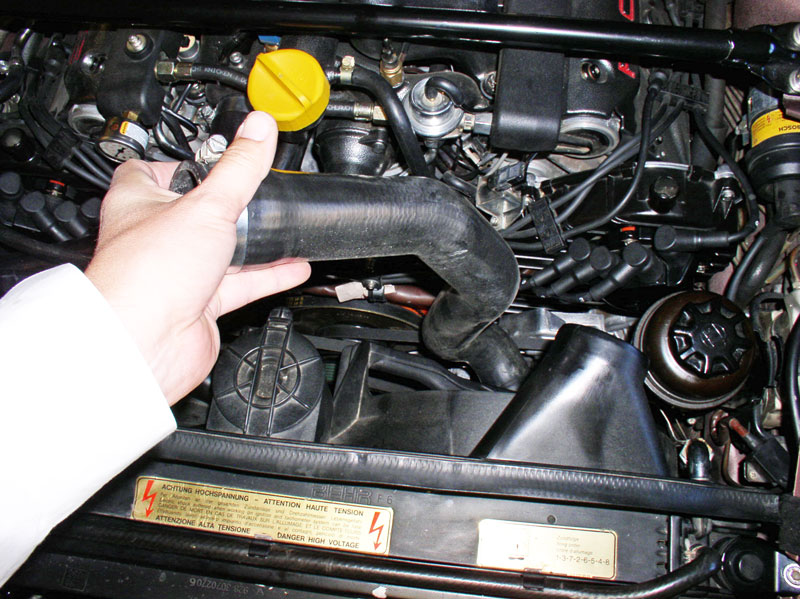
Connect the upper end to the elbow at the thermostat housing. Ensure the clamp can be accessed from above.
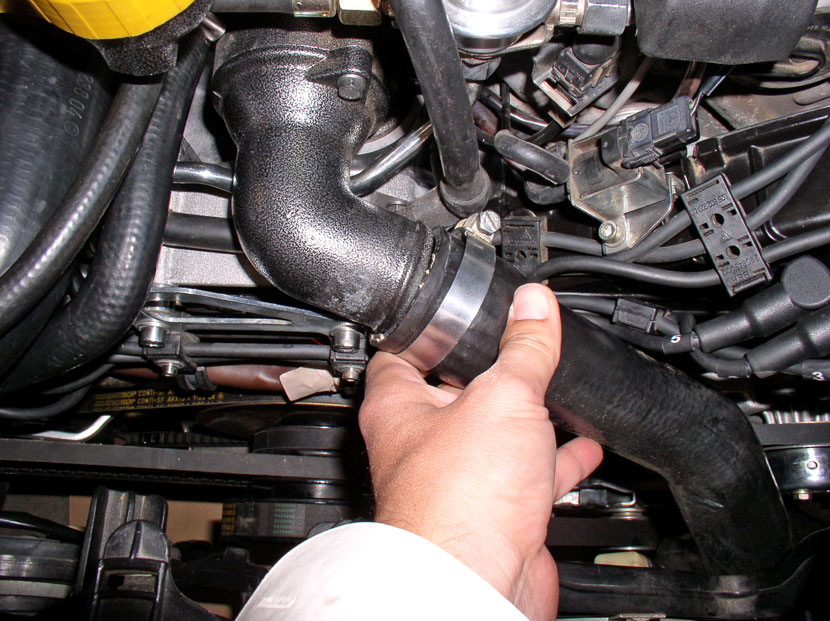
Tighen the clamp with a 10mm socket or flat blade screwdriver.
From underneath, orient the clamp so it can be accessed from underneath the car and install the hose onto the radiator. Tighten the clamp with a 10mm socket or flat blade screwdriver.
Next, we'll wrap up....
Continued....
Tighten the hose clamp with a flat blade screwdriver as shown.
Intall the upper radiator hose next.
Install the hose on the radiator and ensure the clamp can be accessed from above and to the left of the hose. Then tighen the clamp with a 10mm socket or flat blade screwdriver.
Attach the other end to the thermostat housing as shown. Ensure the clamp can be accessed from above. Tighten the clamp with a 10mm socket or flat blade screwdriver as shown.
Install the bleeder hose next. Ensure the clamp can be accessed from above with a screwdriver. Also ensure the hose lays on top of the upper radiator hose.
Tighten the bleeder hose clamp with a flat blade screwdriver as shown.
Attach the fan shroud harness to the fan shroud using the plastic harness clip as shown.
Install the charging post plastic cover and secure it with the plastic cover nut as shown.
Attach the air pump filter elbow pipe to the air pump hose as shown.
Install the elbow into the bottom of the filter housing as shown. Tighten the clamp with a flat blade screwdriver.
Manuever the lower radiator hose down between the engine and fan shroud as shown.
Connect the upper end to the elbow at the thermostat housing. Ensure the clamp can be accessed from above.
Tighen the clamp with a 10mm socket or flat blade screwdriver.
From underneath, orient the clamp so it can be accessed from underneath the car and install the hose onto the radiator. Tighten the clamp with a 10mm socket or flat blade screwdriver.
Next, we'll wrap up....
Continued....
01-02-2010, 09:39 PM
#51
Rennlist Member
Thread Starter
Join Date: Sep 2007
Location: Ridgecrest, California
Posts: 1,363
Likes: 0
Received 143 Likes
on
28 Posts
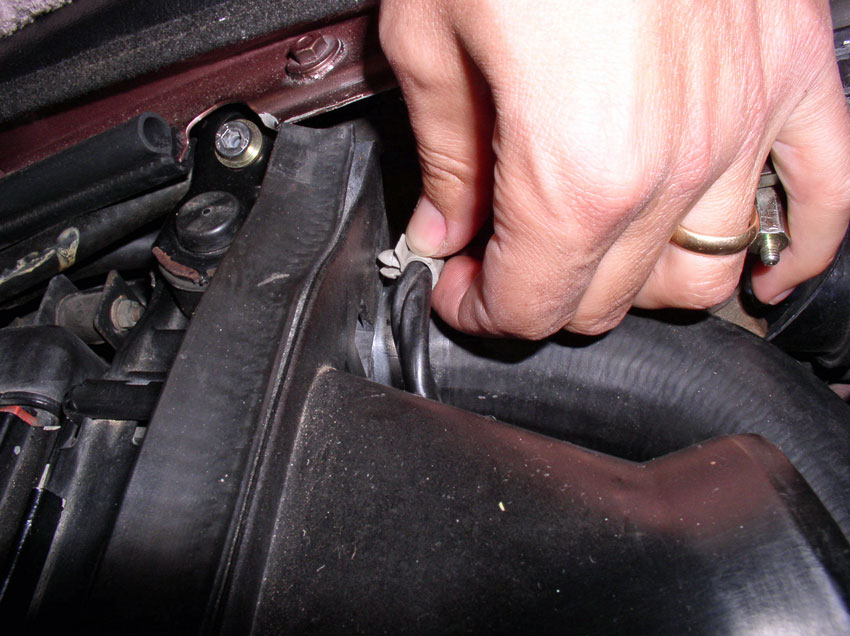
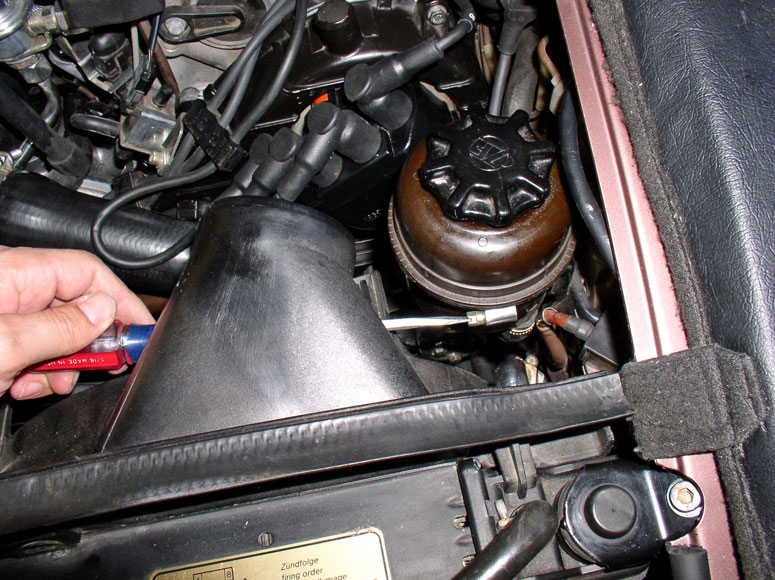
Install the PS fluid reservoir clamp next.
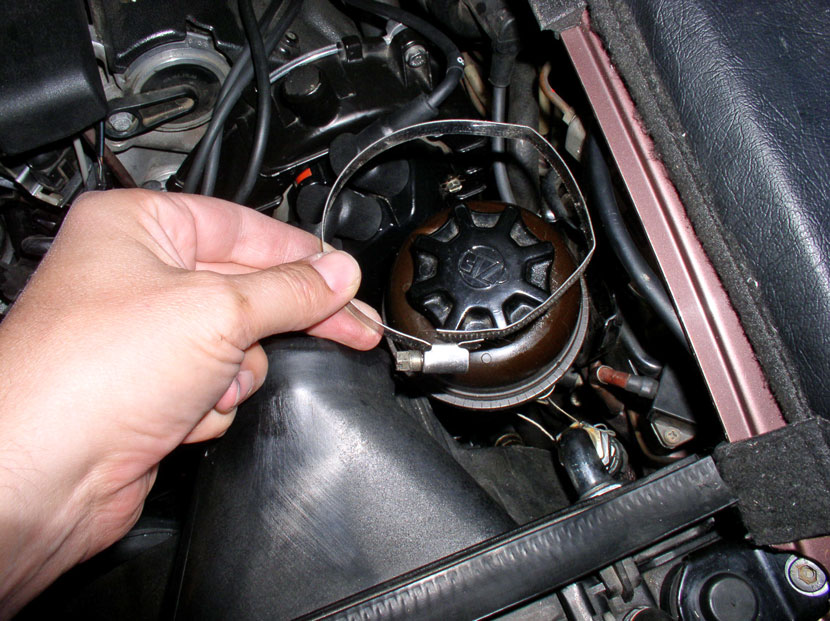
The clamp should still be apart from the removal process. Insert the end of the clamp behind the bracket and under the lip of the reservoir as shown.
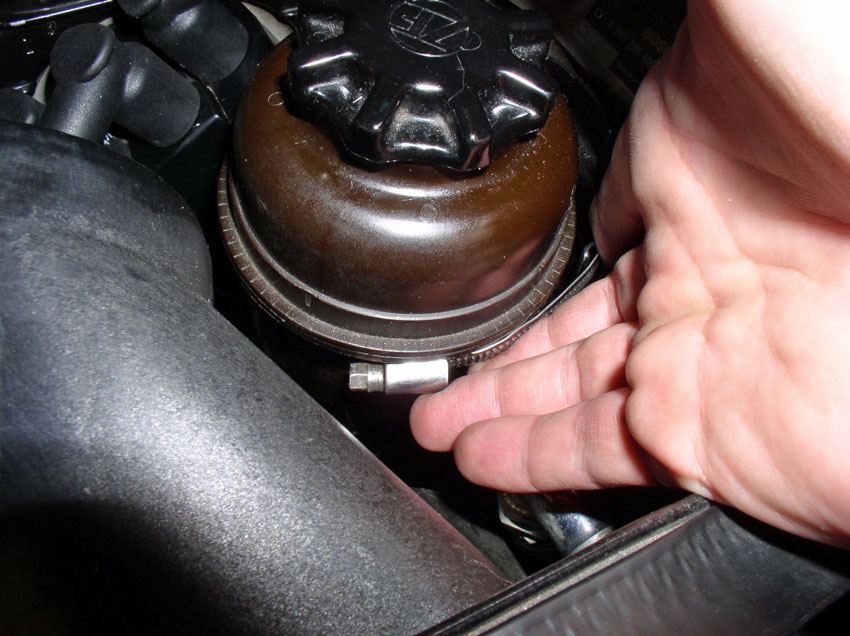
Tighen the clamp with a long flat blade screwdriver.
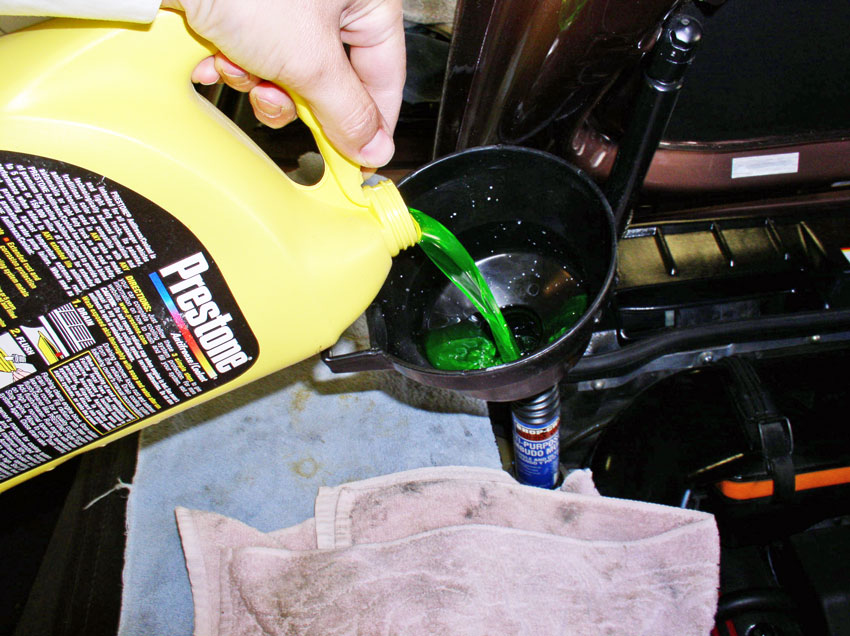
Fill engine block, radiator and coolant reservoir with coolant. I use a 50/50 mixture of coolant and distilled water but coolant strength is a personal preference. WSM recommends minimum of 30% coolant. Coolant capacity is approximately 16 liters or about 4.2 US gallons. You probably won't be able to fit in 4.2 gallons but count on about 3.5 gallons if you drained the block and radiator. It will take some time for the air to bleed out of the system so you can work on a few other things while the coolant is filling. When the engine/radiator appears to stop taking coolant, you can install the cap on the reservoir.
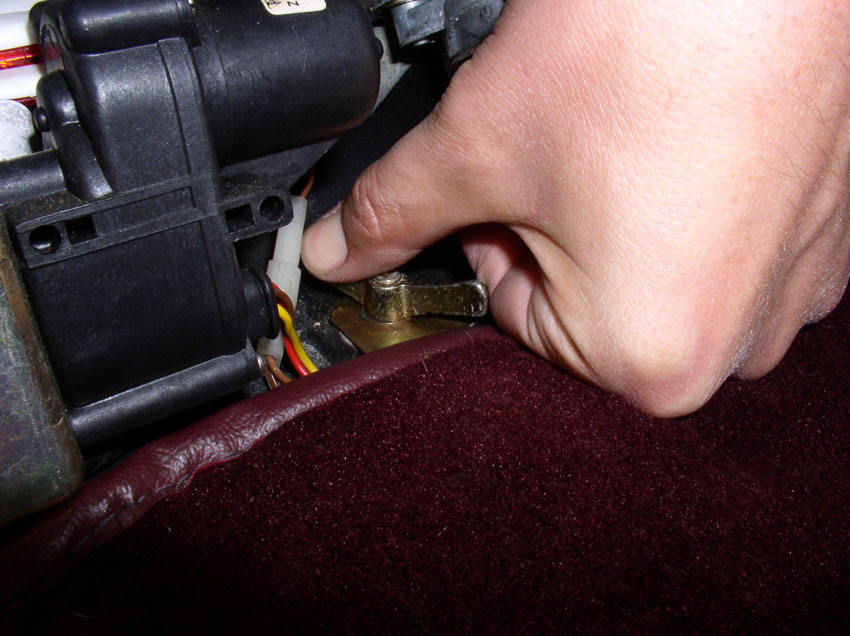
Reconnect the negative battery terminal to the body chassis as shown (or reconnect the negative cable to the battery if you went that route).
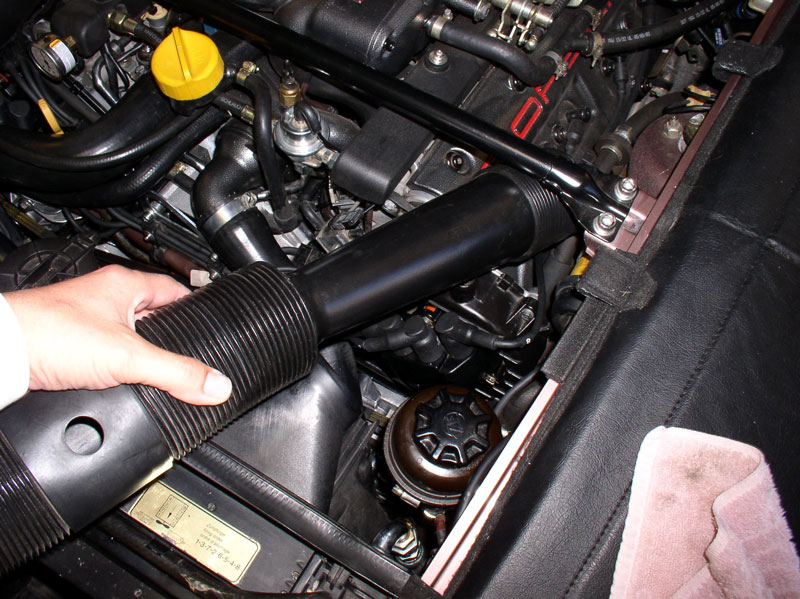
Re-install the intake air tubes.
While the car is still on the jackstands, it's a good time to check for coolant leaks or timing belt tensioner oil leaks. You can start the car while it's on the stands and let it run for a few minutes while checking for leaks. If no leaks, turn off the car and re-install the belly pans. Install the front belly pan first, followed by the rear pan.
Take the car carefully down from the jackstands and take it for a test drive.
Run/drive the car until the operating temperature is reached, turn on the heater to max heat and run for a few minutes. After the car cools down, recheck the coolant level and top off, if necessary. That's about it!
Hopefully, this has been a helpful guide for this common maintenance procedure. Please feel free to comment or add advice as I'm always looking to improve the quality of a post like this. I'm particularly interested in whether or not breaking up the procedure into chapters than can be "searched" with the search function in order to quickly locate a section of the procedure that is of particular interest. THANKS for reading!!
The clamp should still be apart from the removal process. Insert the end of the clamp behind the bracket and under the lip of the reservoir as shown.
Tighen the clamp with a long flat blade screwdriver.
Fill engine block, radiator and coolant reservoir with coolant. I use a 50/50 mixture of coolant and distilled water but coolant strength is a personal preference. WSM recommends minimum of 30% coolant. Coolant capacity is approximately 16 liters or about 4.2 US gallons. You probably won't be able to fit in 4.2 gallons but count on about 3.5 gallons if you drained the block and radiator. It will take some time for the air to bleed out of the system so you can work on a few other things while the coolant is filling. When the engine/radiator appears to stop taking coolant, you can install the cap on the reservoir.
Reconnect the negative battery terminal to the body chassis as shown (or reconnect the negative cable to the battery if you went that route).
Re-install the intake air tubes.
While the car is still on the jackstands, it's a good time to check for coolant leaks or timing belt tensioner oil leaks. You can start the car while it's on the stands and let it run for a few minutes while checking for leaks. If no leaks, turn off the car and re-install the belly pans. Install the front belly pan first, followed by the rear pan.
Take the car carefully down from the jackstands and take it for a test drive.
Run/drive the car until the operating temperature is reached, turn on the heater to max heat and run for a few minutes. After the car cools down, recheck the coolant level and top off, if necessary. That's about it!
Hopefully, this has been a helpful guide for this common maintenance procedure. Please feel free to comment or add advice as I'm always looking to improve the quality of a post like this. I'm particularly interested in whether or not breaking up the procedure into chapters than can be "searched" with the search function in order to quickly locate a section of the procedure that is of particular interest. THANKS for reading!!
 01-02-2010, 09:50 PM
#53
Rennlist Member
Thread Starter
Join Date: Sep 2007
Location: Ridgecrest, California
Posts: 1,363
Likes: 0
Received 143 Likes
on
28 Posts
Dwayne, at the risk of sounding like a broken record, you ARE the man. Thank you so much for taking the exhorbitant amount of time it must have taken to do this.
I know many of us would not be able to own these fine cars without the support and friendship of the more knowledgeable members and vendors on this site.
I'm going to be doing my w/p timing belt job sometime this winter or spring. This is very timely.
Thanks again, and Happy New Year! -Ed
I know many of us would not be able to own these fine cars without the support and friendship of the more knowledgeable members and vendors on this site.
I'm going to be doing my w/p timing belt job sometime this winter or spring. This is very timely.
Thanks again, and Happy New Year! -Ed


Before you even finish this I want to say thank you. I'm new here and at this and I am currently trying to do all the research I can for timing belt replacement in my 86. I just purchased a manual made by someone from this forum and was just getting started reading it. I love the pics the ones in the manual I purchased are good but in black and white.
Honestly thank you, you dont know how valuable this is to me right now (well in a week or two). Keep with the "newbie related" theme...
Honestly thank you, you dont know how valuable this is to me right now (well in a week or two). Keep with the "newbie related" theme...
I will pay for this in a .pdf, I vote for Dwayne for 928 Man of the year 2010 and 2011, lol. Hey Dwayne my car is #356, they were both on the line at the same time. We should have a reunion one day. Too bad I'm flying to LA the end of Jan and not driving the car down. Cheers!
Fantastic stuff Dwayne. Thank you. This job not scheduled for another year or two on my car but am really looking forward to it with such lucid and thorough instructions.
Have done early parts of this procedure several times for other projects (such as retension, ancillary belt replacement, refurb PS pump) but still found tips and advice I hadn't come across or thought of.
Have read other threads on TB replacement where people have struggled with pulleys/harmonic balancer, and you just calmly use a puller having replaced centre bolts.
Wayne, as usual this is a brilliant write up !
I would suggest that you include the tightening torque for the radiator drain plug which is 1.5Nm or 1.1ft/lb. It is easy to break the head off if over tightened. As you say, the seal is due to the O ring on the shank of the bolt, not under the head of the screw.
The part number of the flywheel lock tool is 9161/1 for the later engines (MY 83 and later.)
THANKS for the great comments, guys! I'm humbled and honored by your feedback! - I'm also very happy to help out! Sorry I couldn't get back to you earlier but I was focused on getting this whole thing posted. THANKS AGAIN for reading!!
I added the torque spec for the radiator plug - THANKS, John!
01-02-2010, 09:55 PM
#54
Track Day

Join Date: Jan 2009
Location: Clarksville, TN
Posts: 15
Likes: 0
Received 0 Likes
on
0 Posts
Again, thank you so much. I drove my 'new' car (86 w/57k miles, had been largely parked for many years, last timing belt change at 29k in 1992... I know I probably shouldn't have driven it) home 2 months ago and parked it in the garage. Waiting for time to change the timing belt and some misc maintenance. I've been very intimidated by the job and now I feel like I will be able to handle this job and finally enjoy my 'new' car. It may be another 2 months before I get the time but I'd just started getting into deep research about this. I truely can't thank you enough.
01-02-2010, 09:58 PM
#55
Rennlist Member
Thread Starter
Join Date: Sep 2007
Location: Ridgecrest, California
Posts: 1,363
Likes: 0
Received 143 Likes
on
28 Posts
Dwayne-
I'd be willing to print and bind (spiral bind or three ring bind) these for you at cost plus a small profit to make it worth my time. If you'd send me the pdf files, I could assemble them into a binder format, put together a table of contents and then print them on demand as you need them.
I think three ring bind would work well for users because they could buy a manual with just the sections they want and then add to it by purchasing other sections at a later date. The pages could be put in sheet protectors so they could be taken out into the shop without ruining the pages. send me a PM if you are interested.
It wouldn't be free but sure seems like it might be something people would be willing to pay a little bit for.
Hello Jeff,
I have considered this option previously. I'm thinking of making a set for myself first to see what works best in the shop. In the end, I would like something like this to be very affordable (or better yet, FREE!) to the community. Just have to figure out how to do it. I'll certainly keep your offer in mind. THANKS for the offer and for reading!
01-02-2010, 10:17 PM
#56
Three Wheelin'
Dwayne, I have an '82 and my neighbor may be moving...would you move in next door? ;-)
I would gladly pay for this in an OB version!
Thanks!
I would gladly pay for this in an OB version!
Thanks!
 01-02-2010, 10:41 PM
#58
Three Wheelin'
You are aware that California is going to fall into the ocean one of these days? 
Plus here in Texas we don't have all the smog restrictions.
Thanks again for all you do for us noobs!
Brian
Plus here in Texas we don't have all the smog restrictions.
Thanks again for all you do for us noobs!
Brian
01-03-2010, 02:51 PM
#60
Burning Brakes
Dwayne,
You are an absolute asset to the 928 world.
You are one of the best internet phenoms ever since Al Gore invented the internet.
Steve
You are an absolute asset to the 928 world.
You are one of the best internet phenoms ever since Al Gore invented the internet.
Steve