
Coolant Drain/Change Procedure w/pics
 06-08-2009, 10:56 PM
#1
Three Wheelin'
Thread Starter
Join Date: Sep 2007
Location: Ridgecrest, California
Posts: 1,363
Likes: 0
Received 145 Likes
on
30 Posts
Recently, there was a request for a picture guide for draining/changing coolant (Robot808 and James-man) and since I was going to do this operation on Idaho (88), I took a few pics to share for those that have not tried this procedure yet. I believe the procedure should be the same for all models except for the belly pan removal needed for the S4s.
In summary, the procedures includes removal of the bellypans, draining of the engine block, draining of the radiator, coolant mixing and refilling.
Tools/materials I used include:
8mm and 13mm socket,
3 inch socket extension,
long handle ratchet wrench for the 13mm socket,
torque wrench,
large flat-blade screwdriver,
2 gallons anti-freeze,
2 gallons distilled water,
small/medium kiddie wading pool,
funnel for adding coolant,
Porken's liftbars and jackstands.
You will need a 10mm socket if you decide to remove the front belly pan.
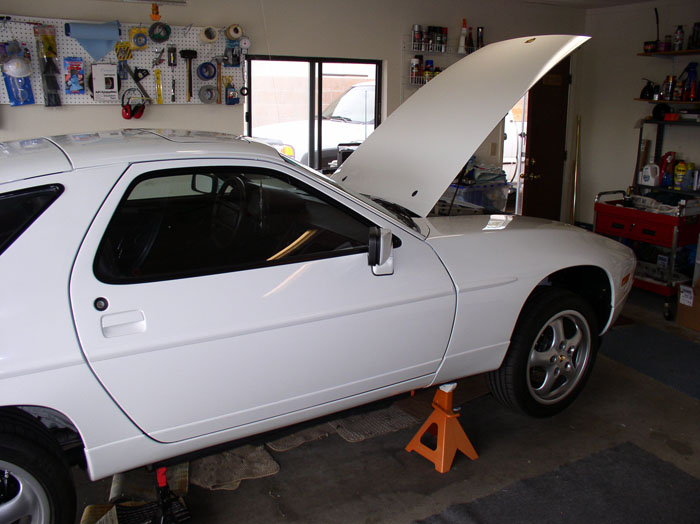
First, you will need to elevate the 928 so you can work comfortably and safely underneath it. I use Porken's liftbars and 4 sturdy jackstands. Weight off wheels is not critical so ramps could be used as well.
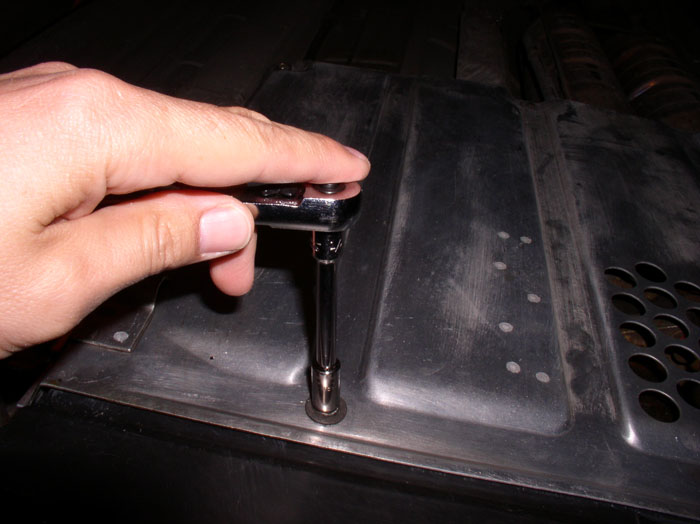
Next, if you have bellypans, the rear bellypan will need to be removed to get access to the engine drain bolts. The rear belly pan uses 8mm screws to attach the pan to the underside of the body. Remove the screws at the front of the rear pan (the ones that attach to the front bellypan). I used a 3" socket extension.
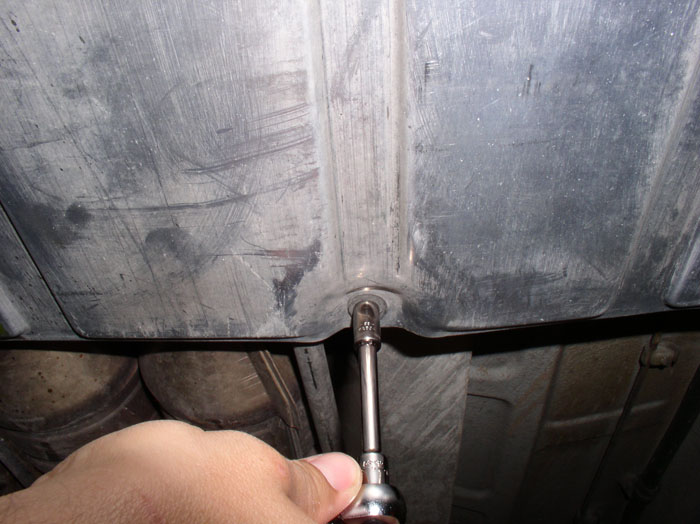
Remove the two screws on the sides of the bellypan (one on each side)
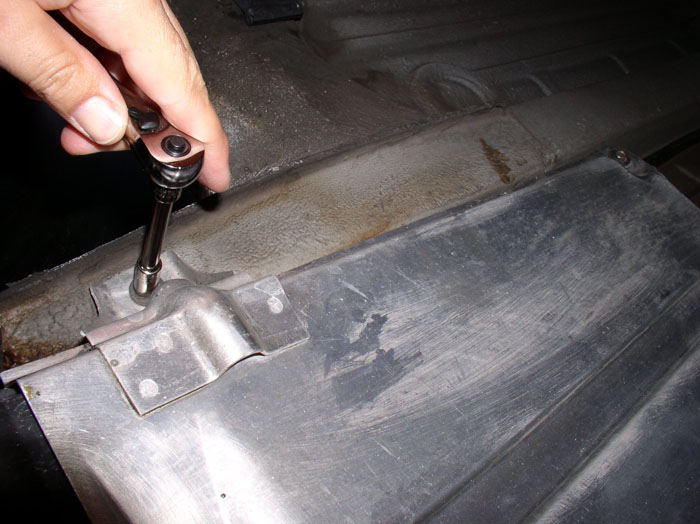
Finally, remove the rear screws while holding up the rear of the rear bellypan. When the last of the screws are out, you will need to slide the bellypan rearward to detach it from the front bellypan (part of the rear pan protrudes over the front pan so it won't drop straight down).
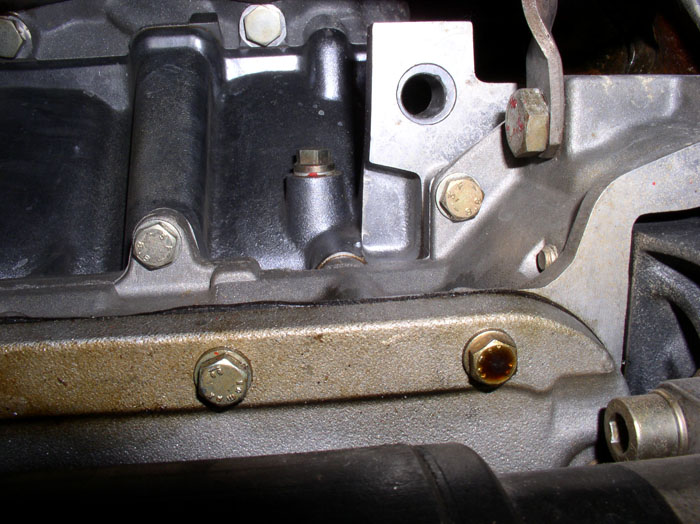
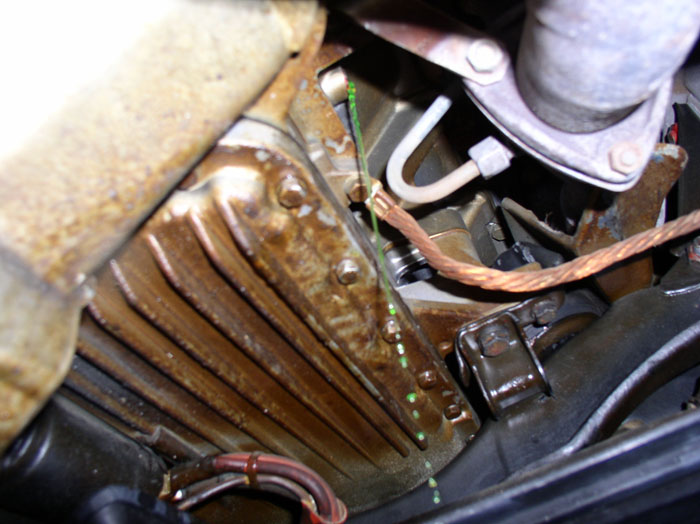
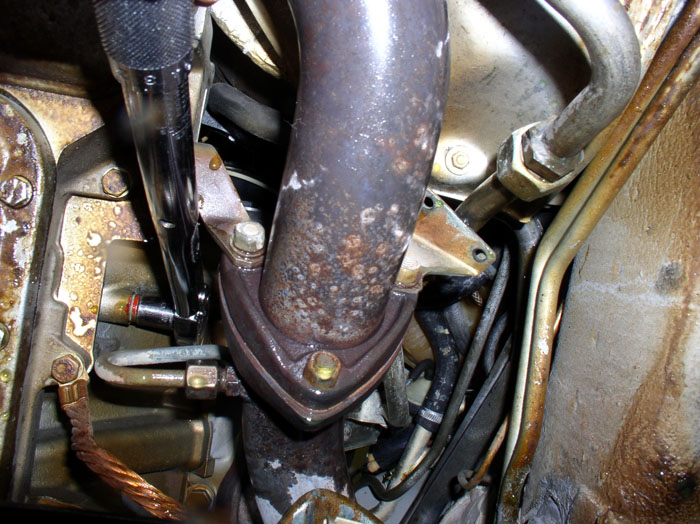
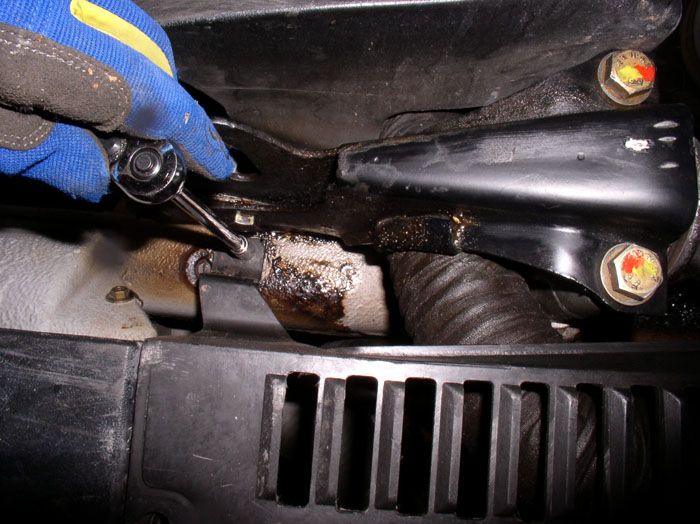
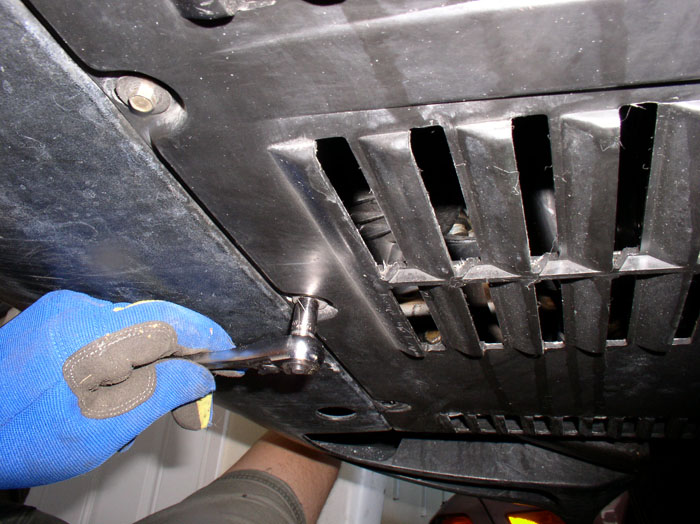
Once the rear pan is removed, you will be able to see the engine coolant drain bolts. These will require the 13mm socket to remove. At this point, you can decided whether to remove the front belly pan as well. In this procedure, I left the front pan in place - the procedure can be done with the front pan in place but it's a little tighter space to manuever in. My preference is to remove both pans and I've included pictures of that procedure at the end of this post. The drain bolt is the one in the center of the picture below and has red paint on the seal. There are 2 drain bolts for the block. If you look in the same location on the other side of the block, you will see the other drain bolt. Both need to be drained.
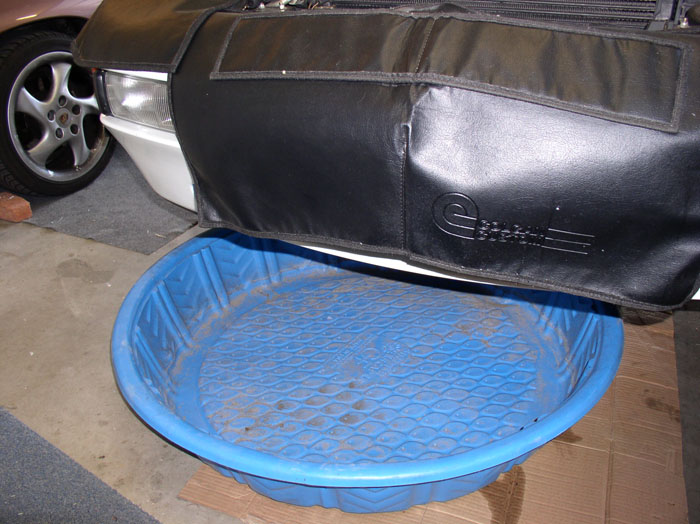
Next, I positioned the drain pan and service covers in place.
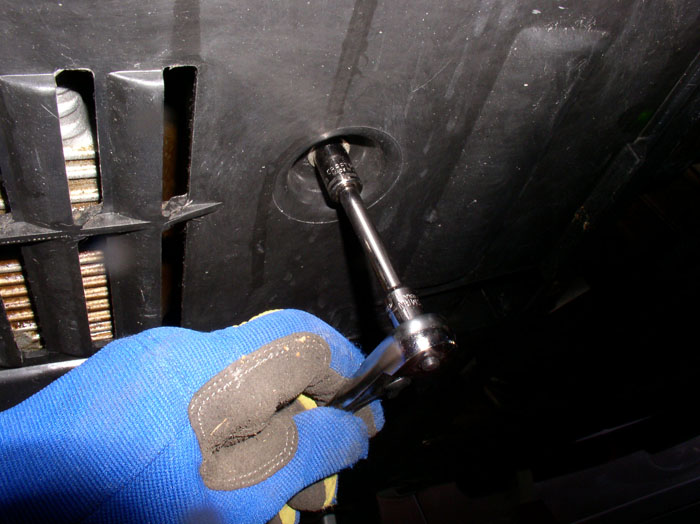
I used a long handle ratchet to get extra leverage and more torque for removing the drain bolt. Make sure you keep the cap on the the coolant reservior tank - don't loosen or remove it yet.
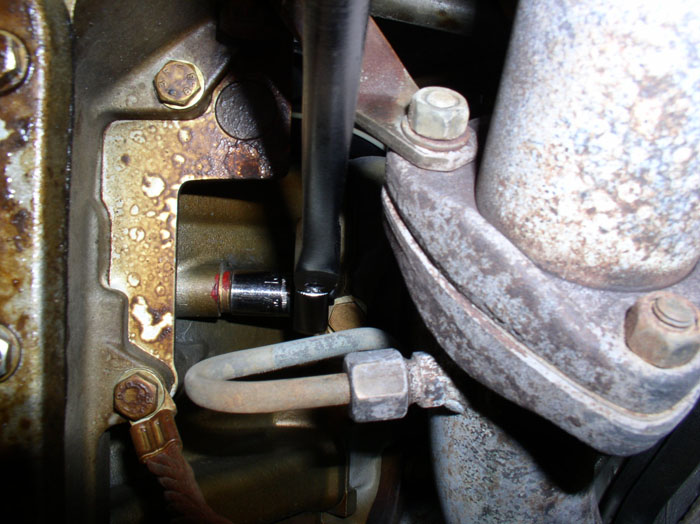
You may find it a little tight to manuever with the front belly pan installed and the kiddie pool in place but it is doable if you take your time and make sure your socket is securely on the drain bolt. You may try breaking the bolt loose first without the kiddie pool in place. Then position the pool while you remove the bolt.
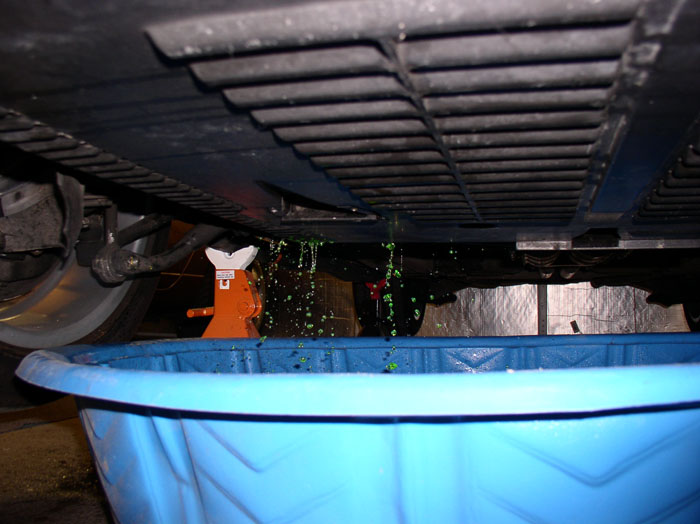
When you get the bolt loosened, you should be able to remove it with your fingers. Coolant will begin to drain but at a fairly slow rate....
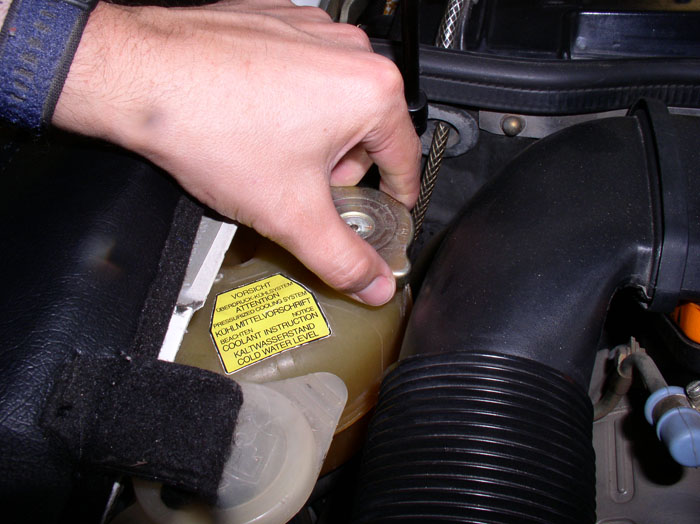
....now you can go topside and loosen the cap on the coolant reservior. This will allow the coolant to drain faster.
If you leave the front belly pan in place, it will leak coolant on it. No problem though, you can wipe it off afterward.
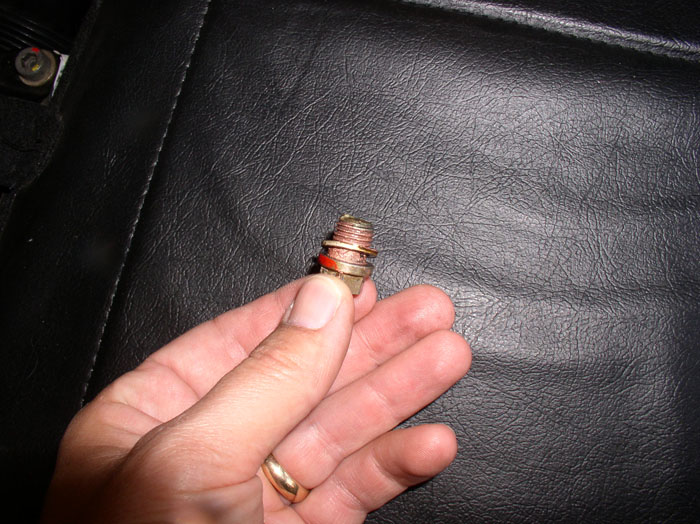
Here's a pic of the drain bolt. The WSM recommends using copper anti-seize on the threads before re-installing. The bolt also has a sealing ring. You can visually inspect the sealing ring for wear or damage. I have re-used the ring before but if you're not sure, you can order a replacement seal. I've purchased seals from 928 Intl but you can probably get them at any of the 928 parts suppliers.
When you have drained both sides of the block, you are ready to re-install the drain bolts. They should be torqued to 35 NM or 25.8 Ftlbs
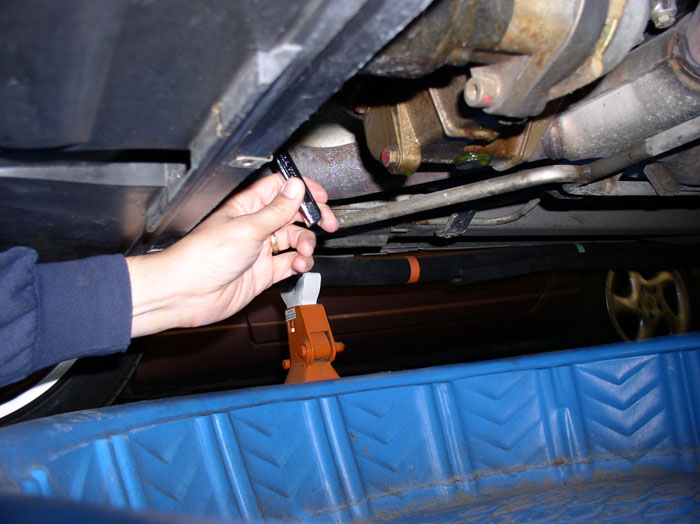
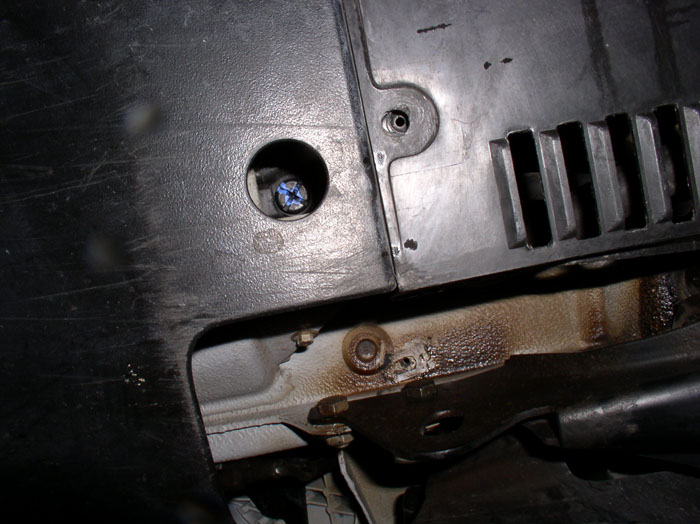
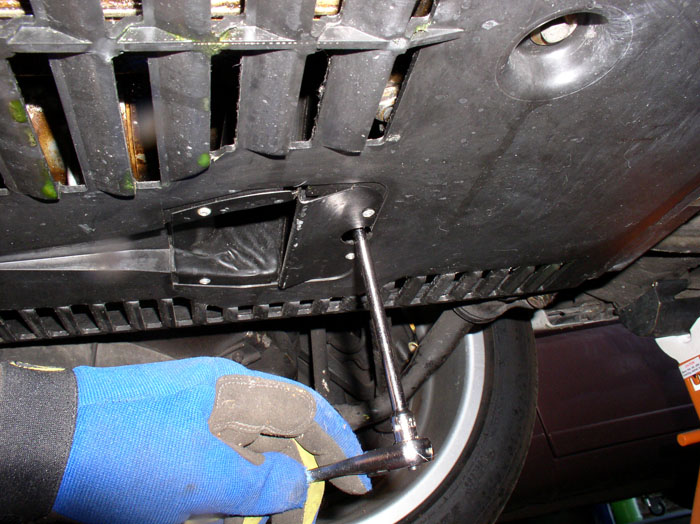
Next, locate the radiator drain plug. It's located near the front of the car on the passenger side. If you have the front belly pan in place, you will see the access hole. The drain plug is made of plastic.
Use a long, large flat-blade screwdriver to remove the drain plug but position the kiddie pool under the plug before loosening it. When you remove the drain plug, you will notice is has a rubber seal ring incorporated. Check the condition of the seal and the threads of the plug and replace if damaged/worn.
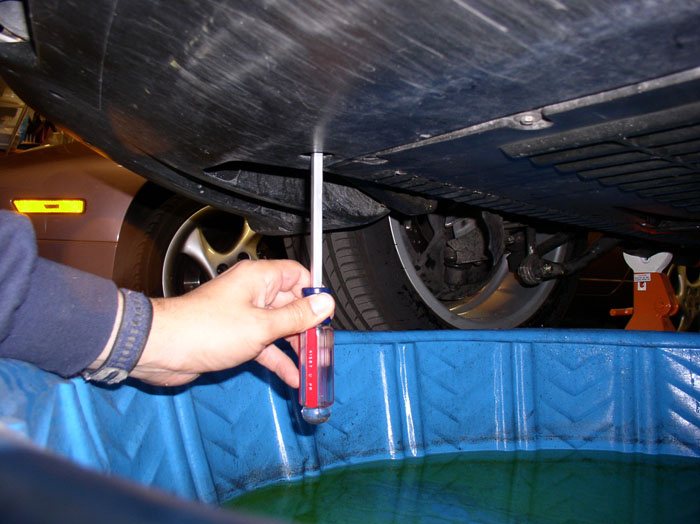
After the coolant is all drained from the radiator, re-install the radiator drain plug using the long, large flat-blade screwdriver. The plug does not require much torque since the properly functioning seal prevents leaks and the threads are plastic - I simply snug it firmly.
continued.....
In summary, the procedures includes removal of the bellypans, draining of the engine block, draining of the radiator, coolant mixing and refilling.
Tools/materials I used include:
8mm and 13mm socket,
3 inch socket extension,
long handle ratchet wrench for the 13mm socket,
torque wrench,
large flat-blade screwdriver,
2 gallons anti-freeze,
2 gallons distilled water,
small/medium kiddie wading pool,
funnel for adding coolant,
Porken's liftbars and jackstands.
You will need a 10mm socket if you decide to remove the front belly pan.
First, you will need to elevate the 928 so you can work comfortably and safely underneath it. I use Porken's liftbars and 4 sturdy jackstands. Weight off wheels is not critical so ramps could be used as well.
Next, if you have bellypans, the rear bellypan will need to be removed to get access to the engine drain bolts. The rear belly pan uses 8mm screws to attach the pan to the underside of the body. Remove the screws at the front of the rear pan (the ones that attach to the front bellypan). I used a 3" socket extension.
Remove the two screws on the sides of the bellypan (one on each side)
Finally, remove the rear screws while holding up the rear of the rear bellypan. When the last of the screws are out, you will need to slide the bellypan rearward to detach it from the front bellypan (part of the rear pan protrudes over the front pan so it won't drop straight down).
Once the rear pan is removed, you will be able to see the engine coolant drain bolts. These will require the 13mm socket to remove. At this point, you can decided whether to remove the front belly pan as well. In this procedure, I left the front pan in place - the procedure can be done with the front pan in place but it's a little tighter space to manuever in. My preference is to remove both pans and I've included pictures of that procedure at the end of this post. The drain bolt is the one in the center of the picture below and has red paint on the seal. There are 2 drain bolts for the block. If you look in the same location on the other side of the block, you will see the other drain bolt. Both need to be drained.
Next, I positioned the drain pan and service covers in place.
I used a long handle ratchet to get extra leverage and more torque for removing the drain bolt. Make sure you keep the cap on the the coolant reservior tank - don't loosen or remove it yet.
You may find it a little tight to manuever with the front belly pan installed and the kiddie pool in place but it is doable if you take your time and make sure your socket is securely on the drain bolt. You may try breaking the bolt loose first without the kiddie pool in place. Then position the pool while you remove the bolt.
When you get the bolt loosened, you should be able to remove it with your fingers. Coolant will begin to drain but at a fairly slow rate....
....now you can go topside and loosen the cap on the coolant reservior. This will allow the coolant to drain faster.
If you leave the front belly pan in place, it will leak coolant on it. No problem though, you can wipe it off afterward.
Here's a pic of the drain bolt. The WSM recommends using copper anti-seize on the threads before re-installing. The bolt also has a sealing ring. You can visually inspect the sealing ring for wear or damage. I have re-used the ring before but if you're not sure, you can order a replacement seal. I've purchased seals from 928 Intl but you can probably get them at any of the 928 parts suppliers.
When you have drained both sides of the block, you are ready to re-install the drain bolts. They should be torqued to 35 NM or 25.8 Ftlbs
Next, locate the radiator drain plug. It's located near the front of the car on the passenger side. If you have the front belly pan in place, you will see the access hole. The drain plug is made of plastic.
Use a long, large flat-blade screwdriver to remove the drain plug but position the kiddie pool under the plug before loosening it. When you remove the drain plug, you will notice is has a rubber seal ring incorporated. Check the condition of the seal and the threads of the plug and replace if damaged/worn.
After the coolant is all drained from the radiator, re-install the radiator drain plug using the long, large flat-blade screwdriver. The plug does not require much torque since the properly functioning seal prevents leaks and the threads are plastic - I simply snug it firmly.
continued.....
Last edited by Dwayne; 06-09-2009 at 09:26 PM.
 06-08-2009, 11:38 PM
#4
Three Wheelin'
Thread Starter
Join Date: Sep 2007
Location: Ridgecrest, California
Posts: 1,363
Likes: 0
Received 145 Likes
on
30 Posts
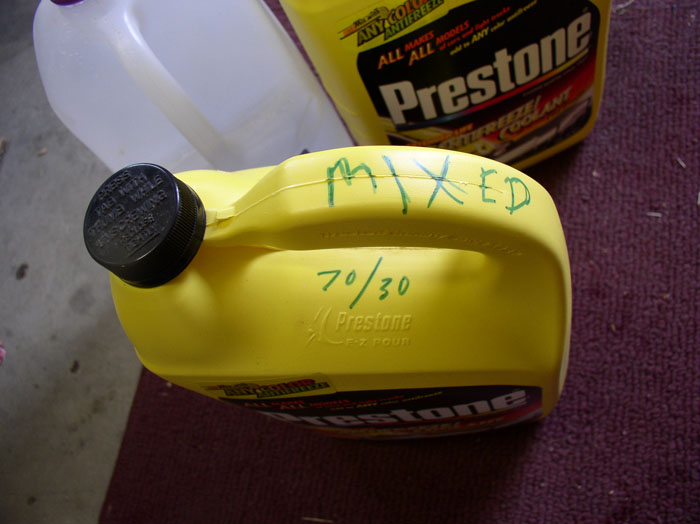
Now, you can mix the coolant. You can use your preference of coolant. I use the green coolant and plain ol' distilled water.
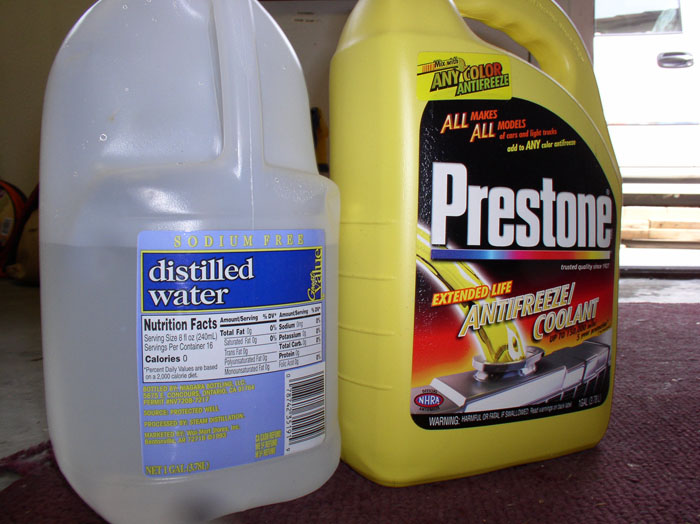
I use to use 50/50 mixture of water/coolant but now days I'm using 70% water and 30% coolant. Once your coolant is mixed, you're ready to fill the reservior.
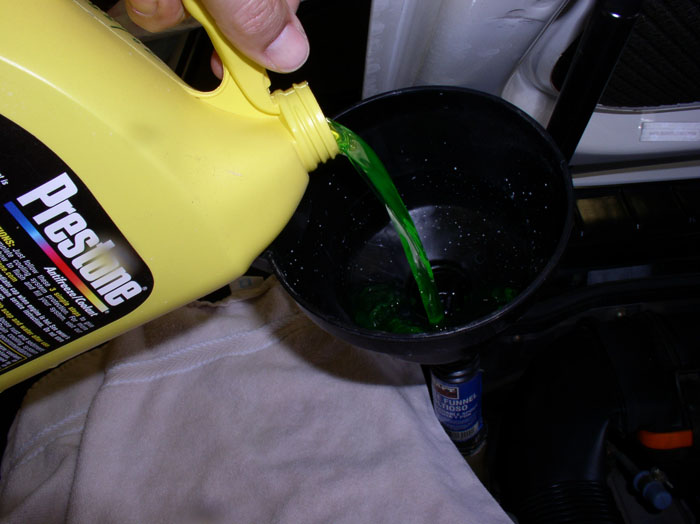
I used service covers to protect the fenders and I place towels around the area I'll be pouring to keep splash from getting on engine and paint. Use a funnel. When pouring coolant in, I pour with one hand while holding the funnel with the other - raising the funnel just enough so I can see the level of coolant in the reservoir. At first, radiator and hoses will take in the coolant rather rapidly. When you get close to 2 gallons, it will slow down as air bleeds out of the engine block. When it slows down, I fill the reservoir to the top with coolant and wait for a while as it slowly fills the engine. During this time you can be productive by disposing of the old coolant, cleaning and putting away your tools or cleaning your bellypan.
Continue to fill slowly until the engine doesn't seem to take any more (i.e., several minutes pass and the reservoir level doesn't move). Check for leaks underneath the car. If no leaks, replace the reservoir cap and start the car and let it get up to operating temperature. You will want to monitor the temperature guage and make sure it doesn't overheat. If there are still no leaks after reaching and maintaining operating temp, you can turn the car off and replace the rear bellypan. Then lower the car off the ramp or jackstands. Check the level of the coolant reservoir and ensure it is at the "full" level mark (about half full). Take the car for a test drive and check the reservoir level again afterward - wait for the car to cool and add coolant as needed.
I continue to monitor the reservoir level after the next few drives and add coolant as necessary. CONGRATULATIONS! YOU'RE DONE!
Now, for those that prefer to remove both bellypans for this job, here's a few pics of the screws/bolts to remove to get the front bellypan off. You will use an 8mm socket for all but two of the mounting hardware. There are two screws near the front and on the side of the belly pan (one on each side) that will require a long extension to reach. I used a 6" extension for these.
With the 6" extension still attached, remove the two 8mm screws that are just behind the vent scoop openings - there's one screw for each vent.
Next, remove the 8mm screws that are at the front of the belly pan. After removing the last screw, hold up the front of the belly pan with one hand.....
....and remove the last two 10mm bolts located near the middle of the belly pan.
Manuever the front bellypan down and away from your work area. Piece of cake!
Please feel free to comment or suggest improvements to this procedure as it will improve the quality of the post. THANKS for reading!
I use to use 50/50 mixture of water/coolant but now days I'm using 70% water and 30% coolant. Once your coolant is mixed, you're ready to fill the reservior.
I used service covers to protect the fenders and I place towels around the area I'll be pouring to keep splash from getting on engine and paint. Use a funnel. When pouring coolant in, I pour with one hand while holding the funnel with the other - raising the funnel just enough so I can see the level of coolant in the reservoir. At first, radiator and hoses will take in the coolant rather rapidly. When you get close to 2 gallons, it will slow down as air bleeds out of the engine block. When it slows down, I fill the reservoir to the top with coolant and wait for a while as it slowly fills the engine. During this time you can be productive by disposing of the old coolant, cleaning and putting away your tools or cleaning your bellypan.
Continue to fill slowly until the engine doesn't seem to take any more (i.e., several minutes pass and the reservoir level doesn't move). Check for leaks underneath the car. If no leaks, replace the reservoir cap and start the car and let it get up to operating temperature. You will want to monitor the temperature guage and make sure it doesn't overheat. If there are still no leaks after reaching and maintaining operating temp, you can turn the car off and replace the rear bellypan. Then lower the car off the ramp or jackstands. Check the level of the coolant reservoir and ensure it is at the "full" level mark (about half full). Take the car for a test drive and check the reservoir level again afterward - wait for the car to cool and add coolant as needed.
I continue to monitor the reservoir level after the next few drives and add coolant as necessary. CONGRATULATIONS! YOU'RE DONE!
Now, for those that prefer to remove both bellypans for this job, here's a few pics of the screws/bolts to remove to get the front bellypan off. You will use an 8mm socket for all but two of the mounting hardware. There are two screws near the front and on the side of the belly pan (one on each side) that will require a long extension to reach. I used a 6" extension for these.
With the 6" extension still attached, remove the two 8mm screws that are just behind the vent scoop openings - there's one screw for each vent.
Next, remove the 8mm screws that are at the front of the belly pan. After removing the last screw, hold up the front of the belly pan with one hand.....
....and remove the last two 10mm bolts located near the middle of the belly pan.
Manuever the front bellypan down and away from your work area. Piece of cake!
Please feel free to comment or suggest improvements to this procedure as it will improve the quality of the post. THANKS for reading!
06-08-2009, 11:55 PM
#5
Team Owner
Nice write up Dwayne.
I would suggest that you remove both of the belly pans, this will give you a chance to clean off all of the crud thats been accumulating .
Dwayne your car is too clean to use for this photo shoot.
Also when you remove the block drain plugs there will be about 1.2 gallons per side and if you pop the cap off it will be a gusher so be prepared to rinse off the floor with a hose or use the small swimming pool like Dwayne
06-09-2009, 07:25 AM
#6
Addict
Rennlist Member
Rennlist Member
Stunning as ever
How many times did you have to drain the coolant just to get the photo of the drops raining from the front belly pan. Normally when I drain coolant I do it with the engine warm (so the wet coolant is not such a shock), wear a wetsuit, and plan on a shower soon after. No way am I taking my camera under there.
How many times did you have to drain the coolant just to get the photo of the drops raining from the front belly pan. Normally when I drain coolant I do it with the engine warm (so the wet coolant is not such a shock), wear a wetsuit, and plan on a shower soon after. No way am I taking my camera under there.

Trending Topics
06-09-2009, 09:15 AM
#8
Rennlist Member
Great one!
The only suggestion I have is to order a couple of extra radiator drain plugs. They are inexpensive. If you don't have spares, I can almost guarantee you'll break the one you've got.
The only suggestion I have is to order a couple of extra radiator drain plugs. They are inexpensive. If you don't have spares, I can almost guarantee you'll break the one you've got.
06-09-2009, 11:27 AM
#9
Supercharged
Rennlist Member
Rennlist Member
Join Date: May 2002
Location: Back in Michigan - Full time!
Posts: 18,925
Likes: 0
Received 59 Likes
on
33 Posts
My only comment is that I will only use the G-05 approved coolant like the Zerex G-05. There have been many discussions on this so I won't go into detail, but if you like your heads... use the G-05.
Excelent guide Dwayne.
06-09-2009, 11:44 AM
#10
Burning Brakes
Dwayne
Fantastic write up as usual. The one thing that I would add is to turn the heater on full when replacing the fluid in order to let the system fill completely. And I am sure someone will mention "burping" the system.
Fantastic write up as usual. The one thing that I would add is to turn the heater on full when replacing the fluid in order to let the system fill completely. And I am sure someone will mention "burping" the system.
06-09-2009, 12:11 PM
#11
Team Owner
there is no burping in the 928 system it is a self bleeding system evidenced by the bleeder on the top of the radiator and the small hose on the top of the water bridge.
Simply fill the system to halfway on the bottle with the cap off the bottle, open the heater control to hot, run the engine till the fans come on , replace the cap and drive with the heater on for 5 miles park the car let cool off then top up as necessary
Simply fill the system to halfway on the bottle with the cap off the bottle, open the heater control to hot, run the engine till the fans come on , replace the cap and drive with the heater on for 5 miles park the car let cool off then top up as necessary
06-09-2009, 01:12 PM
#12
Drifting
Great write up!
I wish I would have read this before I attempted to service mine. I forgot to drain the block... only drained the radiator (and whatever came out of the upper end of the system).
Ended up only putting back in about 2 gallons, so I presume half my coolant still contains beer cooler water from race day when I overheated.
Timing belt & water pump job in the not too distant future, so I’ll completely drain and replenish the system then.
Thanks for the Tips.
06-09-2009, 01:16 PM
#14
Burning Brakes
Matt
06-09-2009, 01:20 PM
#15
Drifting
I’ll throw this out there.
Would it make more sense to drain the radiator first since the drain plug points straight down allowing for easy collection of exiting fluid?
After that’s complete, drain the block with the hopes you can place your catch pan more easily since the pressure will be reduced.
Or is this six one way and a half a dozen the other?