

Hood Removal, Liner Repair, installation procedure (w/pics)
 02-10-2009, 02:11 AM
#16
Cottage Industry Sponsor
Lifetime Rennlist
Member
Lifetime Rennlist
Member

Awesome write-up! And thanks for the business, Dwayne!
I like how you seem to always wear gloves - it both protects your hands AND makes sure you leave no unnecessary evidence...
I like how you seem to always wear gloves - it both protects your hands AND makes sure you leave no unnecessary evidence...

 02-10-2009, 11:13 PM
#18
Three Wheelin'
Thread Starter
Join Date: Sep 2007
Location: Ridgecrest, California
Posts: 1,363
Likes: 0
Received 148 Likes
on
32 Posts
THANKS to ALL for the tremendous feedback/comments. I love working on these cars and enjoy making the posts - especially if some of the members here find them useful. I'm thinking about posting the pics of the center console removal and footwell/comb flap vacuum diaphram repair next but gonna take a little trip to Oregon this weekend with my wife first.
Funny! Just last week I told my wife that if we ever move from the High Desert here we should move to Montana!! I really like the open highways here for 928 driving and was thinking Montana must have something similar. Right now, I'm all too happy to make the 180 mile round trip to the nearest town for even the smallest of errands 
 02-11-2009, 01:35 AM
#20
Rennlist Member
There's more on my site if you're interested. Mine took a bit more cussing to get the adhesive off -- I think it had been painted over. IIRC the default choice for the nose decal was "Porsche" but that seemed redundant.
 Also I liked the more subtle colors. Kinda fits the whole "It's either metal or it's black" theme.
02-11-2009, 11:05 AM
Also I liked the more subtle colors. Kinda fits the whole "It's either metal or it's black" theme.
02-11-2009, 11:05 AM
#21
Addict
Rennlist Member
Rennlist Member
Dwayne, Dave,
You two have some of the best write ups I've ever seen!!!
I for one appreciate all the write ups and think y'all have done a great job for the 928 community!!
Grassy ***!!
You two have some of the best write ups I've ever seen!!!
I for one appreciate all the write ups and think y'all have done a great job for the 928 community!!
Grassy ***!!
02-11-2009, 01:21 PM
#23
Rennlist Member
Thanks Chuck... I have to say, Dwayne often goes into more detail, where I tend to hit the highlights. It's fun though, and always good to hear when it helps someone.
02-11-2009, 02:47 PM
#25
Rennlist Member

Will
02-11-2009, 03:20 PM
#26
Advanced
Join Date: Apr 2008
Location: Germantown, WI
Posts: 58
Likes: 0
Received 0 Likes
on
0 Posts
Dwayne, Like everyone else said fantastic write up. It will be my bible for the first project of the year once we warm up here in Wisconsin and I can take the winter wraps off the car. Thanks again!
12-05-2011, 12:02 AM
#27
Rennlist Member
Thank you, Dwayne. This write-up helped me get mine done (from Rob Budd) on my white car without any snags! A few comments from my experience:
1. I could not find the 3M Citrus Adhesive Remover, but I found 3M General Purpose Adhesive Cleaner (08987), and it worked much faster than the Mineral Spirits (I started with the Mineral Spirits). I picked it up at an Auto Parts store - I forget which one, but not all of them had it.
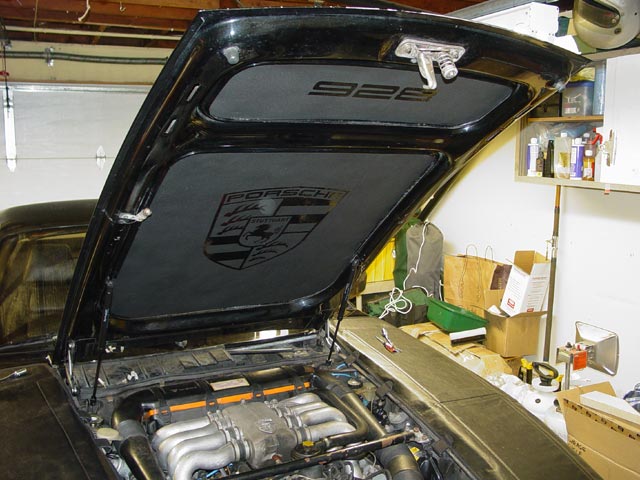
2. For the small section where the Emissions information is, I cut 3 sides of a rectangle to create a flap and glued everything but the flap, then added a velcro strip to the open end of the flap (see pics). The flap tends to want to fall open without the velcro, and I was concerned about it getting tangled up with the front electric fan (86.5 MY) - it does not seem to anyway, but I wanted to be safe, and it looks better when it is all closed up.
3. Since the body color on my car is white, I noticed after I installed mine that the angle the base of the hood sits allows me to see the body color next to the insulating pad. I plan to touch that up with flat black paint, but it would have been a lot easier after everything was clean, and before installing the pad!
4. If you have Magic Blower Syndrome, take care of it while the hood is off - it is a lot easier!
Thanks, again!
1. I could not find the 3M Citrus Adhesive Remover, but I found 3M General Purpose Adhesive Cleaner (08987), and it worked much faster than the Mineral Spirits (I started with the Mineral Spirits). I picked it up at an Auto Parts store - I forget which one, but not all of them had it.
2. For the small section where the Emissions information is, I cut 3 sides of a rectangle to create a flap and glued everything but the flap, then added a velcro strip to the open end of the flap (see pics). The flap tends to want to fall open without the velcro, and I was concerned about it getting tangled up with the front electric fan (86.5 MY) - it does not seem to anyway, but I wanted to be safe, and it looks better when it is all closed up.
3. Since the body color on my car is white, I noticed after I installed mine that the angle the base of the hood sits allows me to see the body color next to the insulating pad. I plan to touch that up with flat black paint, but it would have been a lot easier after everything was clean, and before installing the pad!
4. If you have Magic Blower Syndrome, take care of it while the hood is off - it is a lot easier!
Thanks, again!
12-06-2011, 08:13 PM
#29
Captain Obvious
Super User
Super User
If you keep the hood hinges on the hood and disconnect it from the chasys, you won't have to do any aligment. The hinge - chasys holes are round so they will go back to the same spot every time.
12-06-2011, 08:59 PM
#30
Rennlist Member
That sounds like a great tip! I did it the other way (unbolted the hood hinges from hood) and MARKING where the hinges line up on the hood is very important with the approach I took, if you want to put things back the way they were. The backing plate where the hood bolts go, moves around, so I needed the markings to line everything back up.