


Bearings
Archive Gatekeeper
Rennlist Member
Rennlist Member

Joined: Sep 2002
Posts: 18,813
Likes: 4,012
From: Irvine, CA
Bill-
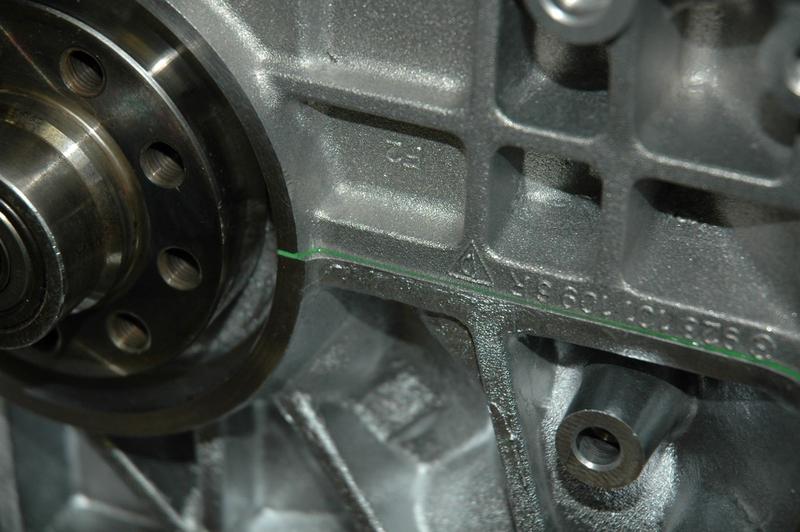
Tough call on what they sealed the crankcase with- The underside of the front and rear cam towers had an orange-ish dried slime on it that smelled just like anaerobic sealant everytime I removed one- though it's possible that the heads were not disassembled durring the 2002-2003 rebuild. The block/cradle interface before cleaning had the same layer of orangish stuff on it, so it could have been loctite and the brownish **** in the passages is just oil staining. Or it could all be permatex.
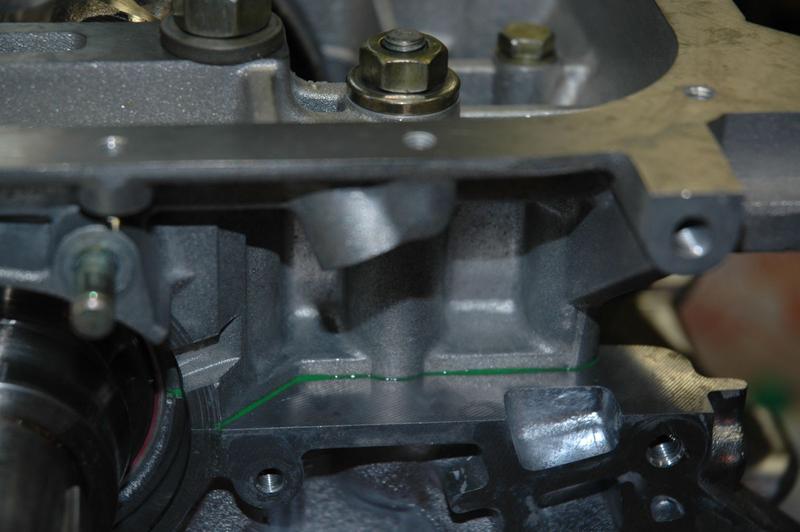
Confession time- the atherosclerosis hypothesis isn't mine, it's Doc Brown's - I managed to break off one of the big M12 studs while disassembling") Apparently I'm big enough AND dumb enough that I can break a 1.2cm steel stud with my bare hands and an 18" breaker bar. When they say heat the block to loosen the loctite, they mean HEAT THE BLOCK..... Anyway, I took it to him to drill out the stud, and I took the main bearings along. The rearmost main bearings were the most worn, and all were worse than the rod bearings, which he said is unusual. He figures the blockages in the passages prevented oil from getting rearward, causing progressive oil starvation as you move rearward down the block.
Apparently I'm big enough AND dumb enough that I can break a 1.2cm steel stud with my bare hands and an 18" breaker bar. When they say heat the block to loosen the loctite, they mean HEAT THE BLOCK..... Anyway, I took it to him to drill out the stud, and I took the main bearings along. The rearmost main bearings were the most worn, and all were worse than the rod bearings, which he said is unusual. He figures the blockages in the passages prevented oil from getting rearward, causing progressive oil starvation as you move rearward down the block.
SO: The REAL issue with using too much sealant between block and cradle is tha you can affect the alignment of the two pieces with a thick uneven layer of stuff- so much so he said I might need to align-bore the mains if/when I rebuild the engine.
Orange crap on the block, amid mostly removed studs:

Broken stud below the surface (d'oh):

Greg saving my butt:

Remains:

Tough call on what they sealed the crankcase with- The underside of the front and rear cam towers had an orange-ish dried slime on it that smelled just like anaerobic sealant everytime I removed one- though it's possible that the heads were not disassembled durring the 2002-2003 rebuild. The block/cradle interface before cleaning had the same layer of orangish stuff on it, so it could have been loctite and the brownish **** in the passages is just oil staining. Or it could all be permatex.
Confession time- the atherosclerosis hypothesis isn't mine, it's Doc Brown's - I managed to break off one of the big M12 studs while disassembling
Apparently I'm big enough AND dumb enough that I can break a 1.2cm steel stud with my bare hands and an 18" breaker bar. When they say heat the block to loosen the loctite, they mean HEAT THE BLOCK..... Anyway, I took it to him to drill out the stud, and I took the main bearings along. The rearmost main bearings were the most worn, and all were worse than the rod bearings, which he said is unusual. He figures the blockages in the passages prevented oil from getting rearward, causing progressive oil starvation as you move rearward down the block. SO: The REAL issue with using too much sealant between block and cradle is tha you can affect the alignment of the two pieces with a thick uneven layer of stuff- so much so he said I might need to align-bore the mains if/when I rebuild the engine.
Orange crap on the block, amid mostly removed studs:
Broken stud below the surface (d'oh):
Greg saving my butt:
Remains:

Addict
Rennlist Member
Rennlist
Site Sponsor
Rennlist Member
Rennlist
Site Sponsor
Joined: Jul 2001
Posts: 11,542
Likes: 4
From: Anaheim California
Nice to have a mill in the shop that can be used to drill out the broken stud..... anyone who has ever tried doing it by hand KNOWS how hard that can be and just how UGLY it can get 
Nordschleife Master
Joined: Apr 2006
Posts: 8,936
Likes: 3
From: theporscheconnection.com
When you applied it with the paint roller, you applied it to just one side correct?
FROM THE WSM
"Note
Only Loctite 574 (orange) should be used as a sealant.
Loctite 574 will dry only in conjunction with metal
and exclusion of air. After applying a coat of sealant
the bolts should be installed and tightened no later
than 10 minutes, since the sealant on the metal will
start to dry.
Removing Old Sealant
The old sealant does not have to be removed for repairs
It is only necessary to remove grease from the surface,
so that after the cleaning solution has dried the new
coaf of sealant can be applied. The new Loctite will
dissolve the old sealant in the surface finish and dry
again after assembling.
We recommend a fine steel brush or Loctite remover
80646 for removing old sealant, if this is ever neces-
saw.
1. We recommend a short-pile velour roller for appli-
cation by hand. A tray will also be required for the
sealant and should have a rough edge to scrape
excess sealant from the roller.
2. Roll on a very thin coat of sealant with a velour
roller. "
Archive Gatekeeper
Rennlist Member
Rennlist Member
Joined: Sep 2002
Posts: 18,813
Likes: 4,012
From: Irvine, CA
Bill-
I took some steroids and in a rage I bent them with my bare hands. Actually, they were previously removed and they're just sort of sitting in the holes, listing to starboard a bit.
I took some steroids and in a rage I bent them with my bare hands. Actually, they were previously removed and they're just sort of sitting in the holes, listing to starboard a bit.
Rennlist Stories
The Best Porsche Posts for Porsche Enthusiasts

9 Features and Characteristics That Only Porsche People Understand
Verdad Gallardo
I've Written 500 Rennlist Articles: Here's How Porsche Has Changed Along the Way
Joe Kucinski
10 Most Unnecessary Porsches Ever Built (And Why We Love Them)
Verdad Gallardo
Porsche 911 GT3 S/C vs 718 Spyder RS: 10 Categories, One Winner
Joe Kucinski
This Builder Is Turning Heads With Its Slantnose 911 Creation
Verdad Gallardo
Porsche 911 GT3 Artisan Edition Pays Homage to Japanese Culture
Verdad Gallardo
Porsche Reveals Coupe Variant of the Electric Cayenne With a Fresh Look
Verdad Gallardo
10 Porsche Colors That Have More Personality Than Most People
Verdad Gallardo
Guntherwerks' Final Speedster Creation Is the Ultimate Porsche Restomod
Verdad GallardoNordschleife Master
Joined: Apr 2006
Posts: 8,936
Likes: 3
From: theporscheconnection.com


Former Vendor
Joined: Feb 2005
Posts: 15,228
Likes: 2,530
From: Anaheim
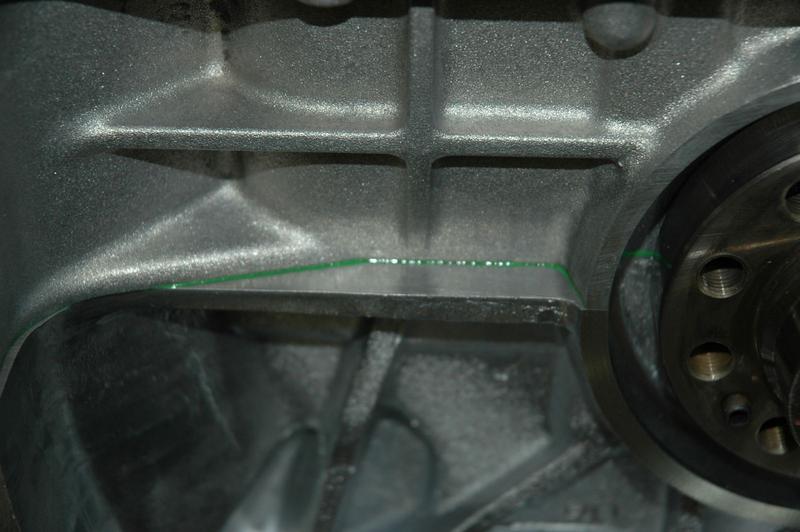
The sealant was indeed Loctite 574....put on with an air powered caulking gun.....or so it looked. Interestingly enough, I'm doing another engine that was rebuilt by one of the "experts" that has the same problem. Loctite 574 works great, when used properly. Works really bad, when used improperly. Rob's engine had a hardened layer of 574 over .010" thick. This keeps the cradle from fitting properly to the block, makes the main bearing holes out of round, and really screws up the oil supply to the engine.
Here's some really clues to using Loctite 574. Buy your Loctite from a supplier that has a large turn-over of this chemical. Shelf life is not good. It will still look good, but hardens quicker. Always assemble with a brand new tube of Loctite and a new roller. Be ready to tighten the two pieces together immediately. If you need to go find a socket or a torque wrench....you screwed up. Wipe up the little "bead" of Loctite that squishes out between the surfaces immediately after tightening. If that "bead" hardened before you got to it...the Loctite is too old and is bad....even if it is a new tube! Take it back apart and start over. Avoid using excessive amounts of Loctite. A very thin layer is all that you want. If you can see the little "bead" squish out...that is enough. Here's the really bad part...even if the tube is new and fresh, if you put it on too thick, it will not squish out properly and will have a layer that hardens...no matter how fast you torque the pieces. And.....never leave the old layer behind....I have no idea what the hell Porsche was thinking when they said this. There are a few other important tricks of the trade, but I can't tell you them....they're propriety stuff...sorry.
The main bearings in Rob's engine were probably reused in the rebuild and the rod bearings were Glyco. Glyco makes the original bearings for Porsche. The specifications are not the same.
Addict
Rennlist Member
Rennlist Member
Joined: Oct 2001
Posts: 1,115
Likes: 2
From: Berkeley, CA
Yep we used Loctite 573. Interesting stuff. It's supposed to cure anaerobically. We assembled in the middle of winter and the engine was in a cold environment (Bay Area winter). It seemed like it took quite a while for it to cure. We applied it as a thin film w/ a small foam roller. This is what it looked like:
Addict
Rennlist Member
Rennlist Member
Joined: Jun 2003
Posts: 9,386
Likes: 72
From: Helsinki, Finland
Certain old pages in WSM say 573 for some reason. 574 is right stuff. IIRR specs on 573 is about the same, it just can't seal quite same thickness as 574 so it will leak more easily.
Former Vendor
Joined: Feb 2005
Posts: 15,228
Likes: 2,530
From: Anaheim
Porsche only ever used Loctite 573 on the balance shaft covers for the 944 engines and on the side cover of the 944 transmissions. (I suspect that Audi might have been more responsible for both of these applications than Porsche was.) It has similar issues that the 574 product does...it can be put on too thick and dry before it gets "pushed" out from tightening. The picture that Dennis has provided is just about the perfect amount of sealant. Nice.