
S4 A/T rebuild thread
 08-08-2008, 01:15 AM
#46
Rennlist Member
Thread Starter
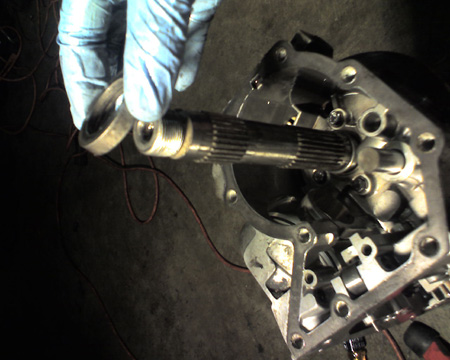
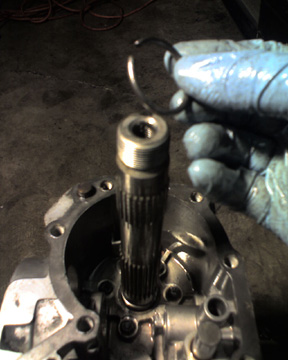
Remove helical gear from the output shaft, it slides right off.
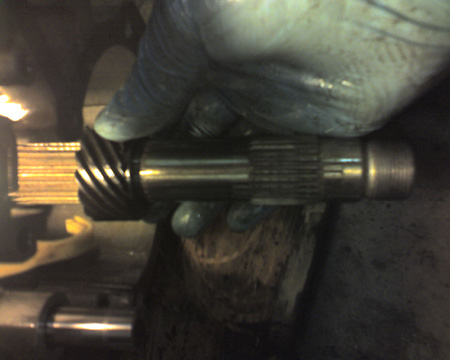
For reference, the splines in the internal diameter of the gear face rearward.
Remove the axial holder from rear part of the case (remember the end of this thing poked through the secondary pump and was anchored by a nut)
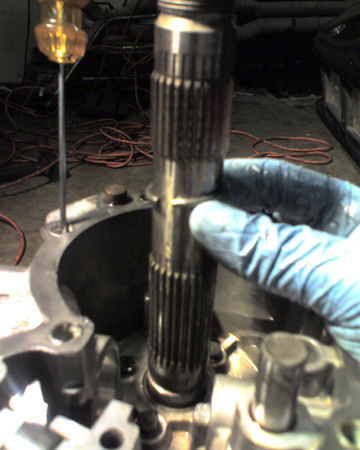
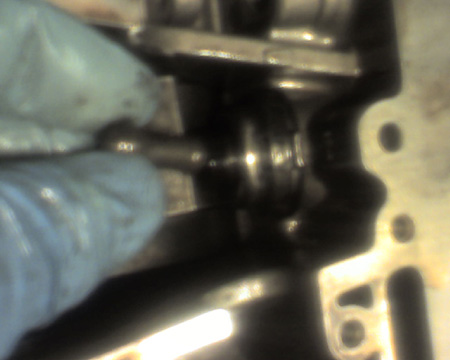
Go back to the output shaft and remove the spacer.
It was too far down for me to get a gear puller on it, so I tried leveraging lightly around it was a large screwdriver.
bingo.
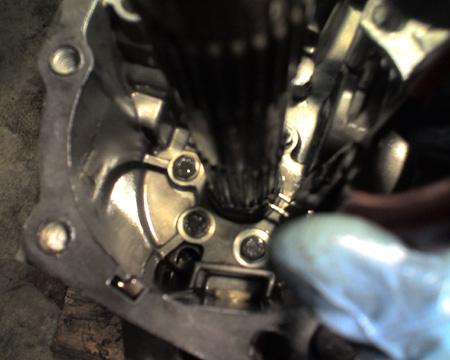
With the spacer out of the way, the circlip at the base of the shaft is exposed, here I'm coming at it with a set of circlip pliers. Unlike all the other circlips, this one had a lot of tension on it and was a bear to get out with my small pliers. I'll be investing in a larger set for the installation.
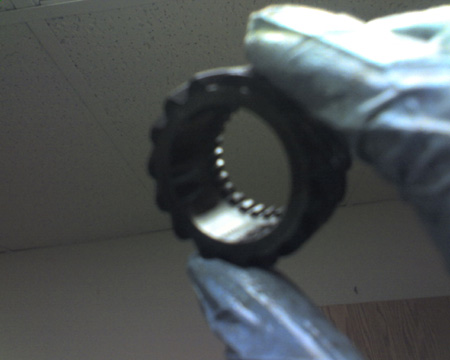
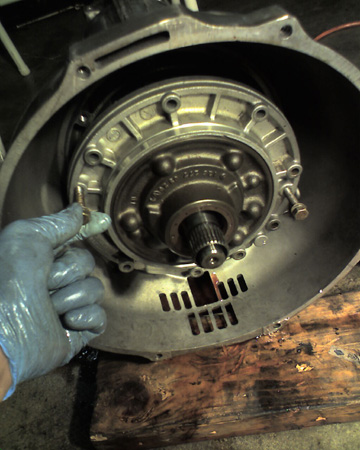
Remove the bolt that holds in the detente plate/shift rod.

Remove the shifter linkage out the side of the tranny case.
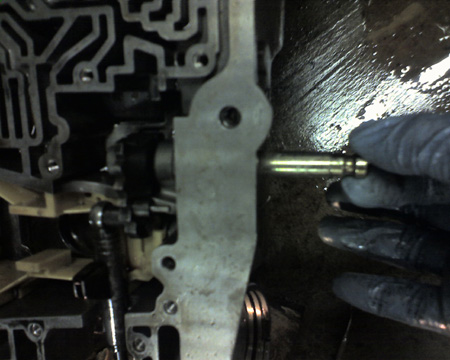
With the linkage out of the way, the plastic brake band holder can be removed.
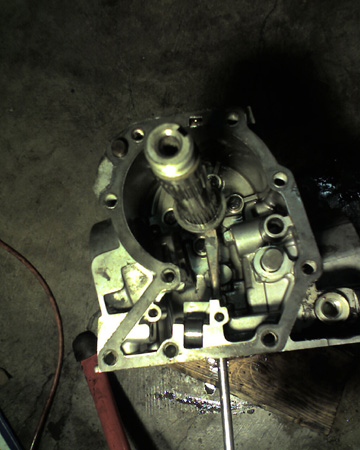
Okay, now we're ready to get to it!
For reference, the splines in the internal diameter of the gear face rearward.
Remove the axial holder from rear part of the case (remember the end of this thing poked through the secondary pump and was anchored by a nut)
Go back to the output shaft and remove the spacer.
It was too far down for me to get a gear puller on it, so I tried leveraging lightly around it was a large screwdriver.
bingo.
With the spacer out of the way, the circlip at the base of the shaft is exposed, here I'm coming at it with a set of circlip pliers. Unlike all the other circlips, this one had a lot of tension on it and was a bear to get out with my small pliers. I'll be investing in a larger set for the installation.
Remove the bolt that holds in the detente plate/shift rod.
Remove the shifter linkage out the side of the tranny case.
With the linkage out of the way, the plastic brake band holder can be removed.
Okay, now we're ready to get to it!
Last edited by atb; 08-08-2008 at 05:11 PM.
 08-08-2008, 01:44 AM
#47
Rennlist Member
Thread Starter
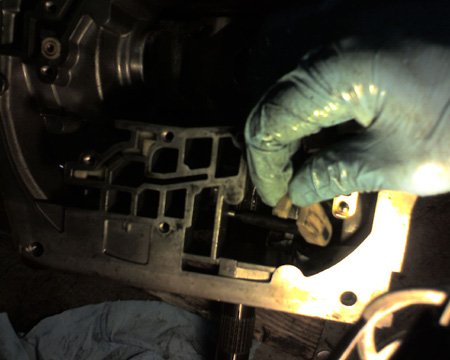
Remove the eight bolts that hold in the primary pump. I untorque these in a star pattern.
Use two of the extracted bolts, and screw them into the two threaded holes. You can then grasp these two bolts as handles and pull the pump forward out of the tranny case.
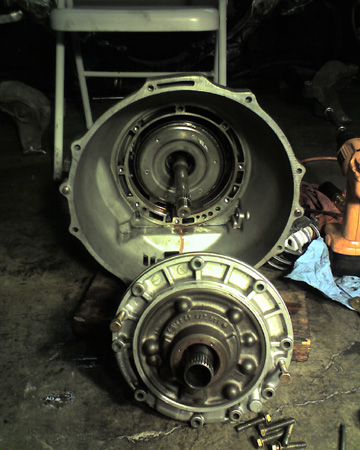
Use two of the extracted bolts, and screw them into the two threaded holes. You can then grasp these two bolts as handles and pull the pump forward out of the tranny case.
Last edited by atb; 08-11-2008 at 03:11 AM.
08-08-2008, 02:16 AM
#48
Rennlist Member
Thread Starter
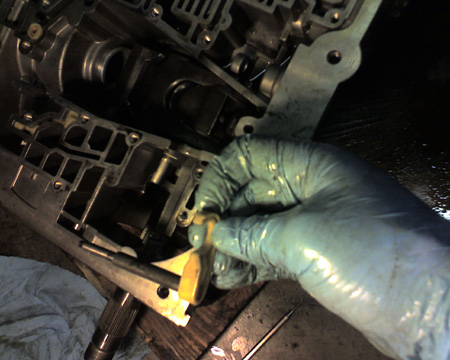
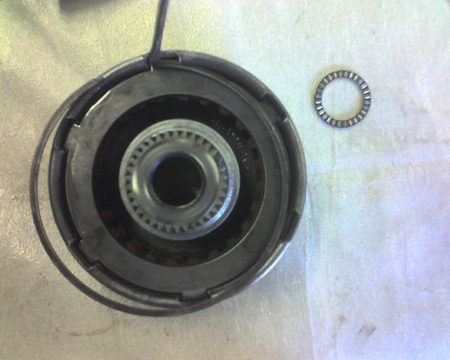
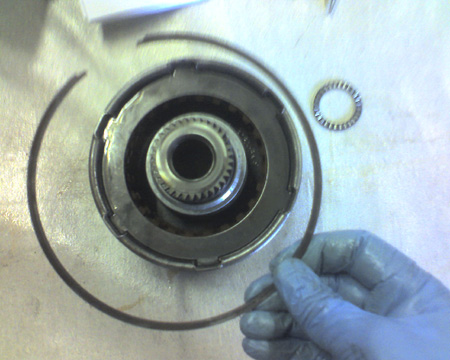
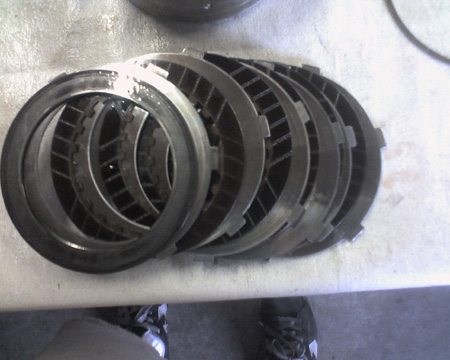
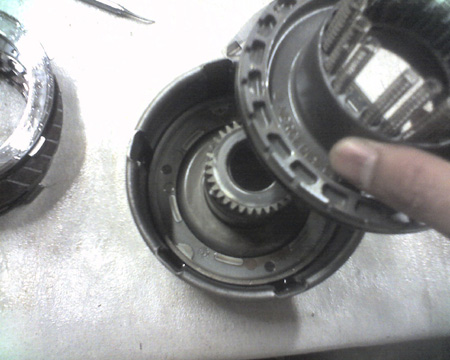
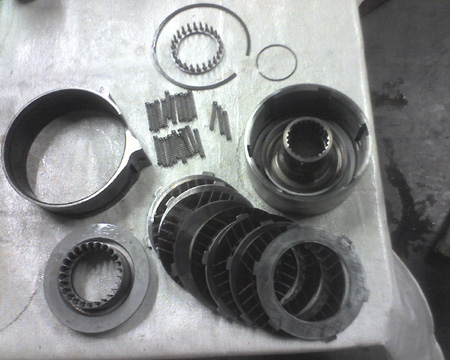
Grasp the input shaft, and pull. Out will come the K1 drum (the big drum in front) which will be wrapped by the B1 brake band, the B3 (reverse) clutch set, and the planetary gear set.
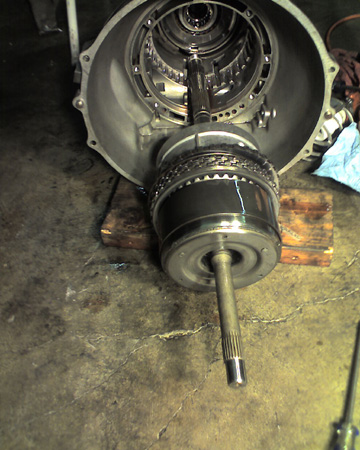
The B3 plates are too wide to set this assembly down on its side, so when you pull out the assembly, stand it on end and take it apart. It goes quick.
B1 brake band.
K1 drum
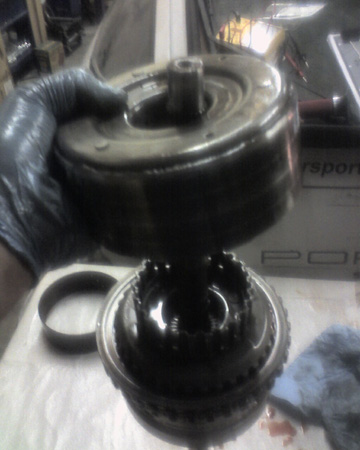
B3 clutch pack
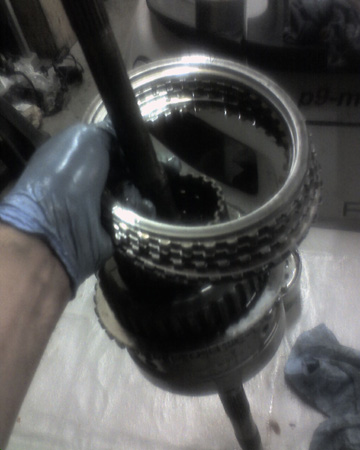
Now you can set it down.
The B3 plates are too wide to set this assembly down on its side, so when you pull out the assembly, stand it on end and take it apart. It goes quick.
B1 brake band.
K1 drum
B3 clutch pack
Now you can set it down.
08-08-2008, 02:45 AM
#49
Rennlist Member
Thread Starter
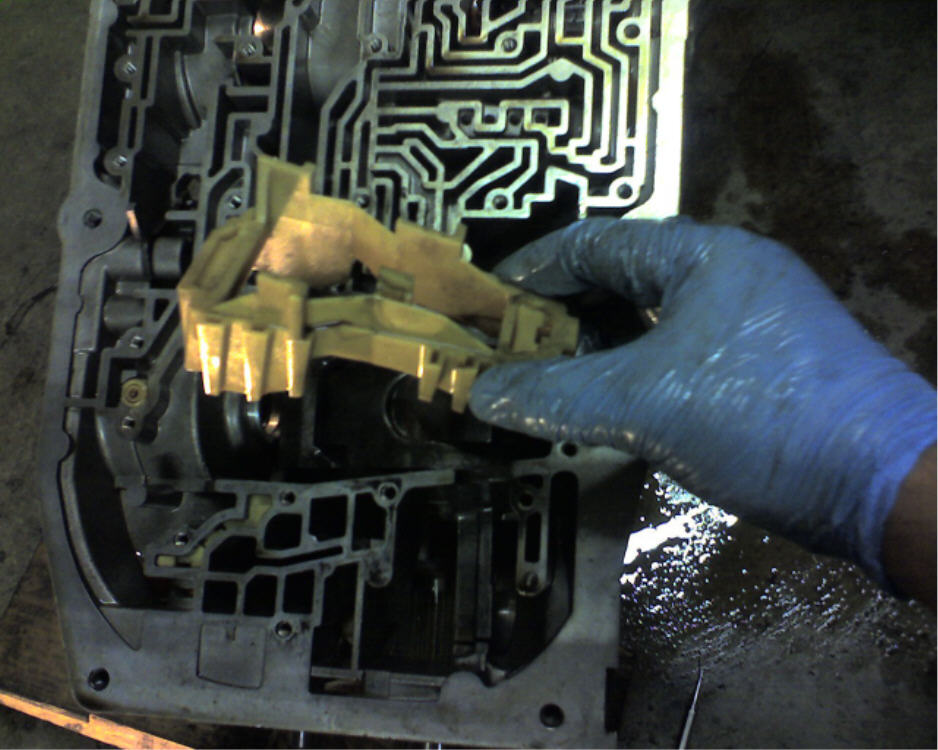
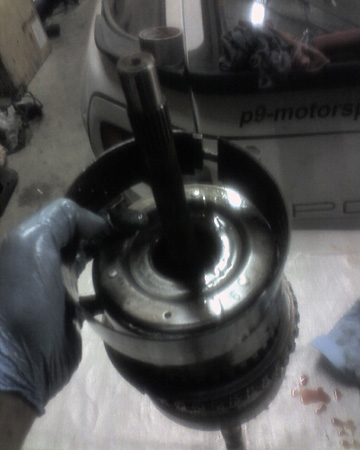
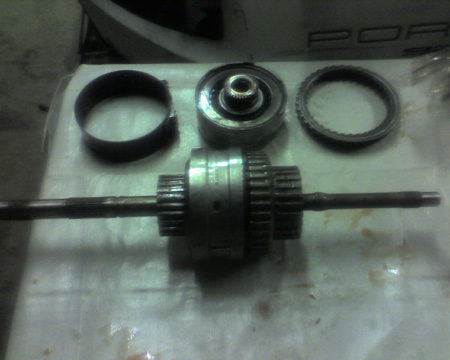
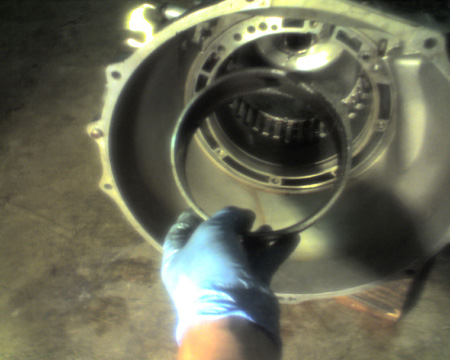
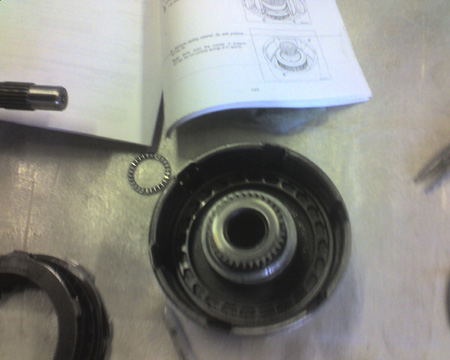
Reach in and pullout the K2 Clutch drum. The B2 brake band will remain in the tranny housing for now.
Remove the B2 pin
Squeeze the B2 band ends together to collapse it, and reach around the front of the tranny and pull it out of position, bringing the top of the band out first.
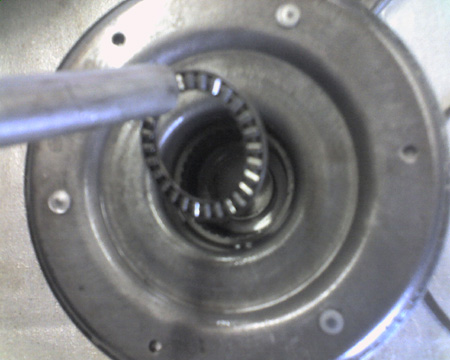
Remove the thrust washer that sits over the rear collar opening.
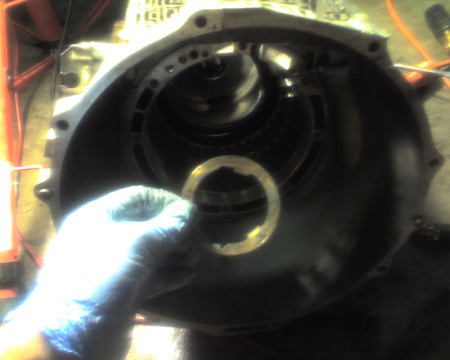
Remove the B2 pressure unit. (This is what you pulled the B2 pin out of).

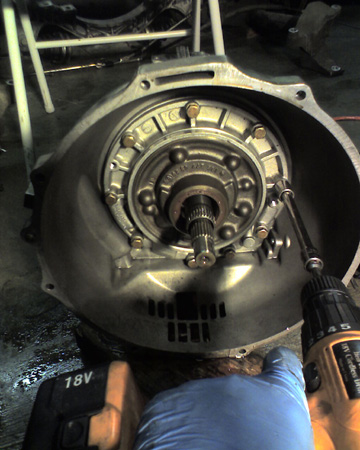
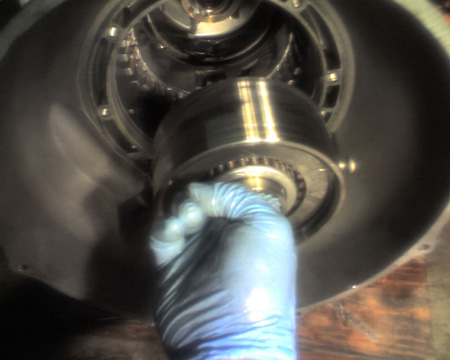
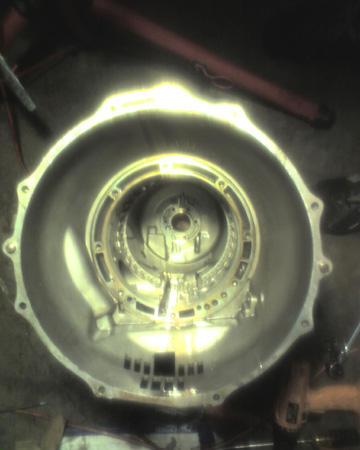
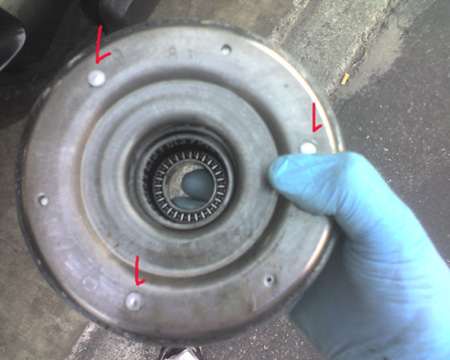
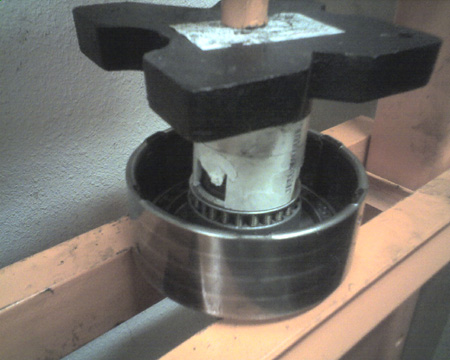
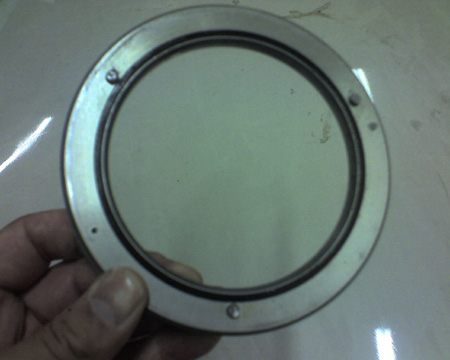
Put the tranny case face down on the bell housing and unbolt the five tranny collar bolts. Leave two opposing bolts loose but not backed out all the way. I used a plastic mallet to drive the collar downward.
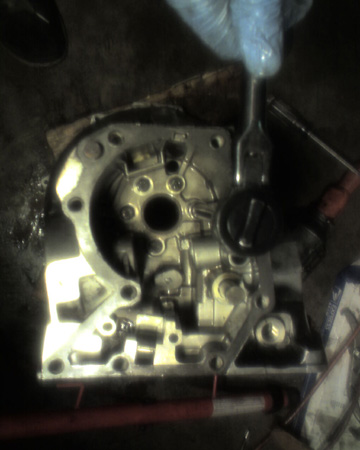
Reach in and grasp the collar from underneath, which is now dangling by the two bolts you left loose. Undo the last two bolts by hand and it will drop down into your hand.

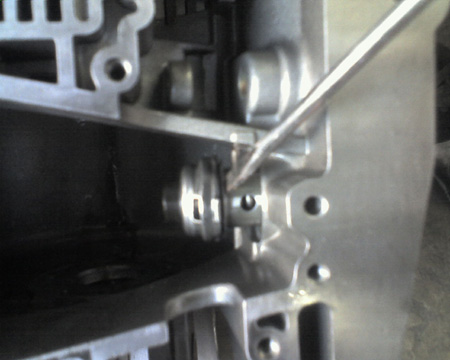
[Edit-spring clip removal]
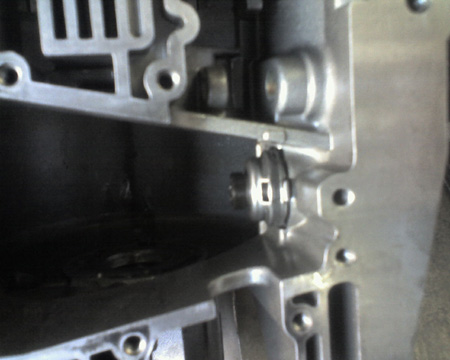
Looking in through the front of the tranny case right at about 11:30, you'll see a four prong spring clip.
The right most prong of the clip lines up with the primary pump bolt hole.
The parallax of this pic makes it look like the right prong of the spring clip is to the left of the hole, but it does line up directly under it when viewed directly from above.
It pulls out easily.
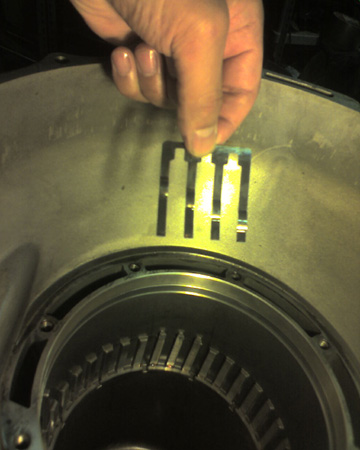
DONE!
Remove the B2 pin
Squeeze the B2 band ends together to collapse it, and reach around the front of the tranny and pull it out of position, bringing the top of the band out first.
Remove the thrust washer that sits over the rear collar opening.
Remove the B2 pressure unit. (This is what you pulled the B2 pin out of).
Put the tranny case face down on the bell housing and unbolt the five tranny collar bolts. Leave two opposing bolts loose but not backed out all the way. I used a plastic mallet to drive the collar downward.
Reach in and grasp the collar from underneath, which is now dangling by the two bolts you left loose. Undo the last two bolts by hand and it will drop down into your hand.
[Edit-spring clip removal]
Looking in through the front of the tranny case right at about 11:30, you'll see a four prong spring clip.
The right most prong of the clip lines up with the primary pump bolt hole.
The parallax of this pic makes it look like the right prong of the spring clip is to the left of the hole, but it does line up directly under it when viewed directly from above.
It pulls out easily.
DONE!
Last edited by atb; 08-09-2008 at 06:00 PM.
08-08-2008, 08:03 AM
#50
Former Vendor

Join Date: Feb 2004
Posts: 2,139
Likes: 0
Received 0 Likes
on
0 Posts
Hi Adam,
Looks like you are doing a great job documenting the inner mysteries of our automatic transmissions. I think many now can see that rebuilding one of these is not for the faint hearted or ham fisted. Dirt is also a big problem since even a small piece can cause problems.
Keep the pictorials coming! I just pulled my 89 trans out and I'm now thinking about doing one on my own after seeing this thread.
Cheers,
Constantine
08-08-2008, 12:54 PM
#51
Rennlist Member
Thread Starter
Hey Constantine.
The thing is, I'm sure taking it apart is definitely the easy part.
Thanks for your "hidden seal" pics, I've already photo-documented that dissassembly and will be posting over the weekend. Do you recall if both drums were disassembled in this manner, or did your tech do just the one?
I'll be re-cleaning my "clean area" for assembly, and should be able to start getting it back together fairly soon. Just checking out my options on mods.
08-09-2008, 09:27 AM
#52
Former Vendor
Join Date: Feb 2004
Posts: 2,139
Likes: 0
Received 0 Likes
on
0 Posts
Hi Adam,
From the pictures you've taken so far putting Humpty back together should not be that hard.
The only hard part I remember was placing the main shaft with drums and friction plates back into the casing. The tech had to feel his way as he completely seated the assembly in making sure he felt everything lining up along the way. This was with the case held in an upright position.
As far as the second drum, he only did the one hidden seal, not sure if the other drum has one.
Keep the pics and write up coming!
Constantine
08-09-2008, 03:12 PM
#53
Rennlist Member
Thread Starter
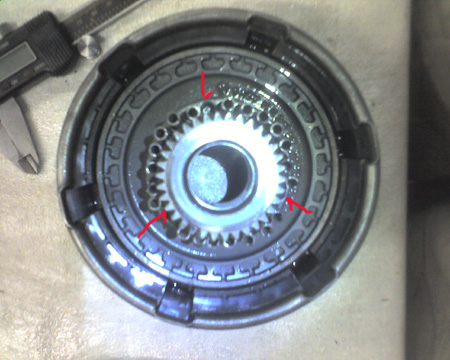
Here's a pic of the K1 drum, this is the one at the front of the tranny. I've highlighted the three rivet heads. This appears to be one area where Porsche may have departed from MB in design. The MB manuals that I have seen do not show the rivets, which hold the piston guide ring firm against the inside of the drum. In the MB manuals, there is an interior snap ring that holds it in place. There is a seal inbetween the piston ring guide and the interior side of the drum, which is the "hidden seal" that Constantine was referring to.
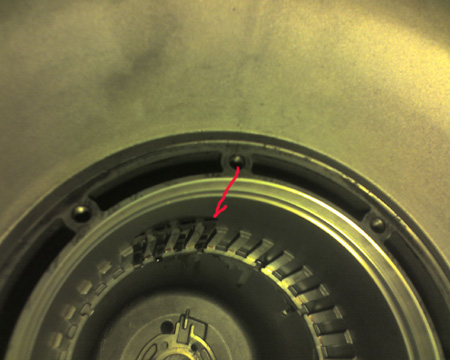
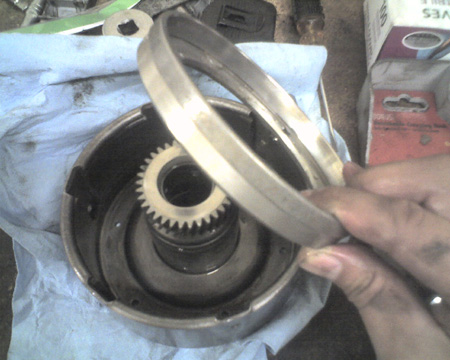
Use a magnetic probe to fish out the radial bearing and shim.

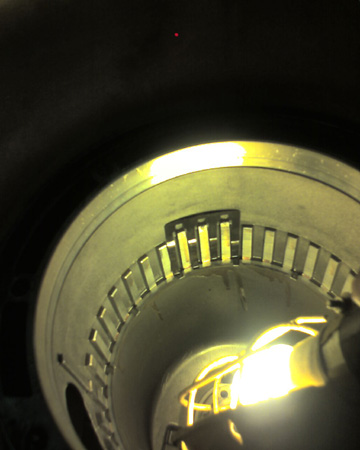
Next, flip the drum face down and remove the snap ring that holds the clutch discs in place.
Put one hand over the open end of the drum and flop the drum over onto it, the clutch discs will drop out.
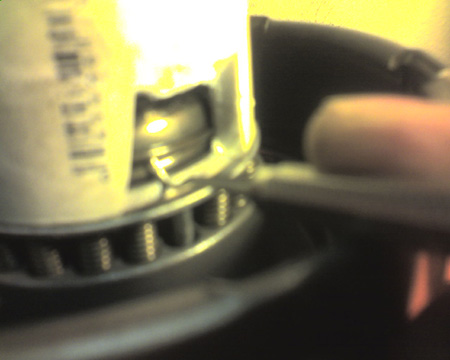
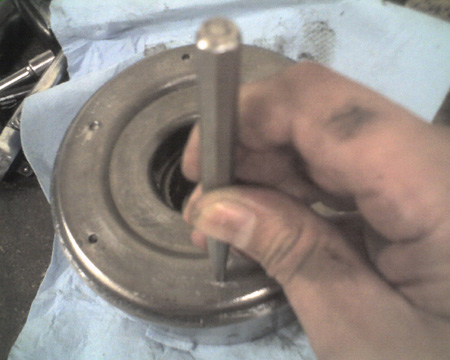
You can now see the back side of the piston sitting in the drum. It is held in place by a spring loaded lock collar that is held in place by a circlip.
I used a hydraulic press with a 2.5" piece of PCV that I cut notches out of to access the circlip.
Here you can see the circlip exposed, pull it out of the slot with a dental tool.
With the circlip out of the way, the springs relax to their full length. Pretty tall. Also, every 8th spring was removed on mine, so I had three groups of 7 springs, with an empty space inbetween.

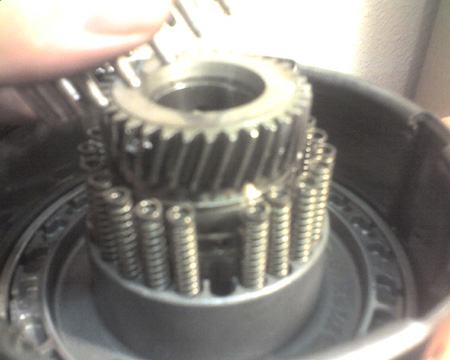
You can now remove the piston.
Take the drum and put in a vise to steady. Just use enough force to steady it, you don't want to distort the drum. Use a cold chisel to de-head the rivets. They are very soft, a couple light taps does the trick.
With the heads off the rivets, I used a center punch to drive down the rivet studs.
Turn the drum over and remove the piston ring guide. This is what the base of the rivets are anchored in to. I haven't taken a close look at it yet, but it appears that they may actually be threaded in. [Edit]- On closer inspection the base of the rivets are pressed through the ring guide. The three rivet holes in the guide are countersunk to accomodate the base of the rivet that has a flat head.
Here's the hidden seal.
Here's a shot of the parts, with the B1 brake band to the left, and the piston ring guide sitting inside the K1 drum.
Use a magnetic probe to fish out the radial bearing and shim.
Next, flip the drum face down and remove the snap ring that holds the clutch discs in place.
Put one hand over the open end of the drum and flop the drum over onto it, the clutch discs will drop out.
You can now see the back side of the piston sitting in the drum. It is held in place by a spring loaded lock collar that is held in place by a circlip.
I used a hydraulic press with a 2.5" piece of PCV that I cut notches out of to access the circlip.
Here you can see the circlip exposed, pull it out of the slot with a dental tool.
With the circlip out of the way, the springs relax to their full length. Pretty tall. Also, every 8th spring was removed on mine, so I had three groups of 7 springs, with an empty space inbetween.
You can now remove the piston.
Take the drum and put in a vise to steady. Just use enough force to steady it, you don't want to distort the drum. Use a cold chisel to de-head the rivets. They are very soft, a couple light taps does the trick.
With the heads off the rivets, I used a center punch to drive down the rivet studs.
Turn the drum over and remove the piston ring guide. This is what the base of the rivets are anchored in to. I haven't taken a close look at it yet, but it appears that they may actually be threaded in. [Edit]- On closer inspection the base of the rivets are pressed through the ring guide. The three rivet holes in the guide are countersunk to accomodate the base of the rivet that has a flat head.
Here's the hidden seal.
Here's a shot of the parts, with the B1 brake band to the left, and the piston ring guide sitting inside the K1 drum.
Last edited by atb; 08-09-2008 at 07:27 PM.
08-09-2008, 07:13 PM
#54
Rennlist Member
Thread Starter
The disassembly of the K2 clutch is identical to the K1 above, so I will not be posting pics of the disassembly. It also has rivets holding it together, but I have not removed the rivets as of yet until I can get confirmation that there is a seal that would need replacing.
Constantine had mentioned that on his rebuild, the tech was able to get more clutch plates in by using thinner steels.
In stock configuration, there are 6 steels in the K1.
1 @ 2mm thick
4 @ 3.0mm or 3.5mm optional to adjust play
1 @ 4.5mm or 5.0 mm optional to adjust play
Mine had:
1 @ 2mm
3 @ 3mm
1 @ 4mm (not listed as an optional size in the WSM)
1 @ 4.5mm
19.5mm total
There are 5 fiber plates at 2.1mm each for a total of 10.5 mm
19.5mm + 10.5mm = 30mm total stack height.
So 30mm is the target for a ball park reference. The spec for the height of the clutch stack requires 0.7mm to 1.2mm of play, so a max tolerance of 0.5mm.
In looking at the available thickness for the steels, if we go thin throughout, and install 8 steels @ 2mm, and 7 fibers at 2.1mm, we are at 30.7mm, only .7mm taller then what came out of the tranny. We can shorten the stack by going to a thinner circlip (the big one that holds the clutches in), which is available in three different thicknesses at .5mm increments.
The K2 has the same specs as the K1.
Mine had
1 @ 2mm
4 @ 3mm
1 @ 4.5mm
Total 18.5mm + 5 fibers @ 10.5 = 29mm total stack height.
Using our thin steels stack at 30.7mm has me coming up short 1.7mm.
If I insert one 3mm steel in place of one of the 2mm steels, that decreases the difference to .7mm too much gap. If I do one more, I'm now at .3mm too tight, and again could loosen the spec by using a thinner circlip.
I suppose its possible this is what the tech did in Constantine's tranny, but it does raise a durability question in that you are now running steels with 25%-50% less thickness then what came stock. At the same time, how much thrust pressure are these plates really subjected to in order to require the thicker steels. None of my steels showed any significant signs of wear (unless that oddball 4mm started it's life as a 4.5mm), and my car must have at least 175K miles on it, and I am hard on my tranny.
The alternative would be to find a way to machine another 5.1mm out of the drum and/or piston to create the extra clearance to fit one more fiber plate and one more 3mm steel.
If anyone has any experience modding trannies, even domestics, as the principles are the same, please feel free to chime in. Any quartermilers out there?
05-15-2010, 09:17 PM
#55

Adam? What happened?
05-17-2010, 01:27 PM
#57
Rennlist Member
Thread Starter
Too many projects and a borrowed S4 tranny = slow turn around.
Also, I had a couple of sources for info on bolstering the clutch pack and getting a stronger gearset, but they've turned into dead ends.
We're just getting set up in our new (more cramped) shop space, but once we're settled in I'll set up a clean table and start the reassembly.
Also, I had a couple of sources for info on bolstering the clutch pack and getting a stronger gearset, but they've turned into dead ends.
We're just getting set up in our new (more cramped) shop space, but once we're settled in I'll set up a clean table and start the reassembly.
05-17-2010, 04:30 PM
#58
Very interested in the info when you get there.
05-17-2010, 09:28 PM
#59
Rennlist Member
Thread Starter
One of the pieces I was trying to locate was an AMG sun and planetary gearset. Had an interesting conversation with a tranny rebuilder some time ago that stated that there wasn't an AMG proprietary gear set. His claim was that AMG retrofitted a different gearset from another MB tranny to fit the 722.3. He was supposed to send me some pics to show me the difference. Never happened, though I called several times. Not that I necessarily believed the guy, but I thought it would have been interesting to see what he was installing in his hot-rodded trannies.
05-17-2010, 11:11 PM
#60
Rennlist Member
Its logical that we will see increasing need to service more of these automatic transmissions in the future.
Anything that you and everybody else here can do to picture-document the practical rebuild by the DIY'er would be valuable.
I've taken one apart also and think they are the ultimate, yet doable, puzzle for the owner.
Anything that you and everybody else here can do to picture-document the practical rebuild by the DIY'er would be valuable.
I've taken one apart also and think they are the ultimate, yet doable, puzzle for the owner.