
Instrument Cluster Repair w/pics (Part II)
 04-27-2008, 10:35 AM
#16
Three Wheelin'
Thread Starter
Join Date: Sep 2007
Location: Ridgecrest, California
Posts: 1,363
Likes: 0
Received 145 Likes
on
30 Posts
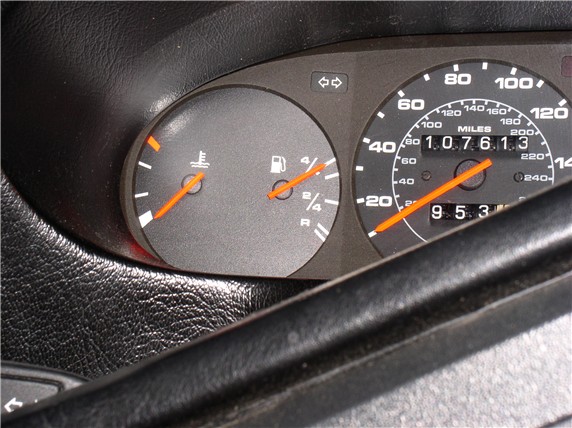
I promised a pic of the fuel gauge operation after a fill up (after the cleaning and needle adjustment) I just filled it up and snapped a pic....
 04-27-2008, 01:44 PM
#17
Rennlist Member
Hi John,
THANKS for the lead on a flux pen....I'll check it out. I was curious about the application....do you simply brush/apply to the pieces to be joined before applying heat and solder?? Or apply while heating with the iron but before applying solder?? Sorry for the Noob questions...
THANKS for the lead on a flux pen....I'll check it out. I was curious about the application....do you simply brush/apply to the pieces to be joined before applying heat and solder?? Or apply while heating with the iron but before applying solder?? Sorry for the Noob questions...
You apply flux before applying heat. Obviously the cleaner you get everything first the better, as it is not an agressive flux. If you can't obtain a similar item in US let me know.
07-19-2008, 10:40 AM
#19
Rennlist Member
Dwayne, fantastic writeup!  Great pictures and great detailed explanation of each step in the process.
This is exactly what I needed before ripping into the pod to fix the PRND23 lights, which have NEVER worked, and my spastic voltmeter.
BTW, I had a problem with my fuel gauge not registering correctly after the car sat for a few years, but the problem must have been with the fuel tank sensor as continued filling the tank seemed to fix the problem. Which was certainly easier than removing the instrument cluster.
Good job!
Great pictures and great detailed explanation of each step in the process. This is exactly what I needed before ripping into the pod to fix the PRND23 lights, which have NEVER worked, and my spastic voltmeter.
BTW, I had a problem with my fuel gauge not registering correctly after the car sat for a few years, but the problem must have been with the fuel tank sensor as continued filling the tank seemed to fix the problem. Which was certainly easier than removing the instrument cluster.
Good job!
07-19-2008, 01:55 PM
#21
Rennlist Member
Join Date: Feb 2008
Location: Lillington, NC
Posts: 2,742
Likes: 0
Received 0 Likes
on
0 Posts
My fuel gauge is flaky too, but there is no way in hell I would try to do this repair.
WHY: I would burn the car to the ground without a doubt!! I have luck like that.
WHY: I would burn the car to the ground without a doubt!! I have luck like that.
03-07-2014, 07:18 AM
#22
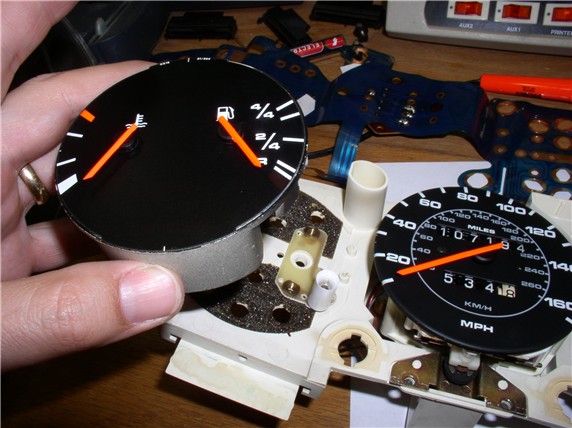
There are 4 bulbs soldered into boards and inside plastic tubes , one of which can be seen here for the low fuel indicator, there are also high coolant temp, low voltage and oil pressure. My low fuel had blown. It can be tested by applying voltage to the two metal parts you see on the board.
The plastic tube has to be removed, solder a new bulb in and glue the tube back on. The little board itself is just held there by a little sticky once the screws are take out from the other side.
02-09-2017, 06:12 PM
#23
Burning Brakes
There are 4 bulbs soldered into boards and inside plastic tubes , one of which can be seen here for the low fuel indicator, there are also high coolant temp, low voltage and oil pressure. My low fuel had blown. It can be tested by applying voltage to the two metal parts you see on the board.
The plastic tube has to be removed, solder a new bulb in and glue the tube back on. The little board itself is just held there by a little sticky once the screws are take out from the other side.
02-09-2017, 06:26 PM
#24
Official Bay Area Patriot
Fuse 24 Assassin
Rennlist Member
Fuse 24 Assassin
Rennlist Member
Alan is our electronics guru on this board. He did an article on LEDs a while back I think. I hope he can chime in to answer this.
I am considering tearing my cluster out of the car since my temperature gauge needle is erratic and always looks like it's overheating regardless of what the pyrometer check on the radiator hoses say.
I am considering tearing my cluster out of the car since my temperature gauge needle is erratic and always looks like it's overheating regardless of what the pyrometer check on the radiator hoses say.
02-10-2017, 09:52 AM
#26
Rennlist Member
Hi Dwayne, great post as usual. This will come in handy when I do decide to tackle the instrument cluster at one point. All is working right now, but a good cleaning doesn't hurt and might prevent other issues. I gather it's close to the same in the 85 ?
 02-28-2018, 05:40 PM
#28

This helped me alot, but I have one problem not addressed. My sliding contact between steering wheel and column, the little copper strip, connecting the horn pad so you can turn the steering wheel and still honk, is worn out, anyone else experienced this, fix or hunt for used part?
Thanks,
Anders
Thanks,
Anders
02-28-2018, 05:59 PM
#29
How is it worn out? Copper likes to oxidize. I took steel wool to mine and also bent it out a little more to give it more pre-load on the mating ring. Applying the grease like Dwayne suggests will help eliminate any annoying scraping noises as you turn the wheel.
02-28-2018, 07:49 PM
#30
3:rd time I try to reply to this, get kicked out as not logged in when I post a pic using cut'n paste....so no pic this time and see if that works
GT6ixer, thanks for answering. The strip is worn away, hanging together by a 2-3mm strip which what is left, see pic above. I am not sure if the part above will fit, I have to investigate further, but it could be a solution. Trying to solder someting on to the copper strip and patch it up will probably be noisy just as you mention.
Thanks,'
Anders