

Rear Wheel Bearing Replacement Guide
 04-02-2008, 06:24 PM
#1
Under the Lift
Lifetime Rennlist
Member
Lifetime Rennlist
Member
Thread Starter
I have not found a 928-specific rear wheel bearing replacement guide anywhere else. If someone else has, please let me know. No sense in being redundant. My guide is linked at the bottom of this post.
I have done only a few of these. Each time it has been a new adventure. Unless you have the Porsche tools, which I doubt anyone here does, there is a fair amount of improvisation in pressing the bearings out and in and supporting the hub parts. After not being able to remember exactly how I did this from one bearing job to the next, I knew I needed to get this documented if I planned to do any more. WSM section 42, pages 7-11 should be handy as well.
For me at least, there is a fairly great potential to destroy the new bearing when pressing it into the hub carrier and then pressing the hub into the carrier. I learned several different ways to make mistakes and I try to highlight them. For an experienced professional, these would be considered stupid mistakes. For me, they are just mistakes. If you are careful to observe a few precautions and understand how the bearing is built, this job is not all that hard.
This job takes about 3 hours per wheel if you are good and have no mishaps. Plan on 4-5 hours the first time. Even after the bearing is in and the hub carrier reinstalled, the parking brake can be a bit of a bi#$h to reassemble.
There are some relatively uncommon tools you will need, such as a shop press and a bearing separator.
Unfortunately, my documentation is sparse on photos. As George Suennen and I were doing this on his car, we sometimes got a bit too wrapped up in dealing with issues to remember to shoot photos. I will try to fix this over time.
Please comment freely whether it is to criticize my bonehead methods or to suggest better alternatives. No offense will be taken.
The guide is located here:
http://www.billsworkshop.com/P928S4/...eplacement.htm
 04-02-2008, 06:37 PM
#2
Team Owner
Hey Bill i wrote a proceedure for doing this. It works pretty well but I am not sure i can find it so i will do a search for you.
04-02-2008, 06:38 PM
#3

If one heats the carrier properly, and chills the bearing - it should basically fall in perfectly maybe with a bit of persuasion.
But you are right - the hub installation is the hardest part of re-assembly. Because then you are trying to heat the bearing in the carrier - and chill the hub.
I don't see a pic of it - did you try and support the other side of the inner bearing piece as you pressed in the hub?
But you are right - the hub installation is the hardest part of re-assembly. Because then you are trying to heat the bearing in the carrier - and chill the hub.
I don't see a pic of it - did you try and support the other side of the inner bearing piece as you pressed in the hub?
 04-02-2008, 06:43 PM
#5
Under the Lift
Lifetime Rennlist
Member
Lifetime Rennlist
Member
Thread Starter
04-02-2008, 06:49 PM
#6
Team Owner
Hey Bill Here it is , any questions I will be happy to answer them.
At the shop we press out the hub flange with a air hammer and a proper sized flat plate to distribute the force and a big slide puller attached to the hub flange ,(Hence the two man job).
The hub comes out then the inner bearing race will need to be carefully cut off the hub with a cut off wheel.
You can remove the e brake by removing the shoes and watch how the fulcrum pin comes out of the cable end.
Its about 3/8 long and about 1/4 in in diameter.
You can heat the hub carrier in place.( use Mapp gas Yellow cylinder,propane isnt hot enough fast enough).
Remove the big bearing snap ring first.
Important!!!! Place the new bearing in the freezer as well as the hub flange for atleast an hour before you try to refit it.
To remove the bearing use the same air hammer and the correctly sized round plate, after heating the hub it takes a couple of seconds to slide the old bearing out ,have your helper ready to catch it.
Once this is done then clean the hub carrier and the E brake mounting pads also the bearing inner bore of the carrier, try not to waste too much time doing this as the carrier will already be hot , keep the heat on it for a few mins staying away from the upper control arm linkage.
Get your helper to fetch your new bearing and quickly place it into the heated hub carrier, it should slide right in if you got the carrier hot enough.
Once this is done refit the snapring, turn the bearing by hand till it starts to warm up from the carrier heat use a bit more heat on the inner race of the new bearing , your now trying to warm the bearing inner races so the hub flange will slide into place, Get the E brake metal protection cover ready , put some anti seize on the threads for the CV joint,
Have your helper install the the cv joint first to the trans a few bolts will work then place the E brake cover in position, then the frozen hub onto the axle, tap flange a bit to expose some of the threads and tighten it with an impact hammer (this will press the flange into the new bearing,While the other side of the CV stub axle holds the rear side of the new inner bearing races)refit and tighten all of the CV bolts at trans output shaft.
Refit the E brake shoes adjust the E brake after fitting the roto.
Refit the wheel thighten the nut on the ground with the center cap removed.
__________________
04-02-2008, 06:55 PM
#7
Under the Lift
Lifetime Rennlist
Member
Lifetime Rennlist
Member
Thread Starter
If one heats the carrier properly, and chills the bearing - it should basically fall in perfectly maybe with a bit of persuasion.
But you are right - the hub installation is the hardest part of re-assembly. Because then you are trying to heat the bearing in the carrier - and chill the hub.
I don't see a pic of it - did you try and support the other side of the inner bearing piece as you pressed in the hub?
But you are right - the hub installation is the hardest part of re-assembly. Because then you are trying to heat the bearing in the carrier - and chill the hub.
I don't see a pic of it - did you try and support the other side of the inner bearing piece as you pressed in the hub?
Yes, supporting the inner race is the key step in pressing in the hub. In fact, all bearing pressing and support should be done on the inner race. If you keep this in mind, nothing should go wrong. Step 33 shows the support. It's basically a large socket sitting under the inner race. There is nothing to keep it centered, so you have to be careful. You could fit an inverted socket up into the bearing, and have the inner race rest on the socket shoulder - that would keep the support centered, but the center hub of the socket will block the wheel hub center as you press it in.
Trending Topics
04-02-2008, 06:57 PM
#8
Under the Lift
Lifetime Rennlist
Member
Lifetime Rennlist
Member
Thread Starter
04-02-2008, 06:58 PM
#9
Addict
Rennlist Member
Rennlist Member
Join Date: Oct 2003
Location: Gone. On the Open Road
Posts: 16,561
Received 1,682 Likes
on
1,092 Posts
I totally cheat on rear wheel bearings. I use the Sir Tools B90 and do the bearing with the hub in place. Once the e-brake and half-shaft is out, as easy as pie, you can press the old bearing out and the new bearing in with this kit.
04-02-2008, 07:15 PM
#10
Under the Lift
Lifetime Rennlist
Member
Lifetime Rennlist
Member
Thread Starter
I totally cheat on rear wheel bearings. I use the Sir Tools B90 and do the bearing with the hub in place. Once the e-brake and half-shaft is out, as easy as pie, you can press the old bearing out and the new bearing in with this kit.
Seems reasonable. Not much more than my press and a lot simpler. Do you heat the hub?
04-02-2008, 07:26 PM
#11
Addict
Rennlist Member
Rennlist Member
Join Date: Oct 2003
Location: Gone. On the Open Road
Posts: 16,561
Received 1,682 Likes
on
1,092 Posts
04-02-2008, 07:29 PM
#12
Under the Lift
Lifetime Rennlist
Member
Lifetime Rennlist
Member
Thread Starter
Hey Bill Here it is , any questions I will be happy to answer them.
At the shop we press out the hub flange with a air hammer and a proper sized flat plate to distribute the force and a big slide puller attached to the hub flange ,(Hence the two man job).
The hub comes out then the inner bearing race will need to be carefully cut off the hub with a cut off wheel.
You can remove the e brake by removing the shoes and watch how the fulcrum pin comes out of the cable end.
Its about 3/8 long and about 1/4 in in diameter.
You can heat the hub carrier in place.( use Mapp gas Yellow cylinder,propane isnt hot enough fast enough).
Remove the big bearing snap ring first.
Important!!!! Place the new bearing in the freezer as well as the hub flange for atleast an hour before you try to refit it.
To remove the bearing use the same air hammer and the correctly sized round plate, after heating the hub it takes a couple of seconds to slide the old bearing out ,have your helper ready to catch it.
Once this is done then clean the hub carrier and the E brake mounting pads also the bearing inner bore of the carrier, try not to waste too much time doing this as the carrier will already be hot , keep the heat on it for a few mins staying away from the upper control arm linkage.
Get your helper to fetch your new bearing and quickly place it into the heated hub carrier, it should slide right in if you got the carrier hot enough.
Once this is done refit the snapring, turn the bearing by hand till it starts to warm up from the carrier heat use a bit more heat on the inner race of the new bearing , your now trying to warm the bearing inner races so the hub flange will slide into place, Get the E brake metal protection cover ready , put some anti seize on the threads for the CV joint,
Have your helper install the the cv joint first to the trans a few bolts will work then place the E brake cover in position, then the frozen hub onto the axle, tap flange a bit to expose some of the threads and tighten it with an impact hammer (this will press the flange into the new bearing,While the other side of the CV stub axle holds the rear side of the new inner bearing races)refit and tighten all of the CV bolts at trans output shaft.
Refit the E brake shoes adjust the E brake after fitting the roto.
Refit the wheel thighten the nut on the ground with the center cap removed.
__________________
At the shop we press out the hub flange with a air hammer and a proper sized flat plate to distribute the force and a big slide puller attached to the hub flange ,(Hence the two man job).
The hub comes out then the inner bearing race will need to be carefully cut off the hub with a cut off wheel.
You can remove the e brake by removing the shoes and watch how the fulcrum pin comes out of the cable end.
Its about 3/8 long and about 1/4 in in diameter.
You can heat the hub carrier in place.( use Mapp gas Yellow cylinder,propane isnt hot enough fast enough).
Remove the big bearing snap ring first.
Important!!!! Place the new bearing in the freezer as well as the hub flange for atleast an hour before you try to refit it.
To remove the bearing use the same air hammer and the correctly sized round plate, after heating the hub it takes a couple of seconds to slide the old bearing out ,have your helper ready to catch it.
Once this is done then clean the hub carrier and the E brake mounting pads also the bearing inner bore of the carrier, try not to waste too much time doing this as the carrier will already be hot , keep the heat on it for a few mins staying away from the upper control arm linkage.
Get your helper to fetch your new bearing and quickly place it into the heated hub carrier, it should slide right in if you got the carrier hot enough.
Once this is done refit the snapring, turn the bearing by hand till it starts to warm up from the carrier heat use a bit more heat on the inner race of the new bearing , your now trying to warm the bearing inner races so the hub flange will slide into place, Get the E brake metal protection cover ready , put some anti seize on the threads for the CV joint,
Have your helper install the the cv joint first to the trans a few bolts will work then place the E brake cover in position, then the frozen hub onto the axle, tap flange a bit to expose some of the threads and tighten it with an impact hammer (this will press the flange into the new bearing,While the other side of the CV stub axle holds the rear side of the new inner bearing races)refit and tighten all of the CV bolts at trans output shaft.
Refit the E brake shoes adjust the E brake after fitting the roto.
Refit the wheel thighten the nut on the ground with the center cap removed.
__________________
The only step I would change is cutting the race off the hub. Porsche uses a bearing separator and shop press. I bought a separator for $18 and it worked perfectly. Took only a minute.
Last edited by Bill Ball; 04-03-2008 at 01:06 AM.
04-02-2008, 07:37 PM
#13
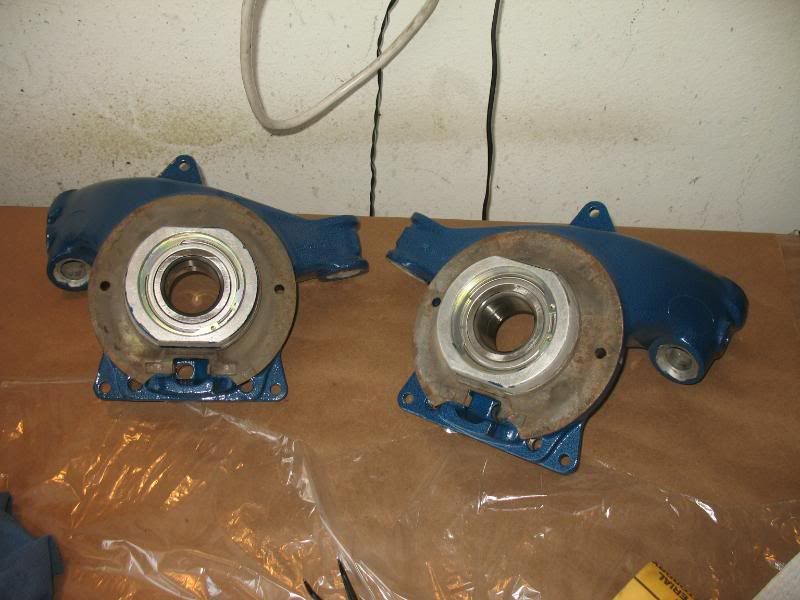
I don't get the working on it with it in the car. On your ***, sitting on the floor, wacking at stuff for hours? Take it out so you can stare at it on the table:
The following users liked this post:
JayPoorJay (09-12-2019)
04-02-2008, 07:50 PM
#14
Under the Lift
Lifetime Rennlist
Member
Lifetime Rennlist
Member
Thread Starter
I'm thinking Stan's or Dave's methods could work well - overall easier than using a press and improvising like I did to replace the Porsche tools.. At least with the car on a lift, it shouldn't be too uncomfotable.
Getting the hub (or hub flange) out of the hub carrier is the only part that seems like it might be arduous. After that, if you heat the hub carrier to over 200F, the bearing should come out easily with a bearing puller or a slide hammer. Heat is the key. Then a chilled bearing and hub should go in. Since there is no way to support the inner race when reinserting the hub, it needs to be chilled well and the bearing heated and no force used or it will pull the inner race out of the bearing. I can tell you that not heating the bearing (other than from residual hub carrier heat) or chilling the hub makes the hub reinsertion require a lot of force from the press. Even off the car, that is one thing I would do differently next time - chill the new bearing, then heat it after insertion and chill the hub. Porsche did not call for this - only heating the hub carrier.
Getting the hub (or hub flange) out of the hub carrier is the only part that seems like it might be arduous. After that, if you heat the hub carrier to over 200F, the bearing should come out easily with a bearing puller or a slide hammer. Heat is the key. Then a chilled bearing and hub should go in. Since there is no way to support the inner race when reinserting the hub, it needs to be chilled well and the bearing heated and no force used or it will pull the inner race out of the bearing. I can tell you that not heating the bearing (other than from residual hub carrier heat) or chilling the hub makes the hub reinsertion require a lot of force from the press. Even off the car, that is one thing I would do differently next time - chill the new bearing, then heat it after insertion and chill the hub. Porsche did not call for this - only heating the hub carrier.
04-02-2008, 08:40 PM
#15
Addict
Rennlist Member
Rennlist Member
Join Date: Oct 2003
Location: Gone. On the Open Road
Posts: 16,561
Received 1,682 Likes
on
1,092 Posts