
Different shock absorber between front and rear

 01-26-2008, 07:35 PM
#17
Three Wheelin'
Thread Starter
I am a bit confuse. Probably my English again 
I am using Tony's website to reinstall my rear coilover and it seems wrong. If I remember correctly, the two conical washers are on both side of the "middle part" like Earl and Gary mention and not on both side on the shock absorber.
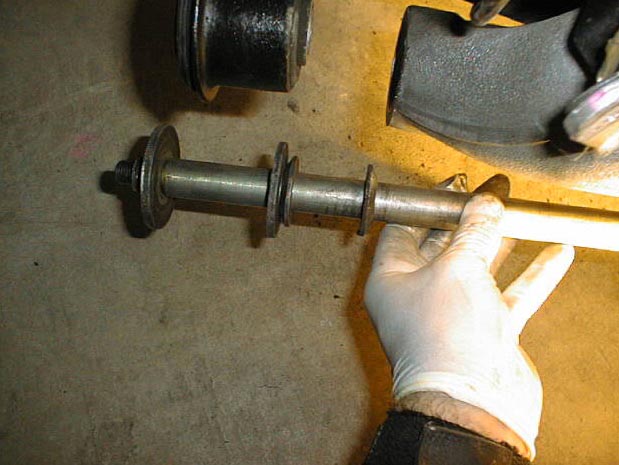
This looks like the proper way. Is it?
I am using Tony's website to reinstall my rear coilover and it seems wrong. If I remember correctly, the two conical washers are on both side of the "middle part" like Earl and Gary mention and not on both side on the shock absorber.
From Tony's site:
The botom of the coilover sits in the open space in the middle ...between the two "conical" washers.
The botom of the coilover sits in the open space in the middle ...between the two "conical" washers.
From Earl Gillstrom and Gary Knox writeup:
BE SURE to properly position the two conical washers on either side of
the �middle� part of the suspension arm, and the flat washer between the
rear of the strut and the rear part of suspension arm before inserting the
large long bolt holding bottom of strut.
BE SURE to properly position the two conical washers on either side of
the �middle� part of the suspension arm, and the flat washer between the
rear of the strut and the rear part of suspension arm before inserting the
large long bolt holding bottom of strut.
01-26-2008, 07:37 PM
#18
Under the Lift
Lifetime Rennlist
Member
Lifetime Rennlist
Member

Those look adjusted up a little high on the threaded collar, especially the lower one. When I change shocks but reuse the springs, if the ride height and corner balance was good, I set the adjuster at the same point on the collar as before (or if the shocks are a different brand with differnt adjusters I set them to get the same static spring length).
Also, others have said and I have found that setting the adjusters the same on both sides, even if ride height is off a few mm, results in closer corner balance. Sounds a little too simple to be true, but it has worked for me. Anway, you can check things after you get them on, but your starting adjustments look off to me.
 01-26-2008, 07:42 PM
#20
Under the Lift
Lifetime Rennlist
Member
Lifetime Rennlist
Member
The conicals are shown incorrectly. They fit in the concave sides of the hub carrier, not around the shock, as that picture implies.
So, it goes:
FROM THE REAR---
Large end washer
lower control arm
Smaller washer
lower shock mount
conical washer fit into concavity on hub carrier
hub carrier
conical washer fit into concavity on hub carrier
lower control arm
Large end washer
So, it goes:
FROM THE REAR---
Large end washer
lower control arm
Smaller washer
lower shock mount
conical washer fit into concavity on hub carrier
hub carrier
conical washer fit into concavity on hub carrier
lower control arm
Large end washer
01-26-2008, 07:46 PM
#21
Addict
Rennlist Member
Rennlist Member
The conicals are shown backwards. They fit in the concave sides of the hub carrier, not around the shock, as that picture implies.
Then you should be good to go.
/Peter
01-26-2008, 07:52 PM
#22
While replacing my shocks, I drove for a couple of weeks with new Bilsteins in the rear and the old Boges in the front. All I noticed is that there was still oscillation in the front going over bumps at speed, but less than before. These new shocks are doing their job!
01-26-2008, 07:55 PM
#23
Under the Lift
Lifetime Rennlist
Member
Lifetime Rennlist
Member
Here's a pic of the final assembly. The conicals are hidden on either side of the center hub carrier. Don't get concerned if you see some unfilled space between some parts, like between the front lower control arm and the hub carrier. It's occupied by protruding bushing cores. As long as the parts are in the right order and the end nuts are torqued to 103 ft lbs, you are good.

01-26-2008, 09:11 PM
#24
Rennlist Member
Luc............Bill is correct.
We've had this discussion before and Tony even chimed in that he'd fix his site........we'll have to remind him.
Your using the original springs?
We've had this discussion before and Tony even chimed in that he'd fix his site........we'll have to remind him.
Your using the original springs?
01-27-2008, 09:35 AM
#25
Three Wheelin'
Thread Starter