

rear suspension bushings
 01-04-2008, 10:36 PM
#1
Drifting
Thread Starter
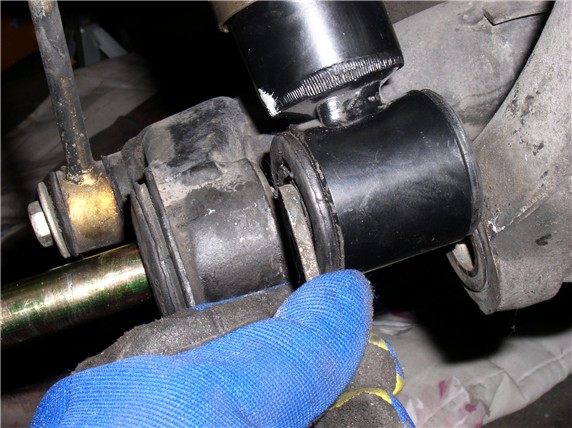
Well crap. I've been rebuilding my brakes and was in final reassembly tonight. I installed both front calipers and lines, new pads, did the left rear and then moved to the right rear. I bolted on the caliper and noticed a LOT of movement in the hub carrier. Investigation revealed that the movement was coming from the lower suspension mounting point, where the lower shock mount connects. One of the rubber bushings is just gone, completely missing.
And here I was hoping to go for a drive tomorrow morning. Looking at PET, it looks like the 928 331 588 13 "rubber mounting" is what I need (definitely a bushing by the shape). I assume I need two per side? It's a little hard to tell from the diagram, but I can't tell exactly where the "cone washers" go in the sequence on the pin. Any hints on disassembly/reassembly? It looks like I can remove the nuts on both ends and drive out the main pin. I don't think anything will fall once that's done, but I don't want to damage things...especially the CV boots which look good.
FWIW I have no interest in poly bushings, going rubber OEM all the way. Definitely not something I wanted to tackle right now. Crap again.
And here I was hoping to go for a drive tomorrow morning.
Looking at PET, it looks like the 928 331 588 13 "rubber mounting" is what I need (definitely a bushing by the shape). I assume I need two per side? It's a little hard to tell from the diagram, but I can't tell exactly where the "cone washers" go in the sequence on the pin. Any hints on disassembly/reassembly? It looks like I can remove the nuts on both ends and drive out the main pin. I don't think anything will fall once that's done, but I don't want to damage things...especially the CV boots which look good.FWIW I have no interest in poly bushings, going rubber OEM all the way. Definitely not something I wanted to tackle right now. Crap again.
 01-05-2008, 12:36 AM
#2
Three Wheelin'
Join Date: Sep 2007
Location: Ridgecrest, California
Posts: 1,363
Likes: 0
Received 147 Likes
on
31 Posts
Hey Mark,
Still looking for info on disassembly/assembly?? If so, let me know and I'll post some pics from when I did my disassembly/assembly just before Christmas - I replaced the shocks and had to take the same pin out and deal with the cone washers. However, I did not have to deal with the bushings - they were OK. Let me know....
Still looking for info on disassembly/assembly?? If so, let me know and I'll post some pics from when I did my disassembly/assembly just before Christmas - I replaced the shocks and had to take the same pin out and deal with the cone washers. However, I did not have to deal with the bushings - they were OK. Let me know....
The following users liked this post:
brim32 (07-19-2021)
01-05-2008, 12:53 AM
#3
Archive Gatekeeper
Rennlist Member
Rennlist Member
Dunno about the bushing, sorry, but I just had my rear pins out too. There are a bunch of threads that differ in opinion on removing the pin from the rear or front. I removed mine from the rear, though in the end I ended up taking off the rotor and dust shield (2 setscrews on the rotor (an impact driver helps here) and 5 10 mm bolts) in order to have more room to work to get everything back together. Pulling the rotor and dust shield is literally 2 minutes a side unless the rotor is frozen......
Make a mental note of the order of flat and cone washers (Hint- the cone washers fit into bevels cut in both faces of the hub carrier, pointing inward....) The only trick I discovered in doing this was that while tightening up the 22mm nuts at each end of the pin, the pin kept turning. I had purchased a replacement set of the big nuts, so I double nutted the rear end of the pin, cranked them together, then used one 22mm wrench on the outer rear nut, and turned the front nut until there were 5-6 threads protruding from it. Then remove the outer rear double nut, and then you can torque to 103 ft lbs.
If the pin is tough to remove, you can remove the front nut, then stick a 17mm socket on the lower sway bar end mounting nut, and use the socket as a pivot point for a prybar to pry on the big *** yellow cad-plated washer on the rear end of the pin.
I have pics on my other PC if this isn't clear.
During reassembly, 'glue' the cone washers into place on the beveled surfaces of the hub carrier with anti-seize. It'll hold them in place while you guide the pin in. I cleaned the snot out of the pin with brake cleaner, rolled it around to make sure it was straight/true, then smeared it with anti-seize. I was able to slide the pin in entirely by hand.
01-05-2008, 12:57 AM
#4
Three Wheelin'
Join Date: Jan 2007
Location: not where you think I am
Posts: 1,466
Likes: 0
Received 0 Likes
on
0 Posts
Mark--
you can loosen the nuts on both ends of the main pin, but you can only drive the pin out in one direction if the brake dust cover is still intact.
I did this same thing last week on a spare set of suspension corners I have, to be able to move them around in the shop for easier storage.
once you determine which way to go with the pin (away from the hub), just watch for the cone washers and their orientation on the pin.
re-assemble them in reverse.
--Russ
Last edited by largecar379; 12-14-2008 at 02:27 AM.
01-05-2008, 01:44 AM
#5
Three Wheelin'
Join Date: Sep 2007
Location: Ridgecrest, California
Posts: 1,363
Likes: 0
Received 147 Likes
on
31 Posts
Mark,
Here's some pics when I was dealing with the cone washers. First a shot of the pin coming out:
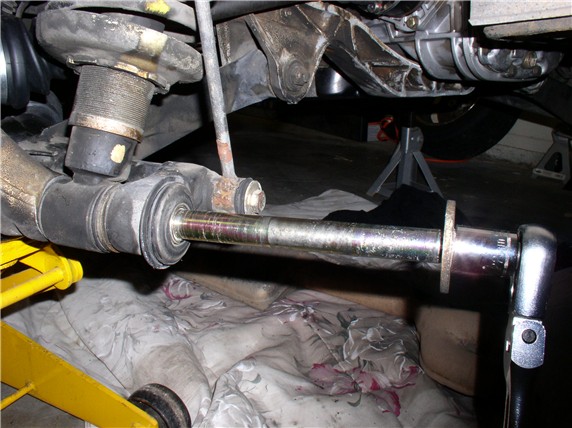
Once the pin came out, a flat washer and 1 or more cone washers fell out so I took pictures of how they went back in.
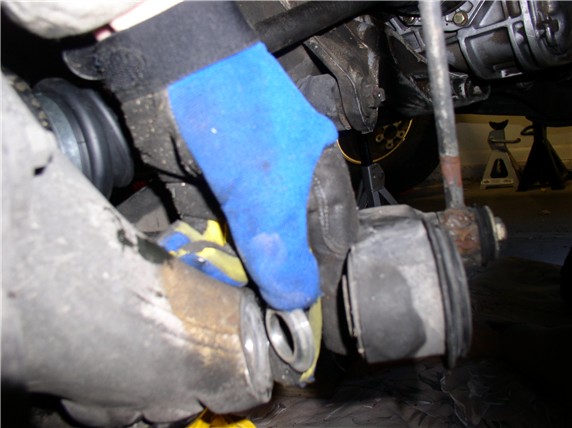
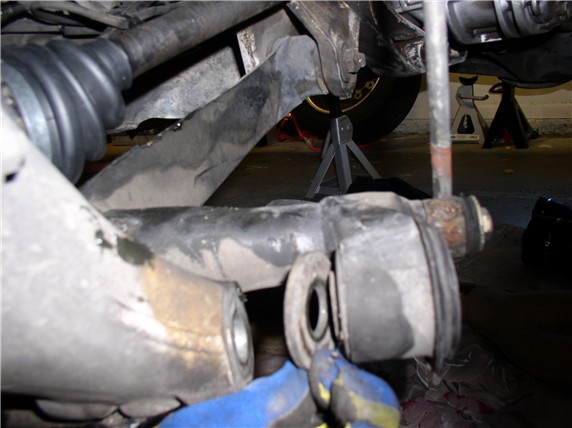
When I was ready to reassemble, I put the cone and flat washers in the same way they were installed. The cone part of the washer faces inward toward the wheel carrier while the flat side of the cone washer faces outward.
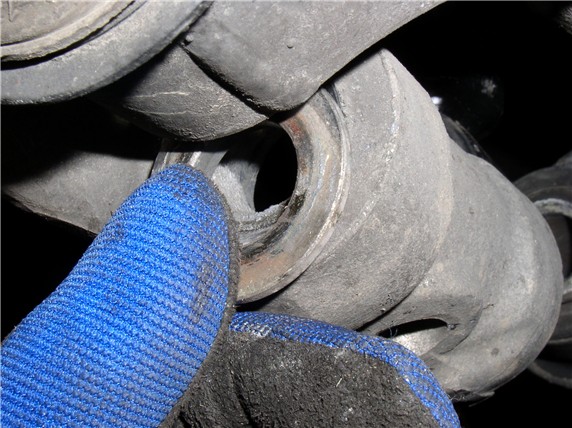
Hope this helps on some of the washer orientation. Let me know if you have more questions - I may have some more pics.
Here's some pics when I was dealing with the cone washers. First a shot of the pin coming out:
Once the pin came out, a flat washer and 1 or more cone washers fell out so I took pictures of how they went back in.
When I was ready to reassemble, I put the cone and flat washers in the same way they were installed. The cone part of the washer faces inward toward the wheel carrier while the flat side of the cone washer faces outward.
Hope this helps on some of the washer orientation. Let me know if you have more questions - I may have some more pics.
01-05-2008, 09:21 AM
#7
Drifting
Thread Starter
Pulling the rotor and dust shield is literally 2 minutes a side unless the rotor is frozen......
If the pin is tough to remove, you can remove the front nut, then stick a 17mm socket on the lower sway bar end mounting nut, and use the socket as a pivot point for a prybar to pry on the big *** yellow cad-plated washer on the rear end of the pin.
If the pin is tough to remove, you can remove the front nut, then stick a 17mm socket on the lower sway bar end mounting nut, and use the socket as a pivot point for a prybar to pry on the big *** yellow cad-plated washer on the rear end of the pin.
you can loosen the nuts on both ends of the main pin, but you can only drive the pin out in one direction if the brake dust cover is still intact.
I did this same thing last week on a spare set of suspension corners I have, to be able to move them around in the shop for easier storage.
I did this same thing last week on a spare set of suspension corners I have, to be able to move them around in the shop for easier storage.
I love Rennlist. You guys are fantastic.
Trending Topics
01-05-2008, 09:31 AM
#8
Craic Head
Lifetime Rennlist
Member
Lifetime Rennlist
Member
Great thread.
Dwayne, seriously do you wear a camera on your head while you're working and just snap a picture every few seconds just in case? Your pics are manual quality: always clear and timely for R&R jobs. Damn!
Dwayne, seriously do you wear a camera on your head while you're working and just snap a picture every few seconds just in case? Your pics are manual quality: always clear and timely for R&R jobs. Damn!
01-05-2008, 11:29 AM
#10
Three Wheelin'
Join Date: Sep 2007
Location: Ridgecrest, California
Posts: 1,363
Likes: 0
Received 147 Likes
on
31 Posts
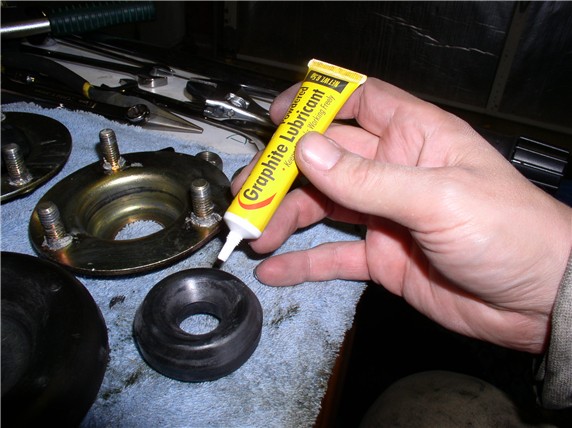
I also considered using lubricant for sliding the pin back in but ended up leaving it dry - went in by hand most of the way and ended up taping it in the rest of the way. The WSM suggests using Molykote U (= dry graphite) for suspension bushings. I used it on my shock/strut bushings when I reassembled them. Should be safe for rubber and won't attract dirt like grease or silicone lubricant. Here's a pic of what I use.

 01-05-2008, 10:59 PM
#12
Three Wheelin'
Join Date: Jan 2007
Location: not where you think I am
Posts: 1,466
Likes: 0
Received 0 Likes
on
0 Posts
01-06-2008, 01:41 AM
#13
Team Owner
If your doing rear suspension work remove the link pins towards the rear, This will accomplish 2 things.
One you get to clean and roll them on a flat surface to make sure they are true (usually the right side is bent from the wheel hitting a curb or a bad tow truck ride).
Second you get to lubricate them . If you have any thick grease this can be used to hold the beveled washer in the hub carrier, use anti seize or grease on the link pins when reinstalling them otherwise they will soon begin to bind and rust..
All of this is a lot easier including R N R ing the rear shocks if the lower sway bar mount bolt is removed and then slid backwards a bit.
01-06-2008, 09:40 AM
#14
Drifting
Thread Starter
Hell mine is probably bent from running without a bushing. I'm pulling them this morning and then I'll order everything I need tomorrow. Looks like another week without driving.  I will be greasing them going back in, both the pins and bushing inner surfaces. At least I'll know it's solid when I'm done.
And to everyone shopping for 928s right now, consider this. I bought a premium car with literally thousands of dollars in recent maintenance. I've had it just over a month now and have already spent another $500 on odds and ends. I love it!
ps - do NOT tell my wife!
I will be greasing them going back in, both the pins and bushing inner surfaces. At least I'll know it's solid when I'm done.And to everyone shopping for 928s right now, consider this. I bought a premium car with literally thousands of dollars in recent maintenance. I've had it just over a month now and have already spent another $500 on odds and ends. I love it!
ps - do NOT tell my wife!
01-06-2008, 10:44 AM
#15
Team Owner
Mark 5 hun is chump change, thats about 5 things that you fixed figure everything costs about 100 an episode to correct.
I got my car and it was ready for a do over now after $ 25,000 , not including the original cost, it just needs the battery charged and the wheels to be cleaned and to be driven
I got my car and it was ready for a do over now after $ 25,000 , not including the original cost, it just needs the battery charged and the wheels to be cleaned and to be driven