

Shift coupler access cover
 12-31-2007, 12:39 AM
#1
Three Wheelin'
Thread Starter
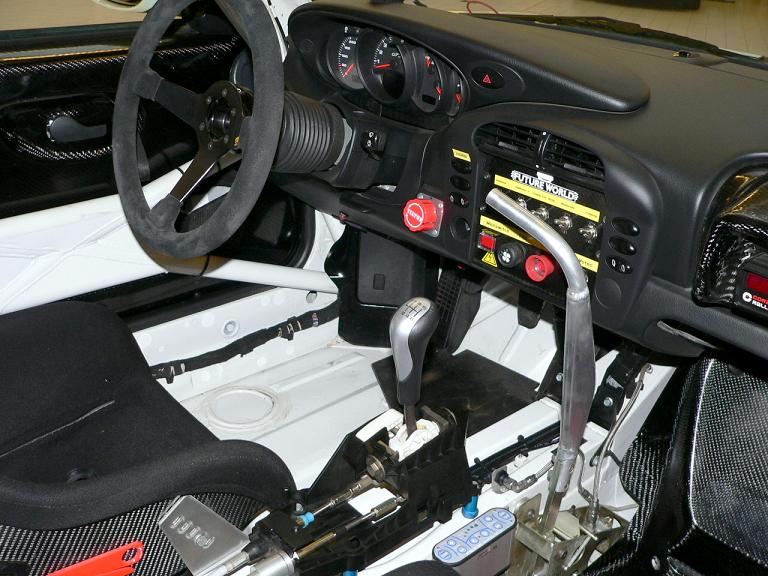
I just finished this and am tickled pink and can't wait to need to adjust the shift linkage Thanks to Rob for giving me ideas in his shift coupler thread.
Thanks to Rob for giving me ideas in his shift coupler thread.
 12-31-2007, 12:49 AM
#2
Addict
Rennlist Member
Rennlist Member
cool idea! That thing is completely stripped.
By chance do you have any pics of the ball cup in front?
By chance do you have any pics of the ball cup in front?
12-31-2007, 12:52 AM
#3
Archive Gatekeeper
Rennlist Member
Rennlist Member
Smart man, to extend the opening so that you can get a drill bit into the 4mm hex setscrew that holds the shift coupler onto the input shaft. I stripped the hell out of mine today (despite soaking O/N in kroil- maybe they're loctited?) and had to drill it out, fortunately I had another rear shift coupler. The setscrews are M8 x 12, 1.25 mm pitch, FWIW. $1.20 at your friendly neighborhood Ace hardware store.....
12-31-2007, 08:26 AM
#4
Craic Head
Lifetime Rennlist
Member
Lifetime Rennlist
Member
Smart man, to extend the opening so that you can get a drill bit into the 4mm hex setscrew that holds the shift coupler onto the input shaft. I stripped the hell out of mine today (despite soaking O/N in kroil- maybe they're loctited?) and had to drill it out, fortunately I had another rear shift coupler. The setscrews are M8 x 12, 1.25 mm pitch, FWIW. $1.20 at your friendly neighborhood Ace hardware store.....
Cool solution BTW Mike!
12-31-2007, 02:44 PM
#6
Inventor
Rennlist Member
Rennlist Member
Mike,
Nice! Do you have one for the clutch master too?
Are the brake lines in your interior for the rally brake?
Nice! Do you have one for the clutch master too?
Are the brake lines in your interior for the rally brake?
12-31-2007, 02:47 PM
#7

I don't know if you saw what I did with that rear coupler mike - I used a Universal Joint from Flaming River, and cut up the splined piece of the coupler to fit into the one end of the universal. That and the Heim at the front makes for no movement in the shifter.
Trending Topics
12-31-2007, 03:00 PM
#8
Nordschleife Master
Join Date: Dec 2004
Location: Guelph, Ontario, Canada
Posts: 6,164
Likes: 0
Received 5 Likes
on
5 Posts
Correct me if I am wrong but the central hump is a huge part in the rigidity of our cars. Some one did a FEA and showed that that area is the weak area and would benefit from strengthening.
I am just saying this would weaken that area as is is up and over the corner of the hump(area of strength)
I am just saying this would weaken that area as is is up and over the corner of the hump(area of strength)
12-31-2007, 03:06 PM
#9
He has a cage, a very big one it looks like, and that would totally change the stress areas on the car and the total strength.
12-31-2007, 05:12 PM
#10
Three Wheelin'
Thread Starter
Yes, it does take away from the structure somewhat and I wouldn't do this to a street car.
I really should knock off posting these things, they're for a racer build and I just assume that's understood but I don't want to imply that these kinds of things are a good idea for a normal car, sorry.
Folks, don't do anything I'm doing in posts like this!
I really should knock off posting these things, they're for a racer build and I just assume that's understood but I don't want to imply that these kinds of things are a good idea for a normal car, sorry.
Folks, don't do anything I'm doing in posts like this!
12-31-2007, 05:29 PM
#11
Addict
Lifetime Rennlist
Member
Lifetime Rennlist
Member
Mike,
Be aware that some race classes don't allow you to modify the floor plan from shock tower to shock tower. Tech might give you a hard time.
Be aware that some race classes don't allow you to modify the floor plan from shock tower to shock tower. Tech might give you a hard time.
12-31-2007, 05:54 PM
#12
Three Wheelin'
Thread Starter
That would be some serious pickiness, not sure I would want to race in that environment anyway, is that a PCA rule? How is it worded, by a certain modified area in square inches? I can't see this being an issue in NASA or the historic groups.

 That should at least work for NASA.
12-31-2007, 08:04 PM
That should at least work for NASA.
12-31-2007, 08:04 PM
#15
Chronic Tool Dropper
Lifetime Rennlist
Member
Lifetime Rennlist
Member

Stamp a factory part number into the cover. Roll a stiffening bead near the edge to make it look strong. Install it with yellow chromate capscrews, put a dot of red nailpolish on each one after you torque them correctly. Paint it to match the rest of the tub.
If it looks like the factory put it there, you'll never get a second look. How many inspectors are that familiar with a 928 anyway?
If it looks like the factory put it there, you'll never get a second look. How many inspectors are that familiar with a 928 anyway?