

Old Bugger Engine Coming Out
 01-13-2008, 01:40 AM
#31
Three Wheelin'
Join Date: Jan 2007
Location: not where you think I am
Posts: 1,466
Likes: 0
Received 0 Likes
on
0 Posts
 01-20-2008, 05:57 PM
#33
Rennlist Member
Thread Starter
Okay guys, gotta say this is getting a bit overwhelming. I woke up at 4am this morning worrying about which head gasket to use with the euroS heads on the 95mm bore. Jeez, I need to relax a bit. I knew the "while you're in there" needed to be a long list.....oh well, just keep plugging along.
While separating the lower portion of the block, I was able to get the oil pump out. OH MY GOD - oil was actually able to be pumped through this? I felt like the bad side of a "pay me now, or pay me later" oil change commercial. Oh well, how much does 30 years of oil changes cost? I did change my oil often, except when she was in storage for years here or there. Surely, this was the previous owners doing! BTW, oil pressure at idle was very low, crusing was good (no wonder with all that blockage).
Back to business. The crank journals measure up with a bit of wear. Rods measured at 2.046" (which is 51.968mm vs standard of 51.971 - 51.990). And main journals measured at 2.7535" (which is 69.939mm vs standard of 69.971 - 69.99). We'll see what the Glyco bearings measure in at when they arrive.
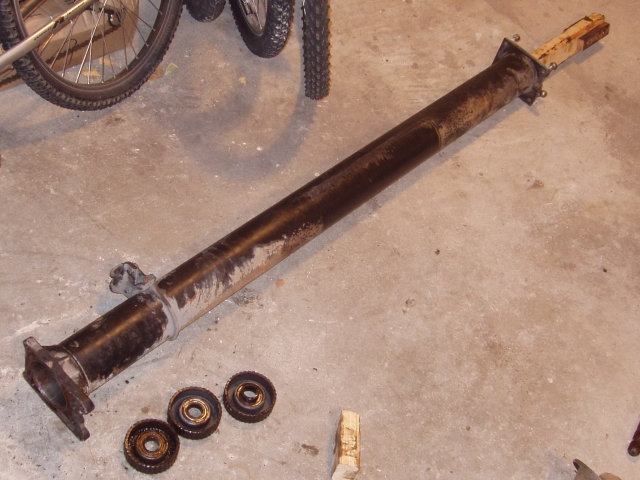
Of course the torque tube had to come out. Unbelievably, the bearings seem fine. Must replace anyway because they will surely go tomorrow if I put the old ones back in today. I used a method of getting the bearing assemblies out that I hadn't seen used before. I had a length of 2X3 a bit longer than the TT. I screwed on some lengths of 1x1.5" (I think) to the end.
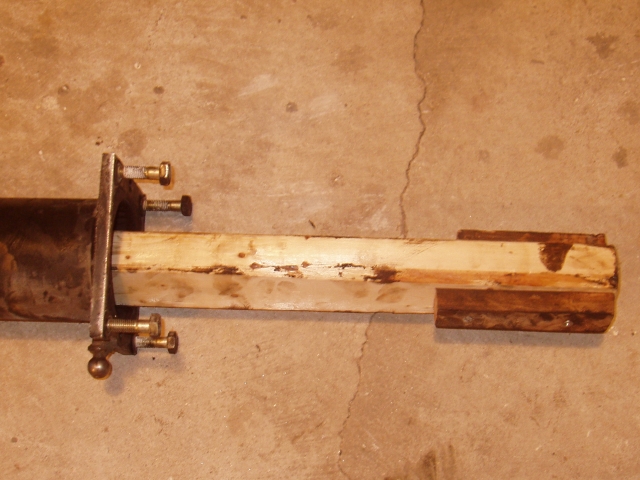
Then I pretended I was back on the ranch driving fence posts. I used the TT as the driver with the 2X3 playing fence post. A bit of beating later, I had all 3 bearing assemblies out.
Like I said, it's getting a bit involved. Engine, TT, upper arms, aircon, brake master cyl, blue hose of death, cv boots, crossmember and MM.
Like I said, just gotta keep plugging along.....
While separating the lower portion of the block, I was able to get the oil pump out. OH MY GOD - oil was actually able to be pumped through this? I felt like the bad side of a "pay me now, or pay me later" oil change commercial. Oh well, how much does 30 years of oil changes cost? I did change my oil often, except when she was in storage for years here or there. Surely, this was the previous owners doing! BTW, oil pressure at idle was very low, crusing was good (no wonder with all that blockage).
Back to business. The crank journals measure up with a bit of wear. Rods measured at 2.046" (which is 51.968mm vs standard of 51.971 - 51.990). And main journals measured at 2.7535" (which is 69.939mm vs standard of 69.971 - 69.99). We'll see what the Glyco bearings measure in at when they arrive.
Of course the torque tube had to come out. Unbelievably, the bearings seem fine. Must replace anyway because they will surely go tomorrow if I put the old ones back in today. I used a method of getting the bearing assemblies out that I hadn't seen used before. I had a length of 2X3 a bit longer than the TT. I screwed on some lengths of 1x1.5" (I think) to the end.
Then I pretended I was back on the ranch driving fence posts. I used the TT as the driver with the 2X3 playing fence post. A bit of beating later, I had all 3 bearing assemblies out.
Like I said, it's getting a bit involved. Engine, TT, upper arms, aircon, brake master cyl, blue hose of death, cv boots, crossmember and MM.
Like I said, just gotta keep plugging along.....
01-20-2008, 08:31 PM
#34

These are great Pics Dan. I don't even know where my dissassembly pics are, at least 75% of them.
What did you measure the crank journals with?
What did you measure the crank journals with?
01-20-2008, 09:21 PM
#35
Rennlist Member
Thread Starter
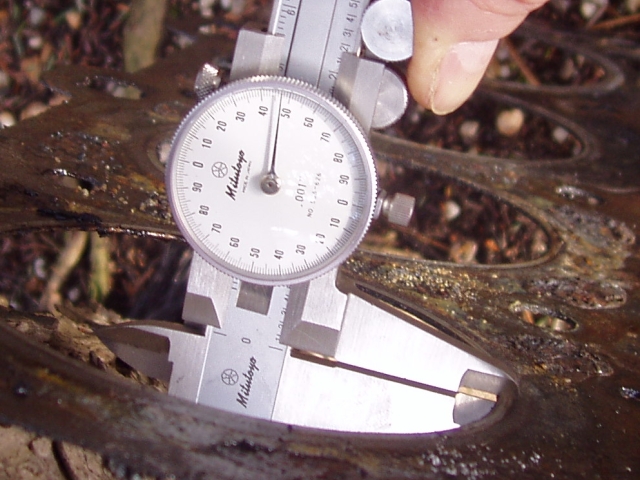
Bought it a garage sale years ago. Never had a reason to use em until now. I think they are pretty accurate.
Thinking about getting a telescoping gauge so I can consistently measure inside diameters with the same part of the tool.
http://store.summitracing.com/partde...5&autoview=sku
01-21-2008, 10:00 AM
#36
Rennlist Member
Thread Starter
Oh yeah, I remember always hearing that the block is heavier than a small block chevy. Well, I must say after lifting the 928 bare block and remembering the last time I carried, alone, a SBC bare block, the SBC is way heavier. Even with the crank gridle, I'd say way heavier. Or, God forbid, I'm stronger now than I was when I was 18?
Should I sneak the bathroom scale out to the garage, or is this an enzo?
Should I sneak the bathroom scale out to the garage, or is this an enzo?
01-21-2008, 12:22 PM
#37
Do the bathroom scale. I t hink the iron block SBC *newer ones) and the 928 block are about even when assembled, but thats crazy because the iron block LSX can carry 2500hp. The Aluminum block LS blocks are much lighter.
 01-26-2008, 11:13 AM
#39
Rennlist Member
Thread Starter
Looking back at post (lucky) number 13, you can see that my firewall heatshield is in a hell of a state. I've searched, but found no recommendations for removing and replacing this with something new. I'm tempted to go over to JC Whitney and see what they have on offer. Anyone BTDT?
01-26-2008, 12:33 PM
#40
Looking back at post (lucky) number 13, you can see that my firewall heatshield is in a hell of a state. I've searched, but found no recommendations for removing and replacing this with something new. I'm tempted to go over to JC Whitney and see what they have on offer. Anyone BTDT?
Thats the plan.
01-27-2008, 04:37 PM
#41
Rennlist Member
Thread Starter
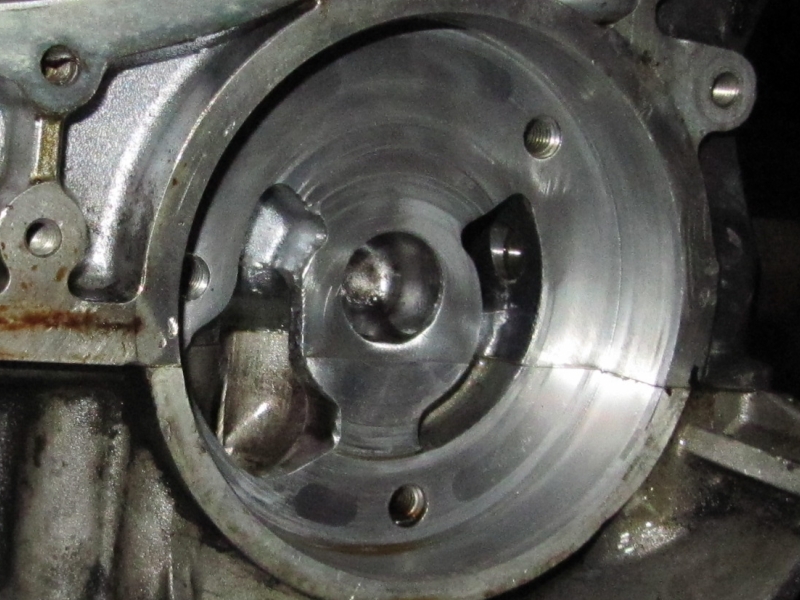
Separating the release bearing from the pressure plate was a breeze when I realized that all I had to do was let the whole assemble rest on the release bearing. This gave enough room to pry the c clip out of it's groove. Just held one end of the clip with an ice pick and used a screwdriver to pry the other end out of the groove. I guess the '78 is pretty easy compared to the others. No pressure at all was necessary. You can see the end of the clip pried out in the lower right of the picture.

I pressed the bearing out of the shell pretty easily (when I say press, its not like I have a press, more like I have a block of wood and a small sledge hammer). I couldn't get the inner sleeve pressed out of the bearing. Here the hammer approach didn't work, so I rigged a press using a 3,300lb screw jack. No luck, I guess this will go to a machine shop for removal.
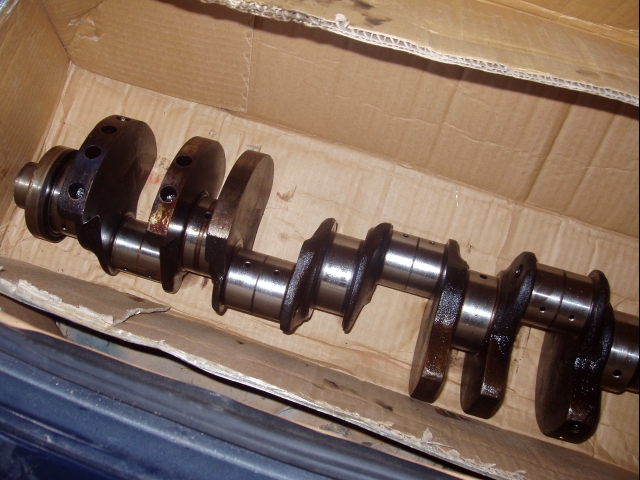
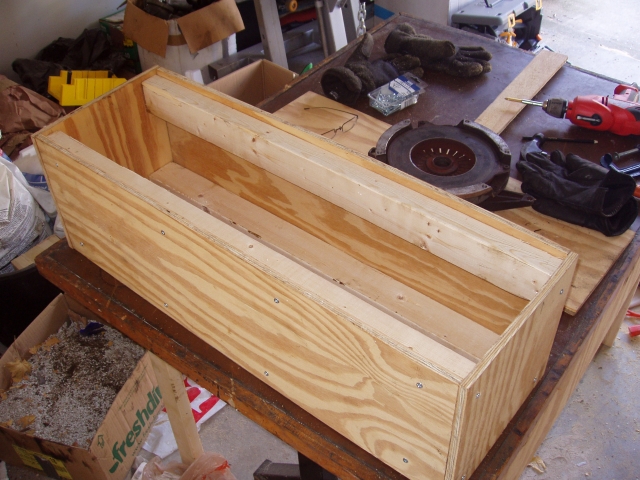
Here's the "coffin" I threw together for the crank. No cardboard shipping container here! I'll call Taylor Engine tomorrow and see when they can fit me in and what the damage will be to "drill it like a chevy."
I pressed the bearing out of the shell pretty easily (when I say press, its not like I have a press, more like I have a block of wood and a small sledge hammer). I couldn't get the inner sleeve pressed out of the bearing. Here the hammer approach didn't work, so I rigged a press using a 3,300lb screw jack. No luck, I guess this will go to a machine shop for removal.
Here's the "coffin" I threw together for the crank. No cardboard shipping container here! I'll call Taylor Engine tomorrow and see when they can fit me in and what the damage will be to "drill it like a chevy."
01-27-2008, 04:40 PM
#42
Rennlist Member
Thread Starter
Oh, the flywheel, pressure plate and intermediate plate surfaces are all smooth. I don't think these need any resurfacing. The clutch disks seem to have some material left. Is this consistent with what others have found? Car has about 85k miles on it.
01-27-2008, 05:23 PM
#43
Burning Brakes
Any hot spots on the flywheel, PP or IP? The surfaces were smooth on my clutch when I first removed, but hot spots did need to be addressed. The flywheel is the only part that can be re-surfaced. The IP an PP have to be replaced. If you do go the replacement route (IP in particular), you will have to order the updated discs, splined shaft and guide tube. The original IP is no longer available and the updated version has a longer travel (this is what necesitates the replacement of the other clutch parts). No need to replace the PP if the surface is ok-- no difference between old and new.
01-30-2008, 12:15 PM
#44
Rennlist Member
Thread Starter
Okay, here's the $100,000 question. Can I put 4.7 liter Euro S heads on a 95mm bore?
If I use a 97mm head gasket, part of the top of the block deck will be exposed.
If I use a 97mm head gasket, part of the top of the block deck will be exposed.
02-02-2008, 11:21 AM
#45
Rennlist Member
Thread Starter
I lost my Tech Spec book for the '86 Euro S. It didn't survived the trip back from England this summer. I wanted to give a copy of the page with the valve sizes and dimensions on it to the machine shop.
I would be forever in someone's debt if this page was scanned and emailed to me.
Gotta be worth a beer or good karma
lt_texas at hotmail.com
I would be forever in someone's debt if this page was scanned and emailed to me.
Gotta be worth a beer or good karma
lt_texas at hotmail.com