

Old Bugger Engine Coming Out

 01-01-2008, 11:00 PM
#18
Rennlist Member
Thread Starter
Ignition resistors, thanks.
This might seem misguided, but a major concern of mine is getting a head gasket that is going to allow me to achieve 35-45/1000 inch piston to cylinder head clearance. I think the cometic gasket will get me there, but I understand it is only available for 100mm bores and over. I worry a lot about detonation with too much clearance.
I've read that the porsche gaskets in are thicker than originally installed. not good I don't think.
So, where Mark's shortblock looks like a great value, I wonder if I drive my decision based on headgasket availability.
Does anyone know of a head gasket for a 95 or 97mm with a compressed thickness of 1mm????
Also, Landseer, I don't think I would have gotten it out without the help of my father.
01-01-2008, 11:12 PM
#19
Team Owner
the clutch systemis very easy to replace if you follow these instructions search for clutch master cylinder replacement.
Basically you remove the whole clutch actuating system as a complete unit, cut off the blue hose at the resivour remove the 2 bolts holding the master in then remove the sway bar hose mount then the oil pan hose mount then the slave it drops out as a unit
Basically you remove the whole clutch actuating system as a complete unit, cut off the blue hose at the resivour remove the 2 bolts holding the master in then remove the sway bar hose mount then the oil pan hose mount then the slave it drops out as a unit
01-01-2008, 11:12 PM
#20
Three Wheelin'
Join Date: Jan 2007
Location: not where you think I am
Posts: 1,466
Likes: 0
Received 0 Likes
on
0 Posts
if you don't pickup Mark K's engine or similar, and decide to rebuild your own, the piston set I have would work great with your Euro top end stuff.....it'll bump your CR up quite a bit.
NIB 4.5L Mahle piston set tolerance group 1 w/rings and circlips (pop up style pistons---high compression ratio)
$500 plus shipping-----
fit them to your rods, add crank bearings and your done-----
--Russ
NIB 4.5L Mahle piston set tolerance group 1 w/rings and circlips (pop up style pistons---high compression ratio)
$500 plus shipping-----
fit them to your rods, add crank bearings and your done-----
--Russ
01-05-2008, 10:23 PM
#21
Rennlist Member
Thread Starter
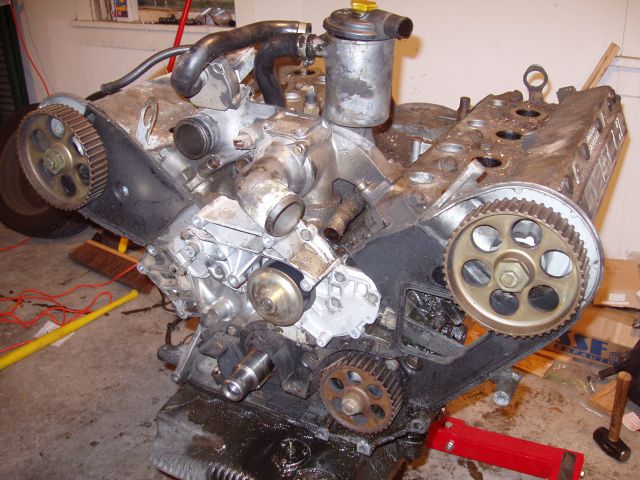
What a tangle of old brittle and broken vacuum hoses. I wonder how many vacuum leaks I had. Also, the engine wiring harness is pretty toasty. I was a bit of work to get everything pulled off the top end. I'm down to a longblock now.
I didn't realize that the fuel distributor/throttle body assemble just sat on in the valley, not like it could go anywhere. What a tangle of wires, hoses and fuel lines.
The only thing unusual was the runner to head gaskets protruding and blocking airflow in most all the cylinders. Look at the buildup on the gasket still stuck to the head.
You can see it too on the gaskets still stuck to the runners. Anyone else have this occur to them?
All the spark plugs read just fine, ashy brown or tan. All very consistent.
Only problem so far is the bolts on the fitting for the heater hose broke right off. Lucky for me I've got Euro S heads to bolt on.

I'll pull the cam towers and heads tomorrow. I want to measure piston to deck height and cc the valve reliefs.
I didn't realize that the fuel distributor/throttle body assemble just sat on in the valley, not like it could go anywhere. What a tangle of wires, hoses and fuel lines.
The only thing unusual was the runner to head gaskets protruding and blocking airflow in most all the cylinders. Look at the buildup on the gasket still stuck to the head.
You can see it too on the gaskets still stuck to the runners. Anyone else have this occur to them?
All the spark plugs read just fine, ashy brown or tan. All very consistent.
Only problem so far is the bolts on the fitting for the heater hose broke right off. Lucky for me I've got Euro S heads to bolt on.
I'll pull the cam towers and heads tomorrow. I want to measure piston to deck height and cc the valve reliefs.
01-06-2008, 07:44 AM
#22
Drifting
Join Date: Nov 2001
Location: z�rich, switzerland
Posts: 2,233
Likes: 0
Received 0 Likes
on
0 Posts
HTML Code:
I cant imagine doing a clutch master cylinder with the engine in the car
I have small hands & I figured I could change my blue hose last week without taking out the Brake booster or the Clutch M/C. I anyway had taken out the Brake M/C for fixing. So I pulled the blue hose & the elbow into the Clutch M/C pulled out with it @#*#.
So now i took out the Clutch M/C & am waiting for the new one.
Marton
01-06-2008, 11:59 AM
#23
Burning Brakes
I agree that marks motor is the way to go. I havent been following what all your doing but if you already have Euro heads, it makes sense to have the Euro block to go with it.
From experience, rings will cost $300, main's $250, rod bearings $180 thats $730 right there. Actually rings for 4.5's maybe more expensive due to low availability. I think either the 95mm or the 97mm rings are double the cost of the other. Last i heard anyway.
From experience, rings will cost $300, main's $250, rod bearings $180 thats $730 right there. Actually rings for 4.5's maybe more expensive due to low availability. I think either the 95mm or the 97mm rings are double the cost of the other. Last i heard anyway.
Someone on this board recently mentioned that rings for a 4.5L will run $70-$100 a hole.
01-06-2008, 01:37 PM
#24
We had a choice?
Rennlist Member
Rennlist Member
Not to sound like a broken record, but Mark's block is a really good deal. But hey, if you want to keep it all original, rebuild the 4.5L. It's definately doable and will be quite rewarding when you fire it up for the first time. Keep the pics coming as you progress through the project.
01-06-2008, 03:37 PM
#25
Three Wheelin'
Join Date: Jan 2007
Location: not where you think I am
Posts: 1,466
Likes: 0
Received 0 Likes
on
0 Posts
His best buy (for rebuilding his 4.5L) is picking up my NIB high compression piston/ring set for $500. (but he already knows this....)
--Russ
01-06-2008, 06:35 PM
#26
Rennlist Member
Thread Starter
Not to sound like a broken record, but Mark's block is a really good deal. But hey, if you want to keep it all original, rebuild the 4.5L. It's definately doable and will be quite rewarding when you fire it up for the first time. Keep the pics coming as you progress through the project.
Mark's short block is a good deal. But I'd still like to rebuild the bottom end myself and even with the high cost of 95mm rings and my free labor, I am still under the shipped cost. If I wasn't so mad, I'd buy it, but I'm a stubborn (not too) old man.
01-06-2008, 06:36 PM
#27
Rennlist Member
Thread Starter
This is a great deal. And one I am considering. But I want to pull my heads before I hit the offer.
01-06-2008, 06:45 PM
#28
Rennlist Member
Thread Starter
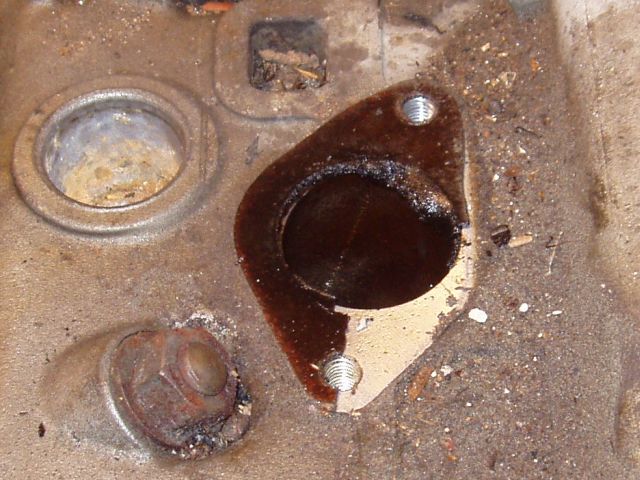
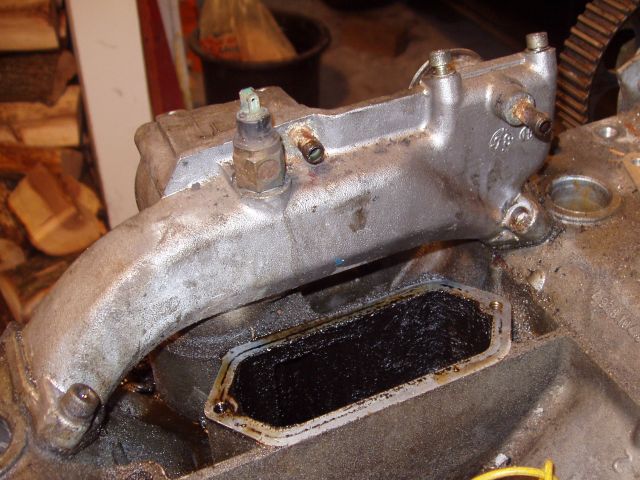
Yikes. It took a mallet and chisel to break loose the heater fitting and get it off. What a mess of corrosion. The bolt heads broke off pretty easily. As I said, I'm not planning to reuse the heads, even if I cannot extract the bolts, all is not lost - just a couple (if any) dollars off ebay.
To add to my problems, the bolts on the water manifold were impossible. The left front came out. But even with overnight soaking with liquid wrench and heating with a torch, the other three bolt heads snapped off. I am very worried about this. I thought I could work the manifold off the "studs" as I pulled the heads, but this seems not too likely. Took a lot of effort just to loosen the head. After the problems with removing the heater hose fitting, I worry that the water manifold will not break free once I start tugging on the head.
Does anyone else have these problems with 30 year old engines?
I am temped to find out how much the water manifold costs AND CUT THROUGH THE DAMN THING ON BOTH SIDES! Hacksaw and aluminum can't be that bad.
01-06-2008, 07:00 PM
#29
We had a choice?
Rennlist Member
Rennlist Member
Does anyone else have these problems with 30 year old engines?
I thought I could work the manifold off the "studs" as I pulled the heads, but this seems not too likely
01-12-2008, 08:00 PM
#30
Rennlist Member
Thread Starter
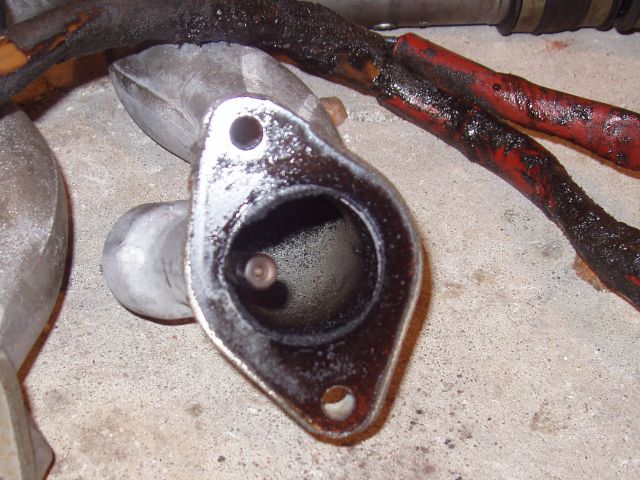
The water manifold came out really easily after I found my hacksaw
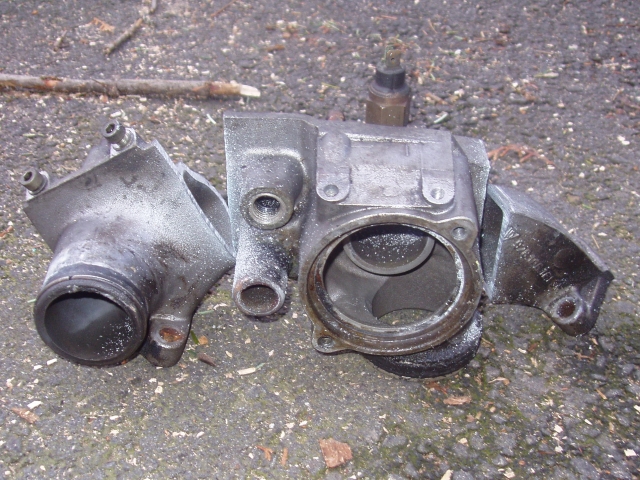
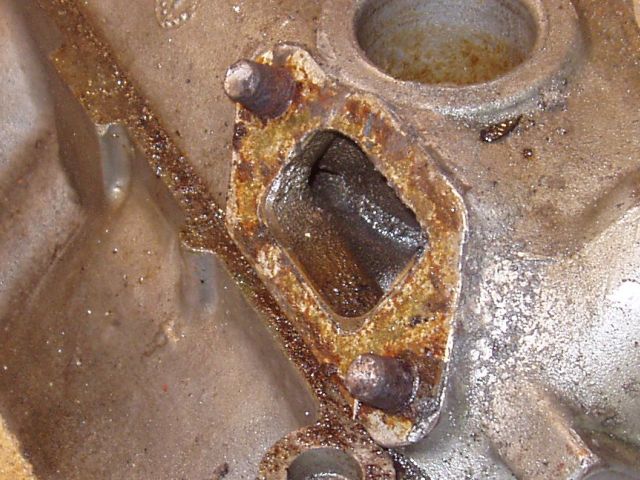
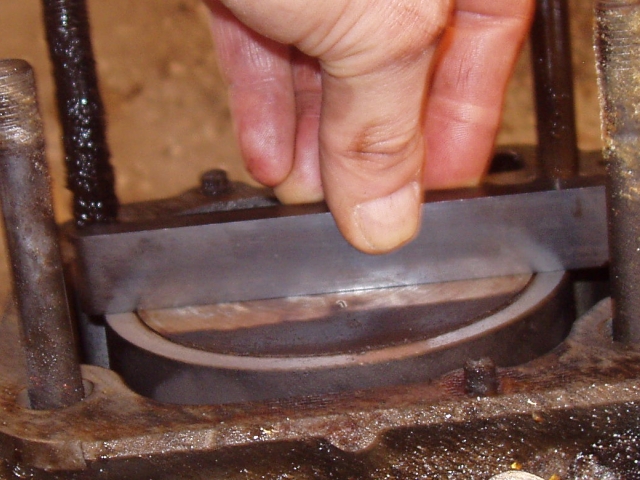
After being compressed for 30 years, I figure it didn't expand much, so old bugger head gasket compressed thickness is 47/1000"
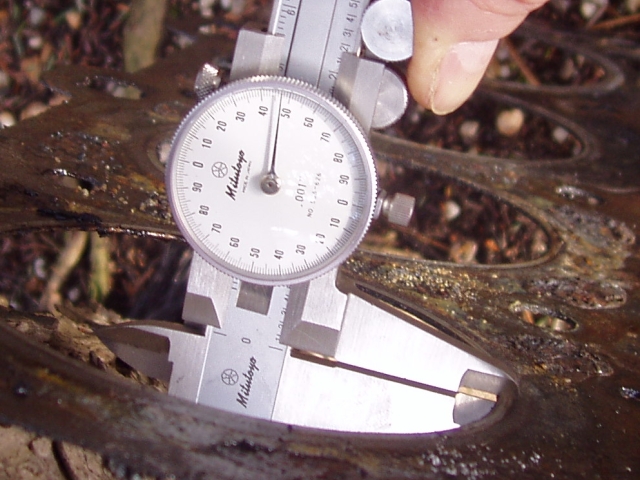
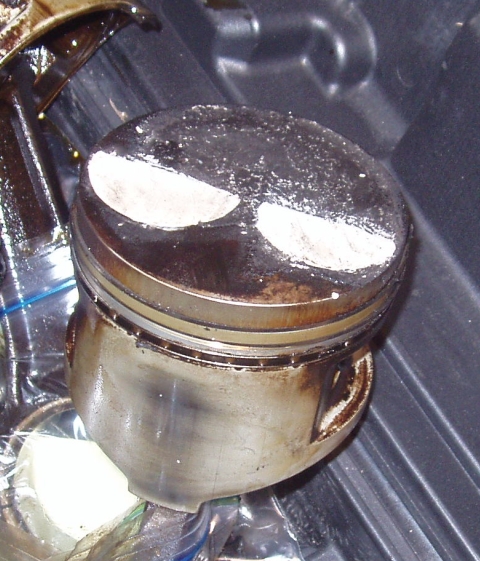
I cleaned up number 1 to check piston to deck height. BTW, no ridge whatsoever
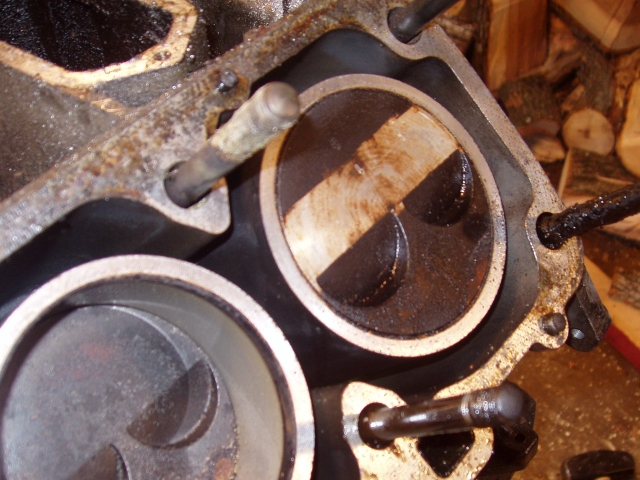
It is out of the hole, but I couldn't get a 6/1000" feeler gauge in between the straight edge and the cylinder deck. So it ain't stickin' out much.
All the rod bearings looked good, except No. 2. The crank rod journals all look just fine.

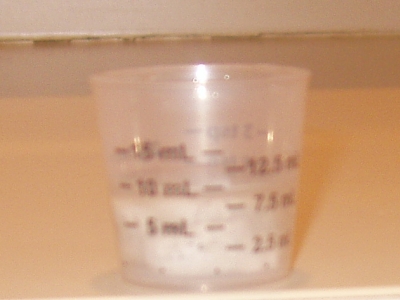
I used some clay from my son's arts and crafts supply to measure the piston valve reliefs
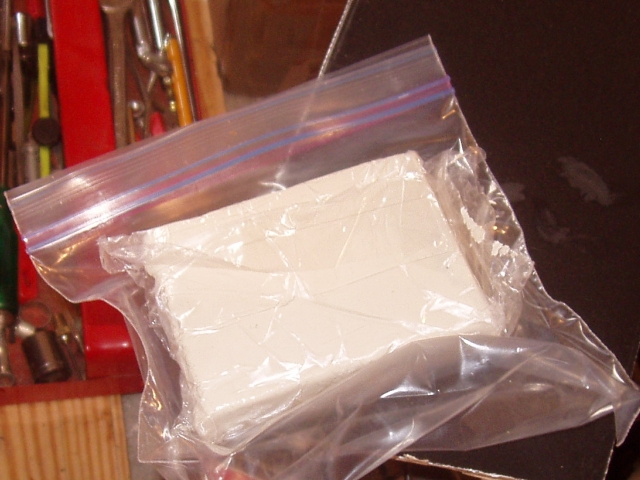
Mashed it in the valve reliefs and flattened it out with a straight edge
Removed the clay and balled it up
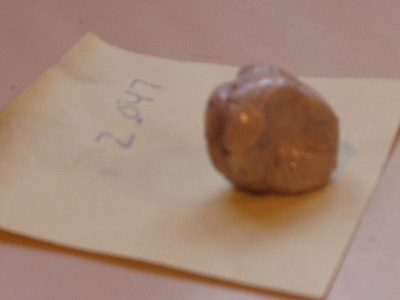
Dropped it in a measuring cup. It went from 5ml to 10ml. So my old bugger combined intake and exhaust valve reliefs are 5ml.
After being compressed for 30 years, I figure it didn't expand much, so old bugger head gasket compressed thickness is 47/1000"
I cleaned up number 1 to check piston to deck height. BTW, no ridge whatsoever
It is out of the hole, but I couldn't get a 6/1000" feeler gauge in between the straight edge and the cylinder deck. So it ain't stickin' out much.
All the rod bearings looked good, except No. 2. The crank rod journals all look just fine.
I used some clay from my son's arts and crafts supply to measure the piston valve reliefs
Mashed it in the valve reliefs and flattened it out with a straight edge
Removed the clay and balled it up
Dropped it in a measuring cup. It went from 5ml to 10ml. So my old bugger combined intake and exhaust valve reliefs are 5ml.