

Steering Rack rebuild seals and O rings pics
 09-07-2007, 06:40 PM
#31
 09-07-2007, 06:45 PM
#32
Instructor

Join Date: Oct 2003
Location: Quartz Hill,CA.
Posts: 129
Likes: 0
Received 0 Likes
on
0 Posts
Never said difficult, just a pita with all of the little parts and the clean room environment required to keep everything clean . I would rather replace a ring/pinion before messing with a rack again.
09-08-2007, 05:24 AM
#34
Griffiths,
Thanks for your offer to help but I already installed a revised one and that seems to work out fine. Had to drive again so no time left for PITA steering rack revision.
Robert, 1994 GTS midnightblue, the Netherlands
Thanks for your offer to help but I already installed a revised one and that seems to work out fine. Had to drive again so no time left for PITA steering rack revision.
Robert, 1994 GTS midnightblue, the Netherlands
10-26-2009, 05:38 PM
#35
Rennlist Member
Does anyone have a good experience rebuilding the steering rack? Mine leaks a bit on one side. I am contemplating buying a seal kit but they don't come cheap at EUR 95 = approx USD 135. Is there a good writeup?
07-12-2010, 02:41 PM
#37
Instructor

Reviving this thread because I need some help locating a part. During my rack rebuild, I ended up stripping the hex key of 2 of the banjo bolts that secure the rack hard lines (ZF schematic part 104 on page 1). I was able to remove them by cutting a slot in the head and using a large screwdriver. I would like to replace them before reinstalling the rack- anyone know a possible source?
07-12-2010, 04:52 PM
#39

Reviving this thread because I need some help locating a part. During my rack rebuild, I ended up stripping the hex key of 2 of the banjo bolts that secure the rack hard lines (ZF schematic part 104 on page 1). I was able to remove them by cutting a slot in the head and using a large screwdriver. I would like to replace them before reinstalling the rack- anyone know a possible source?
Do you know the website: griffiths? They do rebuilds and he may have sort of contact for getting the hard parts you may require.
07-12-2010, 05:05 PM
#40
Instructor
BC- Thanx. I will give them a call. I am thinking that the only solution at this point are the rebuilders. They have to be getting their parts from someone- guess they are able to go directly to ZF as they deal in large qtys. The Rennbay kit seems pretty complete- Only thing missing for me was the Oring on the tensioner and the crescent shaped liner for the tensioner. Mine was in pretty good shape so I just reused it. Will see if leak stops.
07-12-2010, 05:11 PM
#41
Its getting very difficult. Making a new tensioner piece (plastic) may be a good plan. Some have put delrin bushings in the end of the rack so as to create more solidity.
12-05-2010, 08:49 AM
#42
Craic Head
Lifetime Rennlist
Member
Lifetime Rennlist
Member
Just wanted to say that I consider this the best steering rack rebuild thread I've found and it's the one I used for my recent rebuild that came up with no leaks
OK, now my notes because it was my third rebuild in 4 years and I learned a few things along the way. The first two didn't take because I wasn't getting one important part about re-assembly that I haven't seen mentioned anywhere.
When reassembling the end pieces of the rack to the tube (#22 in this picture) it's imperative that you get all O-rings seated properly and that the star shaped pieces (7 and 23 in this pic) are pushed all the way down into their proper position by the center tube (22) at each end.
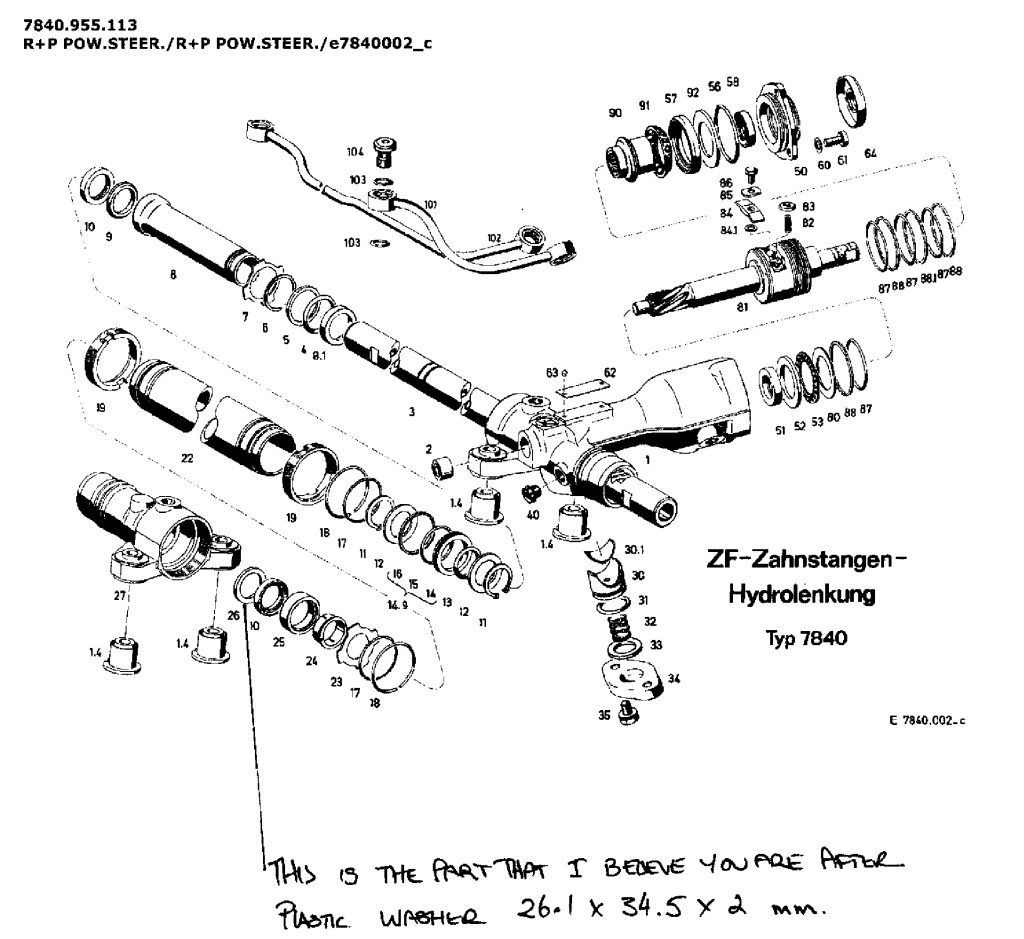
I didn't understand that the ends of that tube are supposed to be pushed up against those two pieces and that will force all of the O-rings into place nice and tight (lube them with ATF or sylglide or something during assembly).
When I did my assembly the first two times I just kind of looked in and made sure everything looked OK, slid the tube in and then started tightening the threaded rings (19) to tighten it in place.
This lead to premature O-ring failure of the O-rings 17 on the outside of the tube (after 3 years) and a smaller one inside the main housing #5 I think immediately because it wasn't properly seated and the toothed end of the shaft ate it immediately.
You will be able to see the ends of the tube and the star rings through the openings for the banjo bolts. Just leave the threaded ring all the way back and push the end of the tube in while watching through the hole. You'll know when it's seated, then thread the ring in and watch through the hole as you tighten it down. It should be almost all the way to the end of the hole when it's fully in place.
For me anyway, this was the part I was missing and this time it proved to be exactly what was needed.
Also, when fitting the part that comes out for the steering knuckle (81) into the main portion, if the roller bearings (53) aren't centered, it won't turn smoothly. You'll need to stand this part straight up as you slide it in to make sure it stays centered and doesn't slide to the side. Once you get it slid in, put the steering knuckle on and test turn it. It should be smooth and easy. If it's hard to turn, that roller bearing probably isn't in right. Then you can close it up and continue.
Finally, since I'd already screwed things up twice, I didn't want to get the whole thing assembled and find out it still leaked so I did a test install:
Just put the rack in place in the car and put one of the 17mm bolts on the passenger (US) end of the rack and one on the near end, just enough to support the rack without that plate under it. Maneuver the steering knuckle on and then put the steering lines on and tighten them down (pressure is the bottom one, return is top). Then put the other 2 17mm bolts on and make all 4 finger tight. Leave the tie rods off and don't connect anything else yet.
Now you can fill up the system and turn the wheel (have to watch for the stops since it doesn't have the tie rods on to stop it). You'll be able to see the whole rack and make sure it's not leaking. Fill it up, start it up and turn it a few times. If it's leaking you only have to drain it and remove a few bolts.
But since you can see the whole thing, you can be 100% sure it's not leaking.
Now that you're sure, remove the four bolts (while holding up the rack with your hand) and put the lower plate in. Put the 4 13mm nuts on to hold that lower plate in place, and continue with the rest of the install with total confidence that this worked!!!
HTH
OK, now my notes because it was my third rebuild in 4 years and I learned a few things along the way. The first two didn't take because I wasn't getting one important part about re-assembly that I haven't seen mentioned anywhere.
When reassembling the end pieces of the rack to the tube (#22 in this picture) it's imperative that you get all O-rings seated properly and that the star shaped pieces (7 and 23 in this pic) are pushed all the way down into their proper position by the center tube (22) at each end.
I didn't understand that the ends of that tube are supposed to be pushed up against those two pieces and that will force all of the O-rings into place nice and tight (lube them with ATF or sylglide or something during assembly).
When I did my assembly the first two times I just kind of looked in and made sure everything looked OK, slid the tube in and then started tightening the threaded rings (19) to tighten it in place.
This lead to premature O-ring failure of the O-rings 17 on the outside of the tube (after 3 years) and a smaller one inside the main housing #5 I think immediately because it wasn't properly seated and the toothed end of the shaft ate it immediately.
You will be able to see the ends of the tube and the star rings through the openings for the banjo bolts. Just leave the threaded ring all the way back and push the end of the tube in while watching through the hole. You'll know when it's seated, then thread the ring in and watch through the hole as you tighten it down. It should be almost all the way to the end of the hole when it's fully in place.
For me anyway, this was the part I was missing and this time it proved to be exactly what was needed.
Also, when fitting the part that comes out for the steering knuckle (81) into the main portion, if the roller bearings (53) aren't centered, it won't turn smoothly. You'll need to stand this part straight up as you slide it in to make sure it stays centered and doesn't slide to the side. Once you get it slid in, put the steering knuckle on and test turn it. It should be smooth and easy. If it's hard to turn, that roller bearing probably isn't in right. Then you can close it up and continue.
Finally, since I'd already screwed things up twice, I didn't want to get the whole thing assembled and find out it still leaked so I did a test install:
Just put the rack in place in the car and put one of the 17mm bolts on the passenger (US) end of the rack and one on the near end, just enough to support the rack without that plate under it. Maneuver the steering knuckle on and then put the steering lines on and tighten them down (pressure is the bottom one, return is top). Then put the other 2 17mm bolts on and make all 4 finger tight. Leave the tie rods off and don't connect anything else yet.
Now you can fill up the system and turn the wheel (have to watch for the stops since it doesn't have the tie rods on to stop it). You'll be able to see the whole rack and make sure it's not leaking. Fill it up, start it up and turn it a few times. If it's leaking you only have to drain it and remove a few bolts.
But since you can see the whole thing, you can be 100% sure it's not leaking.
Now that you're sure, remove the four bolts (while holding up the rack with your hand) and put the lower plate in. Put the 4 13mm nuts on to hold that lower plate in place, and continue with the rest of the install with total confidence that this worked!!!
HTH
01-21-2014, 09:12 PM
#43
Nordschleife Master
I'm in the midst of my rack rebuild using the same seal kit as Jon shows above, bought from the UK. I just need to reassemble, and was looking into what to lube the rack/pinion with.
VW and BMW both use ZF power steering racks, and specify "special" grease for the sliding parts of the rack which aren't internal and bathed in ATF (i.e. the moving parts outside the seals - rack/pinion teeth etc.)
The VW part number is: "G 052 168 A1" (used to be AOF 063 000 04)
BMW part number is: 83 23 9407857
The VW part number comes in a 250g tube and is way more affordable than the BMW 10g tubes
Turns out that both are the same stuff - Fuchs "Renolit JP 1619" grease.
If you search for the two VW part numbers above on google, you'll also find the VW factory instructions for rebuilding their ZF power steering racks, which are interesting (although obviously not identical to the 928 rack).
If you can't get this stuff, I'd look for a synthetic lithium-based grease with some moly in it (should be a dark grey colour).
VW and BMW both use ZF power steering racks, and specify "special" grease for the sliding parts of the rack which aren't internal and bathed in ATF (i.e. the moving parts outside the seals - rack/pinion teeth etc.)
The VW part number is: "G 052 168 A1" (used to be AOF 063 000 04)
BMW part number is: 83 23 9407857
The VW part number comes in a 250g tube and is way more affordable than the BMW 10g tubes
Turns out that both are the same stuff - Fuchs "Renolit JP 1619" grease.
RENOLIT JP 1619
Synthetic based lithium grease for low temperatures. NLGI 1. Specially suited for lubricating high-speed bearings. Temperature range: -50 �C � 120 �C
Synthetic based lithium grease for low temperatures. NLGI 1. Specially suited for lubricating high-speed bearings. Temperature range: -50 �C � 120 �C
If you can't get this stuff, I'd look for a synthetic lithium-based grease with some moly in it (should be a dark grey colour).
09-11-2014, 05:22 PM
#44
3rd Gear

Join Date: Nov 2007
Posts: 3
Likes: 0
Received 0 Likes
on
0 Posts
Hi Hilton,
Whereabouts in the UK did you buy your seal kit from? I ask as I'm halfway through a rack rebuild using the Renbay kit and there seems to be an O-ring missing. It's item 15 in the above diagram - the O-ring that sits in the central washer that has a groove in it. And sods law, it is the only O-ring I have damaged getting it out!
Apart from this minor hiccup, the rebuold is going pretty well - much easier than I thought when I first saw the amount of parts in the kit!
Cheers
Simon.
09-17-2014, 01:08 AM
#45
Nordschleife Master
Hi Hilton,
Whereabouts in the UK did you buy your seal kit from? I ask as I'm halfway through a rack rebuild using the Renbay kit and there seems to be an O-ring missing. It's item 15 in the above diagram - the O-ring that sits in the central washer that has a groove in it. And sods law, it is the only O-ring I have damaged getting it out!
Apart from this minor hiccup, the rebuold is going pretty well - much easier than I thought when I first saw the amount of parts in the kit!
Cheers
Simon.
Whereabouts in the UK did you buy your seal kit from? I ask as I'm halfway through a rack rebuild using the Renbay kit and there seems to be an O-ring missing. It's item 15 in the above diagram - the O-ring that sits in the central washer that has a groove in it. And sods law, it is the only O-ring I have damaged getting it out!
Apart from this minor hiccup, the rebuold is going pretty well - much easier than I thought when I first saw the amount of parts in the kit!
Cheers
Simon.