
Steering Rack rebuild seals and O rings pics
 08-23-2007, 09:23 PM
#1
Addict
Rennlist Member
Rennlist Member
Thread Starter
I'm posting this as a reference. For those about to rebuild a rack the rebuild kit contains about 40 seals, O rings and Nylon rings. Looks challenging enough to make you think twice about doing the job yourself. You'll have to forgive my eccentric naming of the bits and pieces of the rack I haven't a clue what all the bits are called.
NB to avoid confusion this rack is off a RIGHT HAND DRIVE car. Afaik the seals etc are all the same LHD or RhD. In fact the only part that I think would differ is the input shaft housing.
But first in an earlier thread https://rennlist.com/forums/showthre...=295812&page=5Griffiths talks about aligning the input shaft to the triangle on the cover plate - this is with the rack centred on a Rack that afaik is untouched from the factory.
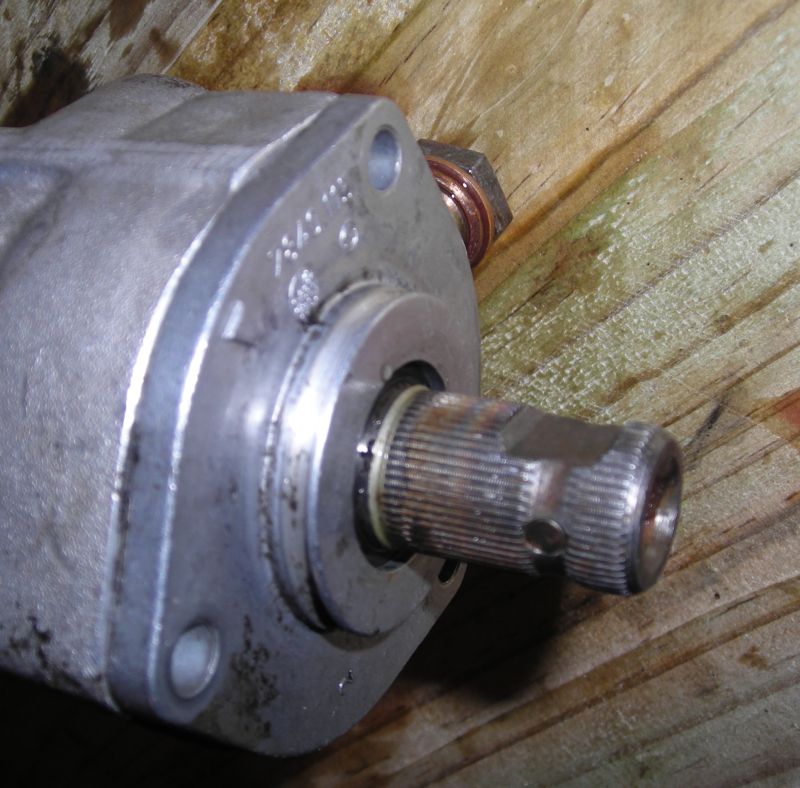
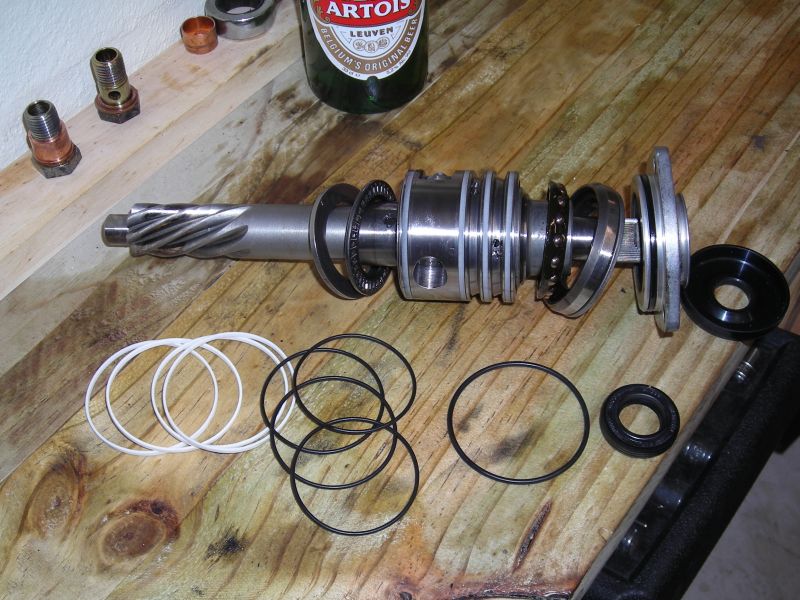
Rack in pieces ready to do battle

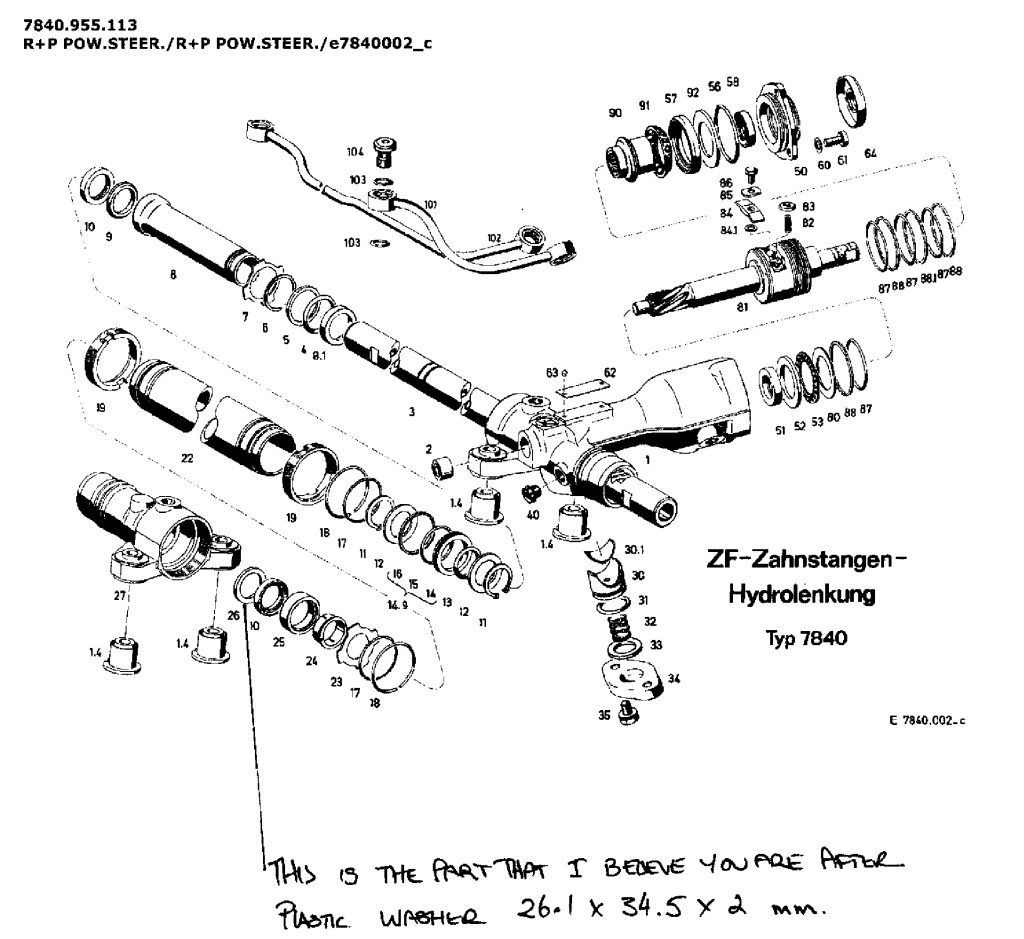
ZF exploded view of the rack - I have a pdf of this which is even better if anyone wants it. The hand writing is identifying the part I thought was missing - turned out I was missing part 9.
Seal set with ZF part No.s marked Part1

Part 2

Parts identified........
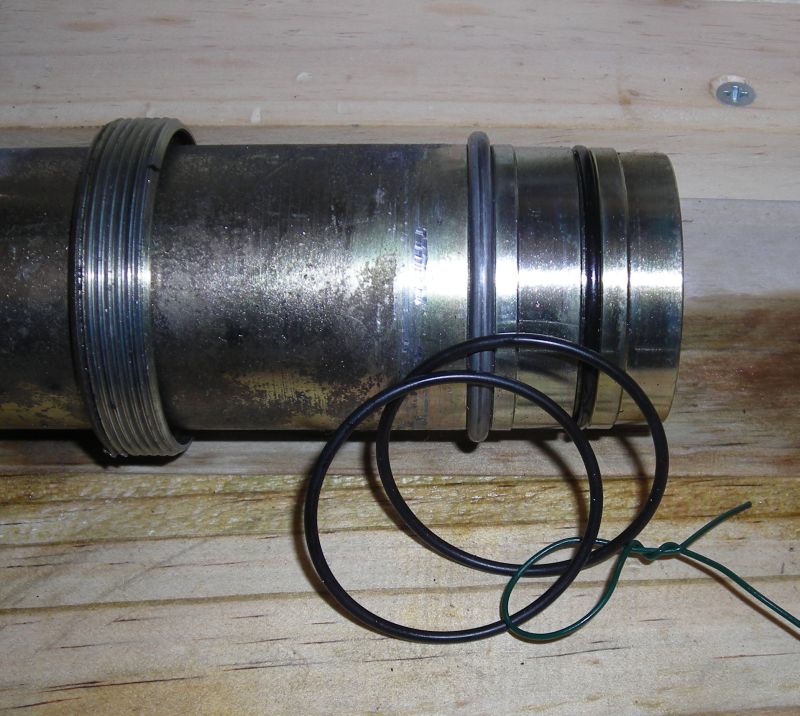
Central tube, the other end looks the same 1 O ring per end
Slidy thing that fits over steering rod new blue seal and nylon ring
Edit "the nylon ring shown in this photo is part No. 26 and doesn't belong here. Part No. 26 belongs inside the passenger side end of the rack housing behind the wiper seal. The nylon ring that should go here is part No. 9 and is identifiable as being about 3.5mm thick with a chamfer on one side to fit in the flared end of the slidy pipe. I don't have a photo of part 9 as it was missing from my seal kit so I reused the old one which was completely unworn."

Other end of slidy thing - with one nylon ring
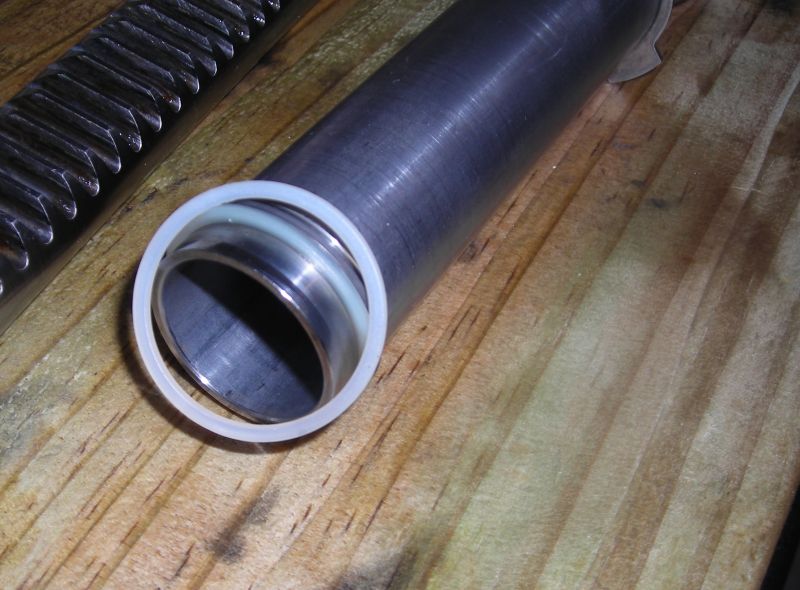
Passenger side end of rack - Edit "There is a white nylon ring hiding behind the seal, this is part No. 26, and is mistakenly shown in the photo of the slidy thing."

Seals on the middle of the steering rod held in with two circlips. You have to remove these to get the slidy thing off the steering rod. You can identify this O ring which is very similar to the one that goes inside the input shaft housing input shaft because it is a close fit inside the metal housing for the nylon ring.

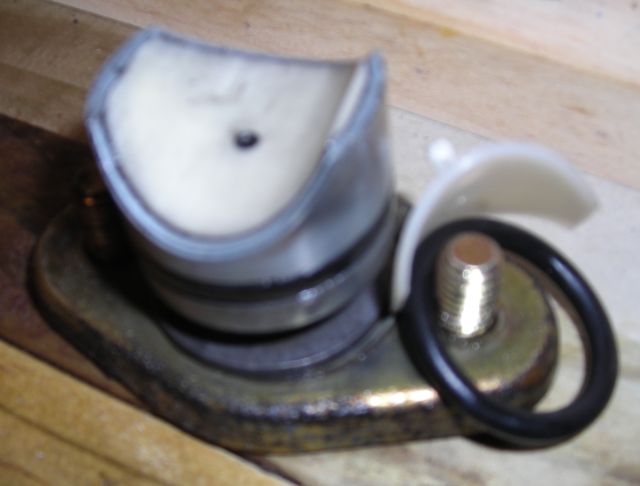
Input shaft thingy - 4 new O rings that go under the 4 nylon rings, 1 larger O ring for the cover plate a wiper seal inside the cover plate and a plastic cover for the outside of the cover plate (old one not shown as it fell to pieces.)
Input shaft Housing. 1 Wiper seal shown, and not shown is the O ring seal which goes in the left hand end in the photo. This is the one which is very similar to the one that goes on the middle of the steering rod.

Friction pad and cover that keeps pressure on the pinion. One nylon pad and one O ring
One of the two steel pipes that connect the rack to the rack. 8 small O rings 2 for each end of the pipes.

Now off to try and find another Nylon Ring.
NB to avoid confusion this rack is off a RIGHT HAND DRIVE car. Afaik the seals etc are all the same LHD or RhD. In fact the only part that I think would differ is the input shaft housing.
But first in an earlier thread https://rennlist.com/forums/showthre...=295812&page=5Griffiths talks about aligning the input shaft to the triangle on the cover plate - this is with the rack centred on a Rack that afaik is untouched from the factory.
Rack in pieces ready to do battle
ZF exploded view of the rack - I have a pdf of this which is even better if anyone wants it. The hand writing is identifying the part I thought was missing - turned out I was missing part 9.
Seal set with ZF part No.s marked Part1
Part 2
Parts identified........
Central tube, the other end looks the same 1 O ring per end
Slidy thing that fits over steering rod new blue seal and nylon ring
Edit "the nylon ring shown in this photo is part No. 26 and doesn't belong here. Part No. 26 belongs inside the passenger side end of the rack housing behind the wiper seal. The nylon ring that should go here is part No. 9 and is identifiable as being about 3.5mm thick with a chamfer on one side to fit in the flared end of the slidy pipe. I don't have a photo of part 9 as it was missing from my seal kit so I reused the old one which was completely unworn."
Other end of slidy thing - with one nylon ring
Passenger side end of rack - Edit "There is a white nylon ring hiding behind the seal, this is part No. 26, and is mistakenly shown in the photo of the slidy thing."
Seals on the middle of the steering rod held in with two circlips. You have to remove these to get the slidy thing off the steering rod. You can identify this O ring which is very similar to the one that goes inside the input shaft housing input shaft because it is a close fit inside the metal housing for the nylon ring.
Input shaft thingy - 4 new O rings that go under the 4 nylon rings, 1 larger O ring for the cover plate a wiper seal inside the cover plate and a plastic cover for the outside of the cover plate (old one not shown as it fell to pieces.)
Input shaft Housing. 1 Wiper seal shown, and not shown is the O ring seal which goes in the left hand end in the photo. This is the one which is very similar to the one that goes on the middle of the steering rod.
Friction pad and cover that keeps pressure on the pinion. One nylon pad and one O ring
One of the two steel pipes that connect the rack to the rack. 8 small O rings 2 for each end of the pipes.
Now off to try and find another Nylon Ring.
Last edited by jon928se; 09-01-2007 at 05:48 PM. Reason: Found a better exploded diagram with the ZF Rack No. on it
 08-24-2007, 01:03 AM
#2
Under the Lift
Lifetime Rennlist
Member
Lifetime Rennlist
Member
Jon:
As to your first photo, every rebuilt rack I have seen has had the shaft at a different orientation. Thank you for the thorough photo expos� on all those "thingies." That pile of seals is intimidating. Good luck finding the nylon ring. Please report back on the final result once the rack is back in the car.
As to your first photo, every rebuilt rack I have seen has had the shaft at a different orientation. Thank you for the thorough photo expos� on all those "thingies."
That pile of seals is intimidating. Good luck finding the nylon ring. Please report back on the final result once the rack is back in the car.
 08-24-2007, 03:48 AM
#4
Addict
Rennlist Member
Rennlist Member
Thread Starter
Hi Dave and Bill.
Dave - yes special brain lube for assembling steering racks. Also useful for other stuff.
Bill - Re the alignment I've no idea if it is "correct" but in the UK at least from memory the steering on most cars locks with the steering wheel about 30 degrees turned towards the left ie towards the kerb as did the GT before it had the rackectomy.
I may be having some success with teflon seal - just spoken with a very helpful chap at the wholesale arm of the main auto chain stores here in OZ. His instant response upon being given the ZF rack number was is it a BMW rack ? I'm just waiting for him to email an exploded diagram of the rack so that I can identify the correct teflon seal - my description using words like thingy didn't really do it for him.
08-24-2007, 07:40 PM
#6
Under the Lift
Lifetime Rennlist
Member
Lifetime Rennlist
Member
I hadn't thought about how the shaft orientation would affect the steering lock. Obviously it affects the steering wheel position. If when you change the rack, you tie down your steering wheel dead center to try to end up with a centered steering wheel, a difference in the shaft orientation will screw that plan up. So, I don't try to do that but just pull the steering wheel off afterward and reinstall it centered. The the only issue is that the lower U-joint has twice as many splines as the steering wheel, so you may have to go back and move the the u-joint over a tooth.
Last edited by Bill Ball; 08-24-2007 at 10:14 PM.
08-24-2007, 07:51 PM
#7
Addict
Rennlist Member
Rennlist Member
Thread Starter
Brief update.
Confident in the knowledge that at worst I could get a new rack seal kit or possibly just the plastic/teflon washers (cheaper) to replace the missing part from the kit I had. (The piece I was missing was part No.9 not part 26 arrowed in the exploded diagram, I forgot to measure or photograph but part 9 has a smaller ID than part 26, is about 3.5mm thick and is chamfered to fit in the flared end of part No 8)
I removed seal 10 very carefully from Part 8. I then tested the original part 9 on the steering rod and found it was a very good fit - like perfect with no wear at all so I decided not to try for a new part and reused the original.
The steering rack specialist who I was talking to suggested that these plastic washers were steel in the earlier racks and are not there as seals but to support the wiper seals.
I'll edit the photos above shortly to show the correct location of part No. 26 and the installed part 9. Edit "Photo description now corrected"
Last edited by jon928se; 08-25-2007 at 08:15 PM.
Trending Topics
 08-25-2007, 12:50 PM
#9
Jon,
I just managed to unscrew the rings of the rack with a hammer. So I can go futher with the rack. Nice to know that you Down Under are doing the same thing, hope it works out well.
Robert 1994 GTS midnightblue, the Netherlands
I just managed to unscrew the rings of the rack with a hammer. So I can go futher with the rack. Nice to know that you Down Under are doing the same thing, hope it works out well.
Robert 1994 GTS midnightblue, the Netherlands
08-30-2007, 05:43 PM
#14
Test drive failed!!!  After 10 km turn right and a familiar noise from the rack. With the wheels up red drips of ATF on both sides. SHIIIIT! I had to write that, hope I find some support from this side. Tomorrow I will order the revised rack!
MB, I bought mine at rennbay.com
Robert, 1994 GTS midnight blue, the Netherlands
After 10 km turn right and a familiar noise from the rack. With the wheels up red drips of ATF on both sides. SHIIIIT! I had to write that, hope I find some support from this side. Tomorrow I will order the revised rack!MB, I bought mine at rennbay.com
Robert, 1994 GTS midnight blue, the Netherlands
08-30-2007, 05:51 PM
#15
Under the Lift
Lifetime Rennlist
Member
Lifetime Rennlist
Member
Ugh! I think people are about 50/50 (maybe less) on rebuilding their own racks. It may be more than just seals and bushings that need rebuilding.